[*]
WordPress is the most powerful content management system globally, used by millions of people every day to create outstanding websites on command. It’s a feature-packed, constantly-evolving platform that anyone can use to present ideas awesomely.
However, many of those features are entirely unknown to most users despite their robust use cases. In this article, we’ll cover some of the most commonly-overlooked features in WordPress to maximize your creative output.
Let’s get started!
1. Reusable Gutenberg Blocks
A reusable block allows you to save a particular block or group of blocks so you can use them elsewhere on your site. They’re an excellent tool for saving you a great deal of time if you frequently add the same content to the same block or group of blocks.
If you want to avoid creating the same content over and over, you can turn it into a reusable block by following these steps:
- Choose a block
- In the toolbar, click on the three dots
- Click Add to Reusable Blocks
- Name your new block
- Select Publish, then click Save
2. Add a Hyperlink by Pasting
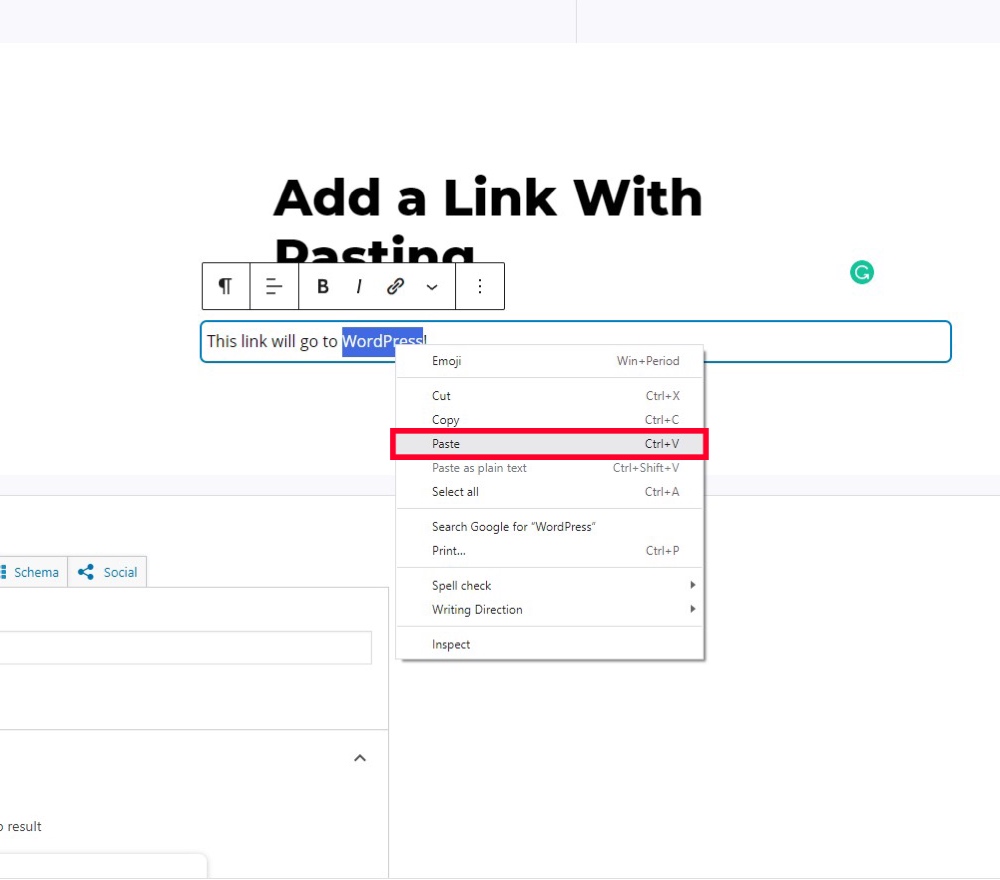
Links within a text can be annoying to create manually, but WordPress has made the process easier. You can do this by copying a link to your clipboard, selecting the text you want to link from, and then pasting the URL into the text.
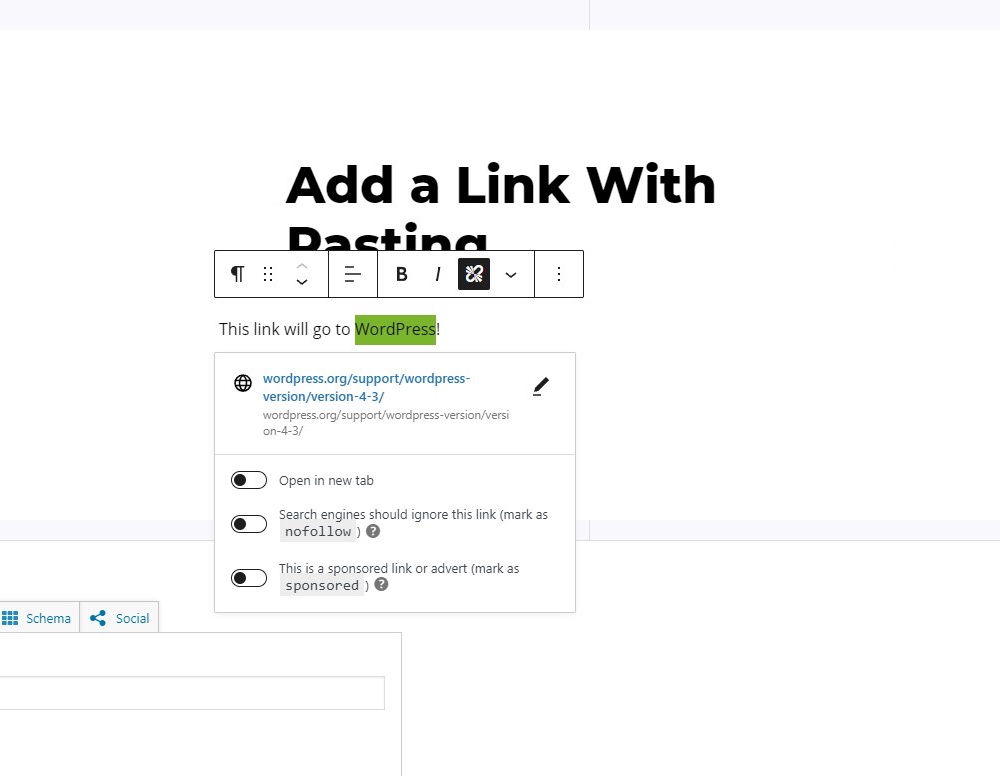
As you can see from the screenshot above, WordPress successfully placed the link. You can edit it further from the menu that will appear after that.
3. Post Scheduling
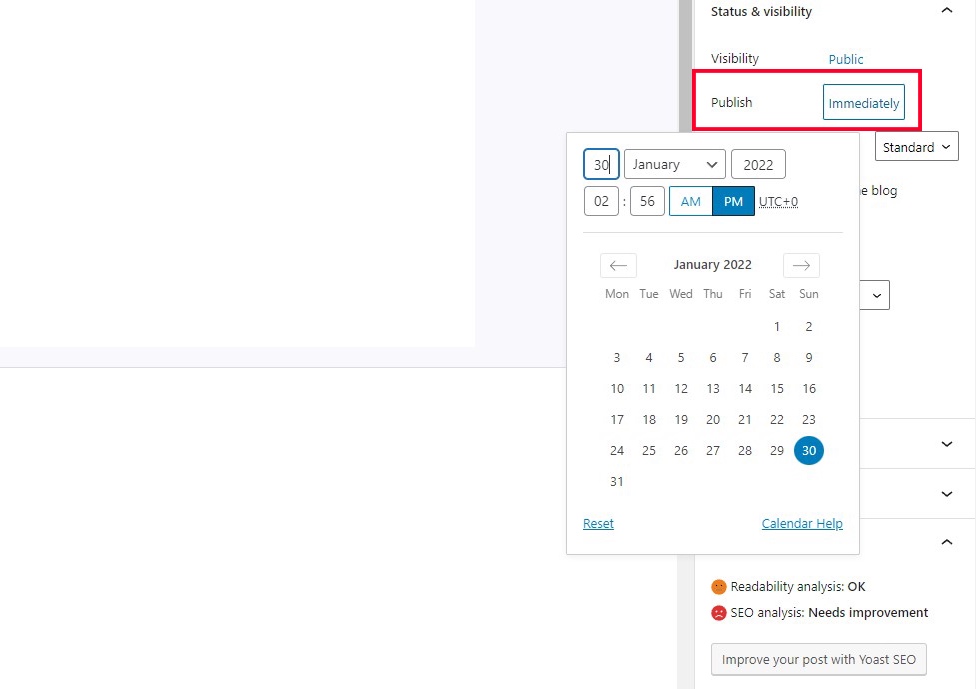
Frequently it’s better to schedule a particular post to publish on a specific date rather than right away. Thankfully, WordPress supports post scheduling, allowing you to set a specific date and time for your post to be pushed live onto your website.
To do so, simply navigate to status and visibility under post settings and find the publish tab, where you can change the date and time to whatever you wish.
4. Embed Social Media Content
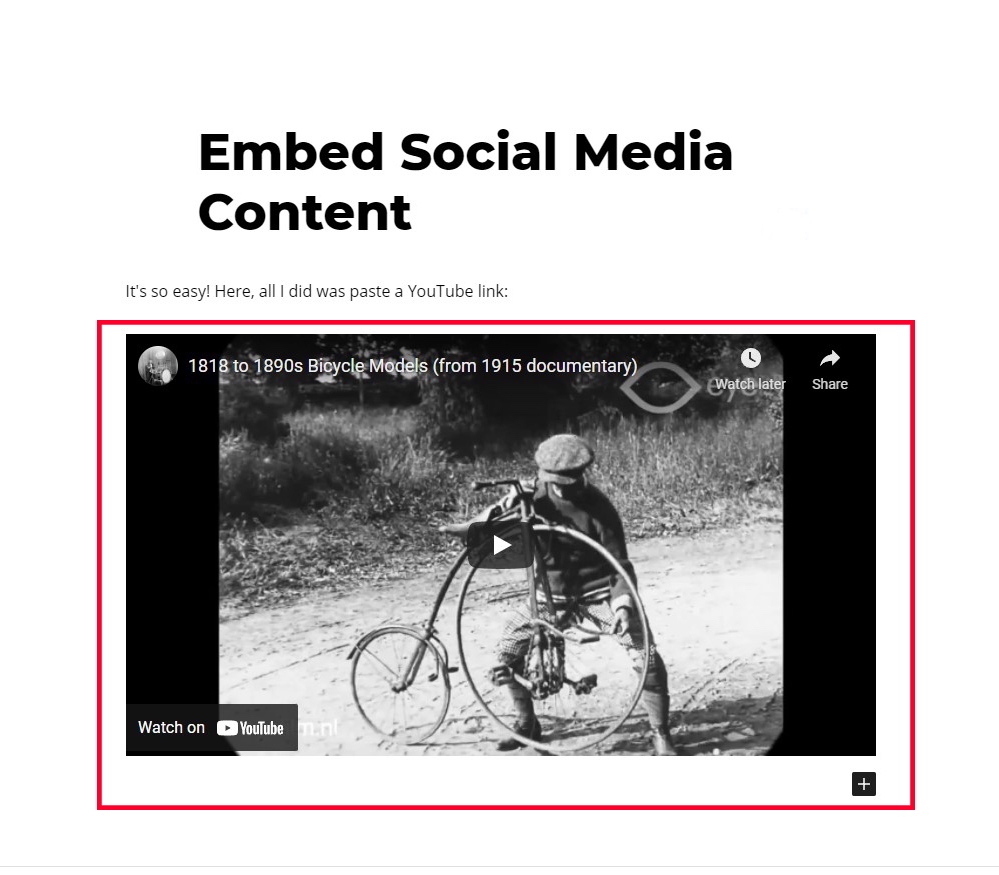
It used to be painful to integrate external content into WordPress, but it has become much more manageable thanks to a new Gutenberg block called Embed.
To use it, search for the Embed block like you would any other block. Once added, paste in the URL of the content you wish to embed. If you’re wondering what particular sites you can add in, WordPress has been kind enough to provide a full list here.
In this example, you’ll an example of a YouTube video embedded in a WordPress post:
5. Image Editing
You can use WordPress to perform basic image editing tasks like rotating, cropping, and resizing – saving you the time of firing up Photoshop every time you need to make an adjustment.
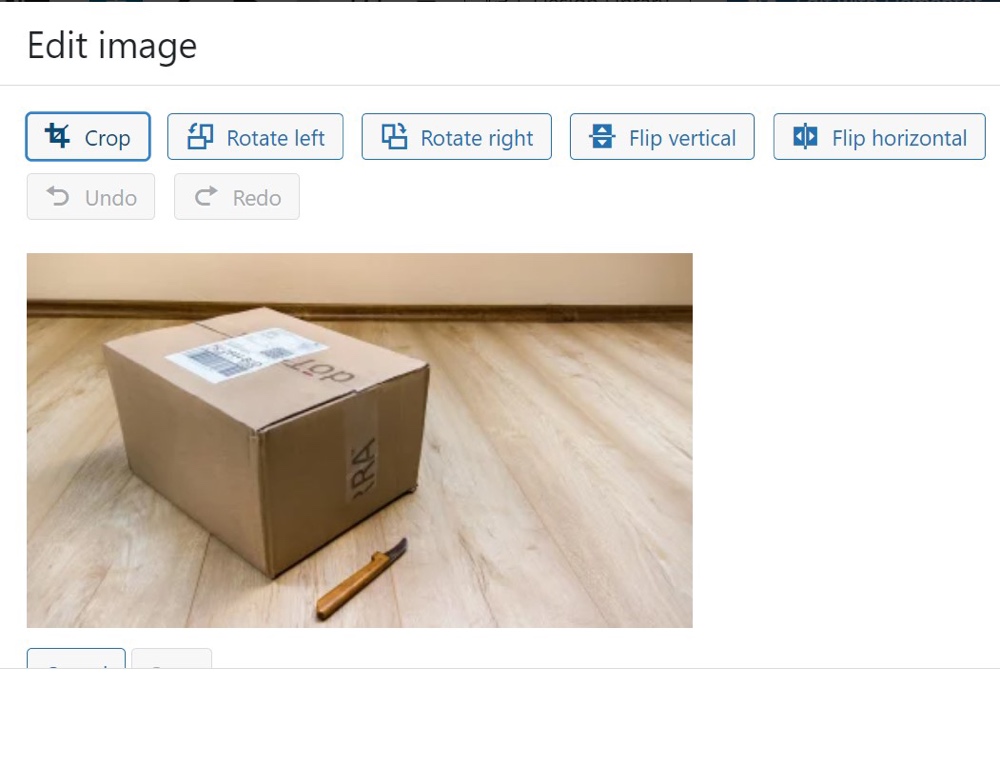
To edit photos, navigate to your Media Library. From there, you can click on Edit Image to make adjustments to any photo.
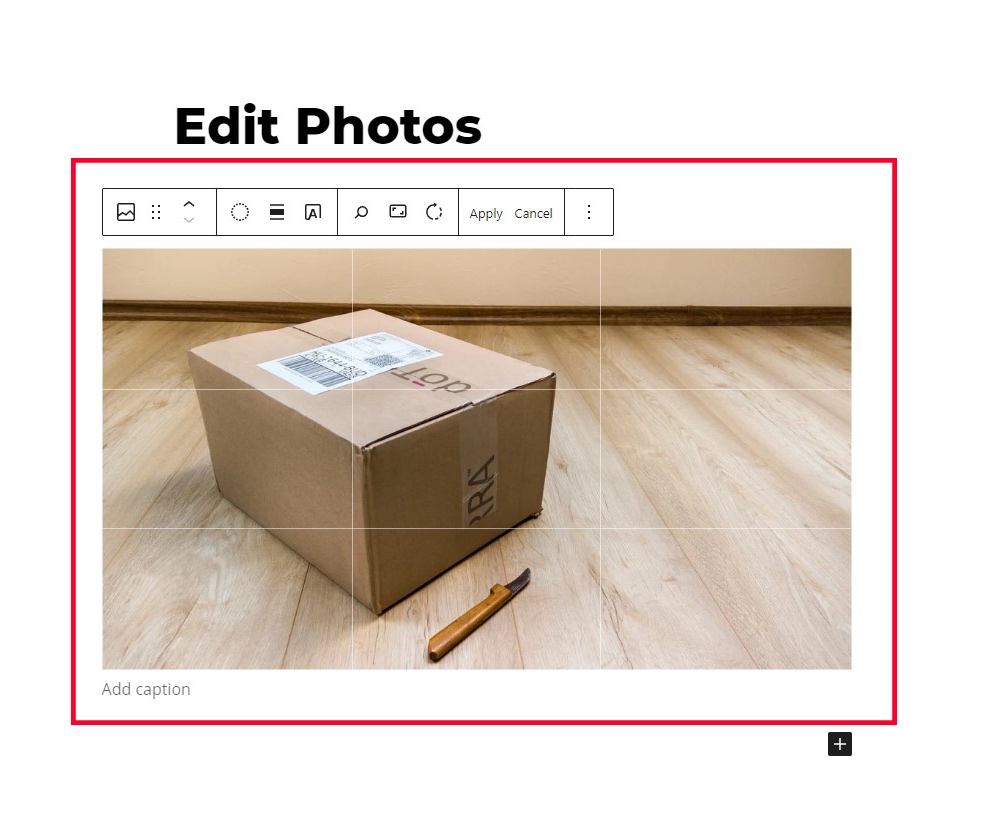
Alternatively, you can edit photos from directly within the text editor as illustrated above.
6. Sticky Posts
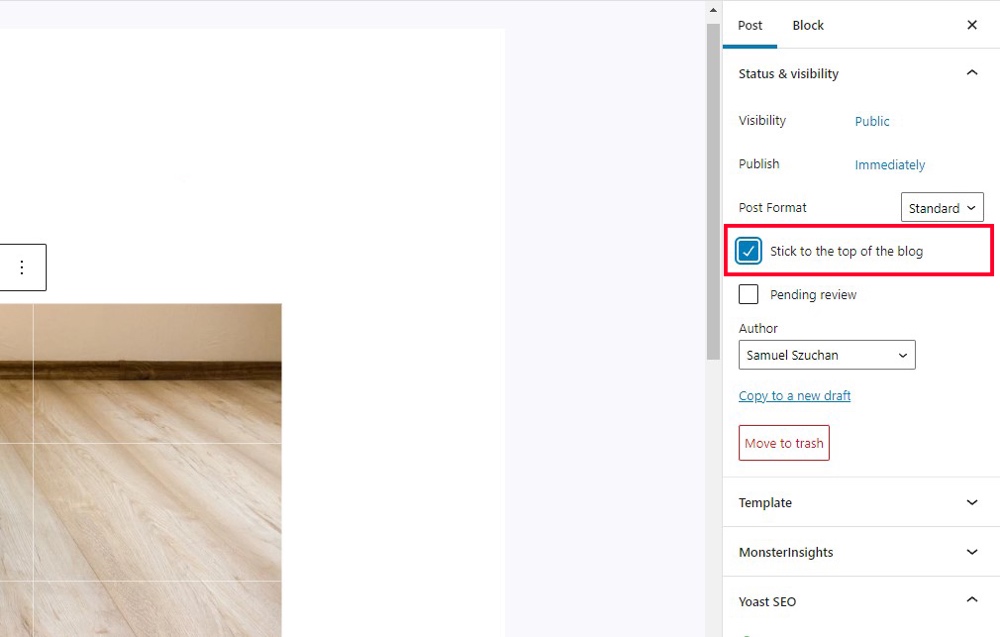
Chronologically sorting your blog has one big downside: the traffic of posts bumped down from the top will suffer. Fortunately, WordPress has introduced “sticky posts,” which allow particular posts to remain at the top of your blog forever.
7. Close Comments Automatically
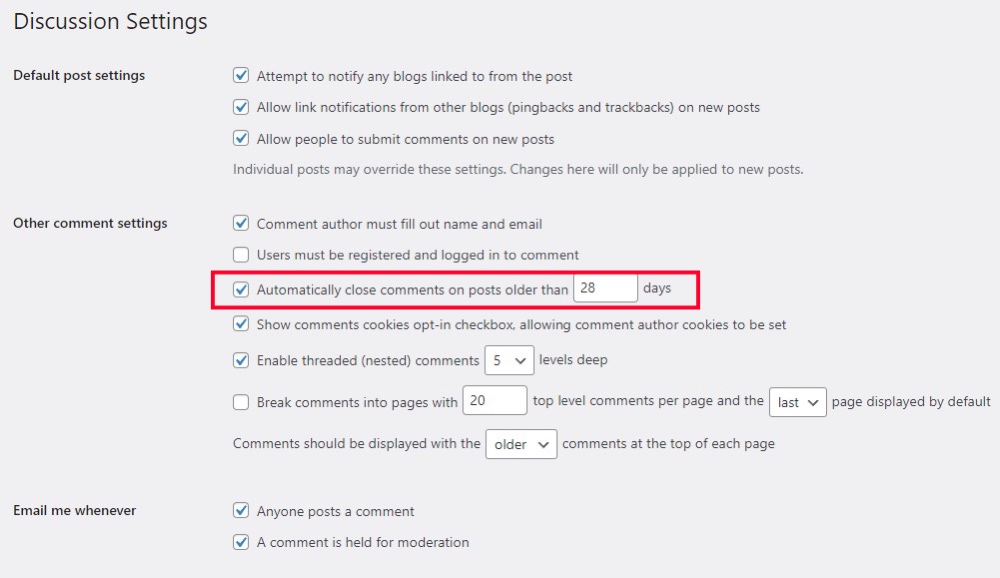
Old posts can be a huge source of spam or unwanted comments. For this reason, many blogs automatically close comments on old posts. Fortunately, WordPress has this functionality built-in!
In your site’s WordPress menu, navigate to Settings and click on Discussion. Once there, you’ll find the below menu:
In other comment settings, you’ll find the setting that allows you to both automatically close comments and change the cutoff period.
8. Distraction-Free Writing
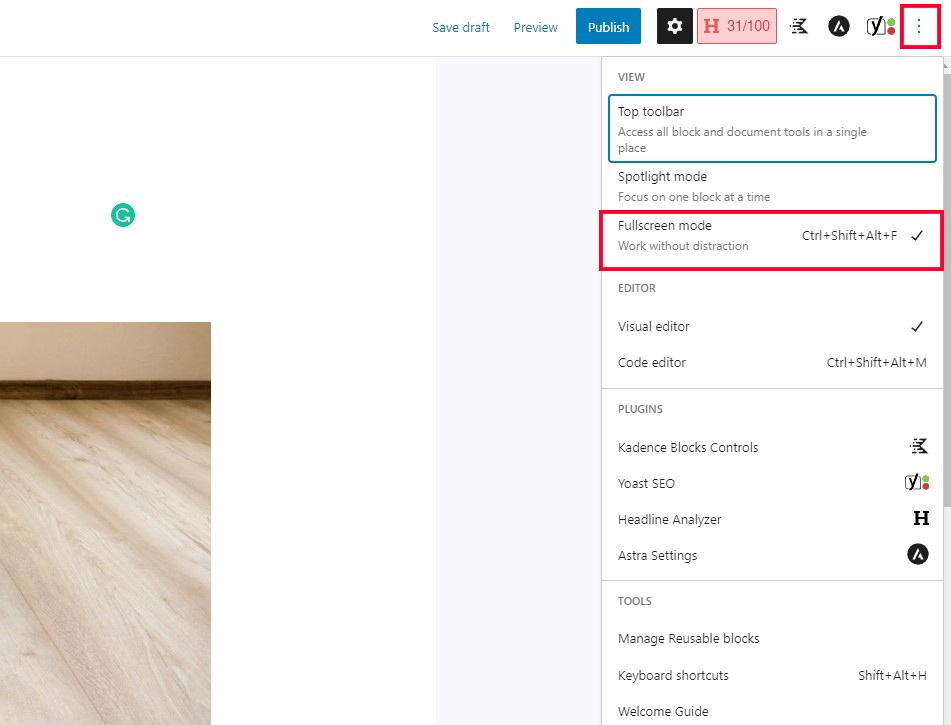
While WordPress’s user interface is handy, it can also be distracting when you’re trying to focus on writing. Fortunately, there’s an option to turn the distraction-free mode on to alleviate this issue.
Navigate to the three dots on the right, click on it, and find fullscreen mode under view. Doing this will allow you to use the WordPress editor without the distracting surrounding user interface.
9. Change the Author of a Post
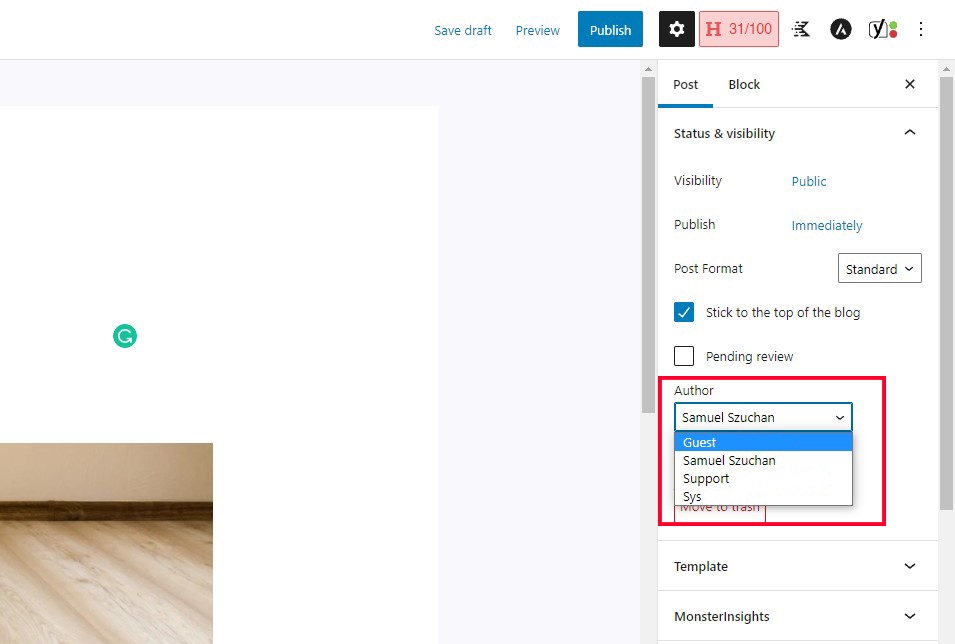
Occasionally, you may need to change the author of an article that another user posted initially. Thanks to built-in functionality, you don’t actually have to repost the article under a different account to switch the author.
Simply navigate to the post settings and find the author box. You can then swap out the author for any of the WordPress accounts associated with your website.
10. Adjust Autosave Regularity
In WordPress, autosaving occurs every 60 seconds. The autosave doesn’t usually cause any issues for most users. However, it may cause some users to experience a crash, making it challenging to write in the editor.
If autosaving is causing your editor to lock up, fear not! This is an easy fix. Before we continue, please back up your WordPress site because we will be changing core files. Afterward, navigate to your wp-config.php file, and add the following code to the bottom:
“define('AUTOSAVE_INTERVAL', 300);”This code will set the autosave interval to every 300 seconds/five minutes. Of course, you can change that interval to be whatever you wish.
11. Page Breaks
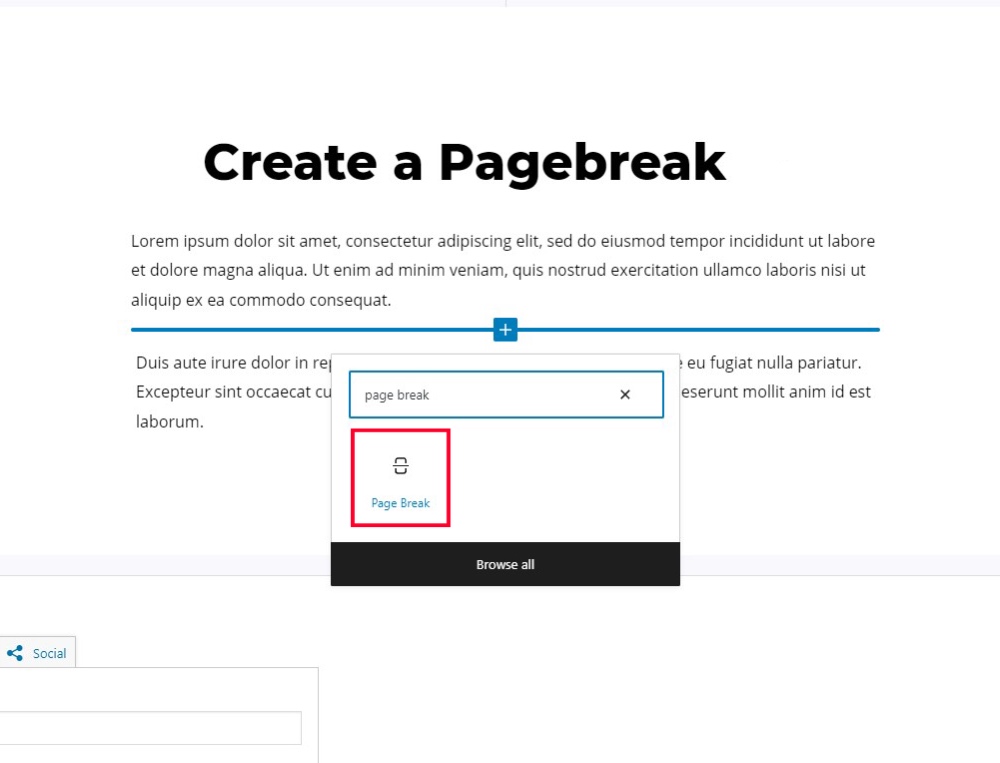
Nobody likes overly-long pages that stretch on for miles. In some cases, it might be necessary to break up longer articles into multiple pages to make them more accessible. Fortunately, WordPress offers an easy way of doing this.
Enter the Page Break block, which inserts a pause at a certain point in a document. It’s an excellent way to add pagination to your blog posts. Adding it is as simple as clicking the Add Block button and clicking on Page Break (you can also type /pagebreak).
12. Responsive Page Preview

A surprising amount of people have no idea this vital feature exists. Responsive page previews enable you to preview the appearance of your website on desktop, tablet, and mobile. Having an optimal appearance on all devices – especially mobile – is an essential part of boosting your blog traffic.
To try it out, navigate to Customize under the Appearance menu of your WordPress site. You’ll see three icons on the bottom right resembling a desktop monitor, tablet, and phone. Clicking each of these icons will allow you to view previews of their respective dimensions.
13. Keyboard Shortcuts
There are a number of keyboard shortcuts in WordPress that you can use to make editing easier. Shortcuts may take a bit to get used to, but they’ll save you a ton of time in the long run.
Firstly, WordPress supports the common “Ctrl + [key]” shortcuts consisting of the following commands:
- C: Copy
- V: Paste
- A: Select all
- X: Cut
- Z: Undo
- Y: Redo
- B: Bold
- I: Italic
- U: Underline
- K: Insert/edit link
- Secondly, WordPress offers “Alt + Shift + [Key]” commands for more advanced functionality. Please note that the specific key combinations will depend on your operating system. According to the WordPress website:
- “Windows/Linux: ‘Alt + Shift (⇧) + letter’. Mac: ‘Ctrl + Option (alt ⌥) + letter’. (Macs running any WordPress version below 4.2 use ‘Alt + Shift (⇧) + letter’).”
- Those commands will allow you to perform the following functions:
- N: Check Spelling (Requires a plugin)
- l: Align Left
- J: Justify Text
- C: Align Center
- D: Strikethrough
- R: Align Right
- U: • List
- A: Insert link
- O: 1. List
- S: Remove link
- Q: Quote
- M: Insert Image
- W: Distraction Free Writing mode
- T: Insert More Tag
- P: Insert Page Break tag
- H: Help
- X: Add/remove code tag
- 1: Heading 1
- 2: Heading 2
- 3: Heading 3
- 4: Heading 4
- 5: Heading 5
- 6: Heading 6
- 9: Address
14. Quick Post Editing
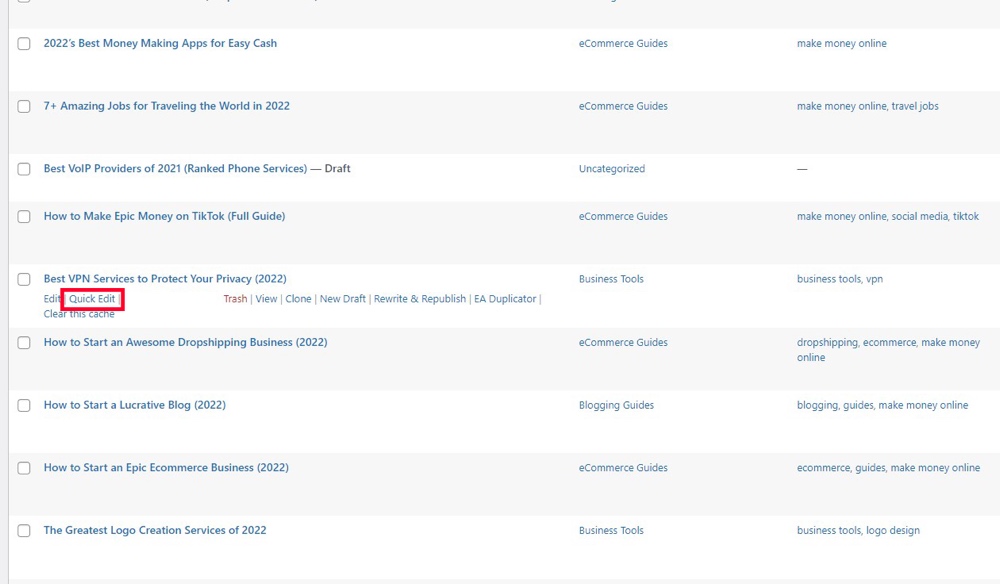
After clicking on Quick Edit, you’ll find the following menu as appears above.
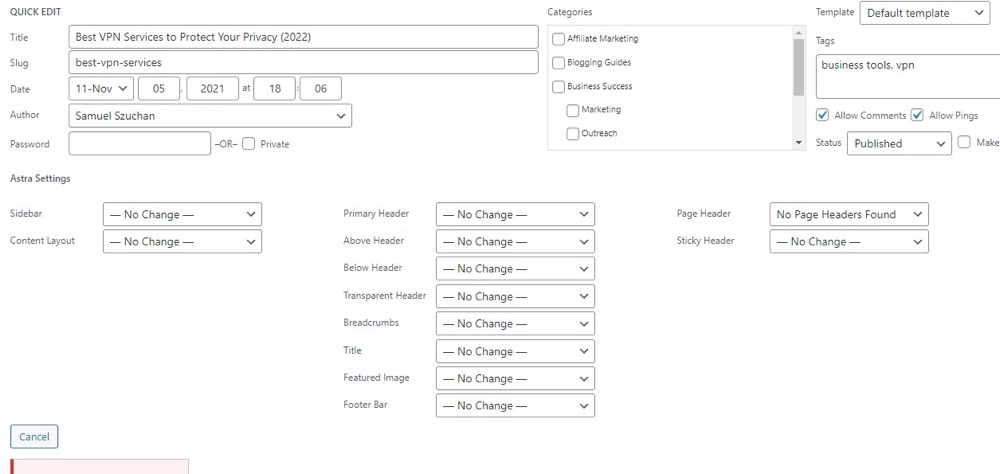
The quick edit menu will allow you to easily edit meta aspects of the article without having to open it up completely. Simple!
15. Formatting Shortcuts
In addition to the previously-featured keyboard shortcuts, WordPress has made the benevolent decision of supporting formatting shortcuts. These will allow you to easily add specific formatting to your article without navigating through menus.
The functions exist as follows:
- [*]: Start an unordered list
- [-]: Start an unordered list
- [1.]: Start an ordered list
- [1)]: Start an ordered list
- [##]: H2
- [###]: H3
- [####]: H4
- [>]: Transform text into blockquote
- [—]: Horizontal line
- [..]: Transform text into code block
16. The “More” Block
By default, WordPress will cut off your text at a certain point for reading previews for each article in your feed, like so:
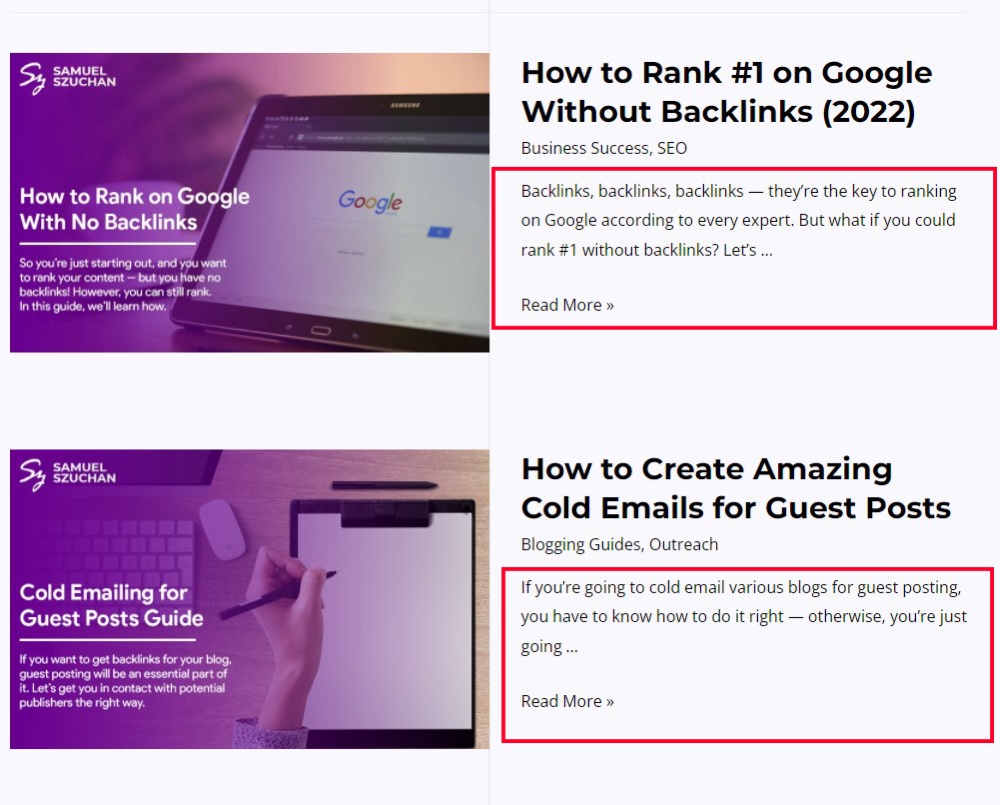
To give you control over where this cutoff appears, WordPress offers the More block. Wherever only part of an article’s text appears, this block adds a “continue reading” prompt.
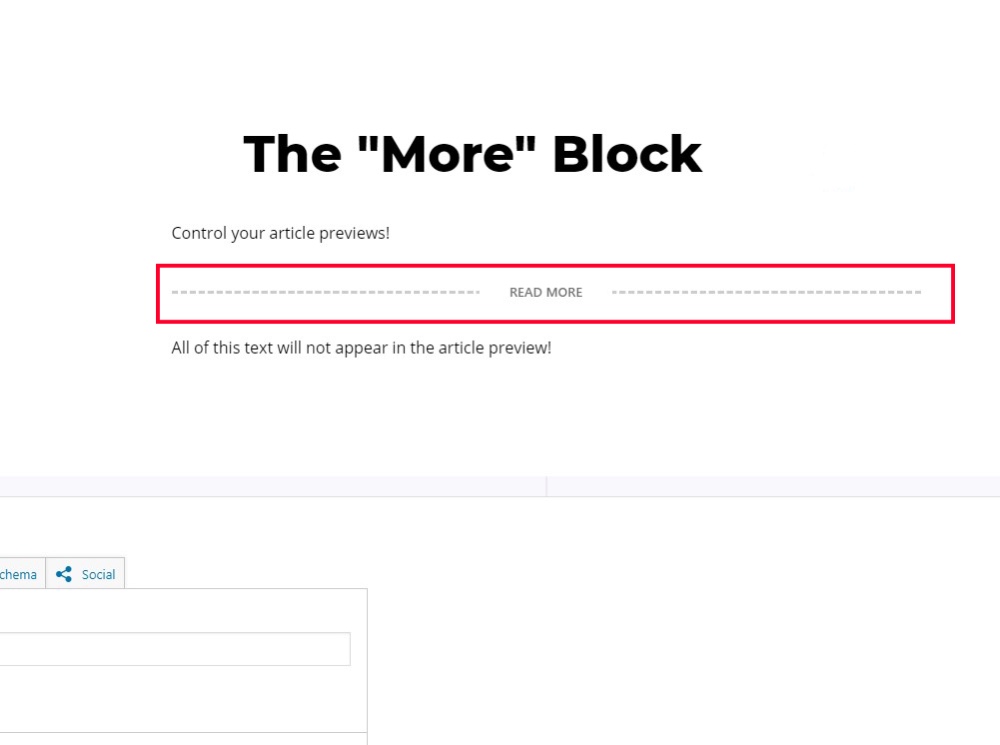
The block lets you choose where you want the article’s preview to end.
WordPress is a potent tool for creating stunning content packed with countless productivity secrets. This article dived into a few of those ways to maximize your output when you’re hard at work on your website.
Each one of these features has the potential to accelerate your productive output. Combined, they can significantly increase your productivity and ease of use. Now that we’ve provided you with the knowledge, it’s your time to make the most of it. Happy creating!
[*]
[*]Source link

