Over the years, I’ve seen WordPress evolve from a simple blogging platform into a powerhouse for businesses, creators, and developers. But with that growth comes complexity. I’ve spent countless hours tweaking settings, troubleshooting glitches, and discovering WordPress tips and tricks that make life easier.
Some changes are small but game-changing, like optimizing images for speed. Others, like using staging sites, can save you from disaster. Whether you’re fine-tuning your workflow or fortifying security, these tips come from real-world experience.
1. Quick Access to wp-admin with /admin or /login
Instead of typing out yourwebsite.com/wp-admin, you can simply add /admin or /login to the end of your domain. WordPress will automatically redirect you to the login page, saving you time when accessing your dashboard.
2. Make Your WordPress Login Page Look Like Yours
Your login page is the front door to your site, but if you’re still using the default WordPress branding, it probably feels generic. Whether running your own site or setting up WordPress for a client, customizing the login page makes things look polished and professional.
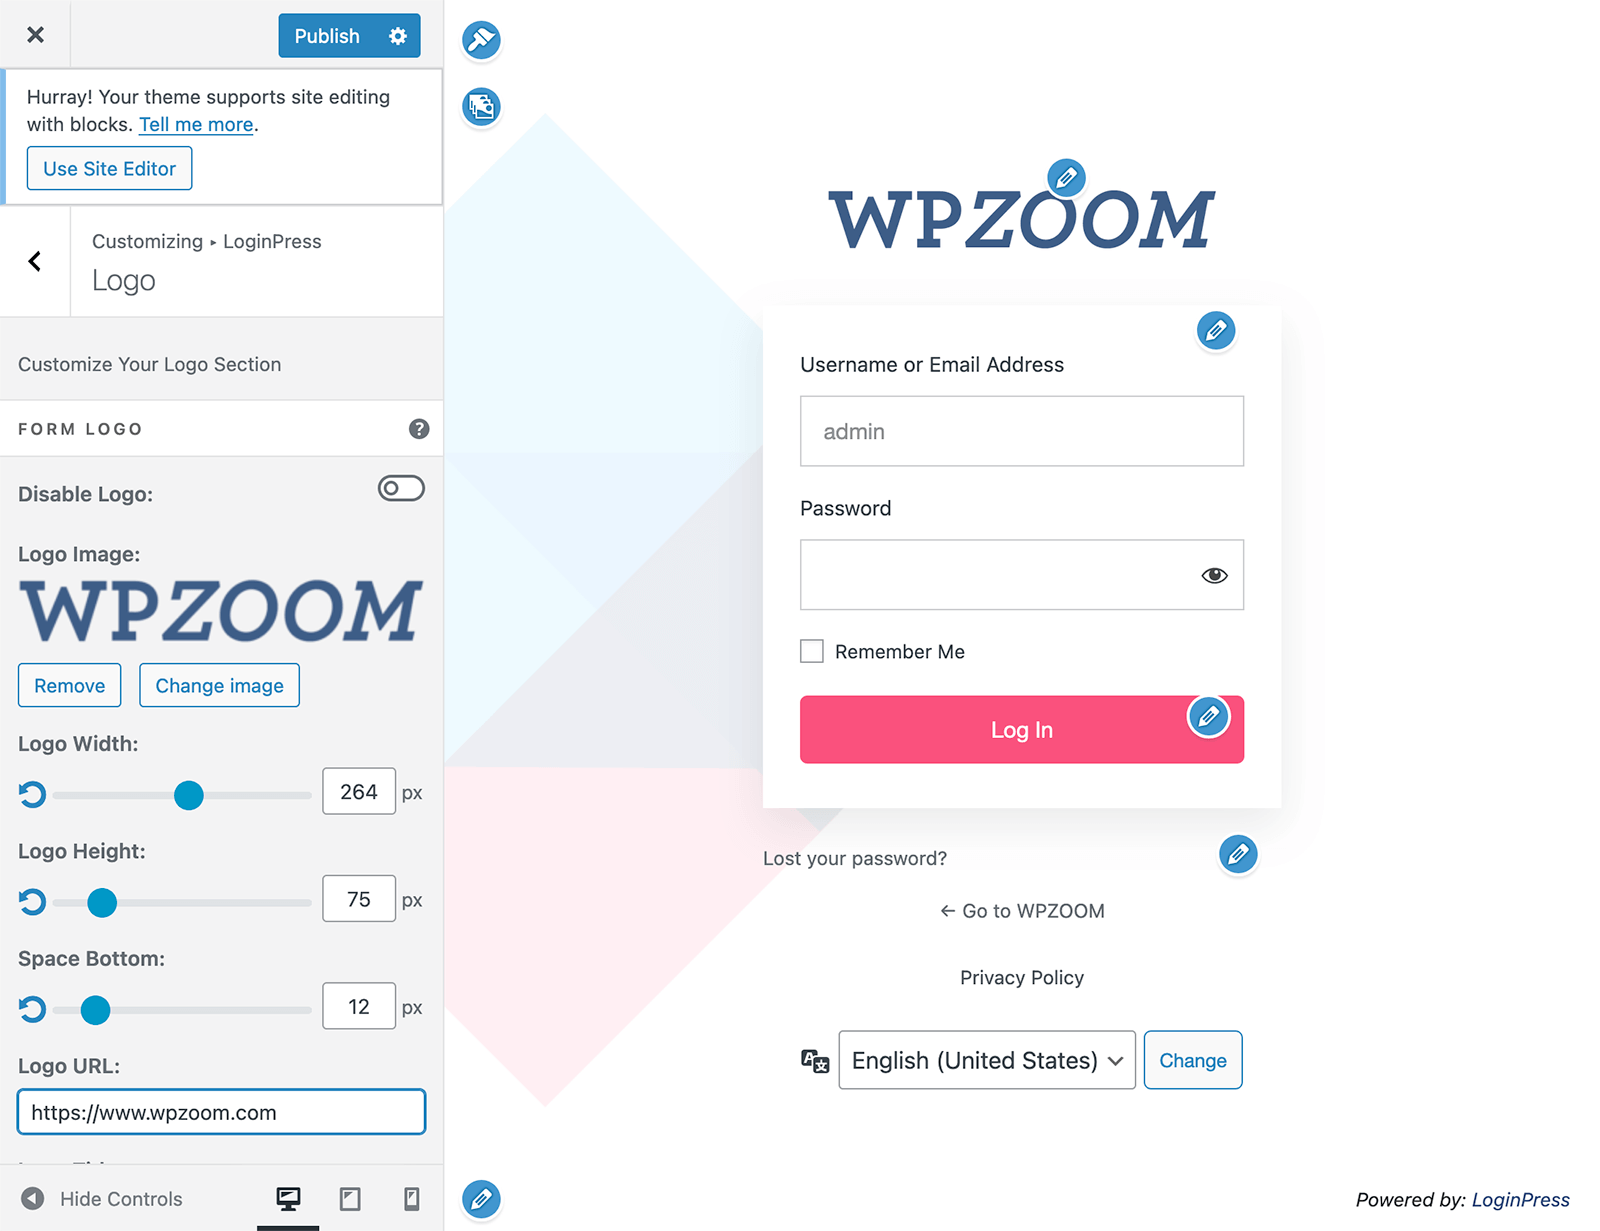

By default, WordPress greets you with its own logo. Change that using a plugin like Login Logo or LoginPress. With just a few clicks, you can upload your logo, tweak colors, and even adjust the login form styling.
3. Ditch the “Admin” Username and Lock Down Your Site
If your WordPress admin username is still “admin,” you’re making life too easy for hackers. It’s the first thing attackers guess when launching brute force attacks, and keeping it puts your site at risk. The fix? Change it right now.
Since WordPress doesn’t let you edit usernames directly, here’s the easiest way to do it:
1. Create a new admin account:
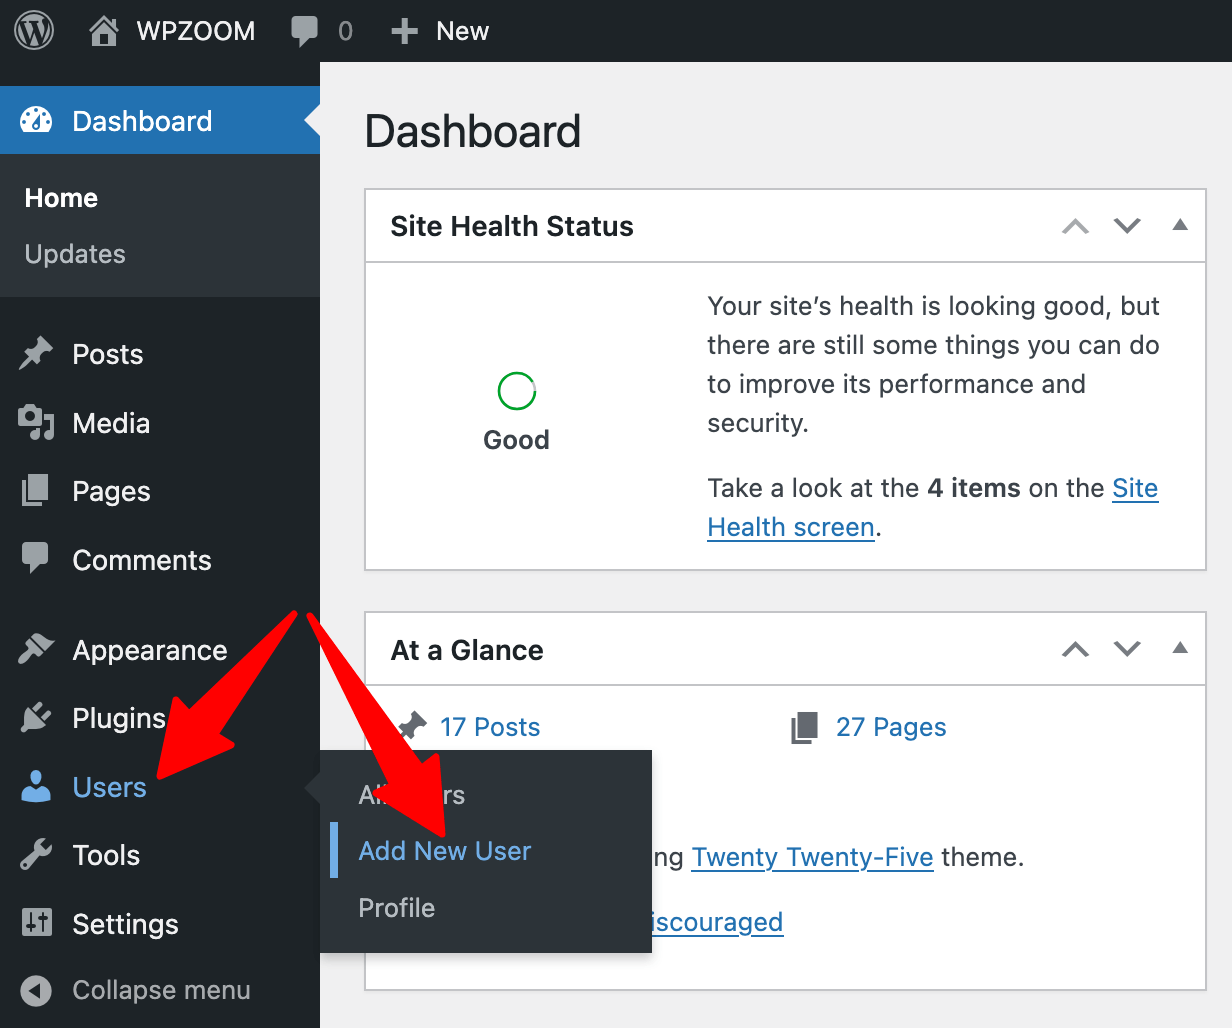
Go to Users > Add New User.
 Add new user” class=”wp-image-807136″ style=”width:600px” srcset=”https://b8f4g5a7.delivery.rocketcdn.me/wp-content/uploads/2025/02/users-add-new-user.png 1232w, https://b8f4g5a7.delivery.rocketcdn.me/wp-content/uploads/2025/02/users-add-new-user-734×612.png 734w, https://b8f4g5a7.delivery.rocketcdn.me/wp-content/uploads/2025/02/users-add-new-user-1024×854.png 1024w” sizes=”(max-width: 1232px) 100vw, 1232px”/>
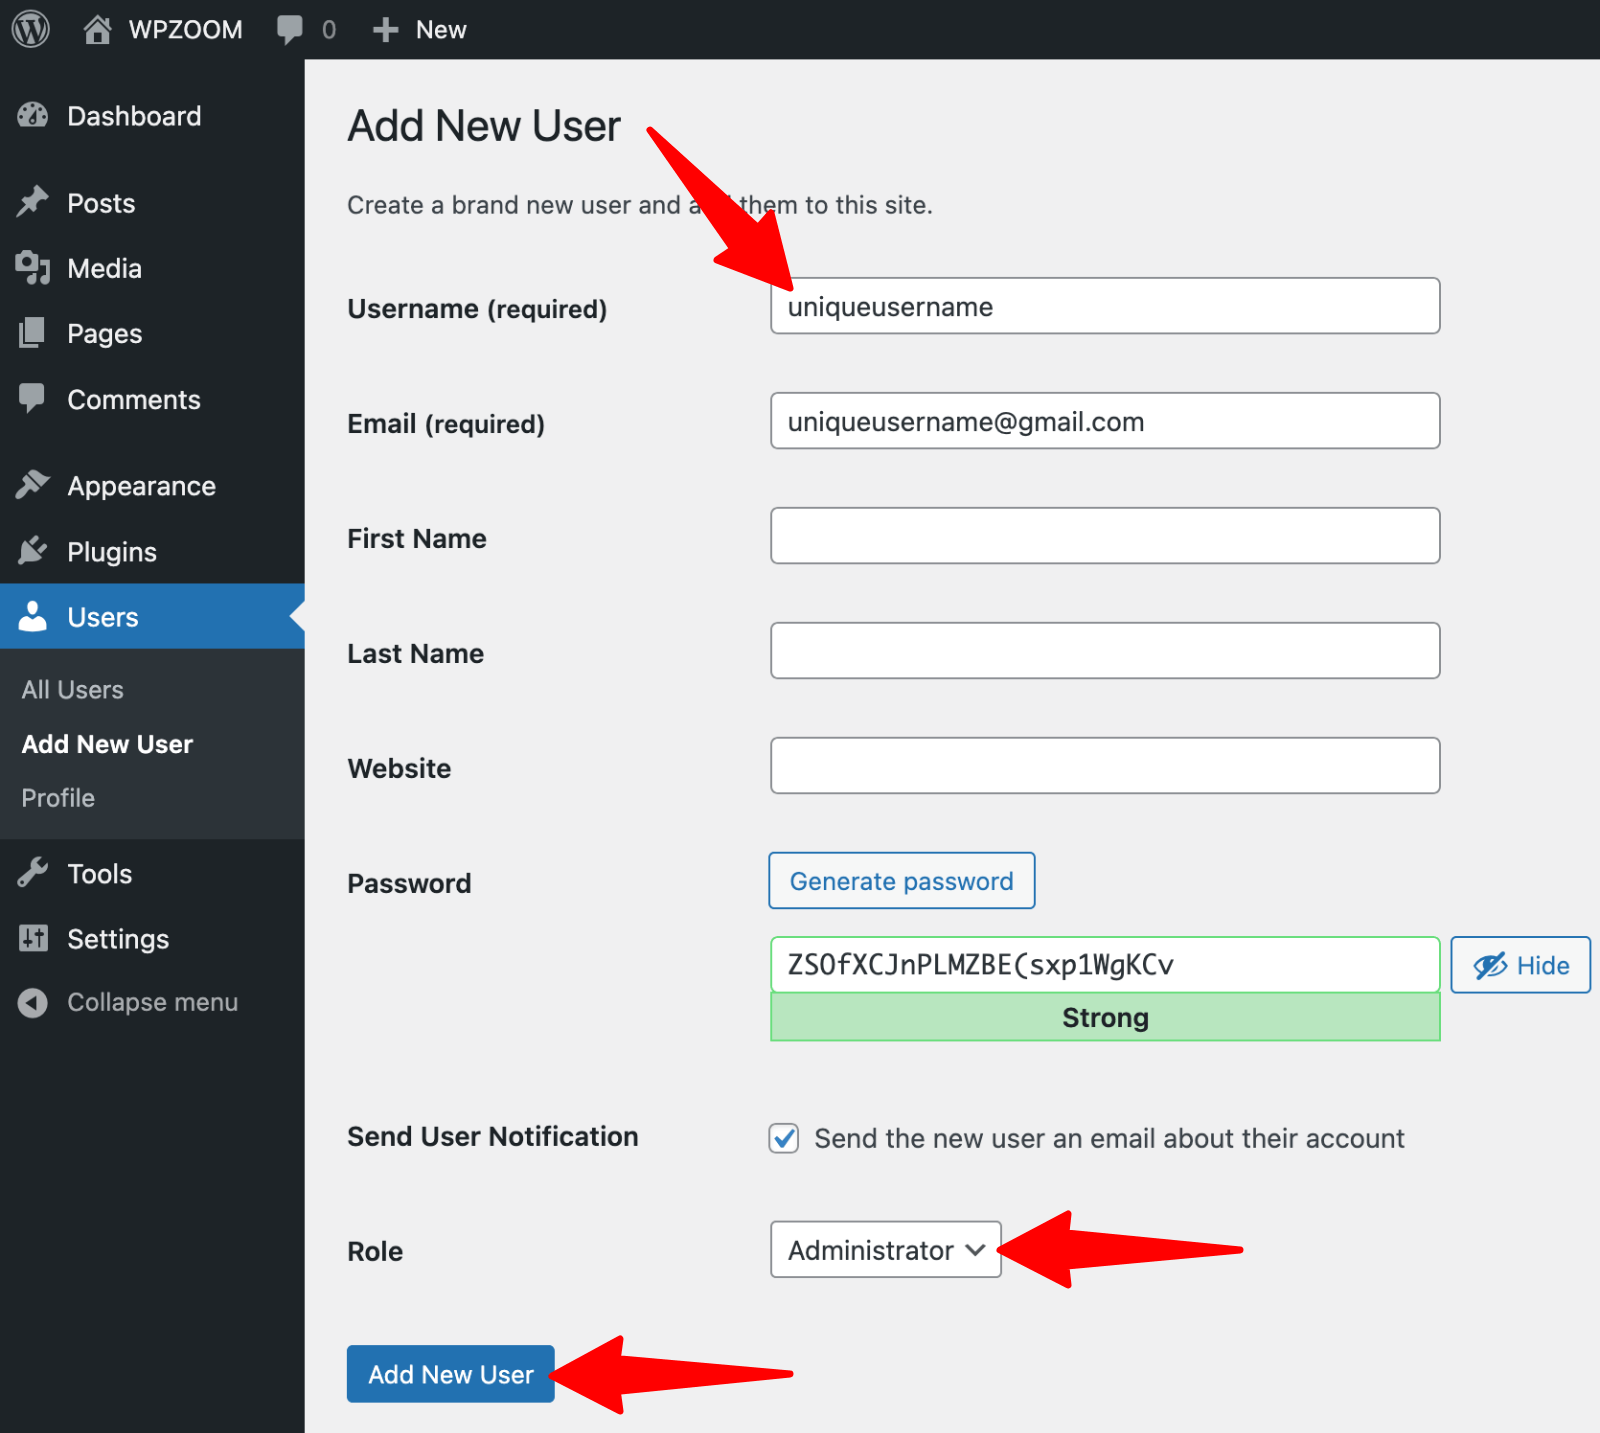
Choose a unique username, assign it Administrator privileges, and click Add New User.
 Add new administrator user” srcset=”https://b8f4g5a7.delivery.rocketcdn.me/wp-content/uploads/2025/02/users-add-new-user-administrator.png 1600w, https://b8f4g5a7.delivery.rocketcdn.me/wp-content/uploads/2025/02/users-add-new-user-administrator-734×657.png 734w, https://b8f4g5a7.delivery.rocketcdn.me/wp-content/uploads/2025/02/users-add-new-user-administrator-1024×917.png 1024w, https://b8f4g5a7.delivery.rocketcdn.me/wp-content/uploads/2025/02/users-add-new-user-administrator-1536×1376.png 1536w” sizes=”(max-width: 1600px) 100vw, 1600px”/>
2. Log in with your new account, then delete the old “admin” user. WordPress will ask what to do with posts linked to that account. Select Reassign to your new admin so you don’t lose any content.
4. Customize Your Dashboard to Work for You
The WordPress dashboard is your command center, but it can feel cluttered by default. With so many widgets, menus, and notifications, it’s easy to get distracted. Simple tweaks can turn your dashboard into a clean, efficient hub that helps you get things done faster.
You’ll see a Screen Options tab at the top right of your dashboard.


Click it, and you’ll find checkboxes for different widgets.
Don’t need the “Welcome” message or site health status in your face every day? Uncheck them and reclaim your space.
5. When in Doubt, Reinstall WordPress for a Fresh Start
Sometimes, no amount of troubleshooting fixes a stubborn issue. Maybe your site is acting strange after a bad update, or corrupted files are causing endless errors. When all else fails, reinstalling WordPress can give you a clean slate without losing your content.
A fresh install wipes out your core WordPress files, so before you take the plunge:
The reinstall process (without losing content):
Automatic Method:
Go to Dashboard > Updates in your WordPress dashboard.
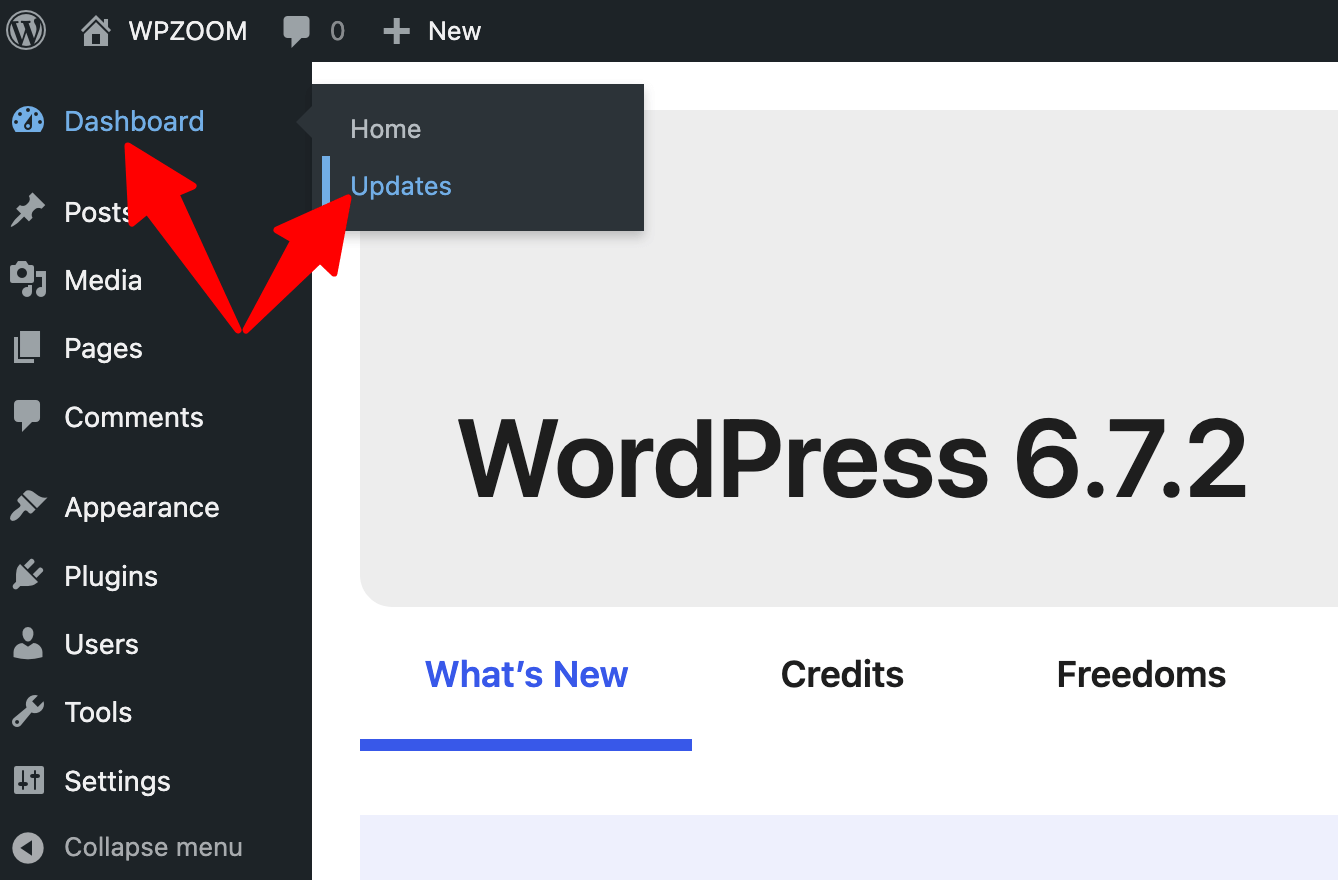 Updates” class=”wp-image-807145″ style=”width:600px” srcset=”https://b8f4g5a7.delivery.rocketcdn.me/wp-content/uploads/2025/02/dashboard-updates-1.png 1338w, https://b8f4g5a7.delivery.rocketcdn.me/wp-content/uploads/2025/02/dashboard-updates-1-734×483.png 734w, https://b8f4g5a7.delivery.rocketcdn.me/wp-content/uploads/2025/02/dashboard-updates-1-1024×673.png 1024w” sizes=”(max-width: 1338px) 100vw, 1338px”/>
Click Re-install version x.x.x.
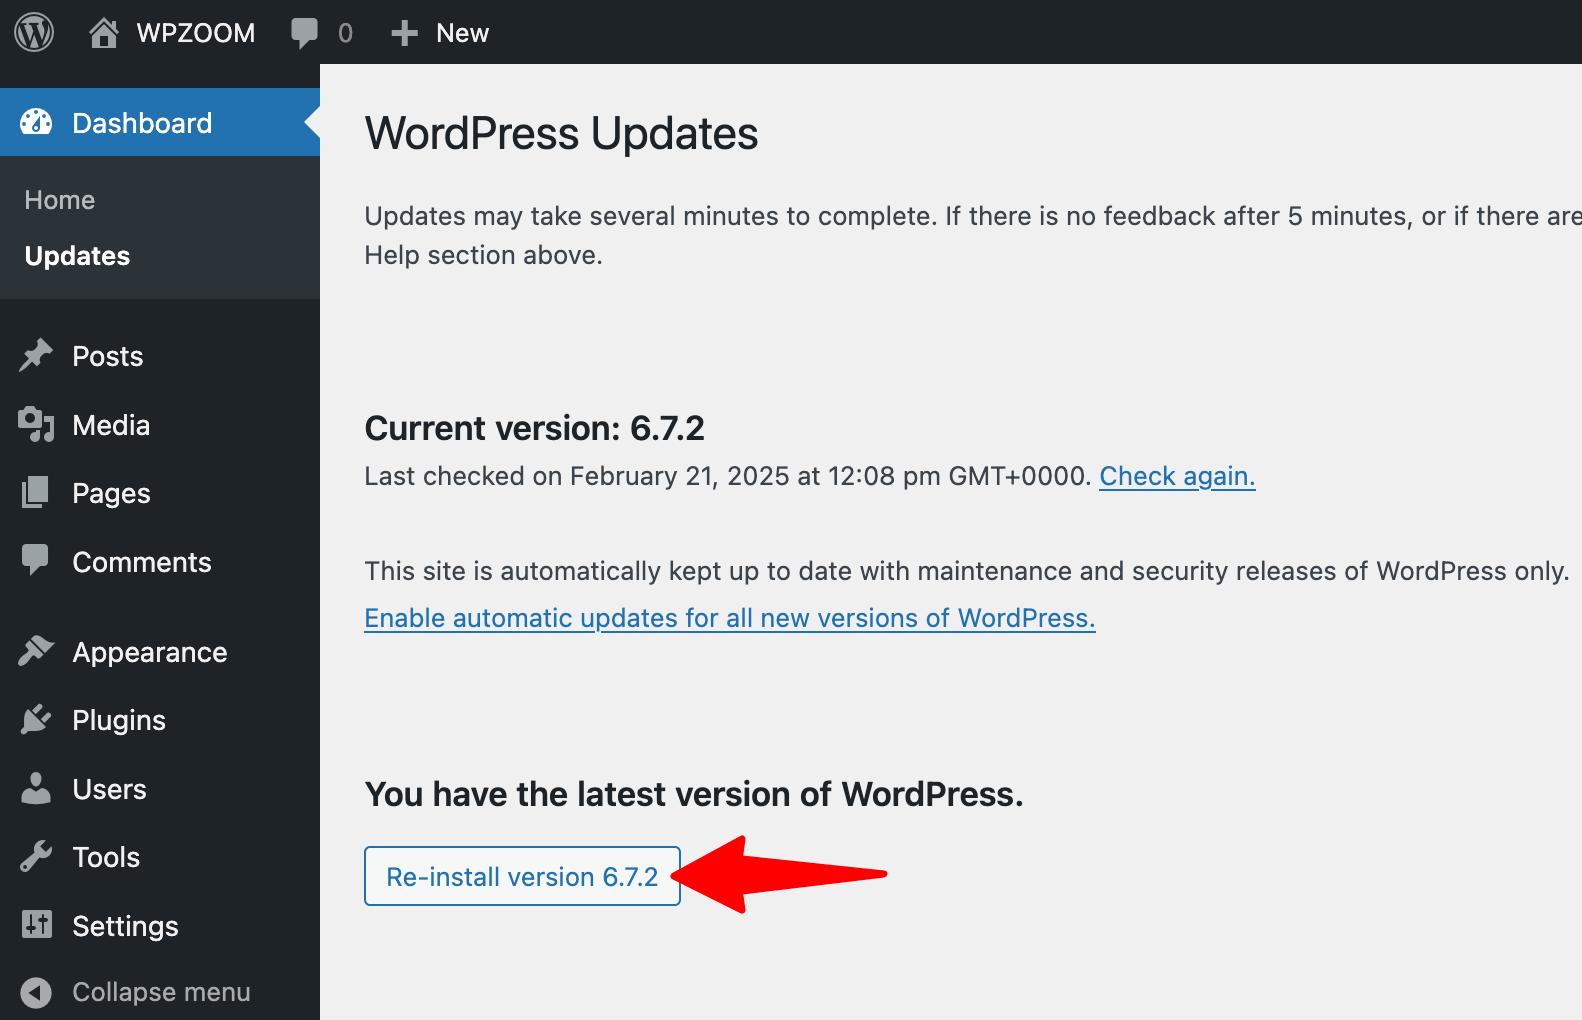 Updates > Reinstall WordPress” class=”wp-image-807146″ srcset=”https://b8f4g5a7.delivery.rocketcdn.me/wp-content/uploads/2025/02/dasbhoard-update-reinstall-wordpress.png 1582w, https://b8f4g5a7.delivery.rocketcdn.me/wp-content/uploads/2025/02/dasbhoard-update-reinstall-wordpress-734×473.png 734w, https://b8f4g5a7.delivery.rocketcdn.me/wp-content/uploads/2025/02/dasbhoard-update-reinstall-wordpress-1024×660.png 1024w, https://b8f4g5a7.delivery.rocketcdn.me/wp-content/uploads/2025/02/dasbhoard-update-reinstall-wordpress-1536×990.png 1536w” sizes=”(max-width: 1582px) 100vw, 1582px”/>
WordPress will refresh itself while keeping your themes, plugins, and content intact.
Manual Method:
Download the latest WordPress version from wordpress.org, delete everything except wp-content and wp-config.php, and then upload fresh files via FTP.
6. Speed Up Your Site by Analyzing and Optimizing Plugins
Not all plugins are created equal. Some improve your site, while others slow it down with bloated code or excessive database queries. If your site feels sluggish, it’s time to analyze and optimize your plugins to cut the dead weight.
Start by installing a tool like Query Monitor. This plugin shows you which ones use the most resources so you can identify performance hogs. If a plugin is slowing things down, consider:
- Replacing it with a lighter alternative
- Disabling it if it’s not essential
- Checking for updates (sometimes poor performance is due to outdated code)
7. Rollback Plugin Updates Without the Headache
Ever updated a plugin only to have your site break instantly? It happens more often than you’d think. While keeping plugins updated is crucial for security and performance, sometimes a new version introduces conflicts or bugs. Instead of scrambling to fix the issue, rolling back to a previous version can get your site working again in seconds.
The easiest way? Use the WP Rollback plugin.
Once installed, go to Plugins > Installed Plugins. Find the one causing trouble, and you’ll see a Rollback option.
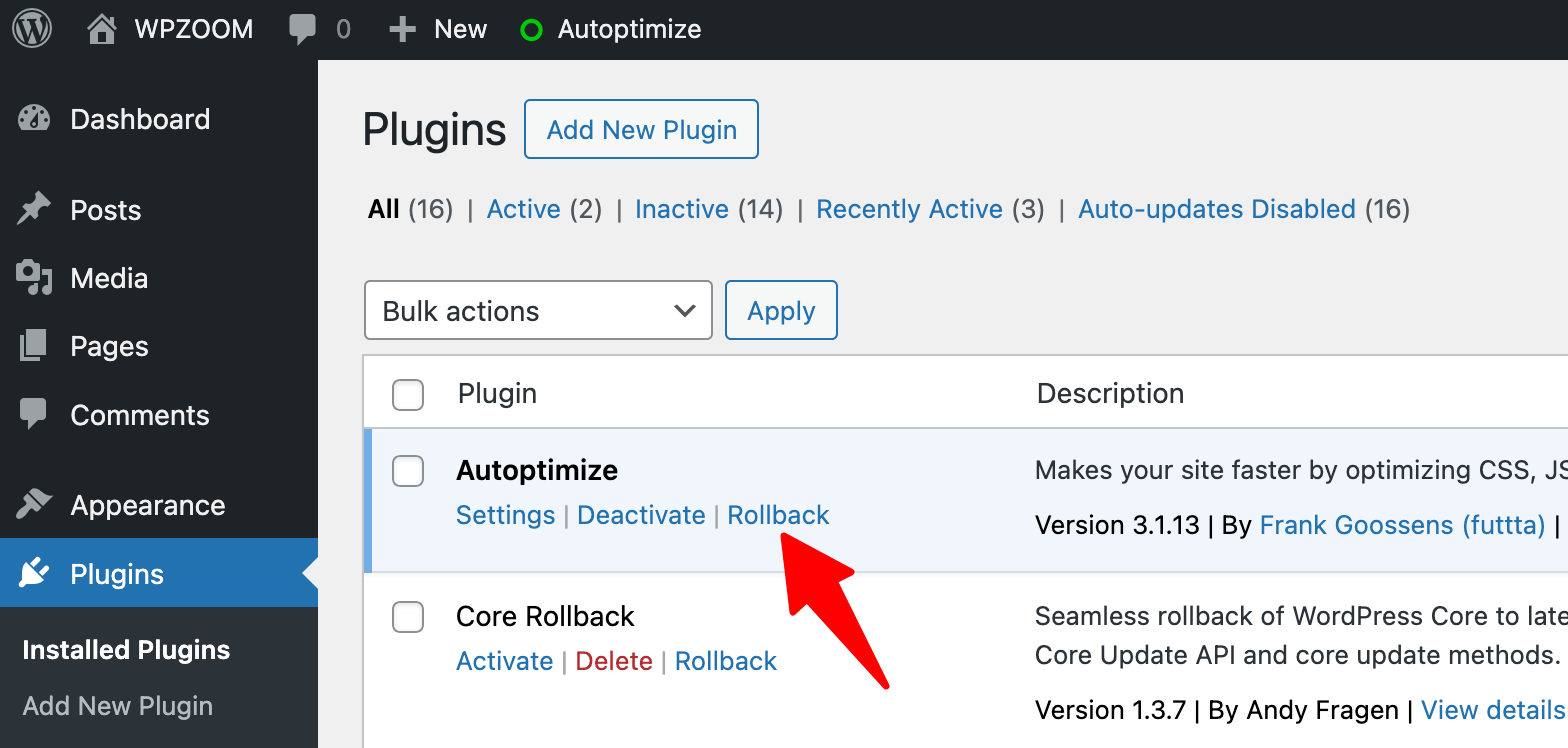

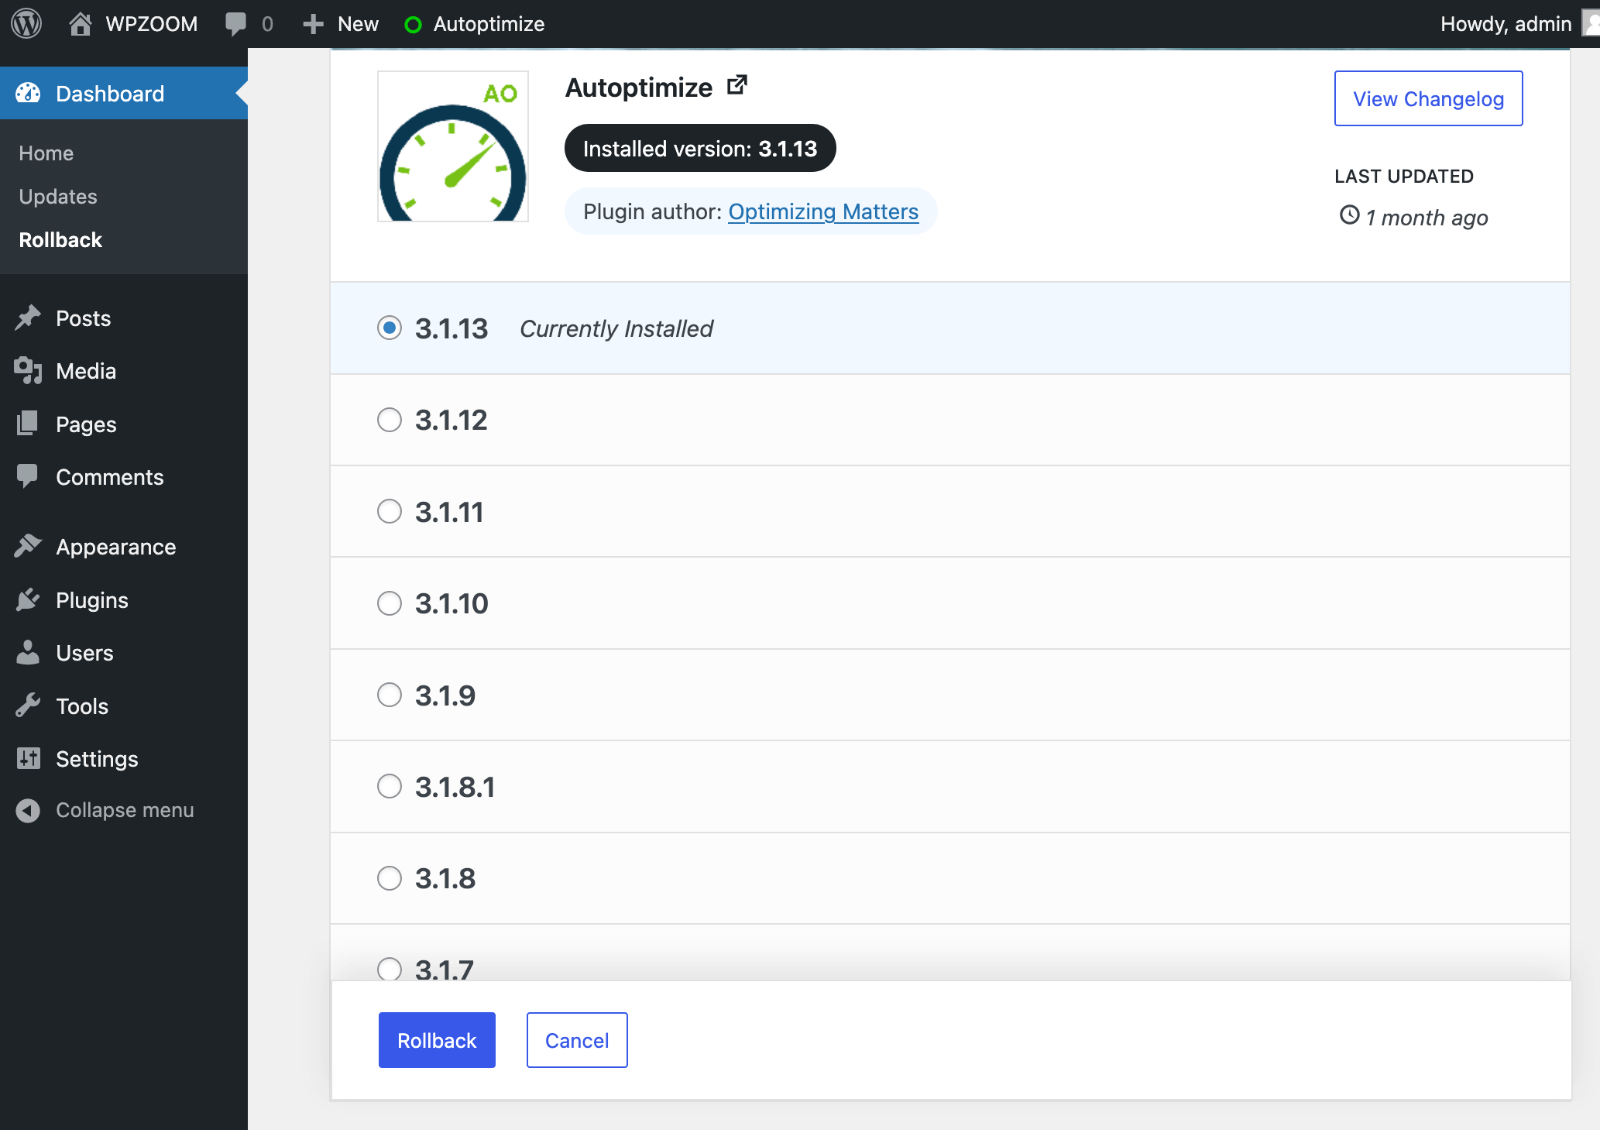
Choose an earlier version, confirm, and you’re back to stability.

8. Write Without Distractions Using Focus Mode
When you’re deep in content creation, the last thing you need is cluttered menus and toolbars getting in the way. WordPress has a built-in Distraction-Free Writing Mode that clears the screen so you can focus on your words without unnecessary distractions.
In the Gutenberg editor, click the three-dot menu (⋮) in the top-right corner and select Distraction free.
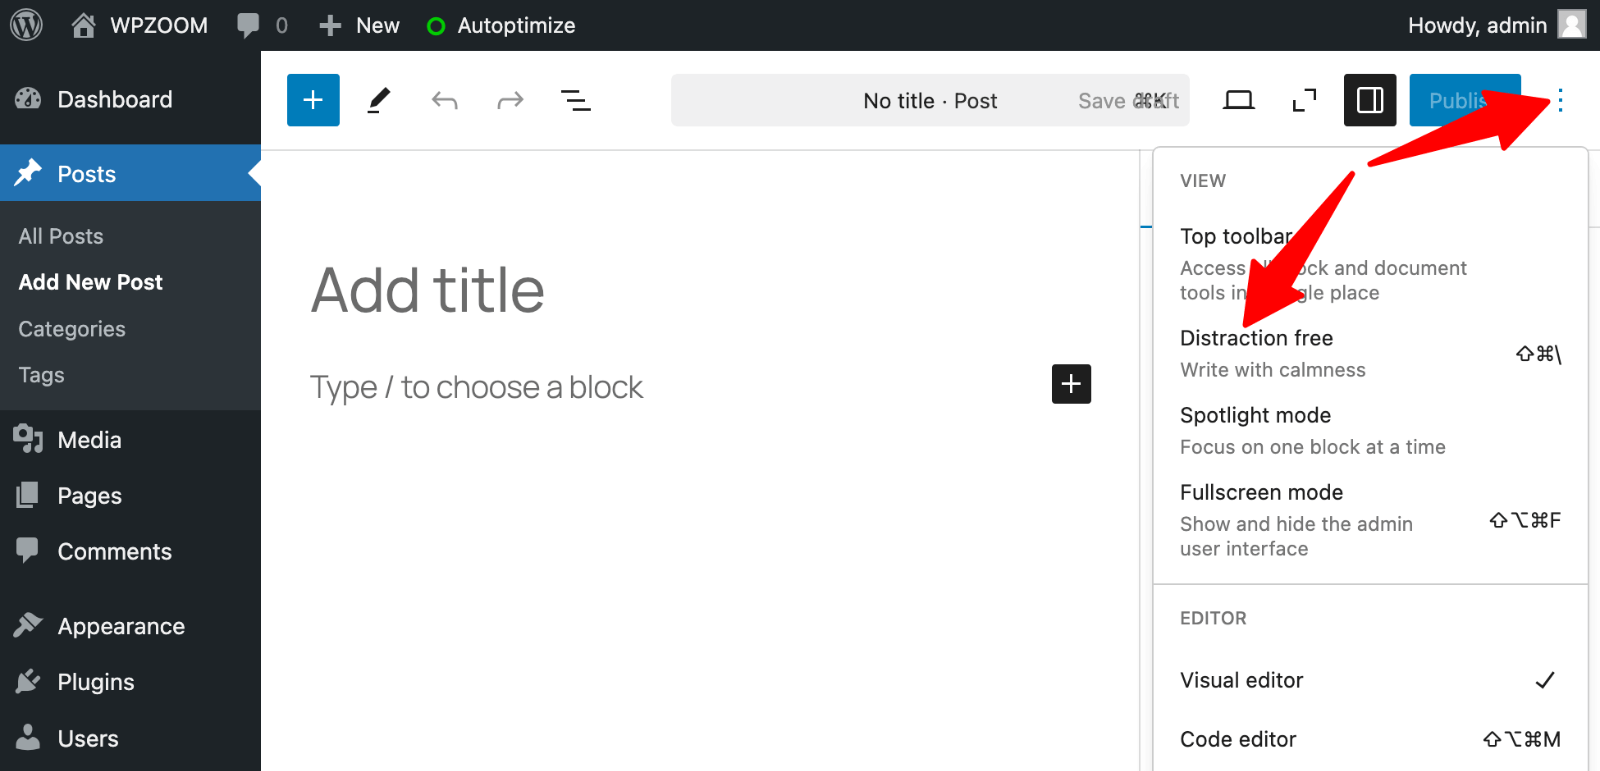

This hides the side panels and lets you concentrate on writing.
If using the Classic Editor, click the “Distraction-Free Writing” button above the toolbar.
9. Speed Up Your Workflow with Editor Keyboard Shortcuts
Clicking through menus to format text or insert blocks might not seem like a big deal, but those extra clicks add up over time. Learning a few WordPress keyboard shortcuts can save time and smooth your workflow if you write or edit content regularly.
Here are some of the most useful Gutenberg shortcuts to speed up editing in the block editor:
/ – Type this in an empty block to quickly insert a new block.
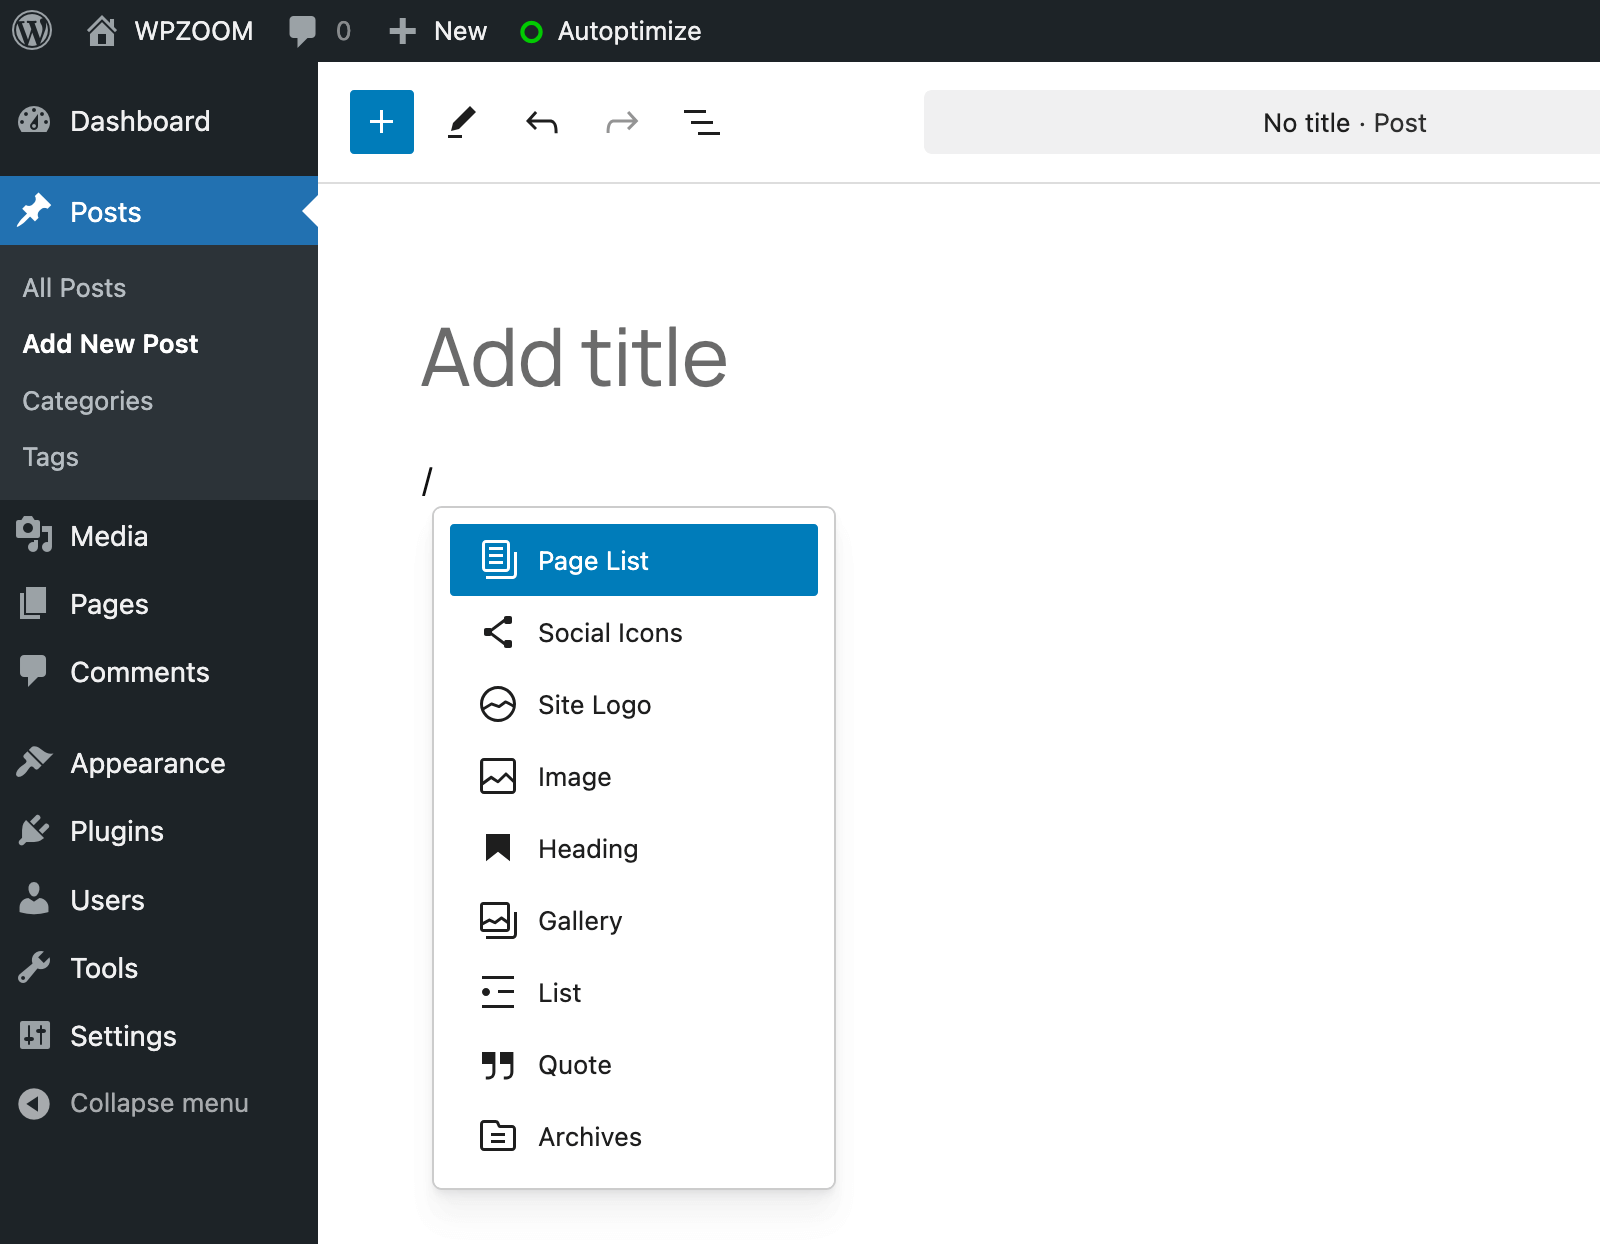

Ctrl + Alt + T (Windows) / Cmd + Option + T (Mac) – Insert a new block above the selected one.
Ctrl + Alt + Y (Windows) / Cmd + Option + Y (Mac) – Insert a new block below the selected one.
Shift + Alt + Z – Remove the selected block.
Ctrl + Shift + V (Windows) / Cmd + Shift + V (Mac) – Paste text without formatting (great for copying from external sources).
10. Speed Up Your Workflow with Custom Templates
Custom templates can save you time and effort if you create the same page layouts repeatedly. Instead of starting from scratch every time, a template lets you reuse a pre-designed structure, making site-building faster and more consistent.
Many themes and page builders like Elementor allow you to save and reuse layouts. For developers, WordPress also supports custom page templates that can be added to your theme files for even more control.
Upgrade Your Website with a Premium WordPress Theme
Find a theme that you love and get a 15% discount at checkout with the FLASH20 code


11. Save Time with Reusable Blocks (Patterns) in Gutenberg
Ever find yourself adding the same content, like a call-to-action, author bio, or styled section, to multiple posts? Instead of recreating it each time, Gutenberg’s Reusable Blocks (patterns) lets you save and reuse content instantly.
1. Select the block you want to reuse.
2. Click the three-dot menu (⋮) and choose “Create pattern.”
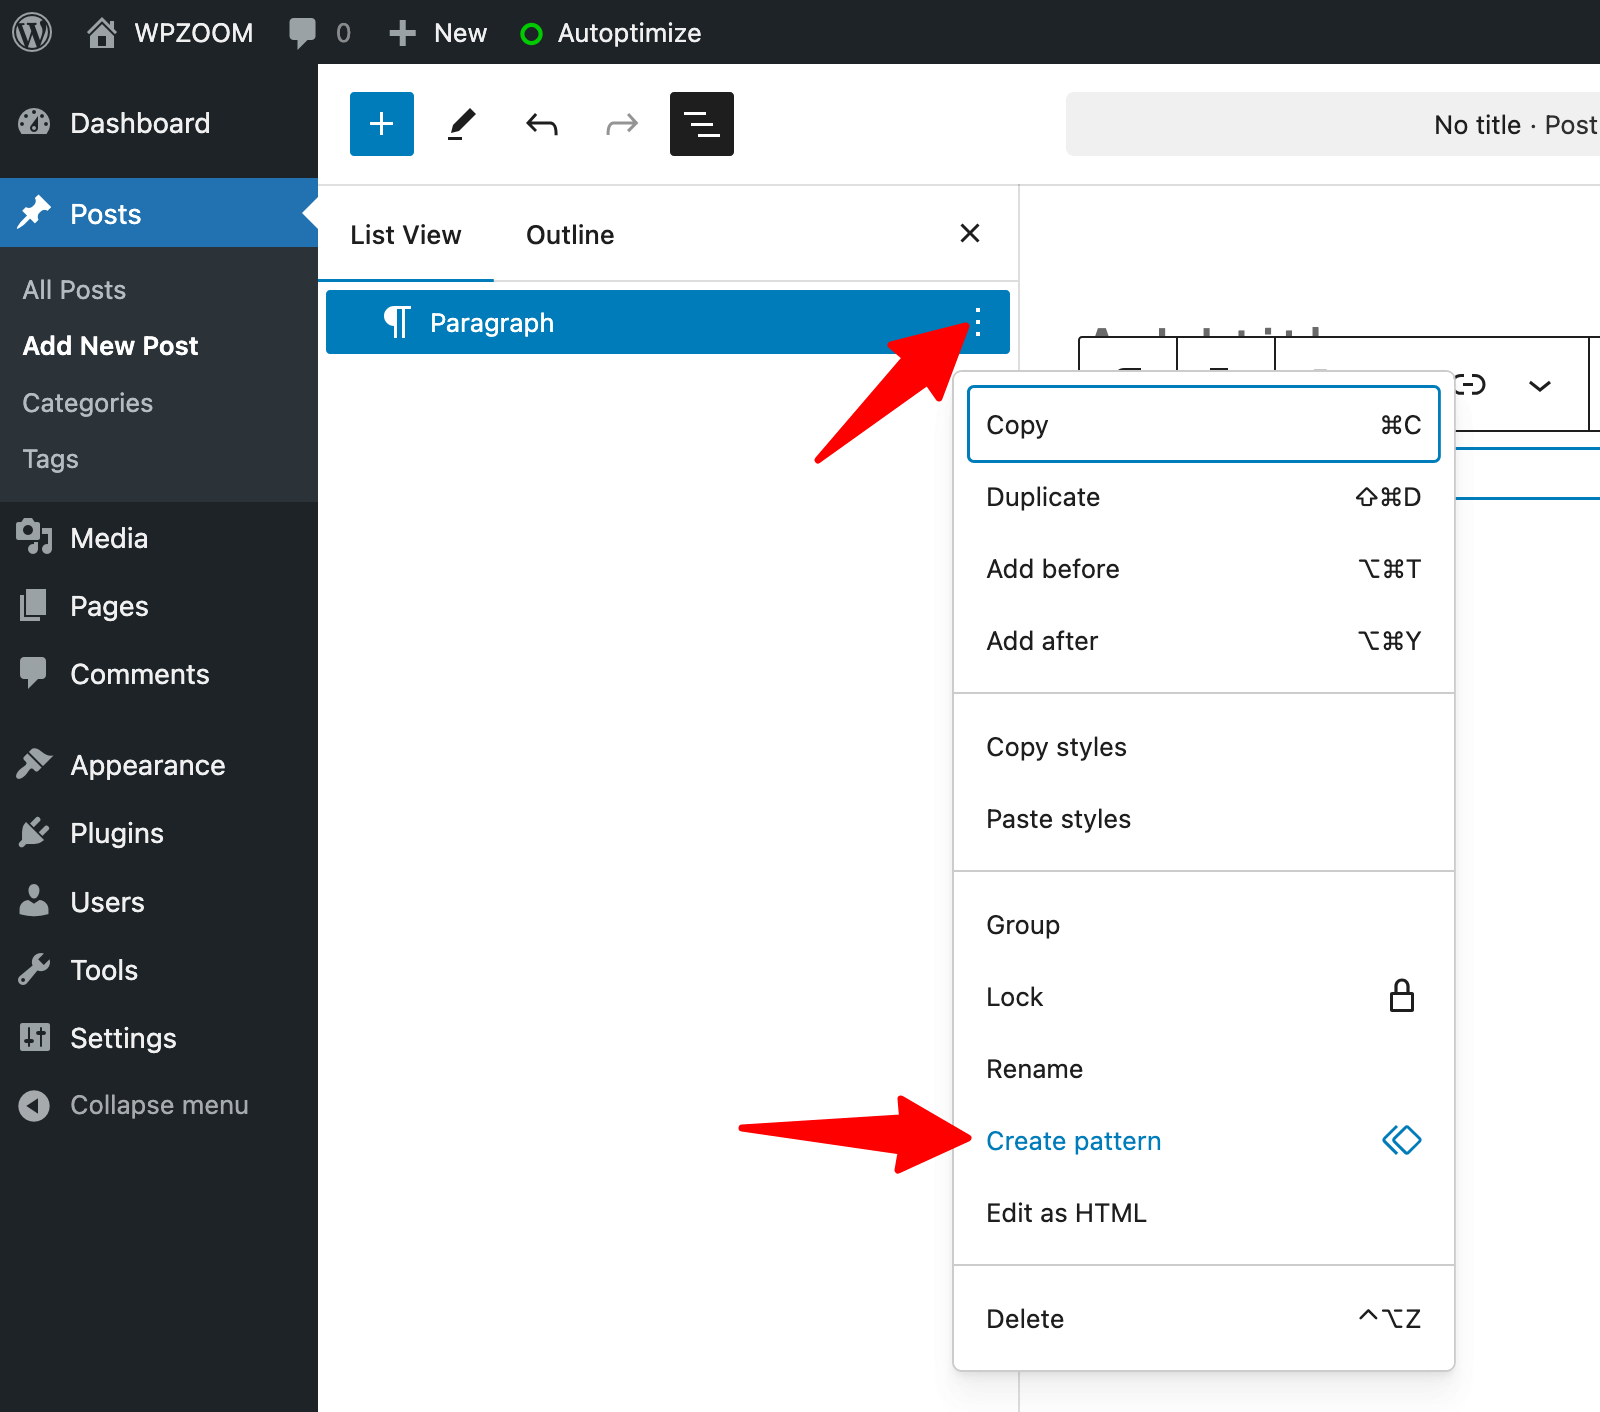

3. Give it a name (e.g., “Newsletter Signup” or “Affiliate Disclaimer”) and save it.
4. Next time you need it, just search for it in the block inserter and drop it in.
12. Unlock Advanced Customization with Custom Fields
WordPress comes packed with features, but sometimes you need a little extra flexibility. That’s where Custom Fields come in. They let you add extra metadata to posts, pages, or custom post types, perfect for things like pricing, ratings, or custom notes.
By default, WordPress hides Custom Fields. To enable them:
1. Open any post or page in the editor.
2. Click the three-dot menu (⋮) in the top right corner and select Preferences.
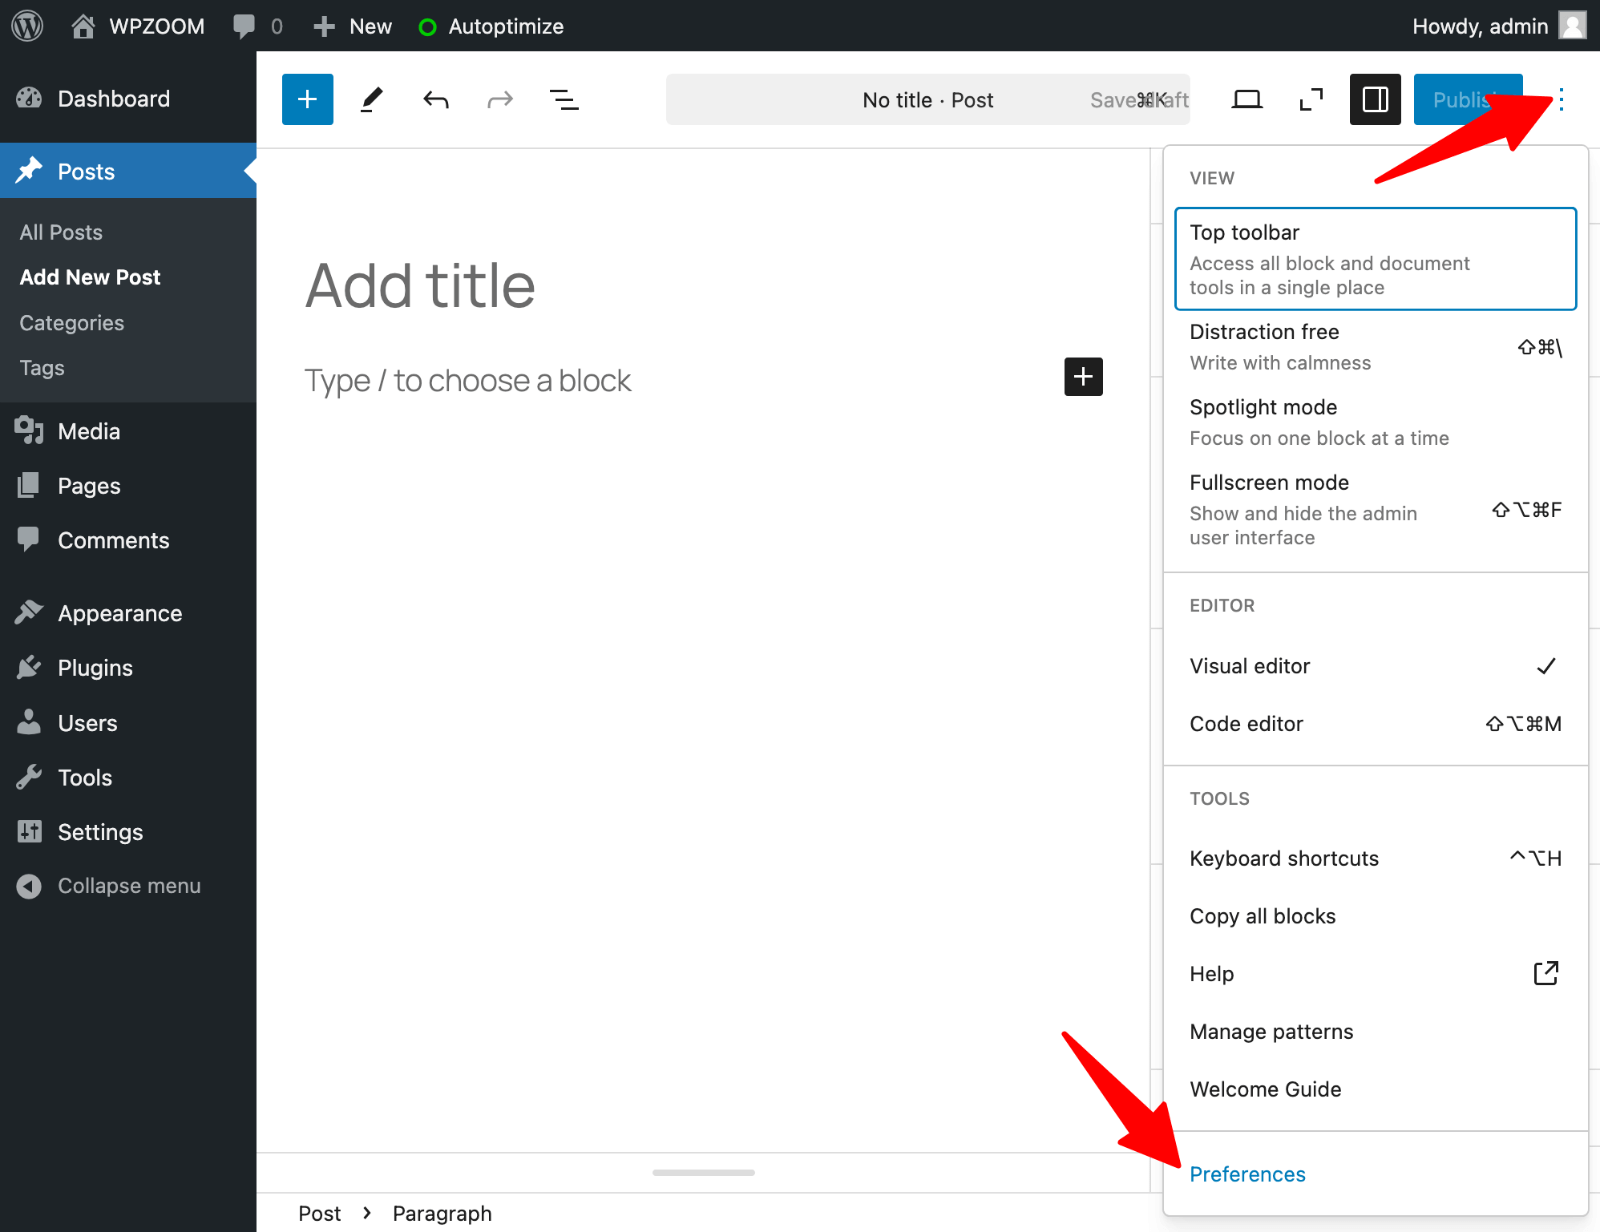 Preferences” srcset=”https://b8f4g5a7.delivery.rocketcdn.me/wp-content/uploads/2025/02/options-preferences.png 1600w, https://b8f4g5a7.delivery.rocketcdn.me/wp-content/uploads/2025/02/options-preferences-734×565.png 734w, https://b8f4g5a7.delivery.rocketcdn.me/wp-content/uploads/2025/02/options-preferences-1024×788.png 1024w, https://b8f4g5a7.delivery.rocketcdn.me/wp-content/uploads/2025/02/options-preferences-1536×1183.png 1536w” sizes=”(max-width: 1600px) 100vw, 1600px”/>
Under the General tab > Advanced, toggle on Custom fields and reload the page by clicking Show & Reload Page.
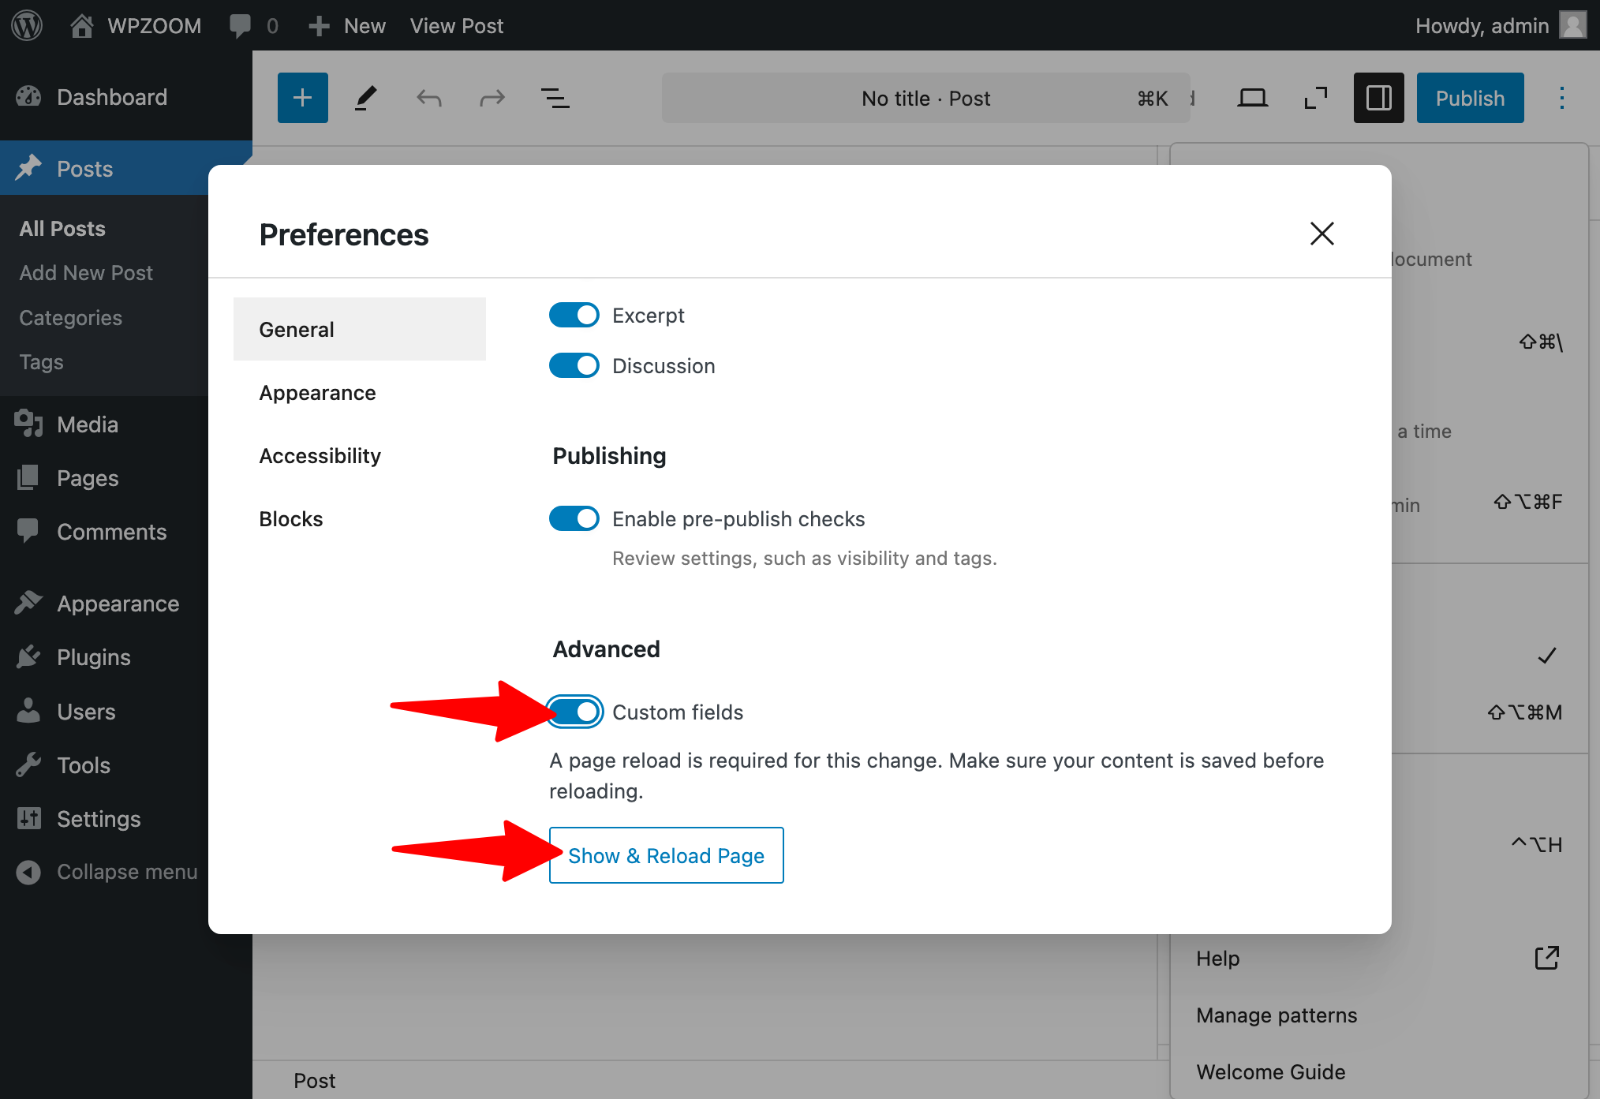

If you need more advanced functionality, plugins like Advanced Custom Fields (ACF) let you create structured, easy-to-manage custom fields without writing code.
13. Extend WordPress Functionality with Custom Post Types
Not everything belongs in a regular post or page. Custom Post Types (CPTs) can help you organize and display them correctly without relying on workarounds if you manage portfolios, testimonials, events, or other structured content.
A plugin like Custom Post Type UI is the easiest way to create one. These tools let you:
- Define a custom post type (e.g., “Portfolio” or “Events”)
- Set up custom taxonomies (like categories and tags)
- Control how the new content appears in the WordPress admin
14. Safely Add Custom Code Without Editing Theme Files
Tweaking WordPress often means adding small code snippets for extra functionality. But you’re taking a considerable risk if you’re still editing your theme’s functions.php file directly. A single mistake can break your site, and updates can erase your changes.
Instead of modifying theme files, use a plugin like WP Code.
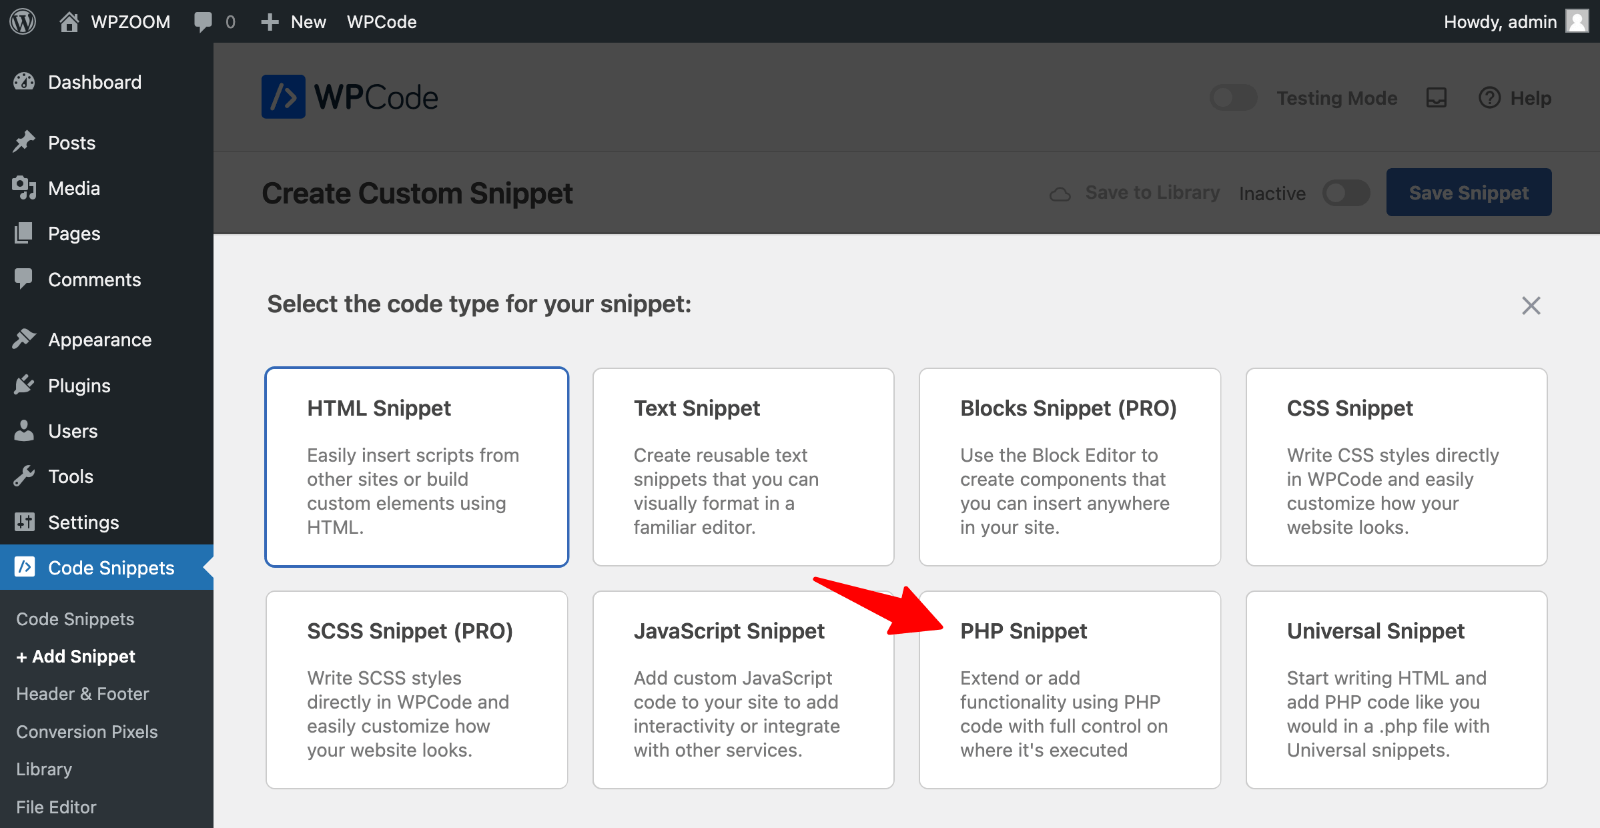

It lets you:
- Add custom code safely without touching core files.
- Enable or disable snippets without affecting your theme.
- Avoid losing changes when updating WordPress or switching themes.
15. Edit WordPress Files Directly from Your Dashboard
Sometimes, you need to tweak a file, whether it’s adjusting CSS, fixing a PHP function, or modifying a template. Instead of using an FTP client or cPanel, you can edit WordPress files from your dashboard with the right tool.
The default WordPress file editor is basic and lacks safeguards. A better alternative is the WPIDE plugin.


It gives you:
- A full-featured code editor with syntax highlighting and error detection.
- Direct access to theme, plugin, and core files for quick adjustments.
- Built-in safety checks to help prevent site-breaking mistakes.
16. Boost Performance with Caching Plugins
A slow website drives visitors away and hurts SEO. A caching plugin is one of the easiest ways to speed up WordPress. Caching stores static versions of your pages, reducing the work your server has to do each time someone visits your site.
If you want reliable performance improvements, the WP Rocket plugin is the most straightforward premium caching plugin with built-in performance optimizations.
17. Minify and Combine CSS & JavaScript for a Faster Site
Already using caching to speed things up? That’s a great start, but CSS and JavaScript files could still slow you down. Every extra request adds to your load time, and unoptimized code can make pages feel sluggish. Minifying and combining these files cuts the bloat, helping your site run even faster.
Many caching and optimization plugins include built-in options for minifying and combining CSS/JS. If you’re already using a performance plugin, check its settings; you might just need to enable the feature.
18. Optimize Images to Improve Load Times
You’ve tackled caching and minified CSS and JavaScript, but large image files might be the culprit if your site still feels sluggish. High-resolution images look great, but if they’re not optimized, they slow everything down, leading to frustrated visitors and lower SEO rankings.
Instead of manually resizing every image, let a plugin do the work. Tools like Smush automatically compress images, reducing their file size without sacrificing clarity. Some plugins like Imagify even convert images to WebP, a next-gen format that loads faster than JPEG or PNG.
19. Optimize Permalink Settings for Cleaner URLs and Better SEO
A cluttered URL filled with random numbers and symbols isn’t just ugly; it’s harder for users to remember and worse for SEO. Your permalink structure plays a significant role in how search engines and visitors navigate your site, and tweaking it can make your content easier to find.
Go to Settings > Permalinks in your WordPress dashboard.
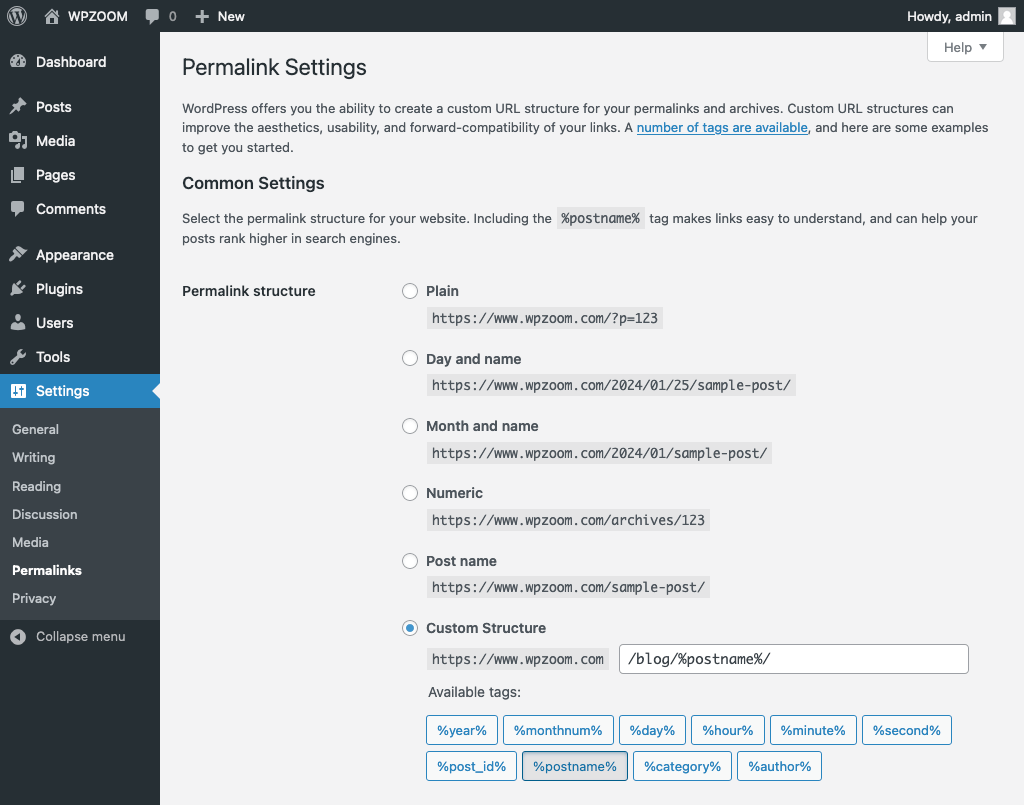

If your URLs look something like this:
yourwebsite.com/?p=123
…it’s time for an upgrade. Choose the “Post Name” option instead:
yourwebsite.com/sample-post/
This structure keeps your URLs clean, descriptive, and easy to read.
20. Enhance SEO with Schema Markup
Great content deserves to stand out in search results, but Google needs more than just text to understand your site. That’s where Schema Markup comes in. It adds structured data to your pages, helping search engines display rich snippets like star ratings, FAQs, and recipe details.
If you’re uncomfortable adding code manually, don’t worry; Schema plugins handle it for you. Popular options include Yoast SEO and Rank Math, which let you add structured data without touching a single line of code.
Upgrade Your Website with a Premium WordPress Theme
Find a theme that you love and get a 15% discount at checkout with the FLASH20 code


21. Protect Your Customizations with a Child Theme
Ever customized your WordPress theme, only to lose everything after an update? It’s a frustrating mistake but easily avoidable. A child theme ensures your tweaks stay intact, no matter how often the parent theme updates.
A child theme is a must-have if you’re making any modifications to a theme, whether it’s adjusting styles, adding custom functions, or tweaking templates. It acts as a protective layer, allowing you to update the parent theme without losing your changes.
Not sure how to set one up? Follow our step-by-step guide on creating a child theme to keep your customizations safe and your site running smoothly.
22. Test Changes Safely with a Staging Site
Making updates directly on a live website is like fixing a car while driving. It’s risky and can break things for visitors. A staging site gives you a safe space to test changes before they go live so you can catch issues before they affect real users.
Most managed WordPress hosts offer one-click staging to clone your site instantly. If your host doesn’t include staging, plugins like WP Staging can create a local test version of your site.
23. Prevent Accidental Emails from Your Staging Site
A staging site is the perfect place to test updates and changes before going live, but what you don’t want is accidentally sending real emails from your test environment. Staging sites should never send emails to real users, whether order confirmations, contact form submissions, or newsletter signups.
To prevent email mishaps, you can:
- Use a plugin like Disable Emails to block outgoing messages.
- Configure your SMTP settings to disable email sending in staging.
- If your host provides staging, check if they automatically disable emails. Many managed WordPress hosts do.
24. Manage WordPress Faster with WP-CLI
Clicking through the WordPress dashboard is fine for everyday tasks, but if you manage multiple sites or need to make bulk changes, WP-CLI (WordPress Command Line Interface) is a game-changer. It lets you update plugins, create users, and even back up your site, all from a terminal window.
Most managed WordPress hosts support WP-CLI by default. If you’re using a VPS or local environment, you can install it manually following the official WP-CLI guide.
25. Keep Track of Changes with Version Control
If you’ve ever made edits to your theme or plugins and wished you could roll back to an earlier version, version control is your best friend. Instead of manually saving backup copies of files, tools like Git allow you to track every change, experiment with confidence, and restore previous versions if needed.
If you’re new to Git, platforms like GitHub make version control more accessible. Some managed WordPress hosts even offer built-in Git support for tracking theme and plugin changes.
26. Register Custom Image Sizes for Better Performance
WordPress automatically generates several image sizes, but they don’t always fit your layout perfectly. If images are being cropped awkwardly or loading larger than necessary, custom image sizes let you take control, ensuring your site looks great and runs efficiently.
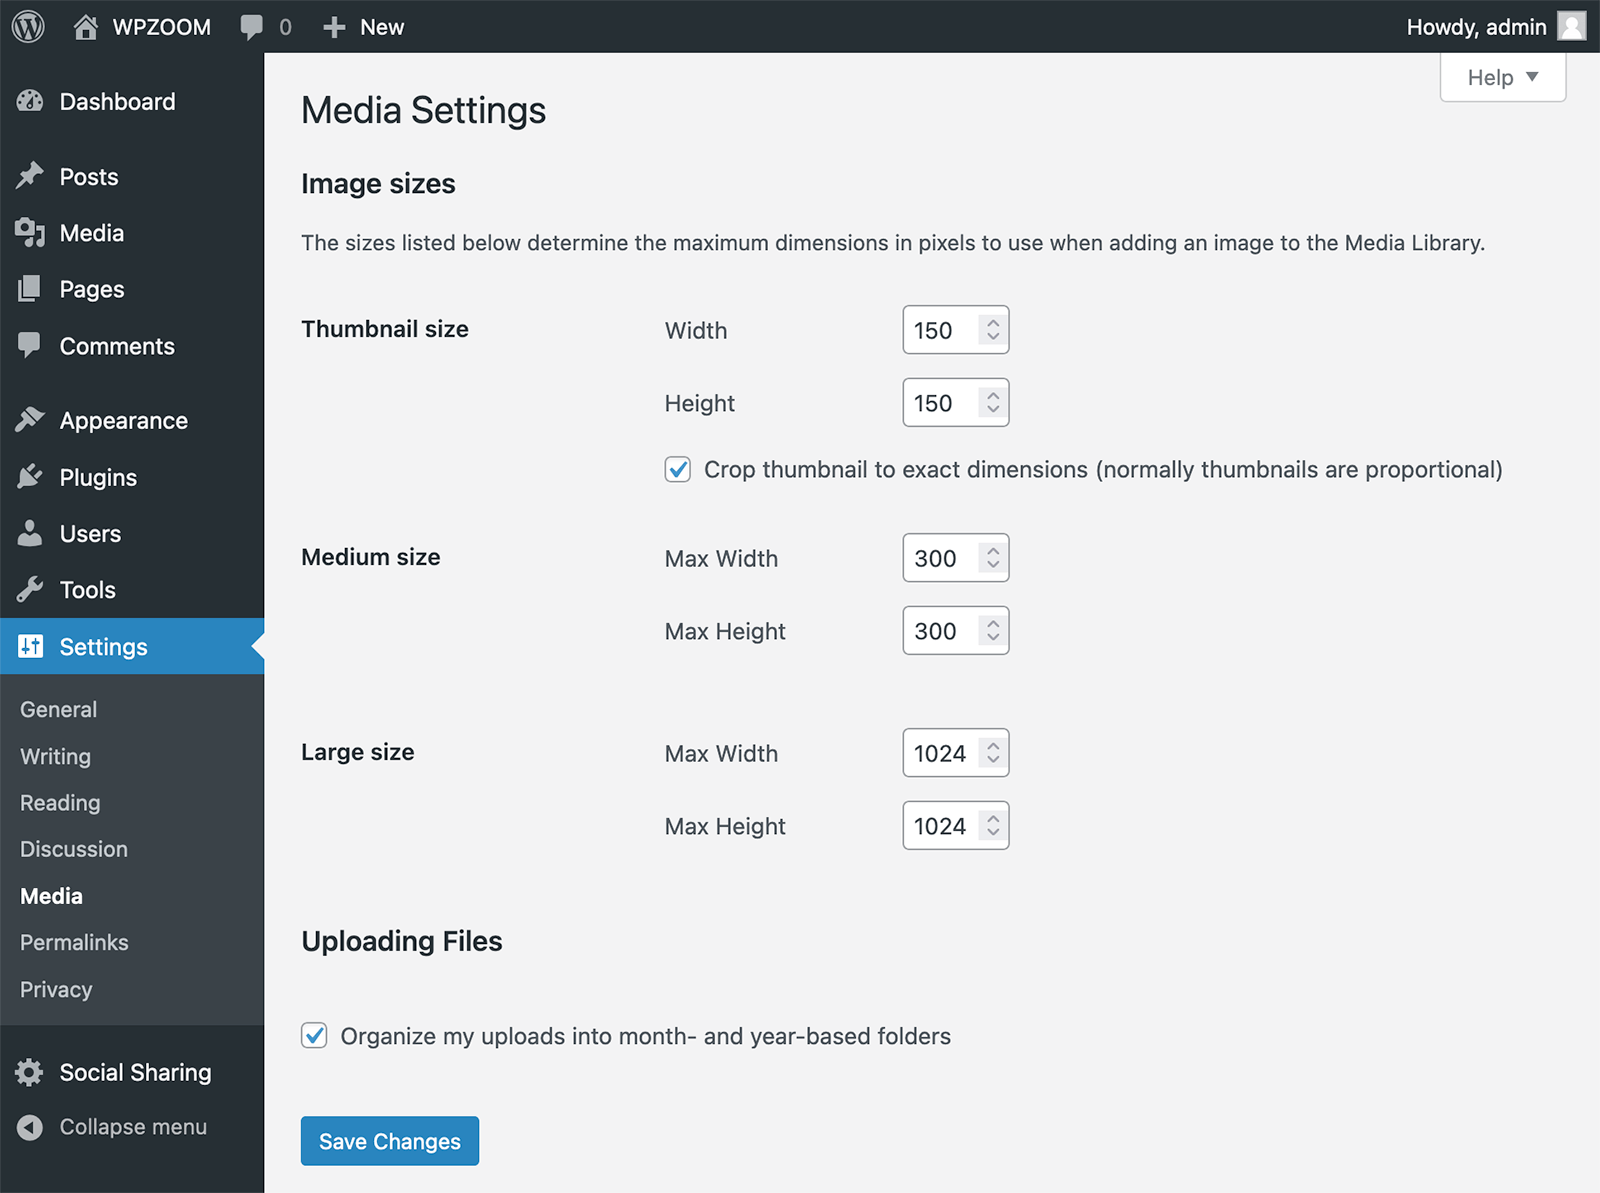

Check out our guide on WordPress image sizes to find out how to add custom image sizes and ensure your images load quickly and look exactly how you want.
27. Limit Post Revisions to Keep Your Database Clean
WordPress automatically saves multiple versions of your posts and pages, which can be a lifesaver if you need to restore an earlier draft. But over time, too many revisions can clutter your database, slowing down your site’s performance.
By default, WordPress stores unlimited revisions for every post. You can limit this by adding a simple line to your wp-config.php file:
define('WP_POST_REVISIONS', 5); // Keeps only the last 5 revisionsAlternatively, plugins like WP-Optimize allow you to manage and clean up old revisions without touching code.
28. Create a Custom 404 Page to Keep Visitors Engaged
Landing on a 404 error page is frustrating, but it doesn’t have to be a dead end. Instead of letting visitors hit a generic “Page Not Found” message, a custom 404 page can guide them back to valuable content and keep them on your site.
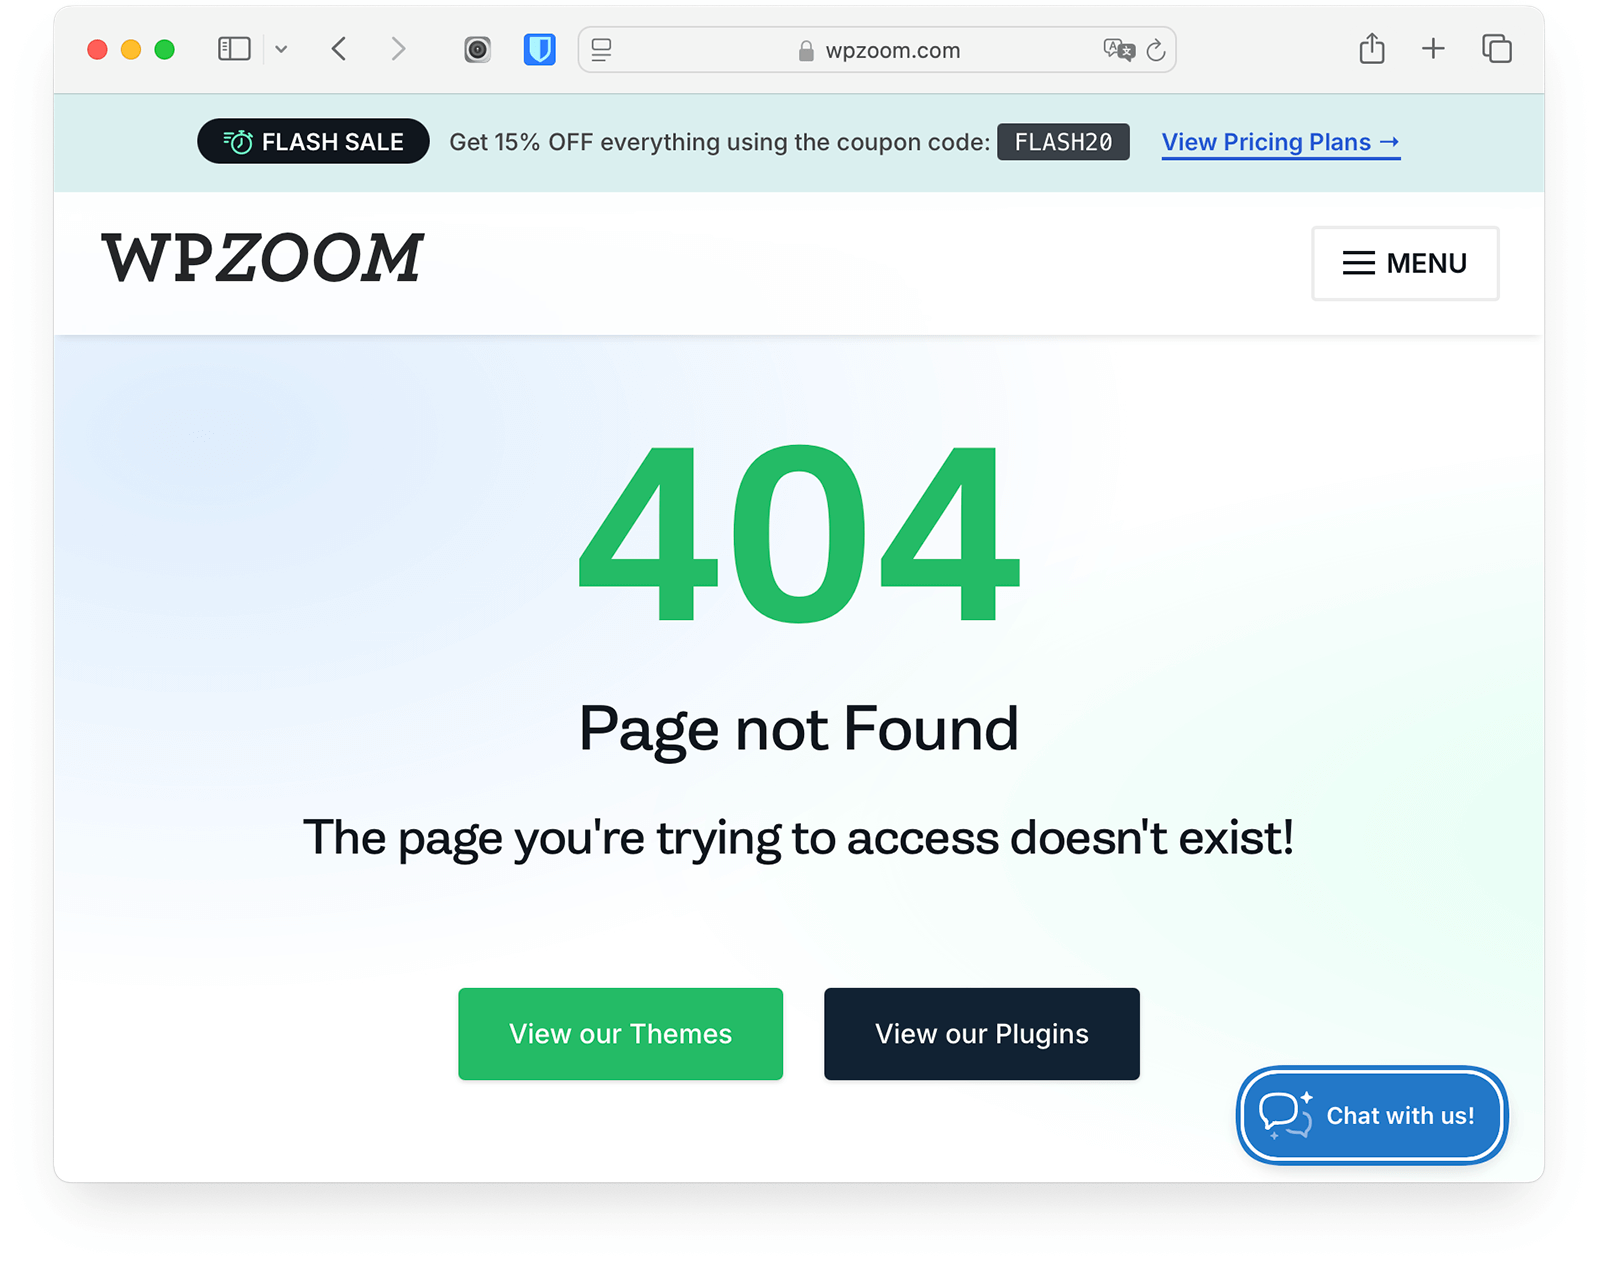

What to include in a custom 404 page:
- A helpful message: Let users know the page doesn’t exist but offer alternatives.
- Search bar: Give visitors an easy way to find what they want.
- Popular or recent posts: Direct them to valuable content instead of making them leave.
- A call to action: Encourage them to visit your homepage or contact you for help.
Many WordPress themes include built-in 404 templates. If yours doesn’t, plugins like Smart Custom 404 Error Page or page builders like Elementor let you design one in minutes.
29. Enable Maintenance Mode for Safe Updates
Making significant updates to your site? The last thing you want is for visitors to see a broken layout or unfinished changes. Enabling maintenance mode keeps your site looking professional while you work behind the scenes.
A plugin like Maintenance is the easiest way to activate maintenance mode. These allow you to create a custom page with branding, a countdown timer, and even a subscription form so visitors can be notified when your site is back up.
For a quick manual method, you can add this to your functions.php file:
function wp_maintenance_mode() {
if (!current_user_can('edit_themes') || !is_user_logged_in()) {
wp_die('We’ll be back soon!
');
}
}
add_action('get_header', 'wp_maintenance_mode');Manually updating the copyright year in your footer every January? There’s a better way. Instead of editing your theme files yearly, you can automate it with a simple PHP snippet that updates the year dynamically.
Replace the static year in your theme’s footer with this simple PHP code:
Your Website Name. All rights reserved.
This will always display the current year, ensuring your site stays up to date without any effort.
The Best WordPress Trick? Choosing the Right Theme
You can tweak settings, optimize speed, and install all the right plugins, but your site will always feel like an uphill battle if your theme is clunky. A good theme should make your life easier, not harder.
At WPZOOM, we’ve spent years creating themes that balance simplicity and power so you get complete control without frustration. If you’re tired of working around your theme instead of with it, maybe it’s time for something better. Check out WPZOOM themes and see how effortless WordPress can feel.

