Ever wondered what WordPress tips, tricks, and hacks most popular WordPress sites are using?
There are so many ways to customize your WordPress website and use it more efficiently. However, it takes months for new users to discover the most useful tips and tricks.
In this article, we will share some of the most wanted WordPress tips, tricks, and hacks that will help you use WordPress like a pro.
Here is a list of all the tips, tricks, and hacks mentioned in this article. Feel free to jump to the one that catches your interest.
1. Use a Custom Homepage
By default, WordPress shows your latest posts on the homepage of your website. You can change that and use any page as your site’s homepage.
First, you need to create a new page in WordPress, and you can name this page Home.
Next, you will need to create another page, and let’s call this page Blog as you will use it to display your blog posts.
Now go to Settings » Reading page in your WordPress admin and under ‘Front page displays’ option and switch to ‘A static page’.
After that, you can select the pages you just created as your home and blog pages.
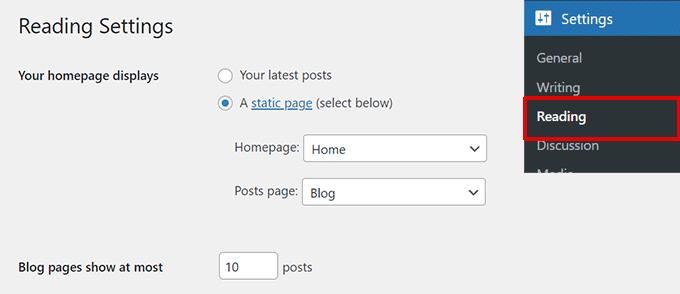
You can also create a custom template for your home page.
1. Create Custom Template in Site Editor
If you use a newer block theme on your WordPress site, you can create a custom template for your home page using the site editor.
Simply go to the Appearance » Editor page and click on the Add New button at the top of the template chooser screen.
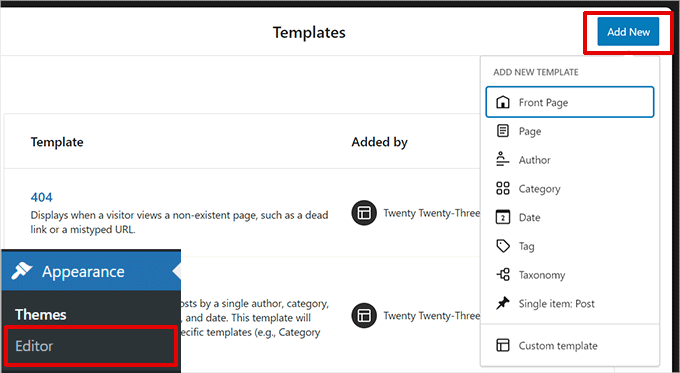
From the fly-down menu, you can choose what type of template you want to create. You can choose Front Page which will automatically include header and other settings, or you can choose a Custom Template to start from scratch.
If you choose a custom template, then you will be asked to give your template a name. After that, Site Editor will open it for editing.
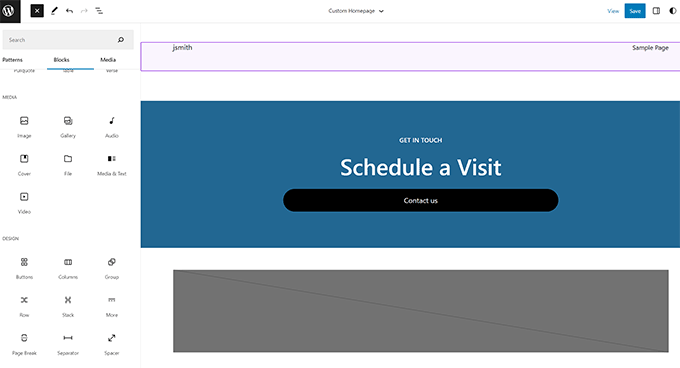
You can design your custom template in the block editor. Once you are finished don’t forget to save your changes.
You can now edit the Home page you created earlier. On the page edit screen, click on the Template option under the Summary box in page settings panel.
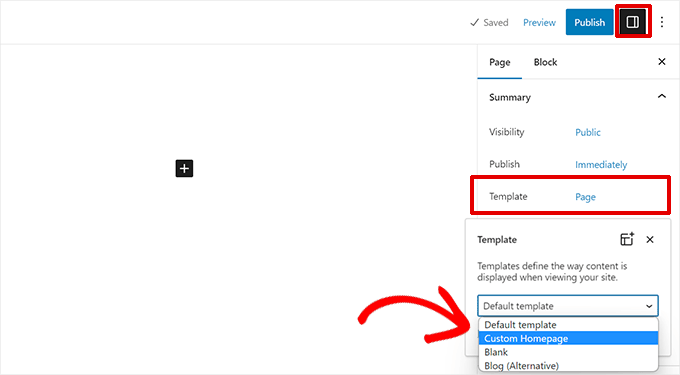
Select your custom homepage template from here.
You can continue editing the page or save and publish your changes to see your custom home page design in action.
2. Create a Custom Template Manually
You can use this method if you are using an older theme or want to write the code manually.
Simply create a new file on your computer using a plain text editor and add this code at the top of it.
Save this file as custom-homepage.php on your desktop.
Next, you need to connect to your website using an FTP client and go to /wp-content/themes/your-current-theme/ folder. Now upload the file you created earlier to your theme folder.
Return to the WordPress admin area and edit your home page.
You will be able to select your custom homepage template under the Summary metabox in the post settings column on the right.

For more details, see our guide on how to create a custom page template in WordPress.
Now this page will be completely empty, and it will not show anything at all. You can use custom HTML/CSS and WordPress template tags to build your own page layout. You can also use a page builder plugin to easily create one using drag-and-drop tools.
2. Install Google Analytics in WordPress
Google Analytics is one of the must have tools for WordPress site owners. It allows you to see where your users are coming from and what they are doing on your website.
The best way to install Google Analytics is by using the MonsterInsights plugin. It is the best Google Analytics plugin for WordPress and shows beautiful reports right inside your WordPress admin area.
Simply install and activate the MonsterInsights plugin. For more details, see our tutorial on how to install a WordPress plugin.
Upon activation, the plugin will walk you through the set up. Simply follow the on-screen instructions to finish the setup.
For detailed instructions see our step-by-step guide on how to install Google Analytics in WordPress.
3. Password Protect WordPress Admin Directory
The WordPress admin directory is where you perform all administrative tasks on your website. It is already password-protected as users are required to enter a username and password before they can access the admin area.
However, by adding another layer of authentication, you can make it difficult for hackers to gain access to your WordPress site.
Here is how to enable password protection for your WordPress admin directory.
Login to your WordPress hosting account control panel. Next, click on the ‘Directory Privacy’ option under the Files section of your website’s Advanced settings.
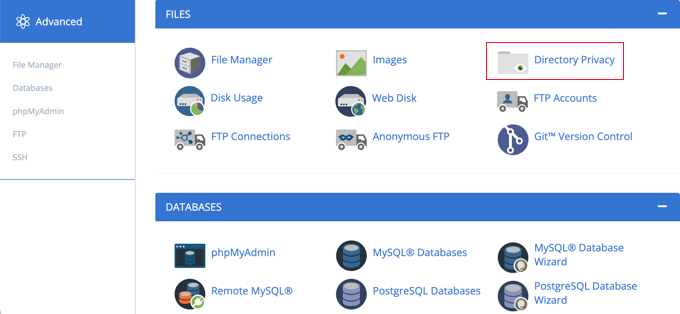
Note: Most web hosts using cPanel, like Bluehost, will have similar steps. However, your dashboard might be slightly different from our screenshots, depending on your hosting provider.
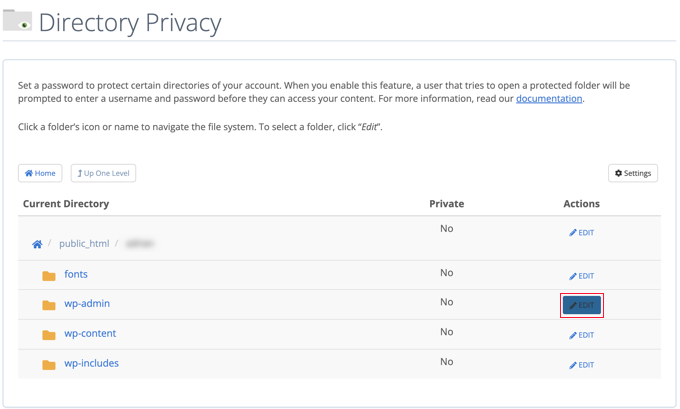
Next, you will be asked to select the directories you want to protect.
Navigate to your WordPress website’s root folder and click on the Edit button next to the wp-admin folder.
On the next screen, simply check the box that says ‘Password protect this directory’.
If you like, you can also give your directory a name like ‘Admin Area’ to help you remember.
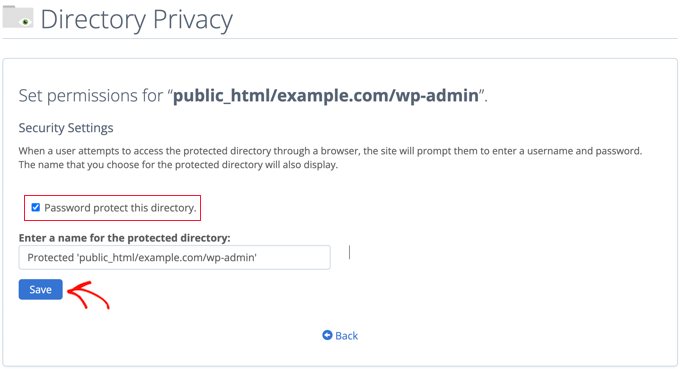
After that, click on the Save button to store your settings.
This will take you to a page where the confirmation message will appear. Click on the Go Back button to continue.

On the next screen, you will be asked to enter a username and password, and then confirm the password.
Make sure to note your username and password in a safe place, such as a password manager app.
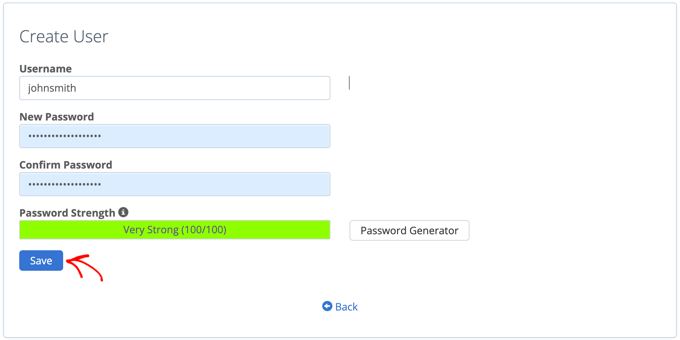
Make sure you click the ‘Save’ button when you’ve done that.
Now, when someone tries to access your /wp-admin directory, they will be prompted to enter the username and password you created above.
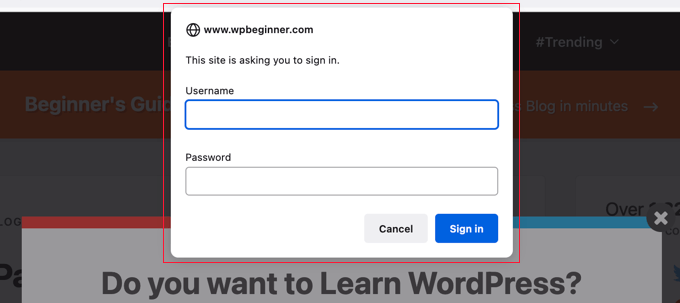
For alternate methods and more detailed instructions see our guide on how to password-protect your WordPress admin directory.
4. Show Images in Rows and Columns
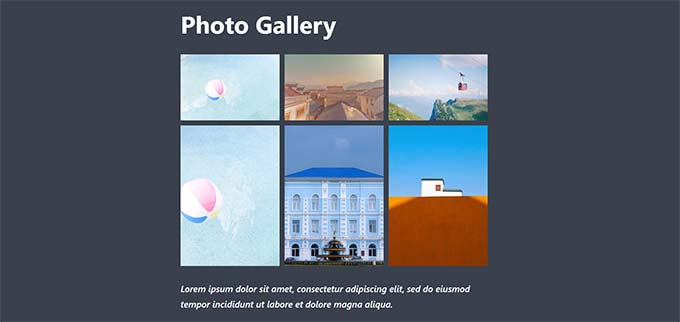
By default, when you add multiple images to a WordPress post, they would appear right next to each other or on top of each other.
This does not look very good because your users will have to scroll a lot to see all of them.
This can be solved by displaying images in a grid layout. You can use the Gallery block to display images in a grid of rows and columns.
You can also use the columns block to display image side by side. If you want to display an image next to the text, then you can try Text and Media block.
For more details, see our guide on how to add an image gallery in WordPress.
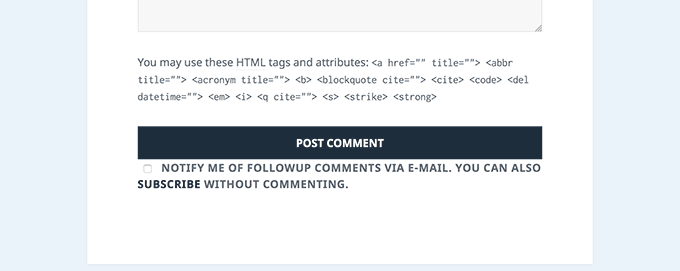
Normally when users leave a comment on your website, they will have to manually visit the same article again to see if you or other users replied to comments.
Wouldn’t it be better if users were able to get email notifications about new comments on your posts? Here is how to add this feature to your website.
Simply install and activate the Subscribe to Comments Reloaded plugin. Upon activation, you need to visit Settings » Subscribe to Comments to configure the plugin settings.
For detailed instructions see our guide on how to allow users to subscribe to comments in WordPress.
6. Limit Login Attempts
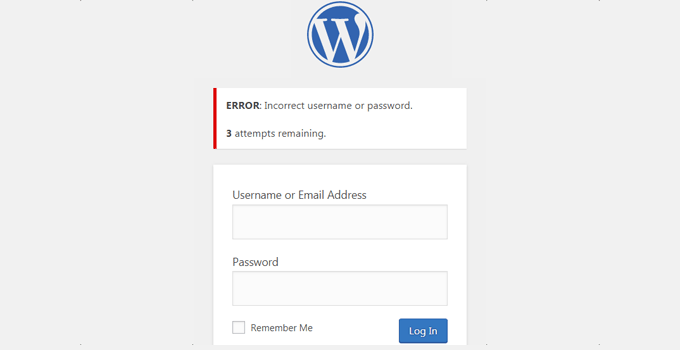
By default, a WordPress user can make an unlimited number of attempts to log in to a WordPress site. This allows anyone to try guessing your password until they get it right.
To control this, you need to install and activate the Login LockDown plugin. It allows you to set limits on the number of failed attempts a user can make to login.
For detailed setup instructions see our guide on how to limit login attempts in WordPress.
7. Display Excerpt (Post Summary) on Home and Archive Pages
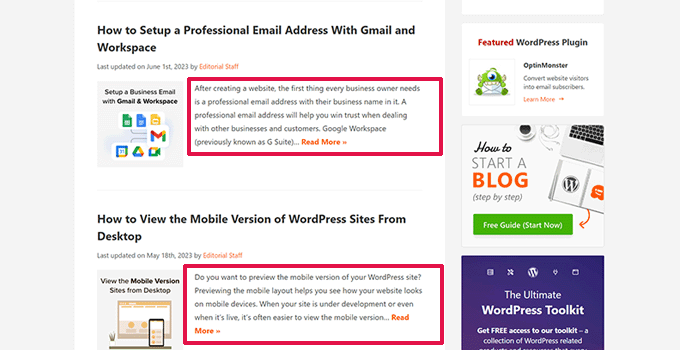
You may have noticed that all popular blogs show article summaries instead of full articles on their home and archive pages. It makes those pages load faster, increases page views, and avoids duplicate content across your website.
For more on this topic, see our article on excerpt (summary) vs full posts in WordPress archive pages.
Many premium and free WordPress themes already use excerpts on home and archive pages. However, if your theme doesn’t display excerpts, then see our guide on how to display post excerpts in WordPress themes.
8. Add Custom Default Gravatar Image
WordPress uses Gravatar to display user profile photos in WordPress. If a user does not have a gravatar, then WordPress uses a default image which is called ‘Mystery Person.’
This default gravatar image will appear many times in your WordPress comments area simply because a lot of users do not have a gravatar image associated with their email address.
You can easily replace this default gravatar with your own custom default gravatar image.
First, you will need to upload the image you want to use as your default gravatar image to your WordPress media library.
Go to Media » Add New page to upload the image. After uploading it, click on the Copy URL to Clipboard button.
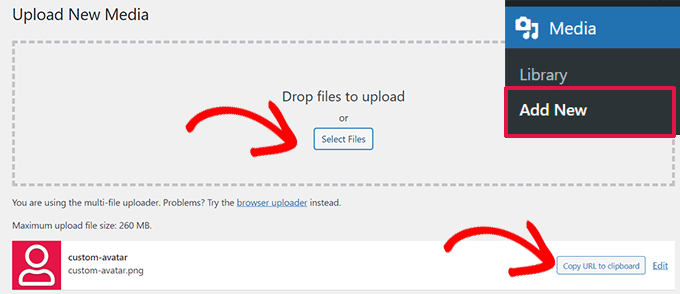
Paste the URL you copied in a text file on your computer, you will need it in the next step.
Now you need to add the following custom code to your website. We suggest using the free WPCode plugin.
add_filter( 'avatar_defaults', 'wpb_new_gravatar' );
function wpb_new_gravatar ($avatar_defaults) {
$myavatar="http://example.com/wp-content/uploads/2017/01/wpb-default-gravatar.png";
$avatar_defaults[$myavatar] = "Default Gravatar";
return $avatar_defaults;
}
Don’t forget to replace $myavatar value with the URL of the custom gravatar image you uploaded earlier.
You can now visit the Settings » Discussion page, and you will notice your custom default avatar added to the default avatar choices.
For detailed instructions check out our tutorial on how to add and change the default gravatar in WordPress.
9. Adding custom CSS to a WordPress Theme
As a WordPress site owner, sometimes you may need to add custom CSS to your site. There are multiple ways to add custom CSS in WordPress. We’ll show you two methods.
1. Add Custom CSS using WPCode (Recommended)
Normally, you can add Custom CSS code in your theme settings. However, your custom CSS will disappear when you change the theme.
What if you wanted to reuse that CSS on this or some other website?
You can solve this by adding your Custom CSS by using the WPCode plugin. It is the best custom code plugin for WordPress and allows you to easily insert custom code and CSS anywhere on your website.
Plus, you can organize your code snippets by giving them names or save them to the cloud library and reuse them on other websites.
First, you need to install and activate the WPCode plugin.
Note: There is also a WPCode free version that you can try. We recommend upgrading to the paid version to unlock more features.
Upon activation, go to Code Snippets » + Add Snippet page and click on the Use Snippet button under ‘Add Your Custom Code (New Snippet)’ label.
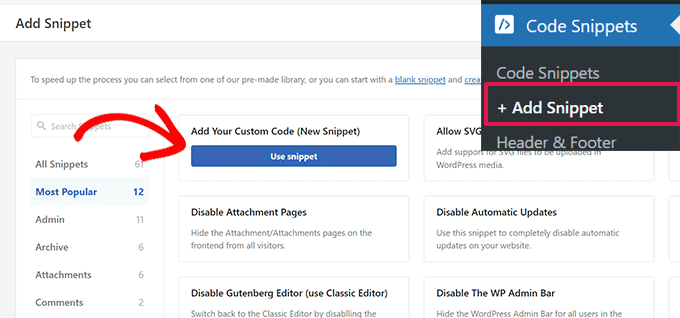
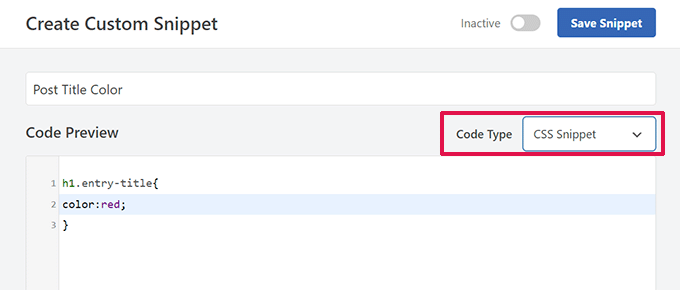
On the next screen, provide a title for your custom CSS snippet and then under the Code Type select CSS Snippet.
After that, you can add your custom CSS code in the Code Preview box.
Scroll down to the Insertion section, from here you can choose where you want to add this custom CSS snippet.
If you want to add it site-wide then you can select Site Wide Header. Once you are finished, don’t forget to click on the Save Snippet button and flick the toggle from Inactive to Active.
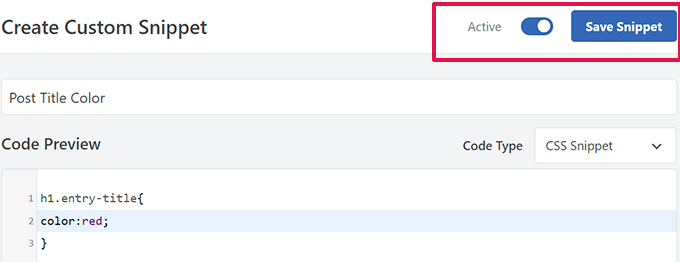
WPCode will now save your Custom CSS and add it to your website according to your settings.
2. Add Custom CSS in Theme Customizer
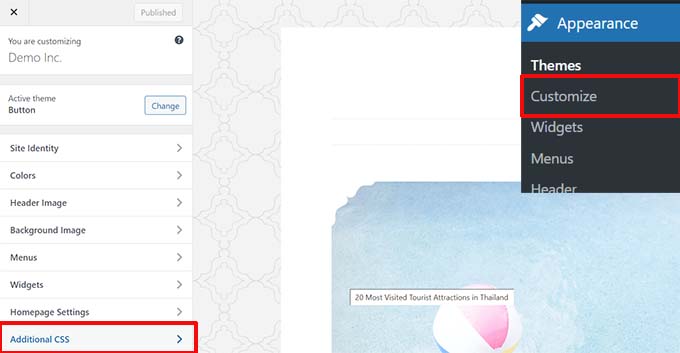
The easiest way to add custom CSS to any WordPress theme is by visiting the Appearance » Customize page in your WordPress admin.
If you cannot see the Customize menu under Appearance, then you can manually visit the Theme Customizer by adding the following URL in your browser’s address bar.
http://yourwebsite.com/wp-admin/customize.php
This will launch the WordPress theme customizer, and you will see your website’s preview in the right panel.
Now click on the ‘Additional CSS’ menu in the left panel to expand it.
You will see a plain text box where you can add your custom CSS.
As soon as you add a valid CSS rule, you can see it applied on your website’s live preview pane.
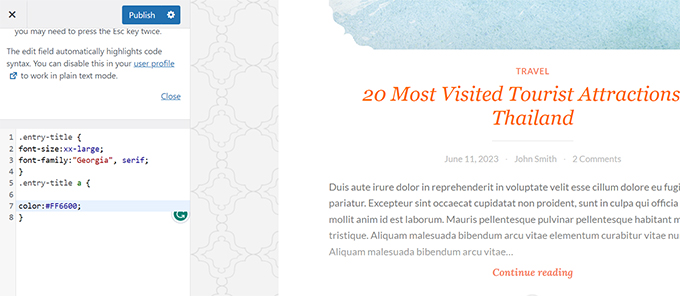
Don’t forget to click on the ‘Save & Publish’ button on the top when you are finished.
For alternate methods and more detailed instructions, check out our beginner’s guide on how to add custom CSS in WordPress.
Note: Some themes, such as Divi from Elegant Themes, also have a spot in the theme options to include Custom CSS. Many of these mirror the Additional CSS section of the Theme Customizer, but we highly recommend choosing only one spot to keep CSS code on your website, whether it’s in WPCode, theme options, or the customizer.
10. Using Inspect Element Tool to Customize WordPress
Adding custom CSS sounds great, but how do you know which CSS classes to edit? How do you debug it without actually having to write CSS?
Using Inspect Element tool, you can edit HTML, CSS, or JavaScript code for any webpage and see your changes live (only on your computer).
For a DIY website owner, these tools can help you preview how a site design would look without actually making the changes for everyone.
Simply point and right-click on any element on a page, then select ‘Inspect’ from your browser’s menu.
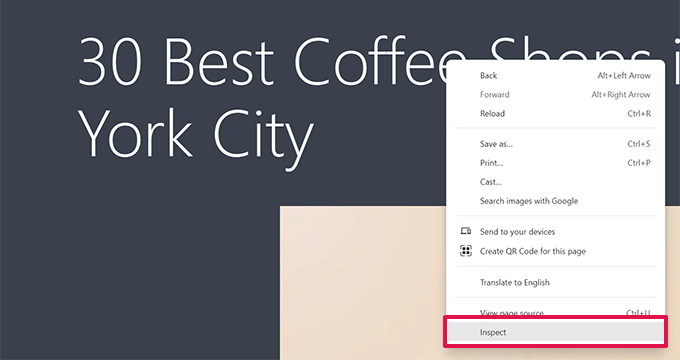
This will split your browser window, allowing you to see the HTML and CSS source code of the page.
You can move your mouse around the code to see the relevant area highlighted in the live preview.
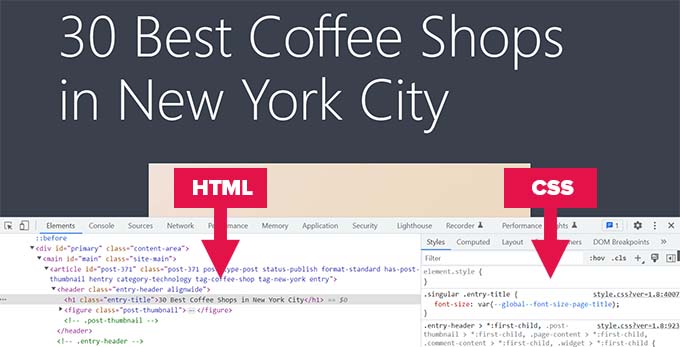
Any changes you make here will be immediately visible on the page above. However, keep in mind that these changes are only happening in your browser and you are not actually editing the page.
This allows you to figure out what you need to edit and how. After that, you can go ahead and change your actual theme files or custom CSS code.
For more on this topic, see our article on the basics of Inspect element and customizing WordPress as a DIY user.
11. Add a Facebook Thumbnail Image
Facebook can automatically pick up an image from your articles when they are shared by you or anyone else. Usually, it picks the featured image of an article. However, sometimes it may pick a random image from the article that may not be suitable.
If you are using All in One SEO plugin, then you can select a Facebook thumbnail image in All in One SEO Settings box on the post edit screen, under the Social tab.
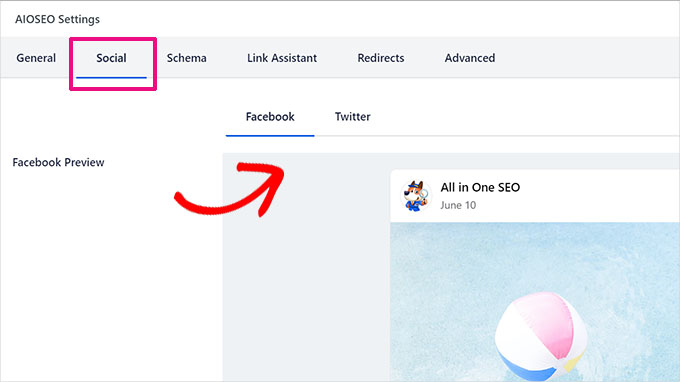
You can also select a default Facebook thumbnail image by visiting the All in One SEO » Social Networks page.
You can upload a custom image or select an image from the media library.
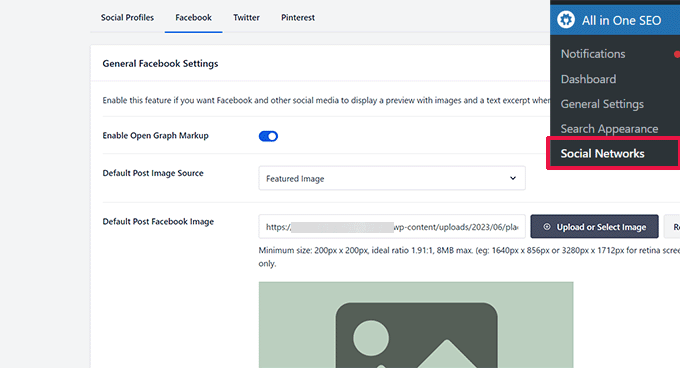
If you scroll further down this settings page, you’ll be able to choose a thumbnail for your homepage as well.
You can see our guide on how to fix the Facebook incorrect thumbnail issue in WordPress for more details.
WordPress RSS feeds show a list of your most recent articles. If you show full articles in the feed, all images inside will be displayed. However, it does not include the featured image or post thumbnail in the article.
To fix this, you can add the following code to your theme’s functions.php file or by using WPCode, which is a safer method and can prevent your site from breaking with minor errors.
function rss_post_thumbnail($content) {
global $post;
if(has_post_thumbnail($post->ID)) {
$content="" . get_the_post_thumbnail($post->ID) .
'
' . get_the_content();
}
return $content;
}
add_filter('the_excerpt_rss', 'rss_post_thumbnail');
add_filter('the_content_feed', 'rss_post_thumbnail');
For more information, see our tutorial on how to add post thumbnails to RSS feeds in WordPress.
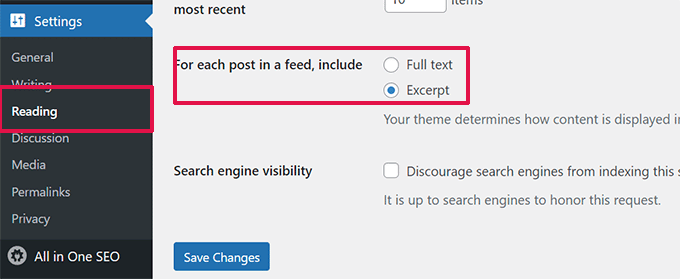
By default, WordPress shows your full article in the RSS feed. This allows content scrapers to automatically fetch and steal your full articles. It also prevents your RSS feed subscribers from visiting your website.
To fix this, head over to Settings » Reading page and scroll down to ‘For each article in a feed, show’ option. Select summary and then click on the save changes button.
14. Add a Click to Call to Button in WordPress
As mobile users make up the bulk of users for most businesses, sometimes a quicker way to contact can help you acquire new customers.
While you must have a contact form on your website, adding a quick button to make an instant call can be much faster for users.
The easiest way to add a click-to-call button is by using the WP Call Button plugin. This free plugin allows you to simply add your business phone number and show a call button on your website.
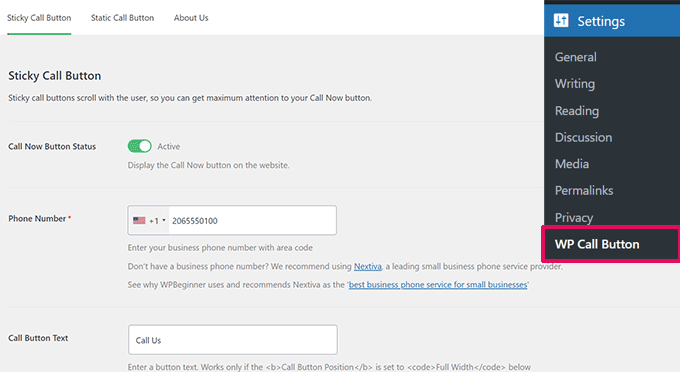
You can choose the button position, color, and where to show it on your website.
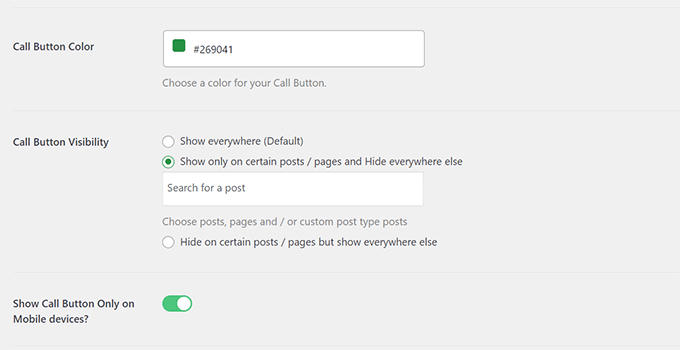
If you don’t want to show the button sitewide, then you can show it on select posts and pages, or turn it on for mobile users only.
Lastly, if you want to strategically place the call button inside your content as a call to action, then you can easily do so with a block or by using the shortcode.
For more details, take a look at our tutorial on how to easily add a click-to-call button in WordPress.
By default, WordPress uses the PHP mail() function to send emails. Many WordPress hosting companies block or limit this function to prevent abuse.
This means you and your users may not be able to receive email notifications from your WordPress site. Some of these notifications are crucial such as lost password emails, new user registration emails, and more.
To fix this, you need to install and activate the WP Mail SMTP plugin. It is the best WordPress SMTP plugin on the market and allows you to send your WordPress emails using the proper SMTP protocol.
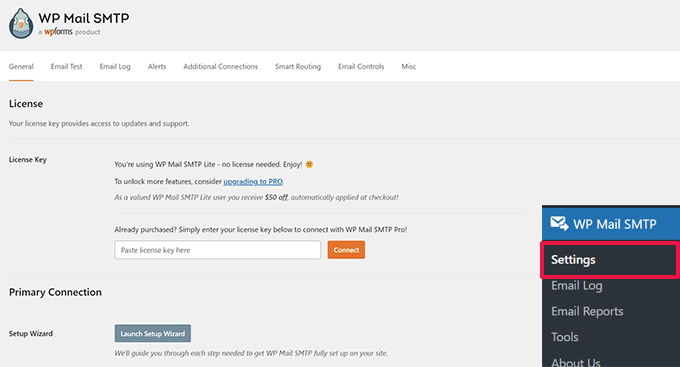
Note: There is also a free version called WP Mail SMTP Lite that you can use. We recommend upgrading to Pro to unlock more features.
For detailed instructions, see our tutorial on how to setup WP Mail SMTP with any host.
16. Add Content to Articles in RSS Feeds
Want to manipulate your WordPress RSS feeds by adding content to your articles visible only to your RSS feed subscribers?
The easiest way to do this is by using All in One SEO for WordPress plugin. It comes with an RSS Content feature that allows you to add content to articles in your RSS feed easily.
First, install and activate the All in One SEO for WordPress plugin. After that, go to All in One SEO » General Settings and switch to the RSS Content tab.
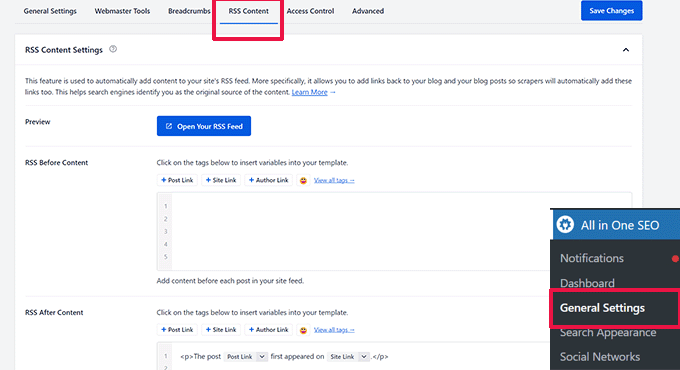
From here, you can add custom content to display before or after each item in your RSS feed.
Alternate Method:
This method requires you to add code to your website, you can use this method if you are not using All in One SEO for WordPress.
Simply add the following custom code snippet to your website using the WPCode plugin (recommended) or your theme’s functions.php file.
function wpbeginner_postrss($content) {
if(is_feed()){
$content="This post was written by Syed Balkhi ".$content.'Check out WPBeginner';
}
return $content;
}
add_filter('the_excerpt_rss', 'wpbeginner_postrss');
add_filter('the_content', 'wpbeginner_postrss');
This code shows the text ‘This post was written by Syed Balkhi’ before an article and ‘Check out WPBeginner’ after the article content.
For more ways to manipulate RSS feed content, see our guide on how to add content to your WordPress RSS feeds.
Have you ever published an article accidentally before it was ready to go live? We have all been there. You can easily just unpublish the article and continue editing it.
However, RSS feed readers and email subscribers may already get it in their inboxes. There is an easy fix to avoid this -delaying posts from appearing in your RSS feed.
Add the following custom code snippet using the WPCode plugin (recommended) or your theme’s functions.php file.
function publish_later_on_feed($where) {

    global $wpdb;

    if ( is_feed() ) {
        // timestamp in WP-format
        $now = gmdate('Y-m-d H:i:s');

        // value for wait; + device
        $wait="10"; // integer

        // http://dev.mysql.com/doc/refman/5.0/en/date-and-time-functions.html#function_timestampdiff
        $device="MINUTE"; //MINUTE, HOUR, DAY, WEEK, MONTH, YEAR

        // add SQL-sytax to default $where
        $where .= " AND TIMESTAMPDIFF($device, $wpdb->posts.post_date_gmt, '$now') > $wait ";
    }
    return $where;
}

add_filter('posts_where', 'publish_later_on_feed');
This code delays your published posts from appearing in the RSS feed for 10 minutes.
For more details, see our article on how to delay posts from appearing in the WordPress RSS feed.
18. Display Social Media Feeds on Your Site
Recent marketing statistics research shows that an average user spends around 2 hours and 29 minutes on social media.
This presents a huge opportunity for you to grow your social media following and bring them back to your website.
The easiest way to build social media following is to promote your social profiles on your website.
To do that, you will need Smash Balloon. It is the best WordPress social media plugin suite on the market and allows you to beautifully promote your social media feeds on your website.
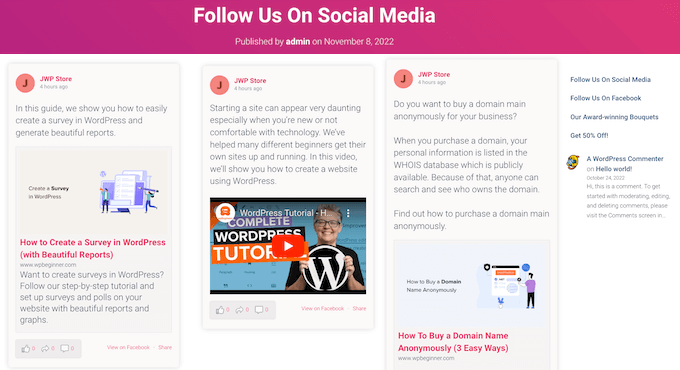
Smash Balloon makes it easy to embed Facebook posts, Tweets, Instagram photos, YouTube videos, combined feeds in a social wall, and more.
For detailed instructions, see our tutorial on how to add social media feeds in WordPress.

Do you want to display image icons next to links in your navigation menu? The easiest solution is to use the Menu Image plugin.
After installing the plugin, simply head over to Appearance » Menu, and you will see the option to add images with each item in your existing menu.
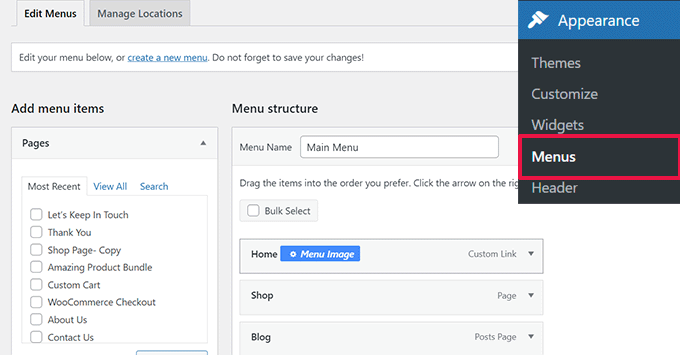
Note: The plugin does not work with Block themes and with the full-site editor.
If, for some reason, you don’t want to use a plugin and would instead do it manually, you can.
First, you need to create the images that you want to use as icons and upload them to your WordPress media library. After that, copy their URLs so that you can use them later.
Adding Navigation Menu Icons in Site Editor
If you are using a block theme then this method is for you. Simply launch the Site Editor by visiting the Appearance » Editor page.
Click on your navigation menu to edit it and then click on a link item in your menu. In the block settings, click on the Advanced tab to expand it and then add a custom CSS class.
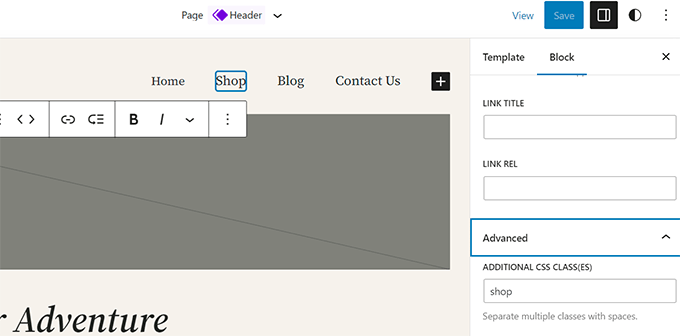
After that, click on the Style icon at the top, this will open the Style Editor.
Click on the three-dot menu in the panel and then select Additional CSS.
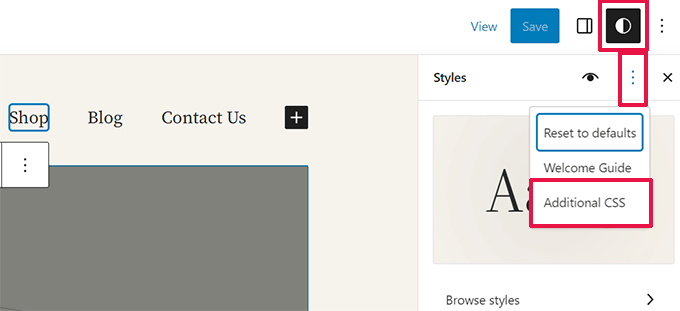
Next, you need to add the following custom CSS to your theme.
.shop {
background-image:url('https://example.com/wp-content/uploads/2023/06/cart-icon.png');
background-position:left;
background-repeat:no-repeat;
padding-left:30px!important;
}
Don’t forget to replace the background-image URL with your own image icon and adjust the padding to your own requirements.
Adding Navigation Menu Icons in Classic Themes
First, you need to visit the Appearance » Menus page and then click on the Screen Options button at the top right corner of the screen.
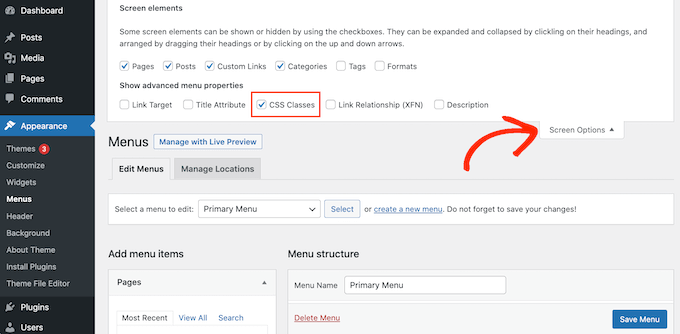
This will bring down a menu where you need to check the box next to CSS classes option.
After that scroll down to your navigation menu and click on an item to expand it. You will see an option to add CSS classes. Enter a different CSS class for each menu item.
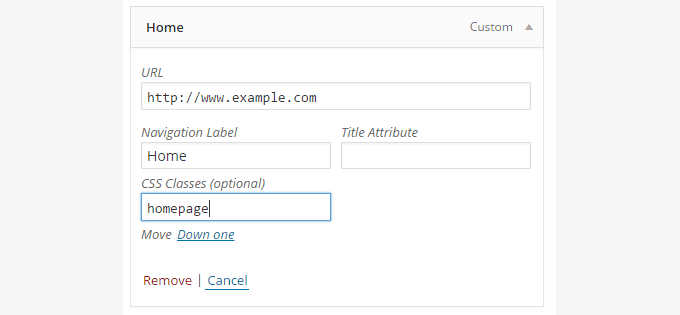
Don’t forget to click on the save menu button to store your changes.
Next, you need to upload the image icons to your WordPress site by visiting Media » Add Media page. After uploading the image files copy their URLs as you will need them in the next step.
Now you can add an image icon to your navigation menu by adding custom CSS. Here is a sample CSS that you can use as a starting point.
.homepage {
background-image: url('http://www.example.com/wp-content/uploads/2014/12/home.png');
background-repeat: no-repeat;
background-position: left;
padding-left: 5px;
}
Don’t forget to replace the image URL with your own image file URL.
Sometimes you may need to make a navigation menu link open in a new window. However, you may not be able to notice the option to do that when adding links.
Opening Navigation Menu Link in New Window in Site Editor
If you are using a block theme on your website, then this method is for you.
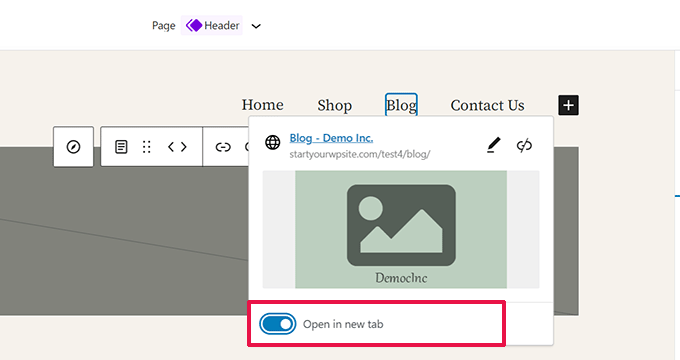
Simply go to Appearance » Editor to launch the site editor. After that, click on the link you want to open in a new window.
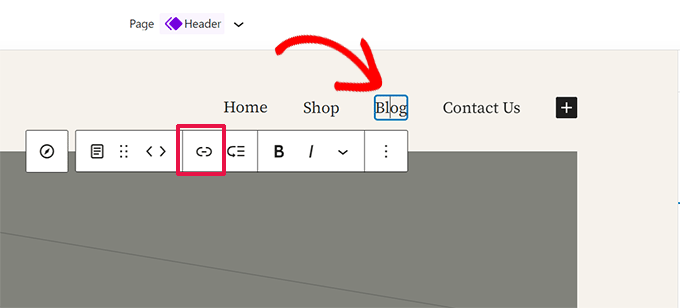
In the block toolbar click on the Link button to edit that link.
This will reveal link settings. From here click to slide the toggle next to the ‘Open in new tab’ option.
Opening Navigation Menu Link in New Window in Classic Themes
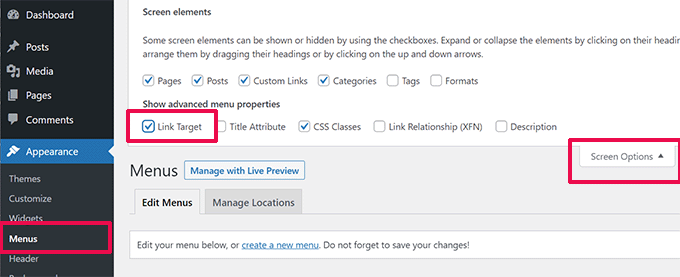
Actually, the option is hidden to remove clutter from the screen.
You will need to click on the screen options button at the top right corner of the screen and check the ‘link target’ option.
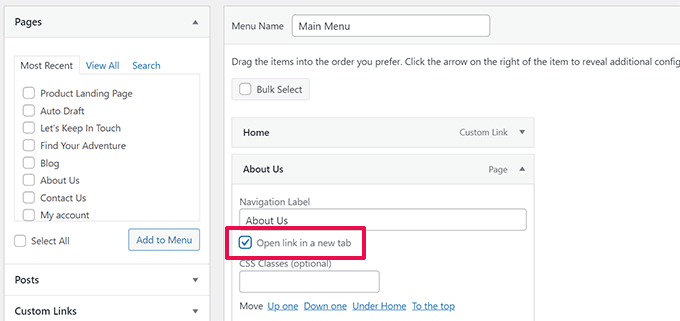
Next, you need to scroll down to the menu item that you want to open in a new window.
Click on the menu item to expand it, and you will see the option to open the link in a new tab.
Don’t forget to click on the save menu button to store your changes.
21. Add Full-Screen Search Overlay in WordPress
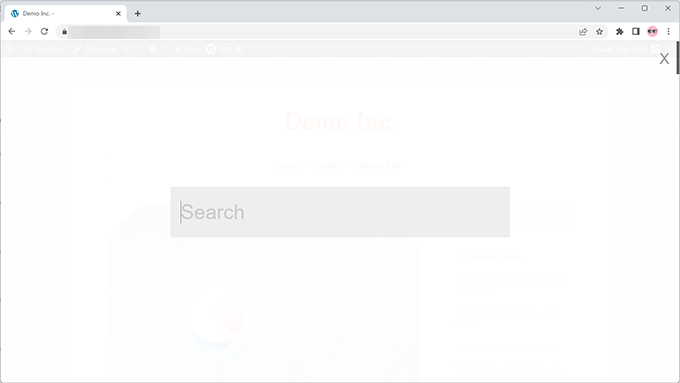
If you click on the search icon at the top right corner of any page on WPBeginner, then you will notice a full-screen search overlay appear. It improves the search experience and makes it more engaging.
You can add this to your WordPress site as well. The easiest way to do this is by installing and activating the WordPress Full Screen Search Overlay plugin.
The plugin works out of the box and there are no settings for you to configure.
Upon activation, it turns any default WordPress search form field into a full-screen search overlay.
For more details, see our guide on how to add a full-screen search overlay in WordPress.
Bonus Tip: Just adding the fullscreen search overlay wouldn’t affect the quality of search results. The default WordPress search is not effective at all.
You can immediately upgrade the quality of search results on your WordPress site by installing the SearchWP plugin. It is the best WordPress search plugin on the market that allows you to add your own search engine to WordPress.
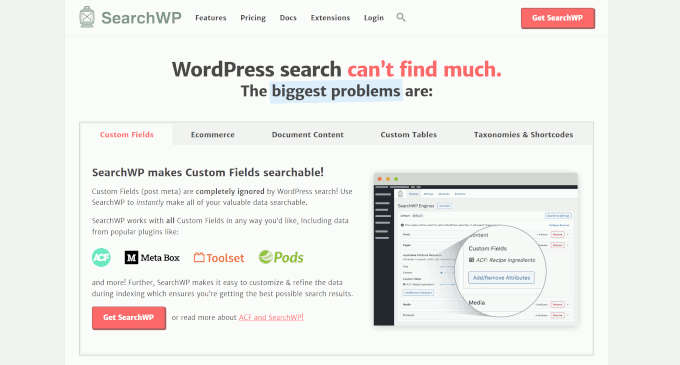
The best part is that it works seamlessly and will automatically replace the default WordPress search feature.
For details, see our article on how to improve WordPress search with SearchWP.
A sticky floating navigation menu stays on top of the screen as a user scrolls down. Some WordPress themes have this feature as an option in their settings. If your theme doesn’t have this option, then you can try this method.
First, you need to install and activate the Sticky Menu (or Anything!) on Scroll plugin.
Upon activation, go to the plugin’s settings page located under Settings » Sticky Menu (or Anything!). Add the CSS class of your navigation menu and save changes.
For detailed instructions, see our tutorial on how to create a sticky floating navigation menu in WordPress.
23. Add Multiple Authors to a WordPress Post
Do you want to credit multiple authors for an article on your website? By default, WordPress posts are assigned to a single author. However, if you often need to credit multiple authors, then there is an easier way to do this.
You will need to install and activate the Co-Authors Plus plugin.
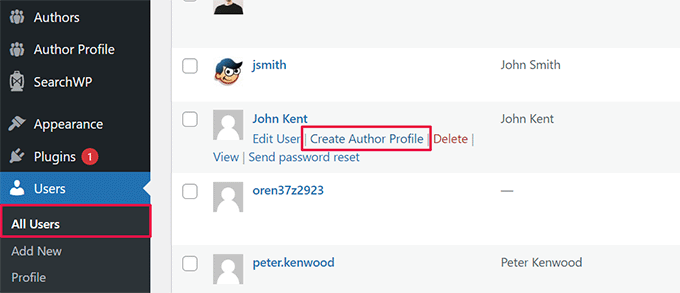
After that, go to Users » All Users page and click on the ‘Create Author Profile’ link below a user that you want to add as co-author.
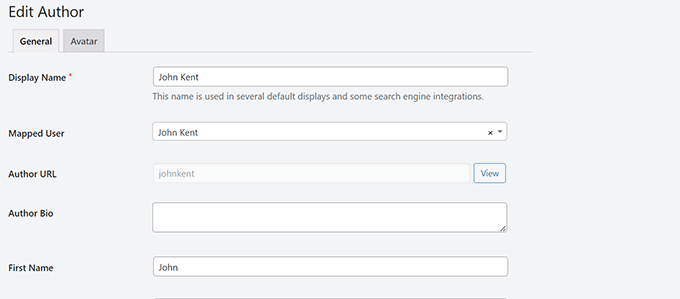
On the next screen, you can set up the user’s profile as an author on your website. The plugin even allows you to upload a custom author image.
Once finished, don’t forget to click on the Update button to save your changes.
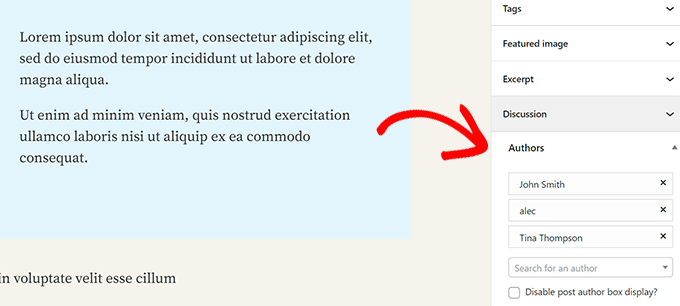
Now go ahead and edit the post or page where you want to credit multiple authors.
On the post edit screen, you will notice the new ‘Authors’ tab under the post settings panel.
24. Add Categories to WordPress Pages
Want to add categories and tags to pages in WordPress? By default, they are only available for posts. Mainly, because pages are supposed to be static standalone content (see difference between posts and pages in WordPress).
If you want to add categories and tags, then simply add the following custom code snippet using the WPCode plugin or your theme’s functions.php file.
// add tag and category support to pages
function tags_categories_support_all() {
  register_taxonomy_for_object_type('post_tag', 'page');
  register_taxonomy_for_object_type('category', 'page');
}

// ensure all tags and categories are included in queries
function tags_categories_support_query($wp_query) {
  if ($wp_query->get('tag')) $wp_query->set('post_type', 'any');
  if ($wp_query->get('category_name')) $wp_query->set('post_type', 'any');
}

// tag and category hooks
add_action('init', 'tags_categories_support_all');
add_action('pre_get_posts', 'tags_categories_support_query');
25. Create a Local WordPress Site on Your Computer
Many WordPress site owners and developers install WordPress on their computers. Doing so will allow you to develop a WordPress site locally, try plugins and themes, and learn WordPress basics.
We have created detailed step-by-step instructions on how to install WordPress on your Windows computer or on Mac.
Comments provide an easier way for users to engage with content on your website. Showing the total number of comments can be used as social proof and encourage more users to participate in discussions.
The easiest way to do this is by installing the Simple Blog Stats plugin. Upon activation, you can add [sbs_apoproved] shortcode to any post or page to display the total number of comments.
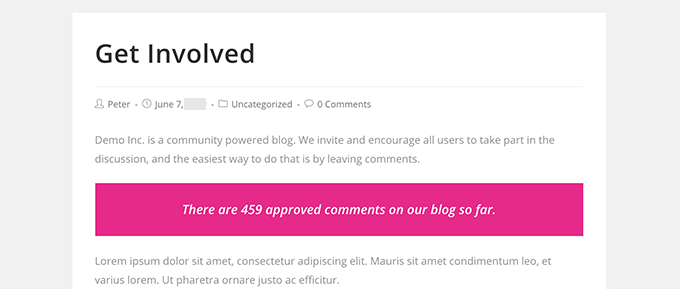
For a code method and more instructions, see our article on how to display total number of comments in WordPress.
27. Show Total Number of Registered Users in WordPress

If you allow users to register on your WordPress site, then showing the total number of registered users can encourage more users to signup.
The easiest way to do this is by installing the Simple Blog Stats plugin. Upon activation, you can add [sbs_users] shortcode to any post or page to display total number of registered users.
For more detailed instructions, see our tutorial on how to show total number of registered users in WordPress.
28. Create New Image Sizes in WordPress
When you upload an image to your blog, WordPress automatically creates several copies of the image. Your WordPress theme and plugins can also add new image sizes.
To create new image sizes in WordPress, you need to add the following custom code snippet using the WPCode plugin or your theme’s functions.php file.
add_image_size( 'sidebar-thumb', 120, 120, true ); // Hard Crop Mode
add_image_size( 'homepage-thumb', 220, 180 ); // Soft Crop Mode
add_image_size( 'singlepost-thumb', 590, 9999 ); // Unlimited Height Mode
This code adds three new image sizes. Don’t forget to change image size names and dimensions to your own requirements.
For more information, see our tutorial on how to create new image sizes in WordPress.
29. Easily Set up Redirects in WordPress
If you have been working on your website for some time now, then you may occasionally want to change URLs or merge content.
However, this could create a 404 error on the older content if you delete it. There are also SEO concerns, such as how do you tell search engines that this content has moved to a new location?
This is where 301 redirects come in. This allows you to automatically redirect visitors to new posts while telling search engines that the content has moved to this new location.
There are many ways to set up redirects, but the easiest and safest way to do this is by using All in One SEO for WordPress.
All in One SEO for WordPress comes with a redirects manager that helps you easily set up all types of redirects on your WordPress site.
First, you need to install and activate the All in One SEO for WordPress plugin.
Note: You’ll need at least PRO plan of the plugin to unlock the Redirection manager.
Upon activation, you need to visit All in One SEO » Redirects page. Add your old article URL under the Source URL and your new location under the Target URL fields.
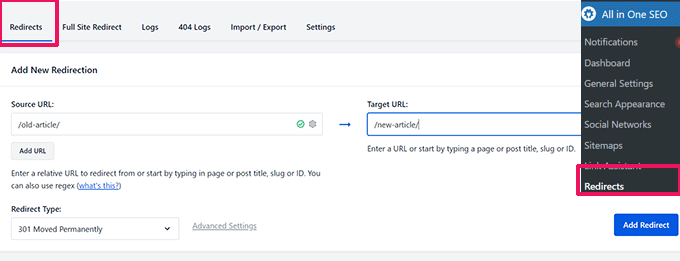
Choose 301 Moved Permanently under the Redirect Type and click on the Add Redirect button to save your settings.
For more details, see our tutorial on how to create 301 redirects in WordPress.
30. Convert Categories to Tags or Vice Versa
Often folks are not clear about how to properly use categories and tags in WordPress. Sometimes you may end up creating categories that should have been tags or vice versa.
It is easily fixable.
Head over to Tools » Import page and then install Categories and Tags Converter.
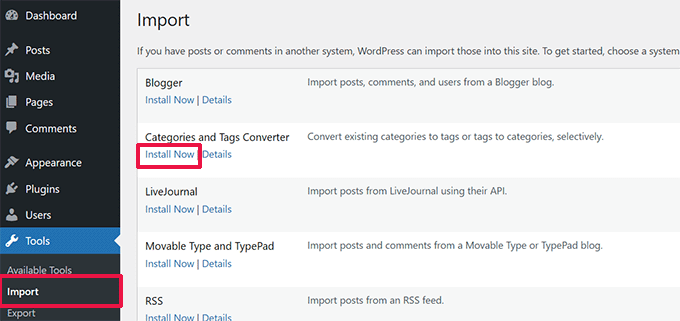
After installation, click on the run importer link to continue.
On the converter page, you can switch between categories to tags or tags to categories converter. Next, select the items you want to convert and then click on the convert button.

31. Bulk Move Posts Between Categories and Tags
Sometimes you may want to bulk-move posts between categories and tags. Doing that one by one for each post can be time-consuming.
Actually, there is a plugin for that. Simply install and activate the Bulk Move plugin. Upon activation, you need to go to Tools » Bulk Move to move your posts.
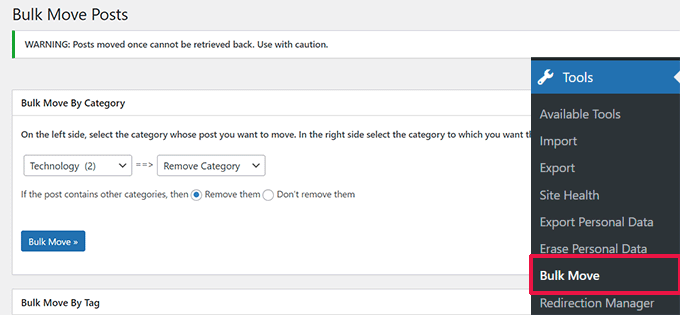
For more detailed instructions, visit our tutorial on how to bulk-move posts to categories and tags in WordPress.
32. Display Last Updated Date of Your Posts
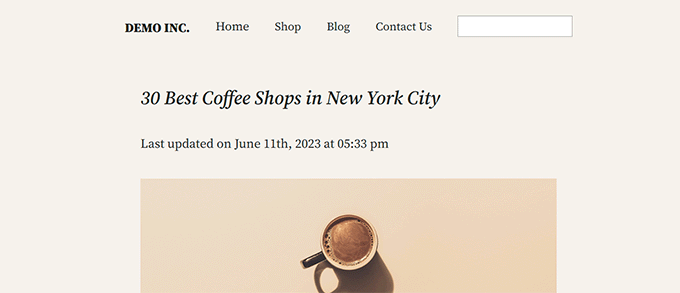
By default, most WordPress themes will show the date when an article was published. This is fine and would work for most websites and blogs.
However, if you regularly update your old content, then you may want to show your users when an article was last updated. Otherwise, you users wouldn’t notice that the article contains current information.
This can be achieved by adding the following code to add the following custom code snippet using the WPCode plugin or your theme’s functions.php file.
function wpb_last_updated_date( $content ) {
$u_time = get_the_time('U');
$u_modified_time = get_the_modified_time('U');
if ($u_modified_time >= $u_time + 86400) {
$updated_date = get_the_modified_time('F jS, Y');
$updated_time = get_the_modified_time('h:i a');
$custom_content .= 'Last updated on '. $updated_date . ' at '. $updated_time .'
';
}
$custom_content .= $content;
return $custom_content;
}
add_filter( 'the_content', 'wpb_last_updated_date' );
For more detailed instructions see our guide on how to display last updated date in WordPress.
33. How to Display Relative Dates in WordPress
Want to display relative dates like yesterday, 10 hours ago, or a week ago for your posts in WordPress? Relative dates give users a sense of how much time has passed since something was posted.
To add relative dates, you need to install and activate the Meks Time Ago plugin. Upon activation, you need to visit Settings » General page and scroll down to ‘Meks Time Ago Options’ section.
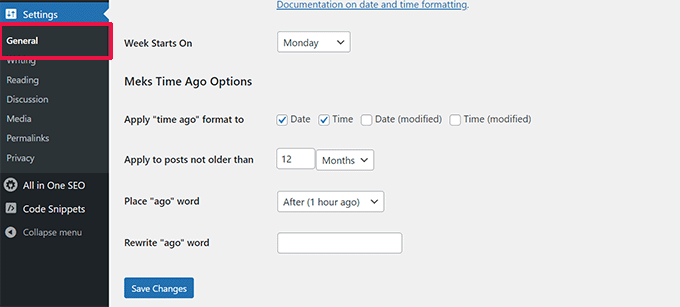
You can select when to use time ago and how to display it. Don’t forget to click on the save changes button to store your settings.
For more details, see our guide on how to display relative dates in WordPress.
34. Remove WordPress Version Number
By default, WordPress adds the WordPress version to your website’s header. Some people think it’s a security liability. Our answer to this is simple: keep WordPress updated.
However, if you want to remove the WordPress version number, simply add the following custom code snippet using the WPCode plugin or your theme’s functions.php file.
function wpbeginner_remove_version() {
return '';
}
add_filter('the_generator', 'wpbeginner_remove_version');
For more information on this topic see our article on the right way to remove WordPress version number.
35. Update WordPress URLs when Not Able to Access WP-Admin
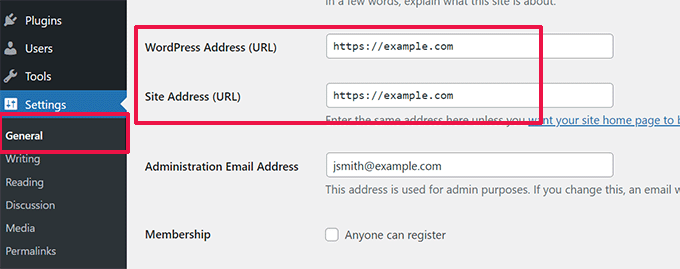
Sometimes when moving a WordPress site to new domain or due to a misconfiguration you may need to update WordPress URLs.
These URLs tell WordPress where to display your site and where WordPress core files are located. Incorrect settings can lock you out of WordPress admin area or redirect you to the old website.
The easiest way to update WordPress URLs is by adding the following custom code snippet using the WPCode plugin or your theme’s functions.php file.
update_option( 'siteurl', 'http://example.com' );
update_option( 'home', 'http://example.com' );
Don’t forget to replace example.com with your own domain name.
Once you access your WordPress site go to Settings » General page and update the URLs there. After that, you need to remove the code you added to the functions file.
If you also need to update URLs in your posts and pages, then see our guide on how to properly update URLs when moving your WordPress site.
36. Deactivate All Plugins When Not Able to Access WP-Admin
When troubleshooting WordPress errors, you will be often asked to deactivate all WordPress plugins. You can just go to Plugins in your dashboard and deactivate all plugins. But what if you are locked out of your WordPress site?
Here is how you can easily deactivate plugins when locked out of the admin area.
First, connect to your WordPress site using an FTP client and go to your /wp-content/ folder. Inside it, you will find the /plugins folder.
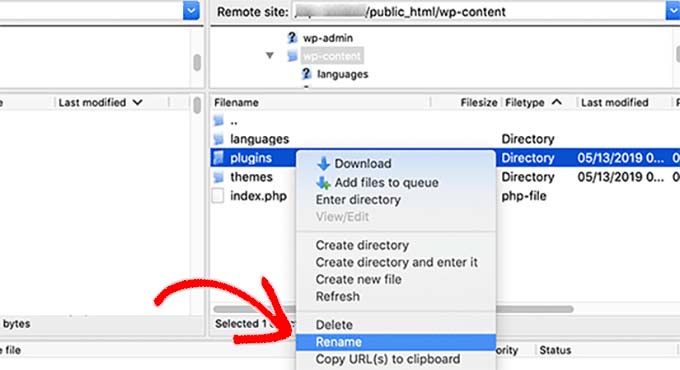
Now you just need to rename the plugins folder to plugins.old and WordPress will automatically deactivate all plugins.
For alternate methods and more information see our guide on how to deactivate all plugins when not able to access wp-admin.
37. Make a Custom 404 Error Page
A 404 error occurs when users type in the wrong address or the address does not exist on your website.
By default, your WordPress theme will then use its 404 error template to display the error.
However, these pages are often quite useless and leave users clueless about what they should do next.
You can fix this by making your own custom 404 error page without writing any code. Doing so will allow you to point users to other useful content on your website.
First, you need to install and activate the SeedProd plugin. It is the best WordPress page builder on the market and allows you to easily create custom pages, landing pages, and even complete WordPress themes without writing code.
Upon activation, go to SeedProd » Landing pages and click on the Set up a 404 Page button.
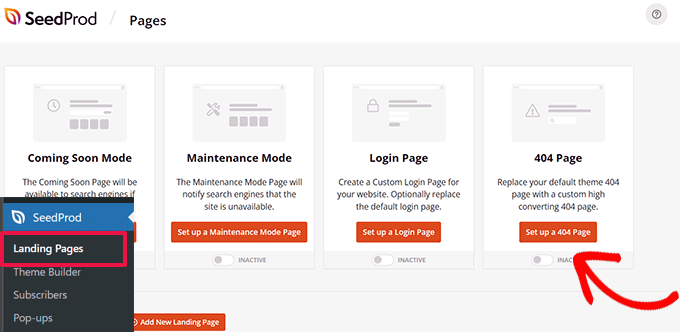
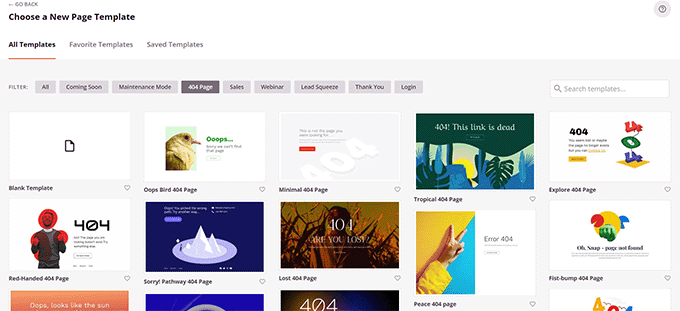
Next, the plugin will ask you to choose a template for your 404 page.
SeedProd comes with a bunch of beautiful 404 page templates that you can use as a starting point.
After that, you will enter the SeedProd page builder.
It is an intuitive design tool where you can simply drag and drop blocks and edit them with point and click.
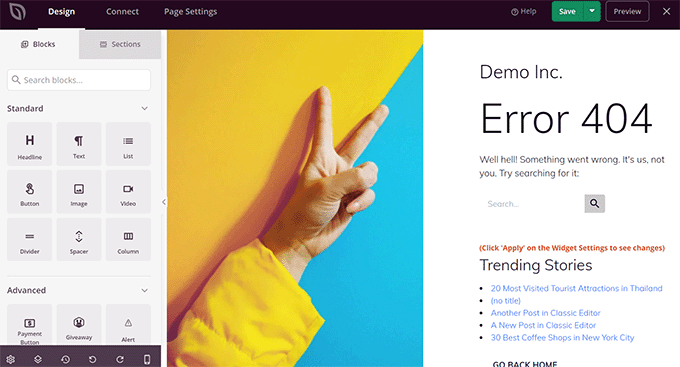
You can add a search form, your most popular articles, top-selling products, or anything you want.
Once you are finished, simply click on the Save and Publish button at the top.
For more details, see our tutorial on how to improve 404 page in WordPress.
38. Include Category in Post URLs
You may have noticed that many WordPress sites use categories in their post URLs. This allows them to add more useful information into a URL which is good for user experience as well as SEO.
If you want to add a category name into your WordPress post URLs, then head over to Settings » Permalinks page. Click on the custom structure and add /%category%/%postname%/ in the field next to it.
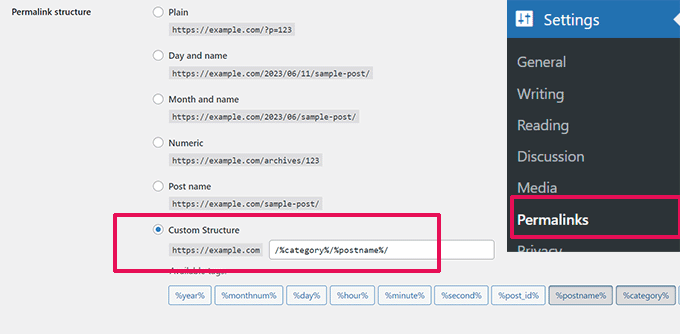
Don’t forget to click on the save changes button to store your settings.
To learn more about how WordPress will handle subcategories and multiple categories, see our guide on how to include categories and subcategories in WordPress URLs.
39. Display Random Posts in WordPress
Want to display random posts in your WordPress sidebar? Random posts give your users a chance to discover articles that they would otherwise never get to see.
First, you need to add the following custom code snippet using the WPCode plugin or your theme’s functions.php file.
function wpb_rand_posts() {

$args = array(
    'post_type' => 'post',
    'orderby'   => 'rand',
    'posts_per_page' => 5,
    );

$the_query = new WP_Query( $args );

if ( $the_query->have_posts() ) {

$string .= '- ';
while ( $the_query->have_posts() ) {
$the_query->the_post();
$string .= '
- '. get_the_title() .' '; } $string .= '
After that, you can use the [wpb-random-posts] shortcode in your posts, pages, or sidebar widgets to display random posts.
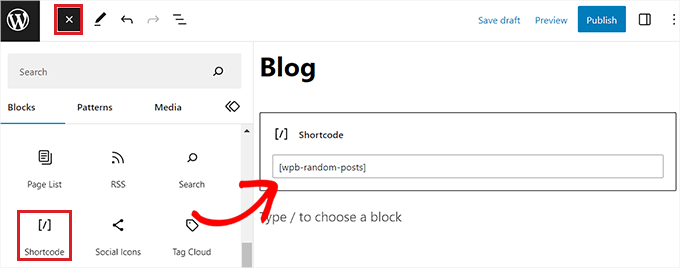
For an alternate method, see our guide on how to display random posts in WordPress.
40. Allow User Registration on Your WordPress Site
WordPress comes with a powerful user management system with different roles and capabilities. If you want to allow users to register on your site, here is how you would turn on that feature.
Head over to Settings » General page and click on the check box next to Membership option. Below that, you need to choose the default role that will be assigned to new users, if you are unsure, then use subscriber.

For more details see our guide on how to allow user registration on your WordPress site.
41. Create a Custom User Registration Form in WordPress
When you open user registration on your site, users will be using the default WordPress registration form. You can replace it with a custom user registration form for an improved user experience.
First, you will need to install and activate the WPForms plugin. You will need at least the Pro plan to get access to the user registration addon.
Upon activation, go to WPForms » Addons page to install and activate the user registration addon.
After that, create a new form by visiting WPForms » Add New page. This will launch the WPForms builder, where you need to select the User Registration Form as your template.
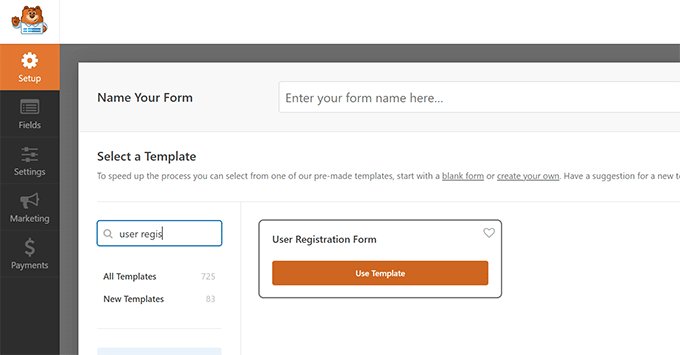
After creating your form you need to click on the embed button to copy the embed code. Now you can add this code to any WordPress post or page to display your custom user registration form.
For more detailed instructions, see our guide on how to create a custom user registration form in WordPress.
Sometimes you may need to exclude specific categories from your WordPress RSS feed. Doing so will hide posts filed under those categories from appearing in your RSS feeds.
Simply add the following custom code snippet using the WPCode plugin or your theme’s functions.php file.
function wpcode_snippets_exclude_feed_category( $query ) {
	if ( $query->is_feed ) {
		// Replace 15 with the desired category id you want to exclude.
		$query->set( 'cat', '-15' );
	}
}
add_action( 'pre_get_posts', 'wpcode_snippets_exclude_feed_category' );
Don’t forget to replace 15 with the ID of the category that you want to exclude.
For more details and alternate methods, see our tutorial on how to exclude specific categories from RSS feeds in WordPress.
43. Change Excerpt Length in WordPress
The default WordPress excerpt length is often too short to describe a post’s summary. To change excerpt length you can add the following custom code snippet using the WPCode plugin or your theme’s functions.php file.
// Changing excerpt length
function new_excerpt_length($length) {
return 100;
}
add_filter('excerpt_length', 'new_excerpt_length');

// Changing excerpt more
function new_excerpt_more($more) {
return '...';
}
add_filter('excerpt_more', 'new_excerpt_more');
If you do not want to mess with code, then see our guide on how to customize WordPress excerpts (no coding required).
44. Display Dynamic Copyright Date in WordPress
To add a copyright date to your WordPress site’s footer, you can edit the footer template in your theme and add a copyright notice.
However, the year that you use in the code will need to be manually updated next year.
Instead, you can use the following code to dynamically display the current year in your copyright notice.
© 2009 – YourSite.com
For more advanced solutions, check out our article on how to add dynamic copyright dates in WordPress.
45. How to Change a User Name in WordPress
WordPress allows you to easily change the name of a user, but you cannot change the username. There are two ways of doing this.
The easiest way is by using a plugin called Easy Username Updater. Upon activation, simply go to the Users » Username Updater page and then click the ‘update’ link next to the username you want to change.

Now you simply enter the new username and then click the ‘Update Username’ button.
If you’d like to notify the user about the change, then make sure you check the ‘Send User Notification’ box first.
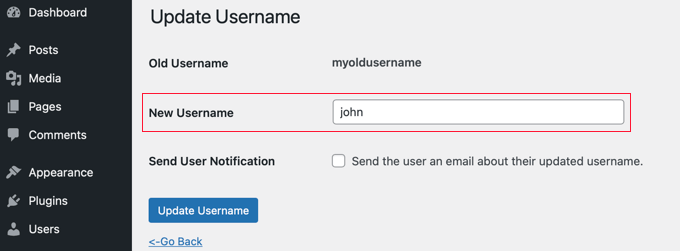
For alternate methods, see our article on how to change your WordPress username.
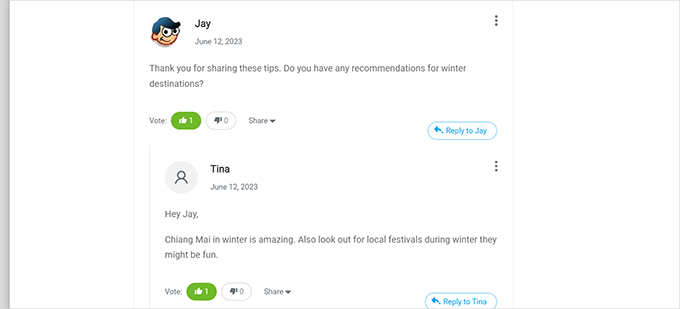
Have you seen how many popular sites like YouTube allow users to like and dislike comments? This brings more user engagement to the discussion on your website.
First, you need to install and activate the Thrive Comments plugin. It is the best WordPress comments plugin and helps you boost engagement on your website.
It adds comment voting, badges, social sharing, and other conversational features to your WordPress comments.
Upon activation, you need to visit Thrive Dashboard » Thrive Comments page and click on the Voting and Badges tab to expand it.
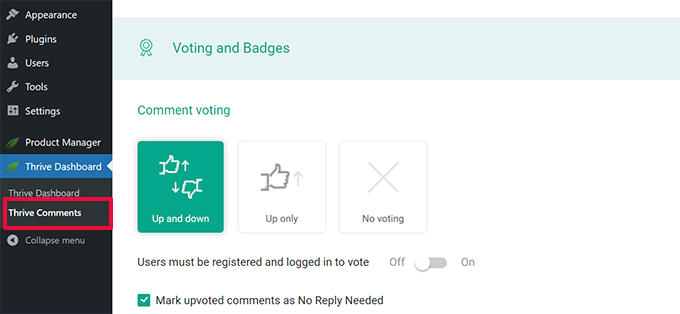
From here, you can choose the ‘Up and Down’ in Thrive Comments which will let users Like or Dislike comments. After that, don’t forget to save your changes.
You can now check your WordPress comments to see these options in action.
47. Duplicate a WordPress Post or Page
The manual way to duplicate a post is by creating a new post or page and then copying the content from the old one. However, this wouldn’t copy the post settings like categories, featured images, tags, etc.
The more efficient way to do this is by using the Duplicate Post plugin. Simply install and activate the plugin and then go to Posts » All Posts page.
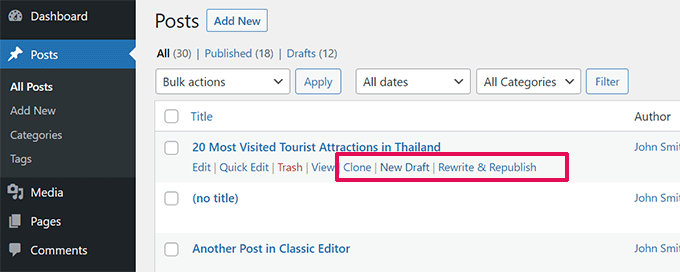
You will see the option to clone a post or create a new draft.
For more detailed instructions, see our article on how to easily duplicate posts and pages in WordPress with a single click.
48. Allow Users to Submit Posts to Your WordPress Site
Authors on your WordPress site can just log in to their accounts and write posts. But what if you wanted your users to be able to submit posts directly without creating an account?
The best way to do this is by creating a blog post submission form.
You will need to install and activate the WPForms plugin. You will need the pro version of the plugin to access the post-submission addon.
Upon activation, go to WPForms » Addons page to download and activate the post submissions addon.
After that you can go to WPForms » Add New page and then select ‘Blog post submission form’ as your template.
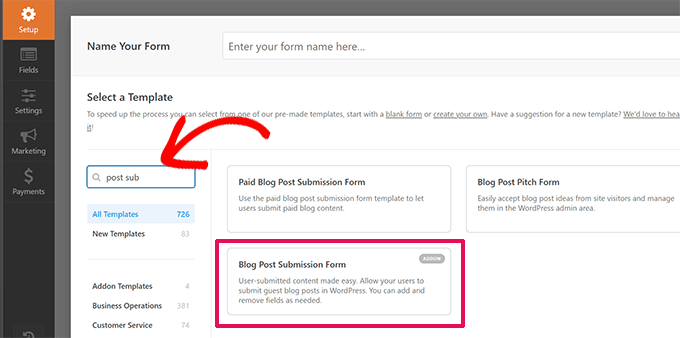
Once you are done editing the form click on the embed button to copy the form embed code. Now you can paste this code in any WordPress post or page to display a blog post submission form.
Posts submitted by users will be stored in your WordPress posts as Pending Review. You can then review, edit and publish them.
For more detailed instructions, take a look at our guide on how to allow users to submit posts to your WordPress site.
WordPress automatically sends email notifications when someone leaves a comment or when a comment is awaiting moderation. This is exciting when you first start your blog, but it becomes very annoying after a short while.
The good news is that you can easily turn these notifications off. Visit the Settings » Discussion page on your WordPress admin and then scroll down to ‘Email Me Whenever’ section. Uncheck both options and then click on the save changes button.

50. Change Sender Name in Outgoing WordPress Emails
By default, when WordPress sends an email notification it uses ‘WordPress’ as the sender name. This looks a bit unprofessional, and you may want to change it to a real person or your website title.
The easiest way to do this is by using the WP Mail SMTP plugin. It is the best WordPress SMTP plugin that improves your WordPress email deliverability.
Simply install the WP Mail SMTP plugin and then go to WP Mail SMTP » Settings. From here, you change the sender name in the ‘From Name’ field.
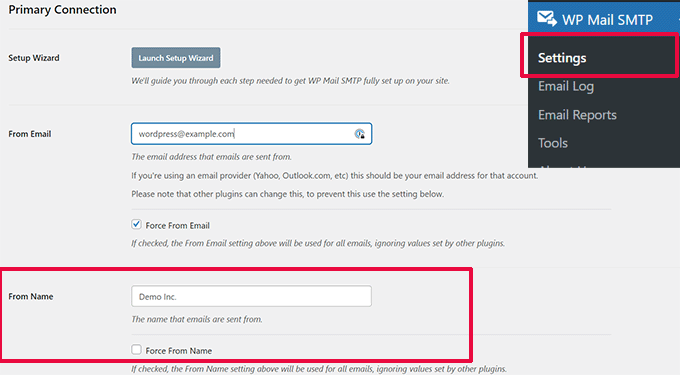
For a code method and more details, see our guide on how to change the sender name in outgoing WordPress emails.
51. Changing the Author of a WordPress Post
Changing the author of a post is quite straightforward. Simply edit the post and select the new author from the Author drop-down menu under the Summary tab.
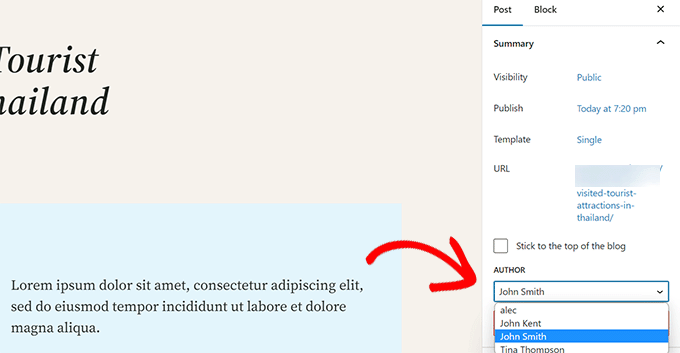
After that, don’t forget to Save or Update the post to store your changes.
On the other hand, if you have disabled the block editor and are using the Classic Editor, then the author option may be hidden on your screen.
You will need to edit the post where you want to change the author name and then click on the Screen Options button at the top right corner of the screen. Check the box next to the ‘Author’ option.
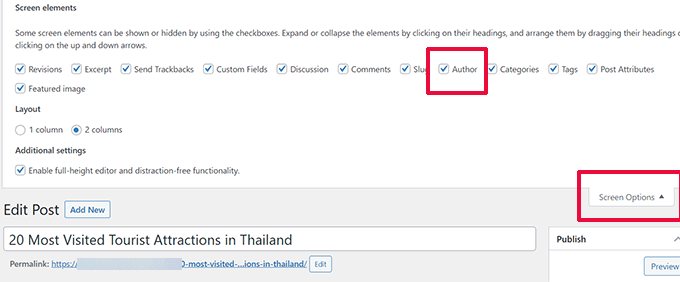
This will display the author meta box on the post edit screen where you can select a different author for the post.
For more details, check out our article on how to change the author of a post in WordPress.
52. Rearrange Post Edit Screen in WordPress
Sometimes you may feel that categories are located too far down on the post edit screen, or maybe the Featured Image box should be higher.
Many users don’t notice it for a while but all the boxes on the post edit screen are quite flexible. You can click to collapse them and even drag-and-drop them to arrange the screen to your liking.
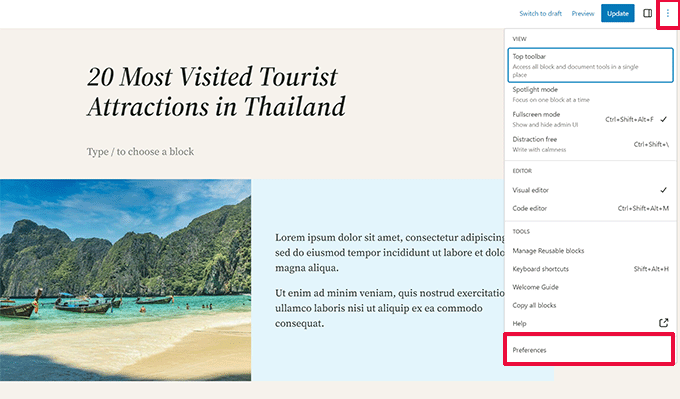
This will bring up a popup where you can choose to show / hide panels in the default editor.
To learn more, see our tutorial on how to rearrange the post edit screen in WordPress.
53. Change Number of Posts Shown on Blog Pages
By default, WordPress shows 10 posts on your blog pages and archives. You can change that to any number you want.
You will need to visit the Settings » Reading page and then scroll down to ‘Blog pages show at most’ option. Enter the number of posts you want to display, then click the save changes button.
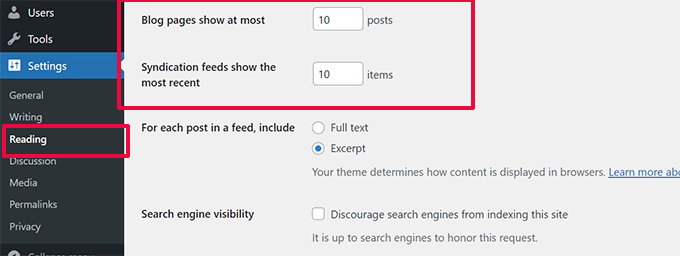
54. Automatically Close Comments on Old Articles
Sometimes you would notice that some very old posts on your site start getting regular spam comments for no apparent reason. One way to deal with this is by closing comments on older articles.
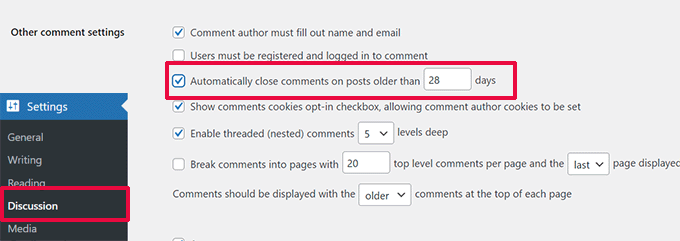
WordPress allows you to automatically turn off comments on old articles. You need to visit the Settings » Discussion page in your admin panel and then scroll down to ‘Other comment settings’ section.
Simply check the box next to ‘Automatically close comments on posts older than X days’ and replace the number with however long you want users to be able to leave comments.
To learn how to deal with spam comments, see these tips to combat comment spam in WordPress.
55. Split Long Posts into Pages
Want to split lengthy posts into pages so that users can easily navigate them without scrolling too much? WordPress makes it super easy, just add the following code where you want to split a post into the next page.
WordPress will add a page break at this point and the rest of the post will appear on the next page. You can add the same code again when you want to start another page, and so on.
For more detailed instructions see our guide on how to split WordPress posts into multiple pages.
That’s all for now! We hope this article helped you find some new WordPress tips, tricks, and hacks. You may also want to see our ultimate guide to boost WordPress speed and performance.
If you liked this article, then please subscribe to our YouTube Channel for WordPress video tutorials. You can also find us on Twitter and Facebook.

