Do you want to display taxonomy images or category icons in WordPress?
By default, WordPress does not come with an option to upload a taxonomy image or category icon. It simply just displays a category or taxonomy name on the archive pages.
In this article, we’ll show you how to easily add taxonomy images or category icons in WordPress. We’ll also show you how to display taxonomy images on your archive pages.
Why Add Taxonomy Images in WordPress?
By default, your WordPress website does not come with an option to add images for your taxonomies like categories and tags (or any other custom taxonomy).
It simply uses taxonomy names everywhere including the category archives or taxonomy archive pages.

This looks kind of plain and boring.
If you get a lot of search traffic to your taxonomy pages, then you may want to make them look more engaging.
The easiest way to make a page more interesting is by adding images. You can add taxonomy images or category icons to make these pages more user-friendly and engaging.
A good example of it is a site like NerdWallet that uses category icons in their header:

You can also use it create beautiful navigational sections on your homepage like Bankrate:

That being said, let’s take a look at how to easily add taxonomy images in WordPress.
Easily Add Taxonomy Images in WordPress
First thing you need to do is install and activate the Categories Images plugin. For more details, see our step-by-step guide on how to install a WordPress plugin.
Upon activation, you can simply go to the Posts » Categories page. You’ll notice the plugin will be showing a placeholder image for your existing categories.

To choose your own category icon, you need to click on the Edit link below a category.
On the Edit category page, scroll down to the bottom and you’ll find a form to upload your own taxonomy image.
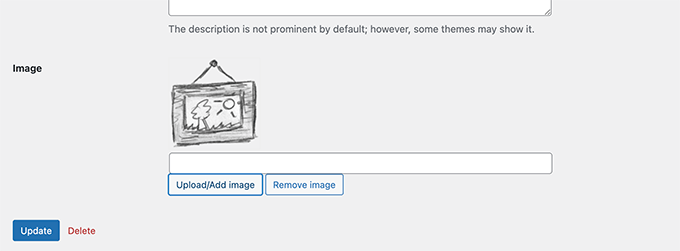
Simply click on the ‘Upload/Add New Image’ button to upload the image you want to use for that particular category.
Don’t forget to click on the Add Category or Update button to save your changes.
Next, you can repeat the process to upload images for other category images. You can also upload images for your tags and any other taxonomies as well.
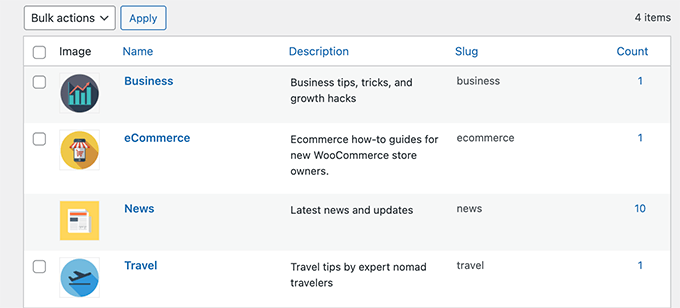
Now the problem is that after adding the images, if you visit a category page, then you won’t see your category image there.
To display it, you will need to edit your WordPress theme or child theme. If this is your first time editing WordPress files, then you may want to see our guide on how to copy and paste code in WordPress.
First, you will need to connect to your WordPress site using an FTP client or your WordPress hosting file manager.
Once connected, you will need to find the template responsible for displaying your taxonomy archives. This could be archives.php, category.php, tag.php, or taxonomy.php files.
For more details, see our guide on how to find which files to edit in a WordPress theme.
Once you have found the file, you’ll need to download it to your computer and open in a text editor like Notepad or TextEdit.
Now paste the following code where you want to display your taxonomy image. Usually, you would want to add it before the taxonomy title or the_archive_title() tag.
) echo z_taxonomy_image_url(); ?>)
After adding the code, you need to save this file and upload it back to your website using FTP.
You can now visit the taxonomy archive page to see it display your taxonomy image. Here is how it looked on our demo archive page.

Now, it may still look a bit awkward, but don’t worry. You can style that using a little bit of custom CSS.
Here is the custom CSS we used for the taxonomy image.
img.taxonomy-img {
    float: left;
    max-height: 100px;
    max-width: 100px;
    display: inline-block;
}
Depending on your theme, you may also need to style surrounding elements like taxonomy title and description.
We simply wrapped our taxonomy archive title and description in a
.taxonomy-title-description {
    display: inline-block;
    padding: 18px;
}
Here is how it looked afterward on our test website.

Exclude Taxonomies from Displaying Taxonomy Images
Now some users may only want to use taxonomy images for specific taxonomies.
For instance, if you run an online store using WooCommerce, then you may want to exclude product categories.
Simply go back to the Categories Images page in WordPress admin area and check the taxonomies you want to exclude.
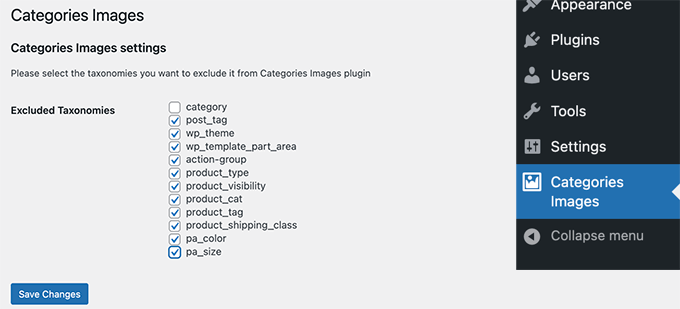
Don’t forget to click on the Save Changes button to store your settings.
We hope this article helped you learn how to easily add taxonomy images in WordPress. You may also want to see these useful category hacks and plugins for WordPress or see our tips on getting more traffic from search engines.
If you liked this article, then please subscribe to our YouTube Channel for WordPress video tutorials. You can also find us on Twitter and Facebook.
The post How to Add Taxonomy Images (Category Icons) in WordPress first appeared on WPBeginner.

