Wondering how to change link color in WordPress? If yes, this article is just the thing you’ve been searching for.
The link color should align with your website’s color and enhance your website’s overall look and feel. It gives aesthetic appeal to users and improves navigation.
You can change the link text color using various methods that we’ve mentioned below. Hence, keep reading to easily change the color of the links on your WordPress website.
Let’s start by learning why you should change link color in WordPress.
Importance of Changing Link Color in WordPress
When you install a theme, it comes with a default link color. Sometimes, you might like the color, while other times, it may not align with your website’s primary color.
Nevertheless, if you don’t like the default link color, you’ll want to change it to a more personalized color. Also, it helps with the consistent branding of your site.
Apart from that, changing the link color can make your site more aesthetic and boost the accessibility of your WordPress website.
Obviously, it also has SEO benefits, as a noticeable link color encourages users to click and explore more content, reducing bounce rates.
How to Change Link Color in WordPress Without Using Code? (4 Simple Ways)
And now, let’s get into the methods to change the link color in WordPress. Also, you don’t need coding knowledge if you use these methods.
Method 1: Using Custom CSS Code
The very first method is to use custom CSS code. For this, you’ll need the hex code for the color you want to use on your website.
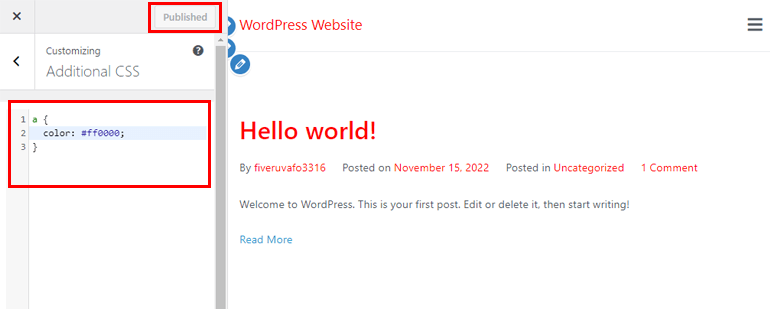
So, log in to your WordPress dashboard and go to Appearance >> Customize.
From the sidebar, select the Additional CSS option. Then, add the following code:
a {
color: #ff0000 ;
}
Don’t forget to hit the Publish button to save all the changes. The link color of your entire site will be (ff0000) Red now. Of course, if you’re not happy with the color, you can change the hex code of your choice.

Method 2: Using WordPress Customizer
The second method for changing link color in WordPress is through the WordPress customizer. Your active WordPress theme can help you change the color of your link.
An important question is which theme provides easier and more versatile options for changing the link. Well, Zakra is the theme we’re suggesting.
Zakra offers 130+ demos suitable for creating any niche WordPress website. It’s also highly customizable and optimized for speed.

To change the link color using Zakra, you need to install the theme first. After you install and activate the Zakra theme, go to Appearance >> Customize.
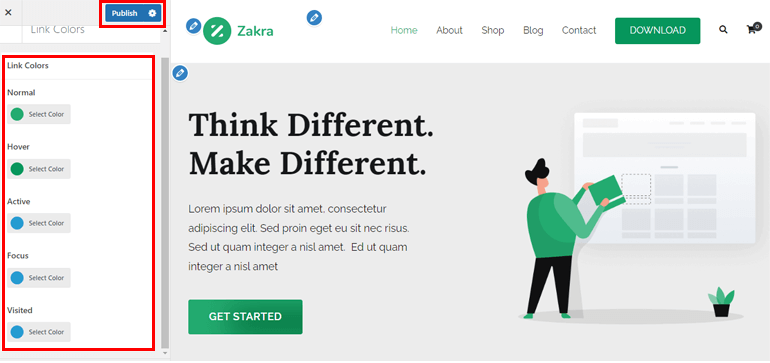
Then, click on Global >> Colors >> Link Colors option. There are two options, which are as follows:
- Normal: Change the color of the link on your site.
- Hover: With the help of this option, you can change the color of the link when hovering.

The free version of Zakra offers limited customization options. Nevertheless, Zakra Pro offers more customization options.
So, if you want more control and options to change your site’s link color, install and activate the Zakra Pro add-on.
Just like before, go to Appearance >> Customize >> Global >> Colors >> Link Colors. Along with the two options mentioned above, you can notice there are more options that we’ve discussed below:
- Active Color: Select the color of the link during the Active state.
- Focus Color: Select the link color on Focus.
- Visited Color: Change the color of the Visited link on your website.

Using the multipurpose Zakra theme, you can change these color link options. Lastly, click on the Publish button to save all the changes.
Method 3: Using Elementor
The next easy method for changing link color in WordPress is to use one of the most popular drag-and-drop page builder plugins, Elementor. Of course, the plugin must be installed and activated on your website to change the link color.

After the installation process, open the page or post in the Elementor editor.
In the top left corner, you can find the Hamburger icon; click on it. Then, select the Site Settings option. Thereafter, click on the Typography option.

Then, from the Link option, you can change the Normal link color and the color of the link on Hover. Furthermore, there are two options – Color and Typography.
Color: Default colors are available. A Color Picker is also provided so that you can add a hex code or select a color.

Typography: You might want to change the typography of the links on your site, along with the color. You can customize the Family, Size, Weight, Style, Decoration, Line Height, Word Spacing, and more.

Elementor also allows you to change the link color on Hover. Similar to the Color option, you can change the link color and typography on the hover of your site. If you’re satisfied with the customization, hit the Update button.
Method 4: Using WordPress Editor
All the above methods are useful for changing the color of links across your entire site. However, you might want a specific page to stand out more than the rest of the page.
In such cases, you can change the link color of an individual page using the standard WordPress editor.
Open the page or post of your choice. Now, highlight the URL link to which you want to change the color. A floating toolbar will appear; simply select the dropdown icon and click on the Highlight option.
There are two further options – Text and Background.

There is a Pre-defined Text color and a Custom Text color as well. With the Custom Text color option, you can easily add a Hex Code of your preference.

As the name suggests, the Background option allows you to add or change the background color. Once you finish the customization process, you can either Update or Publish the page/post.
Wrapping It Up!
And it’s a wrap on this article about how to change link color in WordPress. Above, we’ve mentioned 4 different methods through which you can change the link color globally as well as individually. Once again, below, we’ve mentioned the methods:
- Using Custom CSS
- Using WordPress Customizer
- Using Elementor Plugin
- Using WordPress Editor
You can choose any method you’re comfortable with.
We hope you enjoyed reading this article, and if you did, please share it with your friends and family on your social media. You can follow us on X (formerly Twitter) and Facebook to get regular updates and exciting news.
Before you go, here are some interesting articles on WordPress live chat plugins and how to create an LMS with WordPress.
Disclaimer: Some of the links in the post may be affiliate links. So if you purchase anything using the link, we will earn affiliate commission.

