You’ve just made some updates to your WordPress site, and you’re feeling pretty good about it. You hit the update button, ready to see your changes go live, and then—bam! You’re hit with that dreaded red message: “Updating failed. The response is not a valid JSON response.”
If you’re anything like me, this kind of error can stop you in your tracks, leaving you frustrated and unsure of what went wrong. But don’t worry—you’re not alone in this, and I’m here to help you navigate through it.
Table of Contents
- What Does the Invalid JSON Response Error in WordPress Mean?
- How to Fix “Updating failed. The response is not a valid JSON response.”
- Seek Professional Help
What Does the Invalid JSON Response Error in WordPress Mean?
Alright, let’s get into the nitty-gritty of what this error actually means. When you see the message “Updating failed. The response is not a valid JSON response.”, it’s basically WordPress’s way of saying, “Hey, something’s not right here, and I couldn’t complete the task.”
But what’s really going on behind the scenes?
WordPress, like most modern web platforms, relies on something called JSON—short for JavaScript Object Notation. Think of JSON as a language that WordPress uses to communicate with your server. When you’re updating a post, WordPress sends a request to the server, expecting a response in JSON format. This back-and-forth is what keeps your site running smoothly.
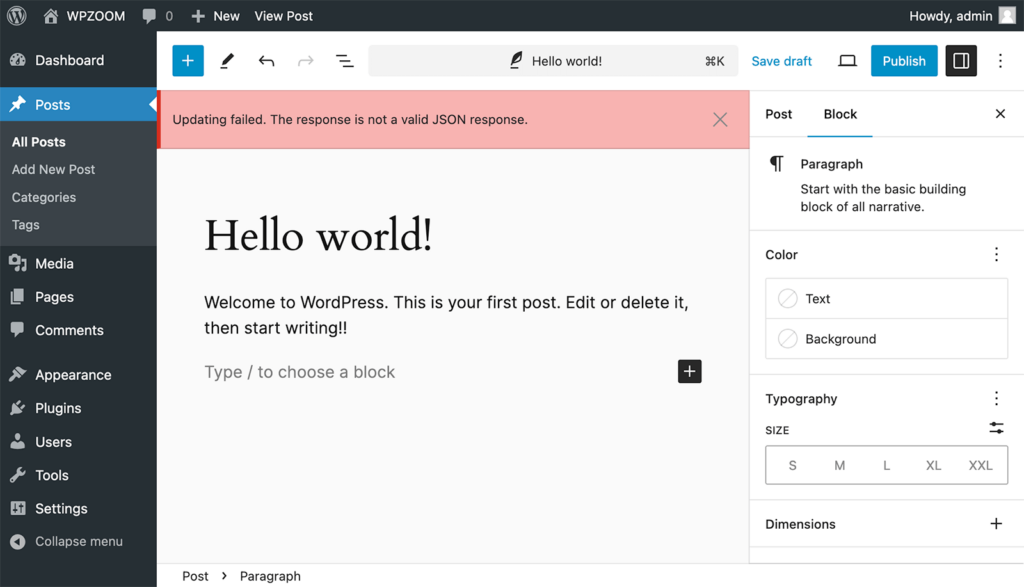
However, when the response that comes back isn’t in the expected format—or worse, doesn’t come back at all—WordPress throws up this error message. It’s like ordering a pizza and getting a burger instead. Sure, the server responded, but it’s not what WordPress was expecting!
This can happen for several reasons—maybe there’s an issue with your permalink settings, or perhaps a plugin isn’t playing nicely with the REST API (which is the bridge between your WordPress site and the server). But don’t worry, we’ll explore all these possible causes in more detail soon.
The key takeaway here is that this error is a communication breakdown between WordPress and your server. And while it’s definitely annoying, the good news is that it’s usually fixable with a few simple steps. Stick with me, and we’ll get your site back on track in no time!
How to Fix “Updating failed. The response is not a valid JSON response.”
It’s time to roll up our sleeves and dive into the solutions. We’ll guide you through each potential solution, starting with the simplest and moving toward more in-depth troubleshooting techniques.
Solution 1: Check and Update Your Permalink Structure
Let’s start with one of the most common and simplest fixes—checking and updating your permalink structure.
Your permalink settings in WordPress determine how URLs are structured on your site. If these settings are misconfigured, WordPress might struggle to connect with your server properly, leading to that pesky JSON error. Sometimes, even a minor change or glitch in your permalinks can trigger this problem.
Step 1: Access Your Permalink Settings. First, log in to your WordPress dashboard. Once you’re in, navigate to Settings > Permalinks. This is where you’ll find the settings that control how URLs are structured across your site.
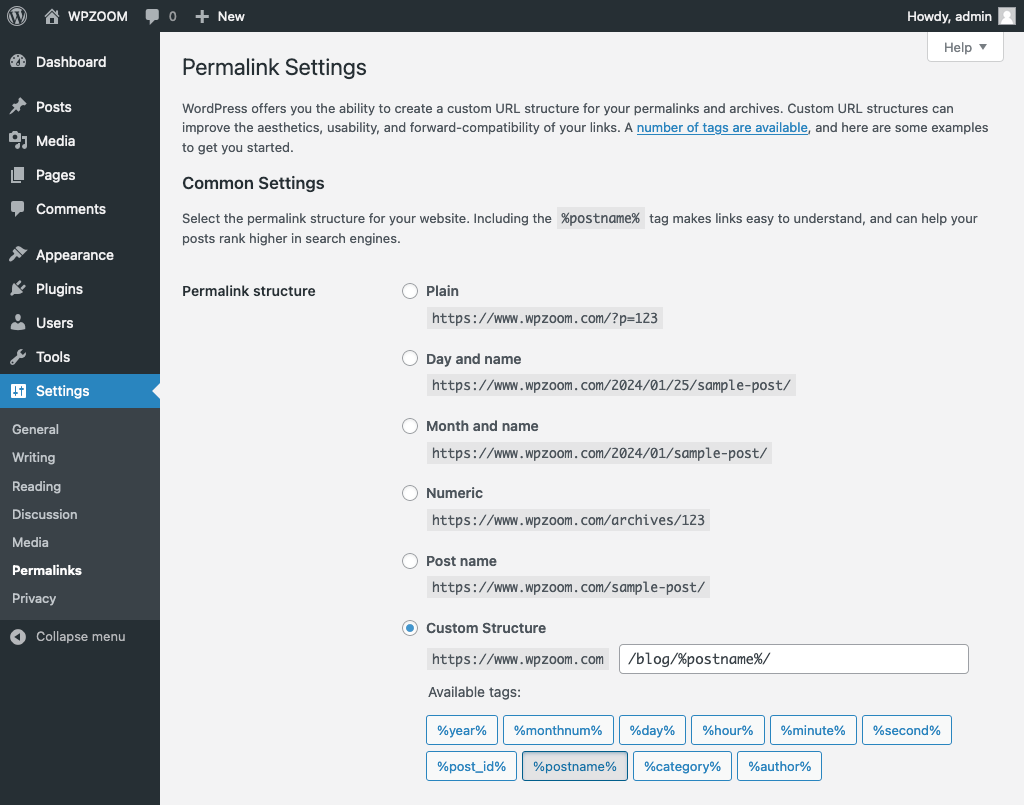

Step 2: Review Your Current Permalink Structure. On the Permalink Settings page, you’ll see several options for how your URLs can be structured. Most sites use the Post name option because it’s both SEO-friendly and user-friendly. Even if you’re already using this option, it’s worth saving the settings again just to refresh things.
Step 3: Save Changes. Now, here’s the key part: even if you don’t make any changes to the permalink structure, go ahead and click the Save Changes button at the bottom of the page. Why? Clicking this button forces WordPress to regenerate its rewrite rules, which can often clear up any issues that might be causing the JSON error.
Step 4: Test Your Site. After saving the changes, head back to the post or page where you encountered the error and try updating it again. In many cases, simply refreshing the permalink settings is enough to resolve the issue.
Step 5: Regenerate Your .htaccess File (If Necessary). If updating the permalink structure didn’t solve the problem, the next step is to regenerate your .htaccess file, which is a configuration file that controls various aspects of your site. This file can sometimes become corrupted, especially after changes to your permalink settings.
To regenerate it:
- Connect to your site via an FTP client or your hosting provider’s file manager.
- Locate the .htaccess file in your site’s root directory (public_html).
- Download a copy of the file to your computer as a backup.
- Delete the .htaccess file from your server.
- Go back to Settings > Permalinks in WordPress and click Save Changes again. This will create a new, clean .htaccess file.
After doing this, test your site again to see if the JSON error has been resolved.
Solution 2: Ensure Your Site Is Running on HTTPS
Another common cause of the JSON error is when your site is experiencing a mix of HTTP and HTTPS content, known as a mixed content issue. This can confuse WordPress when it’s trying to communicate with the server, resulting in an invalid JSON response.
Let’s walk through how to check if your site is properly configured to use HTTPS and fix any issues that might be lurking.
Step 1: Verify Your Site’s URLs. Start by heading to your WordPress dashboard and navigating to Settings > General. Here, you’ll see two fields: WordPress Address (URL) and Site Address (URL). Both of these should start with “https://”. If they don’t, that could be the root of your problem.
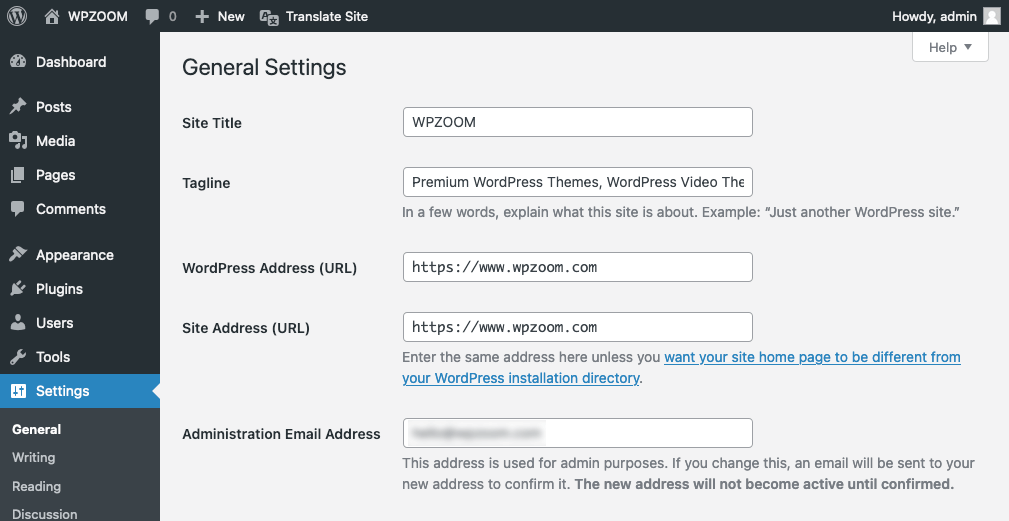

If you see “http://” instead of “https://”, you’ll need to update these URLs:
- Change both URLs to start with “https://”.
- Scroll down and click Save Changes.
Step 2: Install an SSL Certificate (If You Haven’t Already). If you’re not already using HTTPS, you’ll need an SSL certificate to secure your site. Most hosting providers offer free SSL certificates, often through a service called Let’s Encrypt.
Once your SSL certificate is installed, make sure your WordPress URLs are updated to use HTTPS, as we covered in Step 1.
Step 3: Fix Mixed Content Issues. Even after setting up HTTPS, you might still have some resources (like images or scripts) loading over HTTP. This is what we call mixed content, and it can cause the JSON error to appear.
Here’s how to fix it:
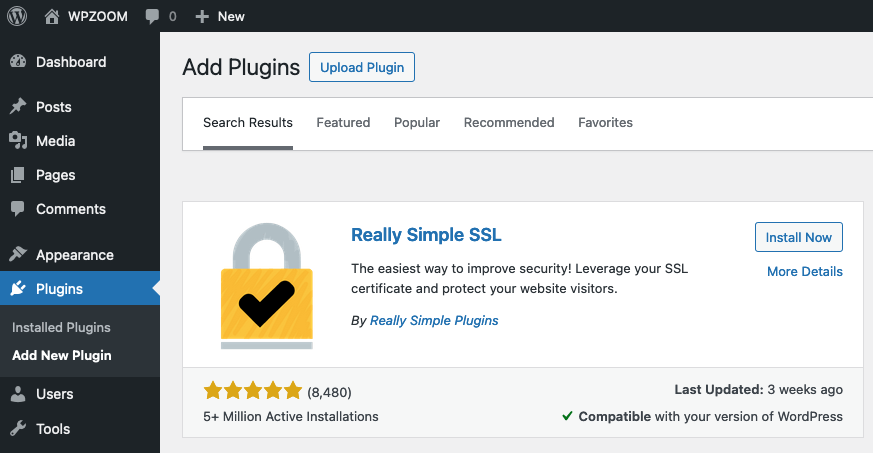
- Install the “Really Simple SSL” Plugin: This handy plugin will automatically detect mixed content and help you fix it. Simply install and activate the plugin and follow its setup instructions.
- Run the Mixed Content Fixer: Once activated, Really Simple SSL will prompt you to enable the mixed content fixer. Do that, and it will help redirect all content to load securely over HTTPS.

Step 4: Test Your Site. After making these changes, go back to the page or post where you encountered the error and try updating it again. With any luck, the JSON error will be a thing of the past!
Solution 3: Deactivate Plugins and Switch to a Default Theme
WordPress plugins and themes add functionality and style to your site, but they can sometimes cause conflicts, especially if they’re outdated or poorly coded.
Here’s how to troubleshoot plugin and theme conflicts:
Step 1: Deactivate All Your WordPress Plugins. The first step is to see if a plugin is causing the issue. To do this, you’ll need to deactivate all the plugins on your site.
- Go to your WordPress dashboard and navigate to Plugins > Installed Plugins.
- Check the box at the top to select all plugins.
- From the Bulk Actions dropdown menu, choose Deactivate and then click Apply.

This will deactivate all the plugins on your site. Now, try updating the post or page again to see if the error persists.
- If the error disappears: It means that one of your plugins is causing the conflict.
- If the error remains: The issue is likely not related to your plugins, so you can move on to checking your theme.
Step 2: Reactivate Plugins One by One. If deactivating all plugins resolved the error, the next step is to identify the culprit by reactivating your plugins one at a time.
- Start by reactivating the first plugin in your list.
- After each plugin activation, return to the page or post and try to update it.
- If the error reappears after activating a specific plugin, you’ve found the problem.
Once you identify the problematic plugin, you can either keep it deactivated, delete it, or contact the plugin developer for support.
Step 3: Switch to a Default Theme. If deactivating plugins doesn’t solve the issue, the next step is to check if your theme is causing the conflict.
- Go to Appearance > Themes in your WordPress dashboard.
- Activate one of the default WordPress themes, like Twenty Twenty-Three or Twenty Twenty-Four.
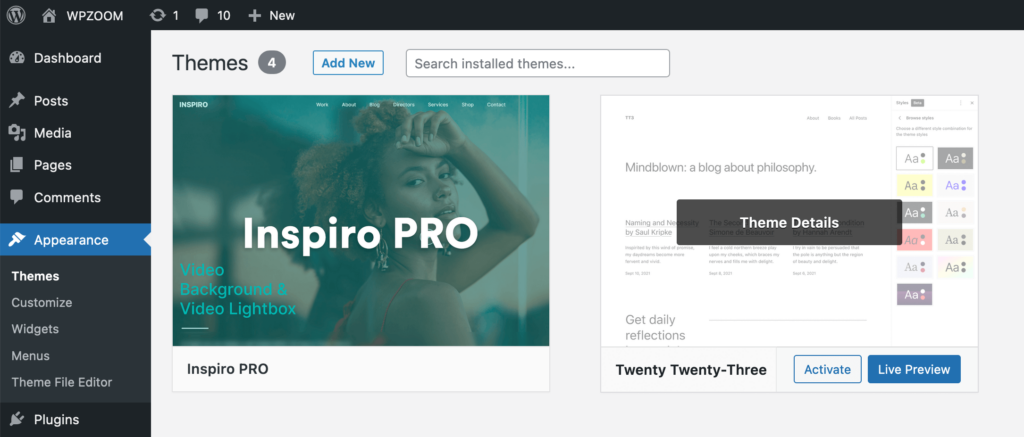
After switching to a default WordPress theme, test the page or post again.
- If the error disappears: The issue is likely related to your previous theme.
- If the error remains: The theme is not the problem, and you can reactivate your original theme.
If your theme is the culprit, you may need to contact the theme developer for support or consider switching to a different theme that doesn’t conflict with WordPress’s core functions. Explore our WPZOOM premium themes for a reliable, beautifully designed solution that ensures compatibility and enhances your site’s performance.
Solution 4: Update or Reconfigure the REST API
The WordPress REST API is a powerful tool that allows your website to communicate with the server, particularly when using the WordPress Block Editor (Gutenberg). If something’s off with your REST API, it can lead to the “updating failed. the response is not a valid JSON response.” error. Thankfully, fixing issues with the REST API can often be straightforward.
Here’s how to check and reconfigure your REST API:
Step 1: Check Your Site’s Health Status. WordPress includes a handy tool called “Site Health” that can help you diagnose REST API issues.
- From your WordPress dashboard, go to Tools > Site Health.
- On the Status tab, look for any critical issues related to the REST API. You might see something like “The REST API encountered an unexpected result.”

If you see a REST API-related issue here, this is likely what’s causing the JSON error.
Step 2: Investigate REST API Conflicts. If Site Health indicates a REST API problem, the next step is to investigate what might be causing it. This could be related to a security plugin, firewall settings, or even your server configuration.
- Security Plugins: Some security plugins might block the REST API as part of their protection measures. Temporarily deactivate your security plugins and check if the JSON error persists.
- Firewall Settings: If you’re using a firewall (through a plugin or your hosting provider), it might be blocking the REST API. Try disabling the firewall temporarily and see if the issue is resolved.
- Server Configuration: Sometimes, your server’s settings could be preventing the REST API from functioning correctly. If you suspect this might be the case, it’s worth reaching out to your hosting provider for assistance.
Step 3: Re-enable the REST API. If you’ve identified that a plugin or firewall is causing the issue, you’ll need to reconfigure it to allow the REST API to function properly. Here’s how you can address common causes:
- Whitelist the REST API: If a security plugin or firewall is blocking the REST API, look for an option to whitelist it or allow REST API requests. This will enable the API to communicate freely with the server.
- Contact Your Hosting Provider: If the issue seems to be server-related, contact your hosting provider’s support team. They can check if there are any server-level blocks on the REST API and help you resolve them.
Step 4: Test the Block Editor Again. After making these adjustments, go back to the page or post where you encountered the error and try updating it. If the REST API was the problem, the error should now be resolved.
Solution 5: Troubleshoot Server Configuration Issues
If you’ve tried all the previous solutions and are still facing the JSON error, it’s possible that the issue lies with your server configuration. Sometimes, certain server settings can interfere with WordPress’s ability to communicate effectively, leading to errors like the one you’re encountering.
Here’s how to troubleshoot and resolve potential server configuration issues:
Step 1: Check Your Server’s Error Logs. Server error logs can provide valuable insights into what might be going wrong behind the scenes. These logs record errors that occur on the server, which might give you a clue about what’s causing the JSON error.
- Access Your Server Logs: You can usually find server error logs in your hosting control panel, often under a section labeled Logs or Error Logs. If you’re unsure where to find them, your hosting provider’s support team can guide you.
- Look for Errors Related to WordPress: Review the logs and look for any entries that correspond to the times when you experienced the JSON error. Pay particular attention to any errors mentioning the REST API, mod_security, or memory limits.
Step 2: Increase Your Server’s PHP Memory Limit. WordPress requires a certain amount of memory to function properly, especially if you’re running multiple plugins or a complex theme. If your server’s PHP memory limit is too low, it can cause errors like the JSON response issue.
Check Your Current Memory Limit: You can check the current PHP memory limit by going to Tools > Site Health > Info in your WordPress dashboard. Scroll down to the Server section to see the PHP memory limit.

Increase the Memory Limit: If your memory limit is below 256MB, consider increasing it. You can do this by adding the following line to your wp-config.php file:
define('WP_MEMORY_LIMIT', '256M');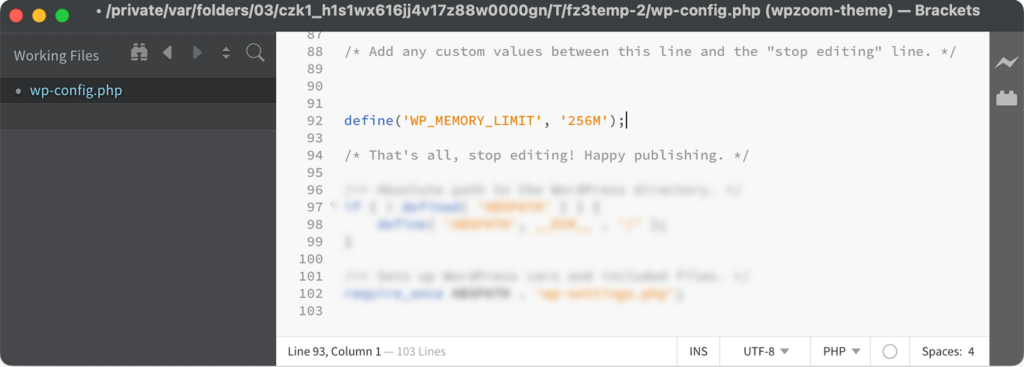
Save the Changes: After increasing the memory limit, save the changes to the wp-config.php file and test your site again.
Step 3: Ensure Proper Permissions and Mod_Security Settings. Sometimes, incorrect file permissions or overly aggressive security settings on the server can block necessary WordPress functions, leading to the JSON error.
- Check File Permissions: Ensure that your WordPress files and directories have the correct permissions. Typically, files should be set to 644 and directories to 755. Incorrect permissions can prevent WordPress from accessing or modifying necessary files.
- Review Mod_Security Settings: Mod_Security is a common web application firewall that might be blocking legitimate WordPress requests. If you suspect this might be the issue, contact your hosting provider and ask them to check the Mod_Security logs. They can whitelist the necessary requests to allow WordPress to function properly.
Step 4: Contact Your Hosting Provider. If you’re not comfortable making server changes or if the issue persists despite your efforts, it might be time to contact your hosting provider. Explain the problem to them, including the steps you’ve already taken. They can investigate further and adjust server settings to resolve the issue.
Step 5: Test Your Site Again. After making any necessary server adjustments, return to the page or post where you first encountered the invalid JSON error and try updating it again. If the problem was server-related, you should now be able to update your content without any issues.
Seek Professional Help
Troubleshooting the “Updating Failed. The Response Is Not a Valid JSON Response.” error can often be handled with the steps we’ve outlined, but there are times when you might need a little extra help. WordPress is a powerful platform, but managing it effectively requires ongoing maintenance, security checks, and performance optimizations.
If you’re finding that this error persists despite your best efforts, or if you’re encountering other complex issues that are beyond your expertise, it might be time to call in a professional. Our team at WPZOOM specializes in diagnosing and resolving tough WordPress problems, ensuring that your site runs smoothly, efficiently, and securely.
Whether you need help fixing stubborn errors, optimizing your site’s speed, or enhancing its security, we’re here to provide the support you need. Let us handle the technical challenges so you can focus on what really matters—growing your business and engaging with your audience. With WPZOOM, you can be confident that your WordPress site is in expert hands, ready to perform at its best.

