Encountering file upload size limits in WordPress is a common frustration, especially when managing a media-rich website or uploading essential themes and plugins. Default limits often range between 2 MB and 128 MB, depending on your hosting provider. However, these restrictions can disrupt workflows, particularly for businesses and creators who require high-quality media uploads.
This guide will walk you through various methods to increase the maximum file upload size in WordPress, ensuring your site runs efficiently without compromising functionality.
Table of Contents
- How to Check Your Current Maximum File Upload Size in WordPress
- Method 1: Contact Your Hosting Provider
- Method 2: Updating the .htaccess File
- Method 3: Editing the functions.php File
- Method 4: Creating or Modifying the php.ini File
- Method 5: Using a WordPress Plugin
- Increasing Upload Size for WordPress Multisite
- Other Methods for Adjusting Upload Limits
How to Check Your Current Maximum File Upload Size in WordPress
Before increasing the maximum file upload size in WordPress, it’s important to know your current limit. Here are three simple methods to check it:
1. Using the Media Library
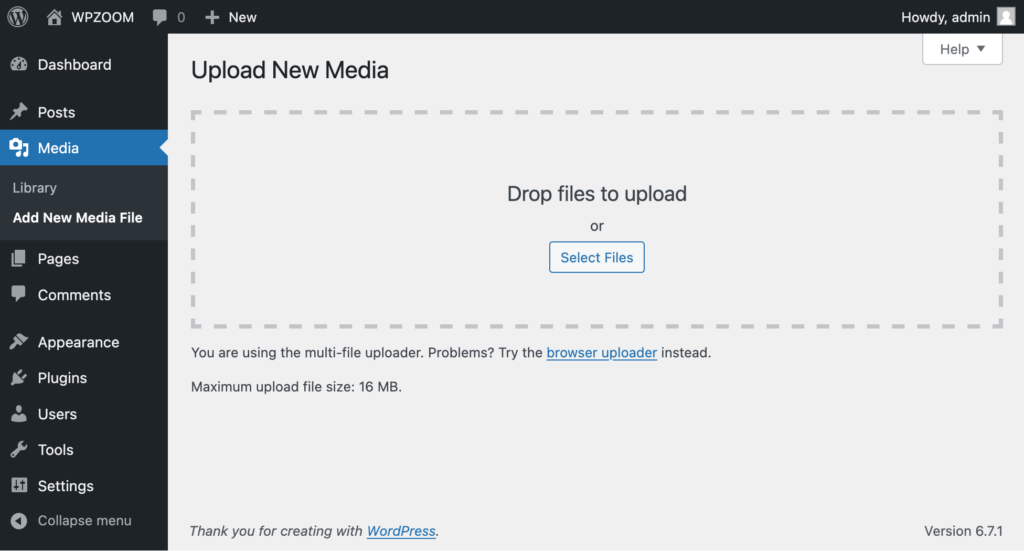
Navigate to your WordPress Dashboard and click on Media > Add New Media File.
Below the upload box, you’ll see a message indicating the current maximum upload size (e.g., “Maximum upload file size: 16 MB”).

2. Using Site Health Info
Go to Tools > Site Health, and click on the Info tab at the top.
Expand the Server section to view server-specific settings like Upload max filesize.


3. Checking Through Your Hosting Control Panel
Log in to your hosting account and access the cPanel or equivalent server settings.
Look for PHP settings or server information that displays the current upload file size limit (upload_max_filesize).


Once you know the current limits, you can choose the most suitable method to increase them.
In the next section, we’ll explore the first method: contacting your hosting provider.
One of the easiest and most reliable ways to increase the maximum file upload size in WordPress is by reaching out to your hosting provider. Hosting providers have direct access to server settings and can adjust the upload limits on your behalf.
This method is ideal if you’re unfamiliar with technical file editing or if you’re using a managed hosting service where changes to server settings are restricted.
Here’s how to do it:
- Log in to Your Hosting Account Control Panel, such as cPanel, Site Tools, or MyKinsta, depending on your host.
- Locate Customer Support. Use the live chat feature, submit a support ticket, or call their customer support team. Most providers have a dedicated section for support requests.
- Provide Relevant Information. Mention the file upload error or limitation you’re experiencing. Request an increase in the upload_max_filesize, post_max_size, and memory_limit settings.
- Confirm Changes. Once the changes are made, check your new upload limit by revisiting the Media Library or Site Health Info.
This method is highly effective and removes the risk of misconfigurations.
If contacting your host isn’t an option, proceed to the next section, where we’ll explore updating the .htaccess file.
Method 2: Updating the .htaccess File
If your WordPress site is hosted on an Apache server, you can increase the maximum file upload size by editing the .htaccess file. This file controls server configuration and is located in your site’s root directory.
This method works well when you can access your server via FTP/SFTP or your hosting control panel and feel comfortable making server configuration changes. Follow these steps:
1. Access Your Server. Use an FTP client (e.g., FileZilla) or your hosting provider’s file manager to locate your WordPress files.
Navigate to the root directory of your WordPress installation, typically labeled as public_html or www.
2. Locate the .htaccess File in the root directory.
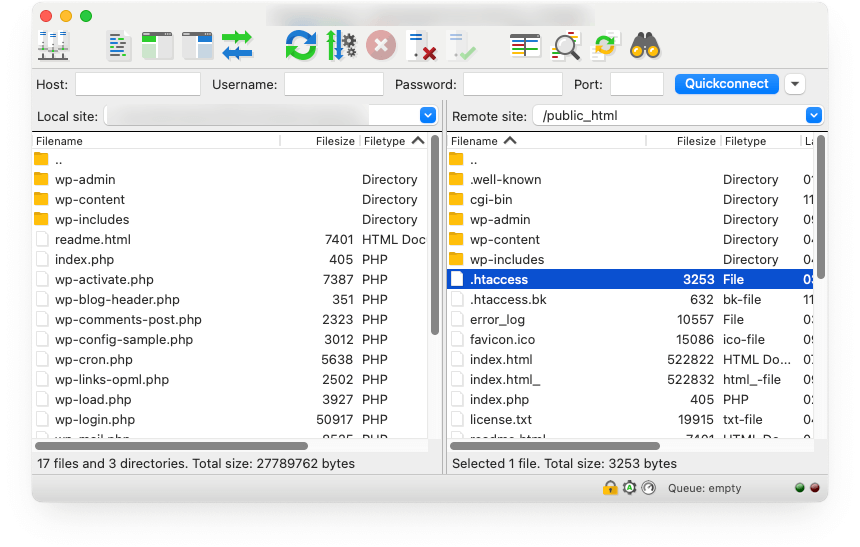

If you don’t see it, ensure hidden files are visible in your FTP client or File Manager settings.
3. Create a Backup. Download the .htaccess file to your computer as a backup before making any changes.
4. Open the .htaccess file in a text editor (e.g., Notepad or TextEdit) and add the following lines of code at the bottom of the file:
php_value upload_max_filesize 64M
php_value post_max_size 128M
php_value memory_limit 256M
php_value max_execution_time 300
php_value max_input_time 300
Adjust the values (64M, 128M, etc.) as per your requirements.
5. Save and Reupload. Save your changes and upload the updated .htaccess file back to the server.
6. Verify the Changes. Return to your WordPress Dashboard and check the Media Library or Site Health Info to confirm the new file size limit.
Note: If the changes don’t take effect, your hosting provider may have restrictions preventing .htaccess modifications. In that case, try another method or contact support.
Common Issues and Solutions
- 500 Internal Server Error. If you encounter this error, your server might not support php_value directives in .htaccess. Try another method, such as editing the php.ini file.
- Missing .htaccess File. Generate a new .htaccess file by going to Settings > Permalinks in WordPress and clicking Save Changes.
This method is effective for Apache servers and allows precise control over file size limits.
For users on other server types or seeking a simpler approach, proceed to the next section on editing the functions.php file.
Upgrade Your Website with a Premium WordPress Theme
Find a theme that you love and get a 20% discount at checkout with the FLASH20 code


Method 3: Editing the functions.php File
Another way to increase the maximum file upload size is by adding custom PHP code to your theme’s functions.php file. This file is part of your WordPress theme and allows you to add or modify PHP code to customize your site.
This method is ideal for users who prefer making changes through the WordPress dashboard without accessing server files directly.
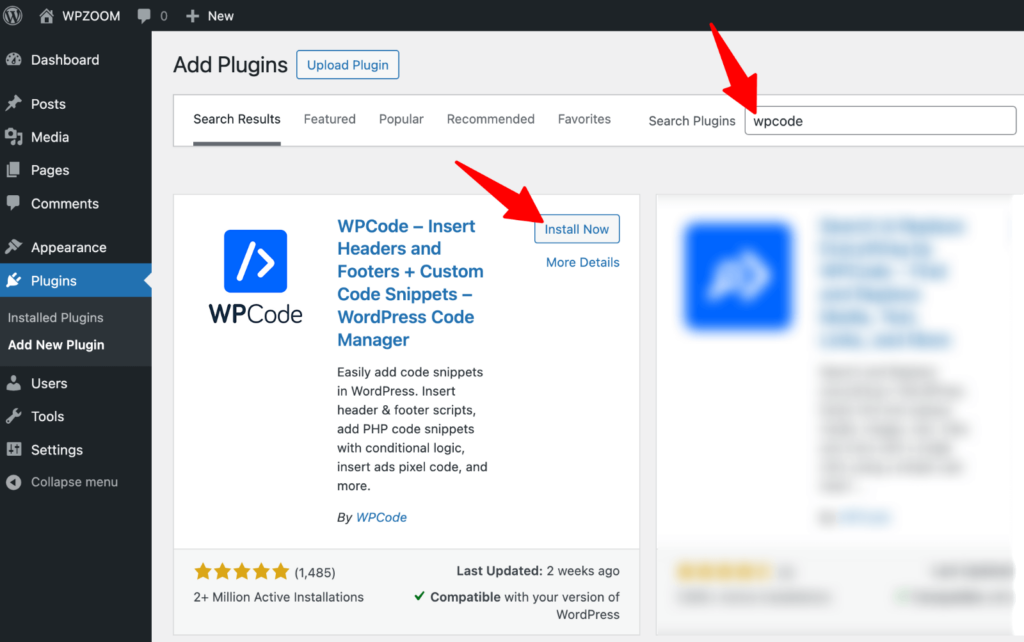
Manually editing the functions.php file can be risky, especially if you’re not familiar with coding. Instead, you can use the WPCode plugin to safely add the necessary code to increase your WordPress upload limits. WPCode is a user-friendly code snippets plugin that simplifies this process and prevents errors. Follow these steps:
1. Install and Activate WPCode. Log in to your WordPress dashboard and navigate to Plugins > Add New Plugin.
Search for WPCode and click Install Now, then Activate.

2. Add a New Snippet. In your dashboard, go to Code Snippets > Add Snippet.
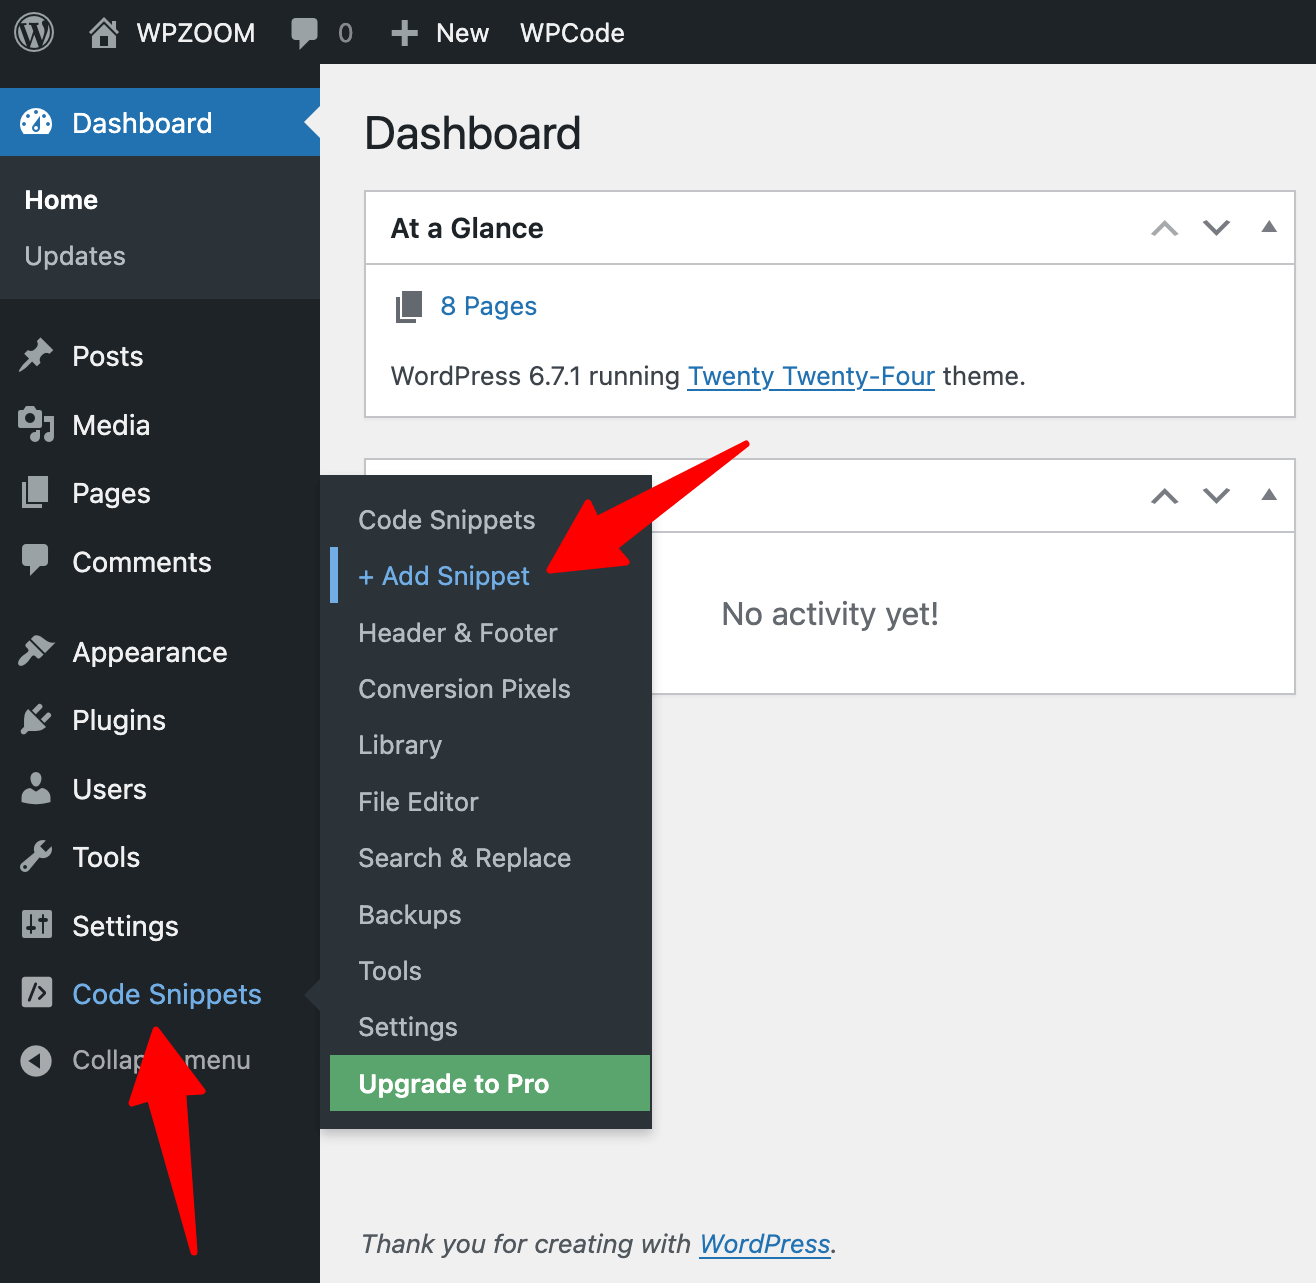

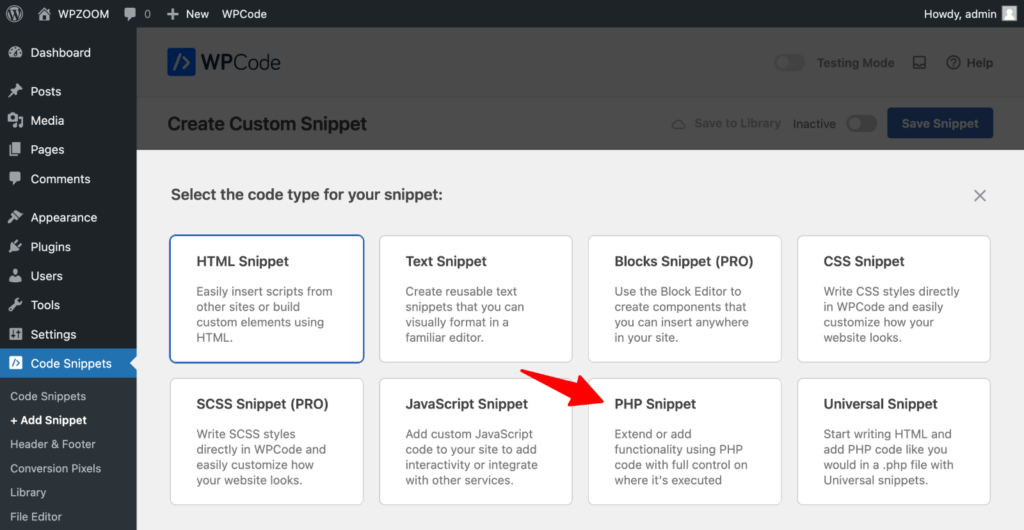
Choose Add Your Custom Code (New Snippet).


Select PHP Snippet as the code type.

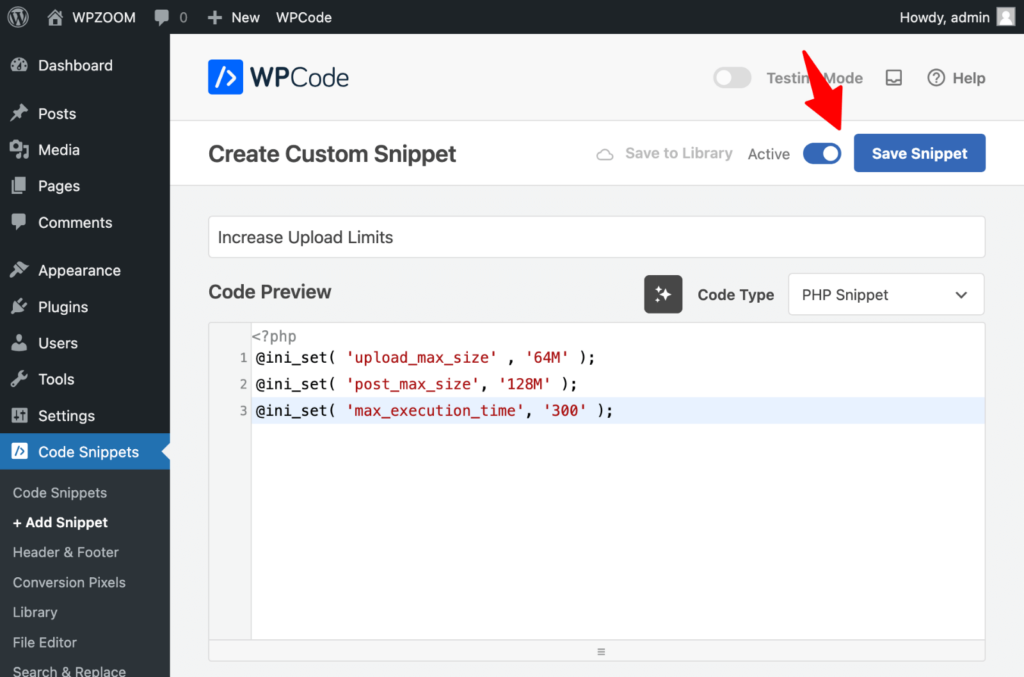
3. Add the PHP Code. In the snippet editor, name your snippet (e.g., “Increase Upload Limits“).
Paste the following code into the Code Preview editor:
@ini_set( 'upload_max_size' , '64M' );
@ini_set( 'post_max_size', '128M' );
@ini_set( 'max_execution_time', '300' );
4. Activate the Snippet. Toggle the Active switch at the top to enable the snippet and click Save Snippet to apply the changes.

5. Verify the Changes. Return to the Media Library or Site Health Info to check if the new limits are applied.
If this method doesn’t work for your hosting setup or you prefer an alternative, the next section will cover creating or modifying the php.ini file.
Method 4: Creating or Modifying the php.ini File
The php.ini file controls PHP settings on your server, including upload size limits. If you can access this file, modifying it is an effective way to increase the maximum file upload size. Follow these steps:
1. Access Your Server. Use an FTP client (e.g., FileZilla) or your hosting provider’s file manager to access your WordPress site files.
Navigate to the root directory of your WordPress installation or the directory where PHP is configured (this may vary by host).
2. Locate or Create the php.ini File. Look for an existing php.ini file in the directory.
If it doesn’t exist, create a new file and name it php.ini.
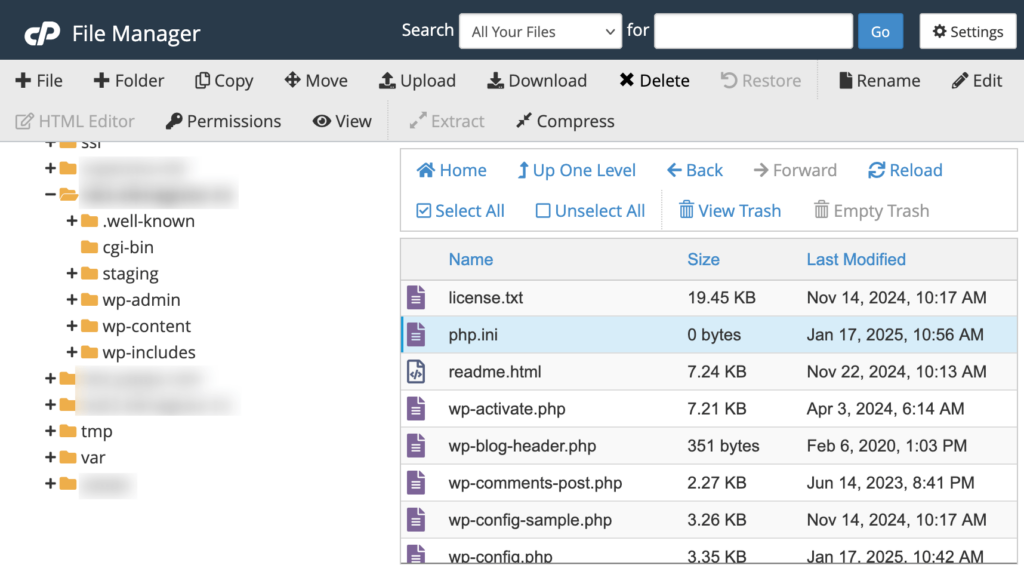

3. Open the php.ini file in a text editor and add or modify the following lines:
upload_max_filesize = 50M
post_max_size = 50M
memory_limit = 128M
max_execution_time = 300
max_input_time = 300
4. Save and Upload the File. Save your changes and upload the updated php.ini file back to the server.
5. Restart Your Server (If Required). Some hosting environments may require you to restart your server for the changes to take effect. Check your hosting provider’s documentation for instructions.
6. Verify the Changes. Go to the Media Library or Site Health Info in your WordPress Dashboard to confirm the new file upload size limit.
Common Issues
- File Not Recognized: Some hosting providers use a .user.ini file instead of php.ini. If changes don’t take effect, try renaming the file to .user.ini and upload it again.
- Restricted Access: On shared hosting, editing the php.ini file may not be allowed. In such cases, try other methods or contact your hosting provider.
If this method isn’t feasible or you’re looking for a simpler alternative, the next section will explore using a WordPress plugin to increase the file upload size.
Method 5: Using a WordPress Plugin
For those who prefer a simpler, non-technical approach, using a WordPress plugin is a convenient option to increase the maximum file upload size. Plugins are user-friendly and require no coding or server access. Here are two recommended plugins you can use:
- Big File Uploads: This plugin allows you to bypass server upload size limits by breaking large files into smaller chunks, ensuring seamless uploads without manual configuration.
- MaxUploader: A user-friendly plugin that provides an intuitive interface to set higher upload limits, perfect for beginners looking for quick results.
Important Considerations
- Server Restrictions: Plugins cannot override the maximum limits set by your hosting provider. If the limit remains too low, contact your host for assistance.
- Plugin Dependency: Relying on a plugin means adding another component to your site, which could affect performance if not optimized.
Increasing Upload Size for WordPress Multisite
Managing a WordPress Multisite network requires special attention to upload size limits since these settings apply across all network sites. Adjusting the upload size in a Multisite setup is straightforward but requires access to the Network Admin dashboard.
1. Access the Network Admin Dashboard. Log in to your WordPress Multisite network admin account. Navigate to My Sites > Network Admin > Dashboard.
2. Go to Network Settings. In the left-hand menu, select Settings > Network Settings.
3. Locate the Upload Settings Section. Scroll down to the Upload Settings section. Find the field labeled Max upload file size.
4. Adjust the Max Upload Size. Enter the desired file size in kilobytes (e.g., 51200 KB for 50 MB). Ensure the value does not exceed the server-imposed limit. If needed, verify the server limit using the Site Health tool or contacting your hosting provider.
5. Save Changes. Click the Save Changes button to apply the new upload limit.
6. Test the New Limit. Visit one of the sites in your network, go to Media > Add New, and verify the updated upload size.
Important Considerations
- Server-Imposed Limits: If the value you set exceeds your server’s maximum upload size, the changes will not take effect. Adjust the server settings if necessary.
- Site-Specific Settings: If specific sites in your network need different upload limits, you can set them individually by visiting the Site Admin Settings for each site. The max upload size for individual sites in the network cannot exceed the network-wide limit.
Other Methods for Adjusting Upload Limits
If the previous methods don’t suit your needs, there are alternative ways to increase the maximum file upload size in WordPress. These options provide flexibility depending on your server configuration:
Modify the wp-config.php File
The wp-config.php file contains critical configuration settings for your WordPress site. Adding upload directives here can sometimes increase the upload limit, although this method may not work with all hosting setups.
1. Access your site’s files via FTP or File Manager.
2. Locate and edit the wp-config.php file in the root directory.
3. Add the following code at the bottom:
@ini_set( 'upload_max_size', '64M' );
@ini_set( 'post_max_size', '128M' );
@ini_set( 'memory_limit', '256M' );
4. Save the file and upload it back to the server.
5. Test the new limits in the Media Library.
Note: This method may not work on shared hosting due to restrictions on the wp-config.php file.
Change PHP Settings via cPanel
If your hosting provider uses cPanel, you can increase upload limits directly through the PHP settings.
1. Log in to your hosting account and access cPanel.
2. Under the Software section, click on Select PHP Version or PHP Settings.
3. Adjust the following parameters:
- upload_max_filesize (e.g., 50M)
- post_max_size (e.g., 50M)
- memory_limit (e.g., 128M)
4. Save the changes and restart your server if required.
Note: cPanel settings apply server-wide, making this method ideal for users with multiple WordPress installations.
Adjusting Configurations for Nginx Servers
For sites hosted on Nginx servers, file upload limits are managed through the nginx.conf file.
1. Access your server via SSH or your hosting provider’s File Manager.
2. Locate the nginx.conf file (usually in /etc/nginx/).
3. Add or modify the following directive:
client_max_body_size 64M;4. Save the changes and restart the Nginx server.
Note: Restarting the server requires root access, so this method is suitable for VPS or dedicated hosting. Contact your hosting provider if you’re unsure how to access or modify the Nginx configuration.
Bottom Line
Higher file upload limits open new possibilities for your WordPress site. Want to make the most of your increased upload capacity?
Check out WPZOOM‘s collection of media-optimized WordPress themes. Our themes support high-resolution images and videos, perfect for creating stunning visual experiences. Plus, our themes have built-in optimization features to keep your site running smoothly, even with larger files. Our solutions help you showcase your content exactly as you envision it.

