The footer of your WordPress website may not always stand out, but it plays a vital role in tying your site together. It’s the space where you can add copyright information, navigation links, or contact details—ensuring visitors find the essentials quickly.
I remember feeling overwhelmed the first time I tried to update the footer in WordPress, struggling to figure out where to start. However, once I discovered the right tools and methods, the process became effortless.
In this guide, I’ll walk you through simple and effective ways to edit the footer in WordPress—whether you’re using a theme’s built-in tools, a block-based editor, or plugins.
Table of Contents
- Customizing the Footer with Theme Settings
- Editing the Footer in Block-Based Themes
- Manually Editing the footer.php File
- Adding Navigation Menus to the Footer
- Adding Footer Widgets to the Footer
- Enhancing Your Footer with Plugins
The first step to customizing your WordPress footer is understanding what type of theme you’re using. Your theme determines how the footer can be edited—whether through built-in tools, block-based editing, or manual customization.
Modern themes, like WPZOOM’s Inspiro Premium, often provide easy-to-use options in the WordPress Theme Customizer or come with a Footer builder for seamless editing. Block-based themes rely on the Site Editor for flexible, modular edits. Standard themes, on the other hand, might require you to manually edit files like footer.php.
To avoid confusion, check your theme’s settings or documentation. Knowing your theme’s capabilities will help you choose the proper method and make the process much smoother.
If your theme supports the WordPress Theme Customizer, you’re lucky—this tool makes it incredibly easy to change the footer in WordPress without writing a single line of code.
The Theme Customizer lets you update footer elements in real-time. You can remove the “Powered by WordPress” default text or replace it with your branding, add widgets for functionality, or adjust the layout to achieve your ideal footer design.
Below, we’ll walk you through the process of customizing the built-in footer settings using the Inspiro Premium theme as an example:
1. From your WordPress dashboard, navigate to Appearance > Customize.


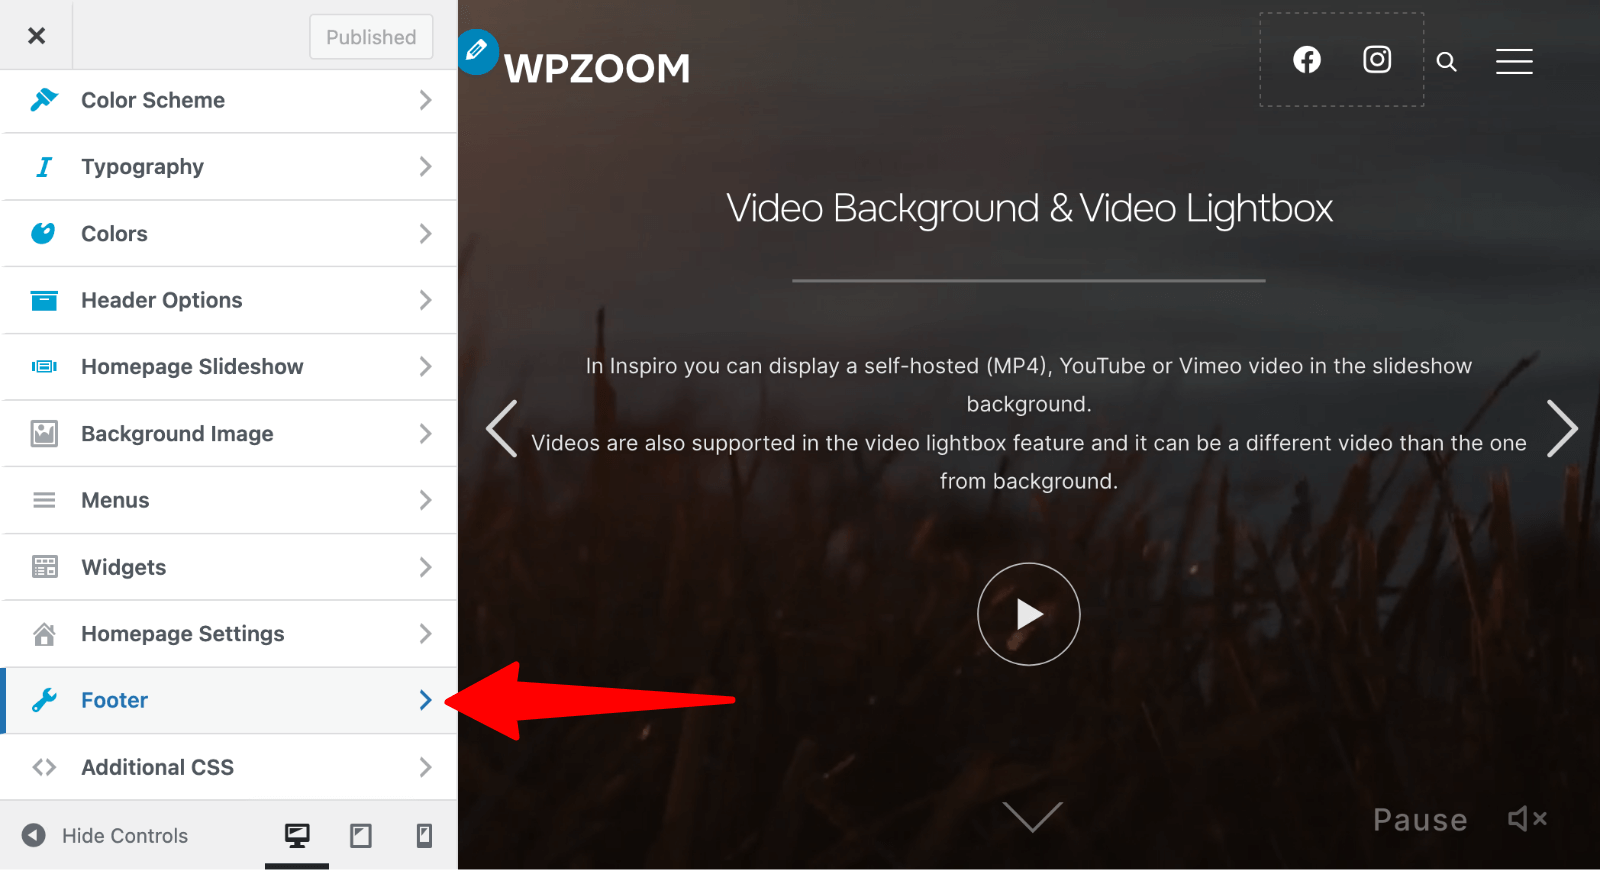
2. In the Customizer menu, find and click on the Footer section. This may be labeled differently depending on your theme (e.g., Footer, Footer Settings, or Footer Options).

4. Adjust Footer Layout: In the Footer Layout section, select a layout (e.g., one column, two columns, three columns, etc). Rearrange or resize columns using the customization tools.
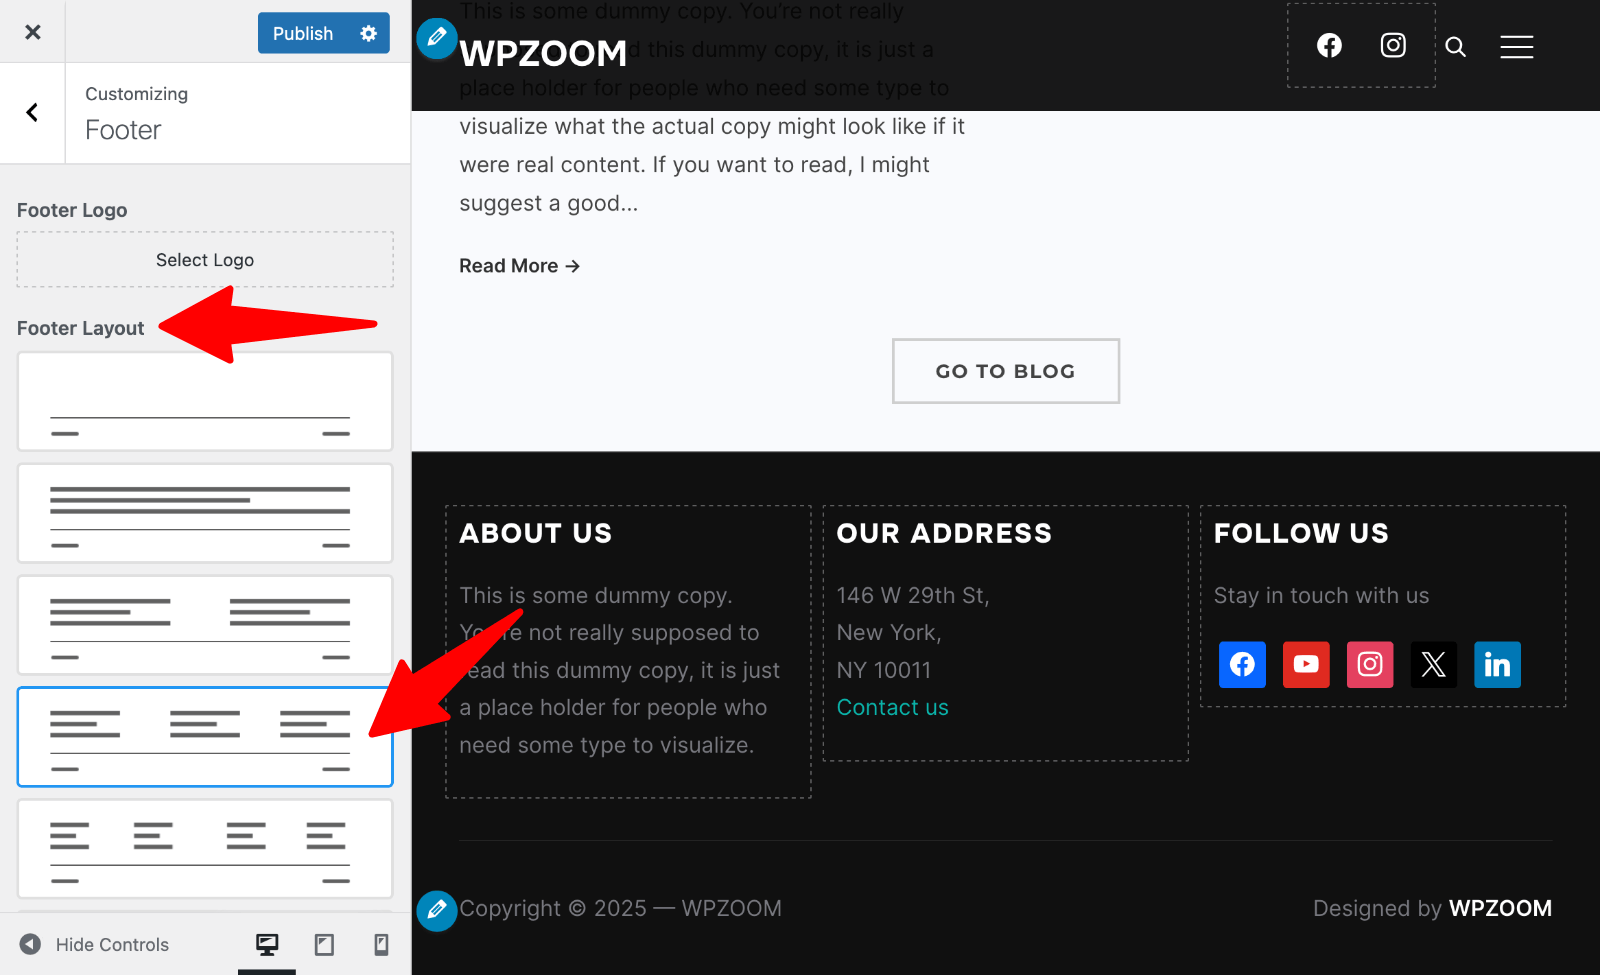

3. Change Footer Text: In the Footer Text section, you can update the text to your preferred message, like your brand name or a custom disclaimer.


5. Preview and Save Changes: Use the live preview in the Customizer to see how your changes look on your website. Once satisfied, click Publish to save your edits and make them live.
If you’re using a block-based theme, WordPress offers a dynamic and flexible way to design your footer through the Site Editor. This powerful tool allows you to add, rearrange, and style individual blocks to create a fully customized footer bar.
To make things easier, I’ll walk you through how to edit the footer using the UniBlock theme as an example:
1. Navigate to Appearance > Editor (also called Site Editor in some installations).


2. Once the editor opens, navigate to Patterns.
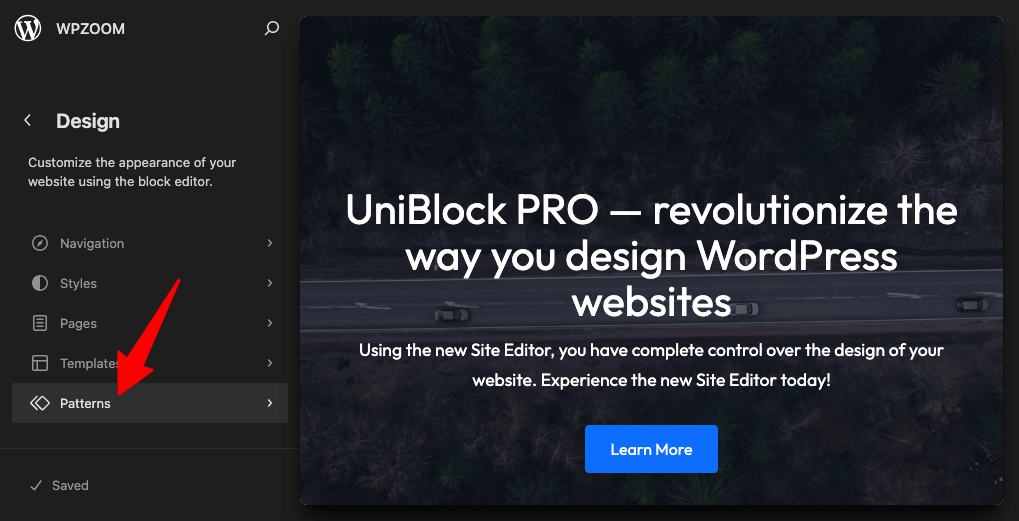

3. Click Footer in the left menu and choose the footer you want to edit from the right side of the screen.


You can also select the footer directly when editing a page and click the Edit button to start editing the footer.
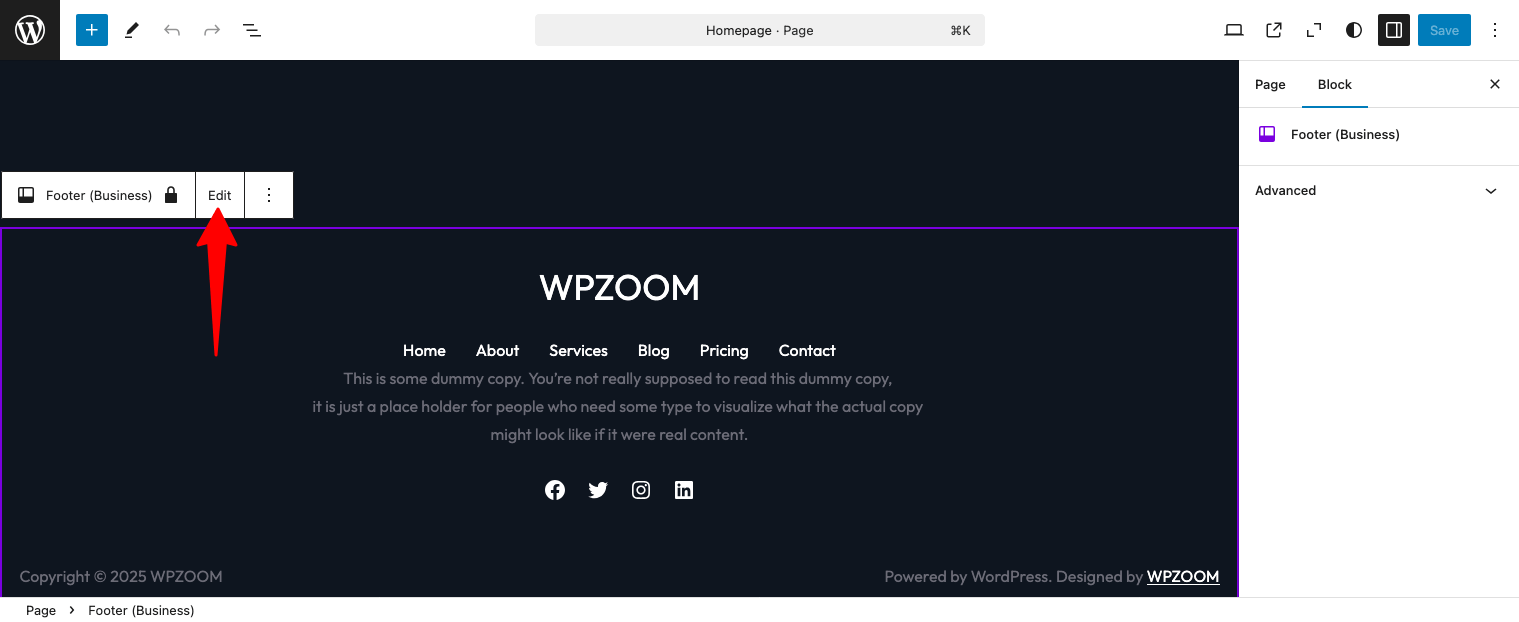

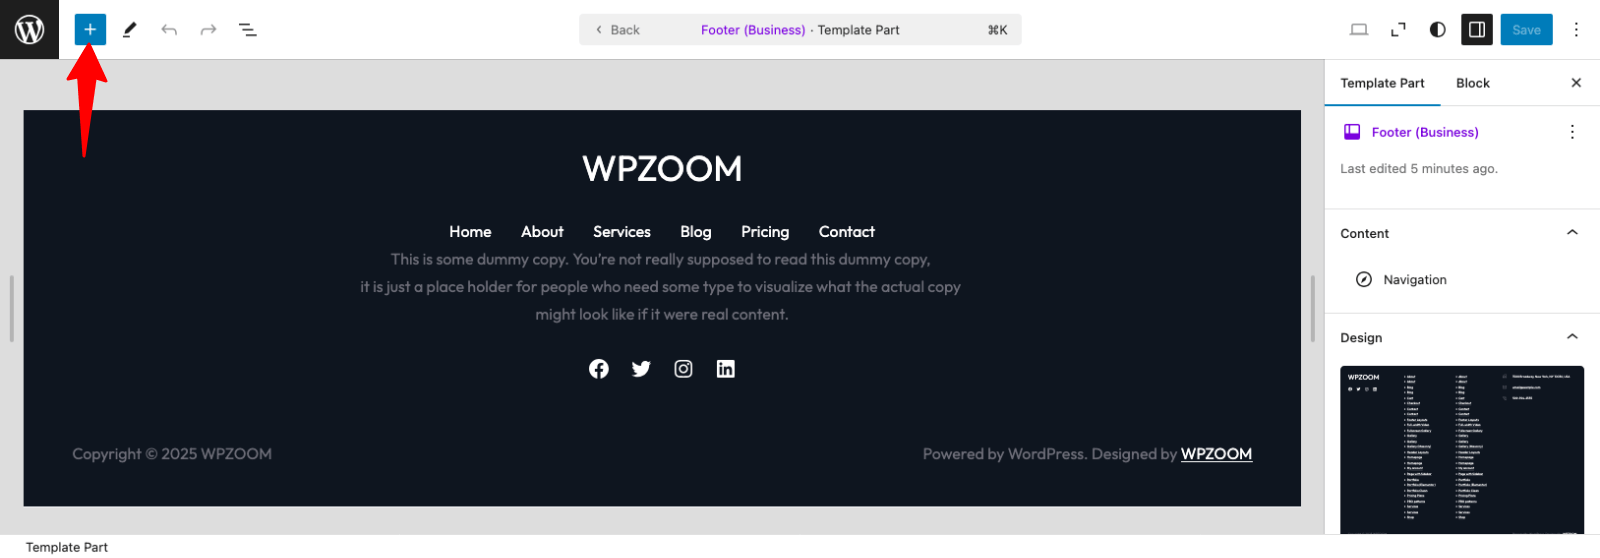
3. Add Footer Blocks: Click the + Add Block button in the footer area. Select blocks such as WordPress Navigation Menus, Social Icons, Paragraphs, or Custom HTML.

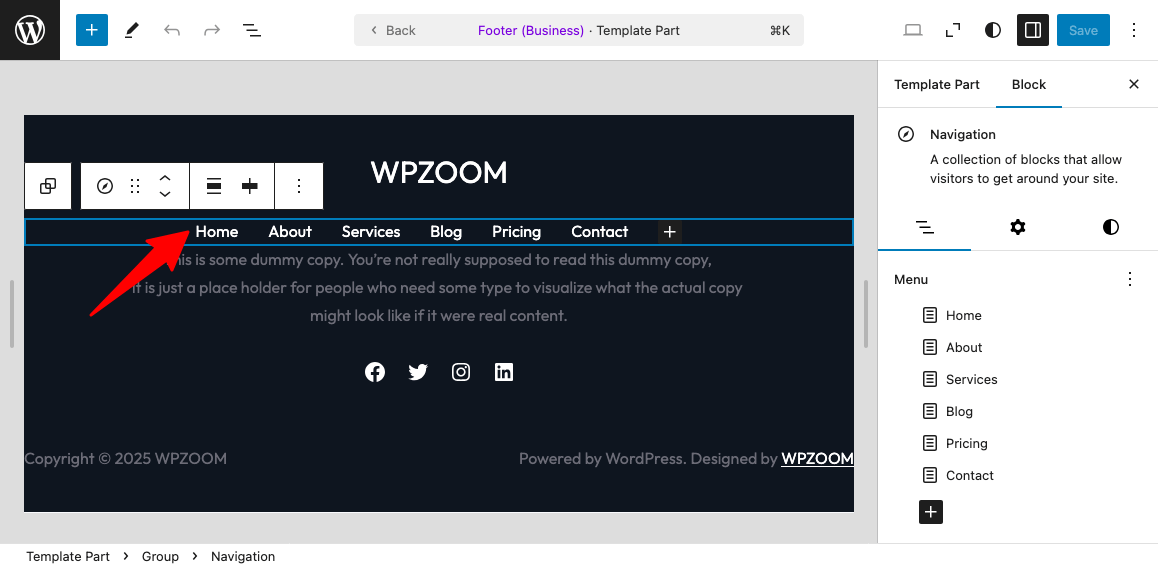
4. Edit Existing Content: Click on any existing block (e.g., text, widgets, or menus) to edit its content directly. Update text, links, or styles using the toolbar options above the block.
For example, click on the menu to start editing it:

5. Rearrange Blocks: Drag and drop blocks to rearrange their order within the footer. Use alignment and spacing options to create the desired layout.
6. Style the Footer: Explore footer styling options such as adjusting colors, fonts, padding, and margins. Customize the footer background or typography to align with your site’s branding.
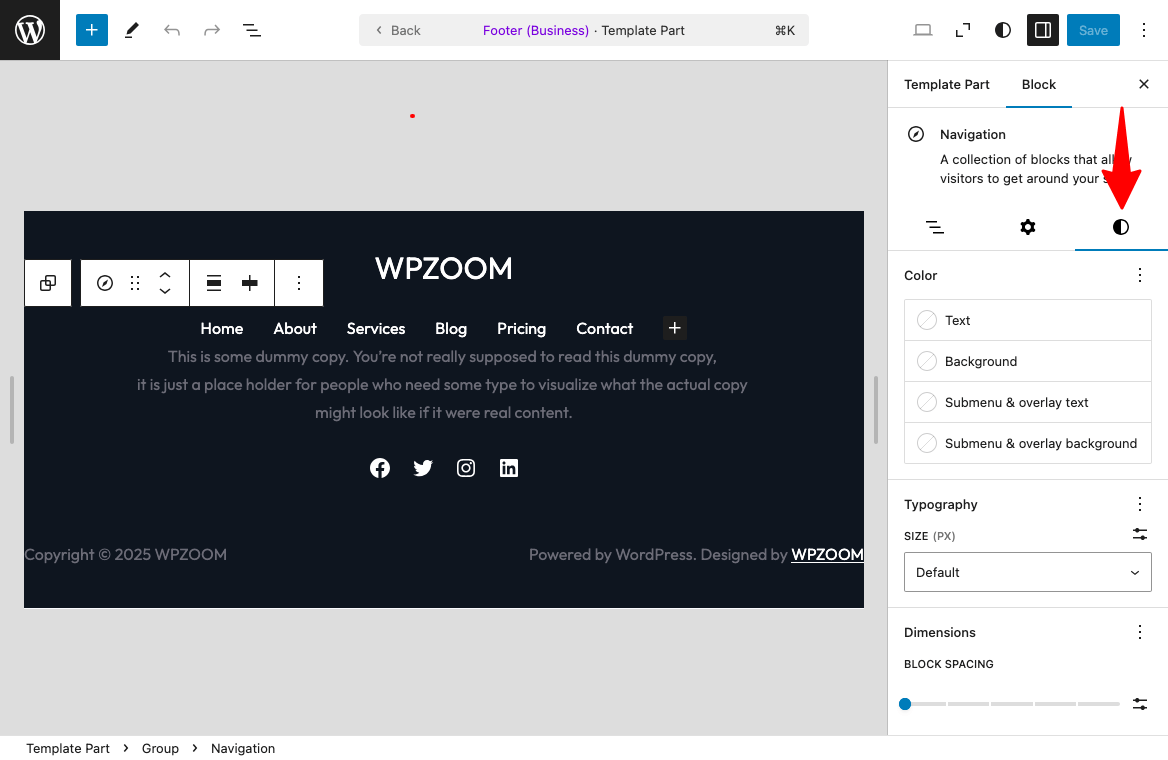
For example, when the menu block is selected, click the Styles icon and you’ll see all the styling options available for this block:

7. Save and Publish Changes: After making your edits, click the Save button in the top-right corner of the editor. Choose whether to save changes to the entire template or specific blocks, then confirm your changes.
Upgrade Your Website with a Premium WordPress Theme
Find a theme that you love and get a 20% discount at checkout with the FLASH20 code

Not all WordPress themes come with advanced tools for customizing the footer. In these cases, you’ll need to manually edit the footer.php file to make the changes you want.
But before diving into code, it’s critical to use a child theme. Why? Because without one, any updates to your theme could erase your hard work. A child theme ensures your customizations are safe and allows you to modify your footer confidently without the risk of losing changes down the line. Just follow these steps:
1. Activate or Create a Child Theme:
Navigate to Appearance > Themes to check if a child theme already exists and is activated.
If one doesn’t exist, follow our tutorial to create a child theme and activate it.
2. Move the footer.php File to Your Child Theme:
Before making edits, you need to copy the footer.php file from your parent theme to your child theme.
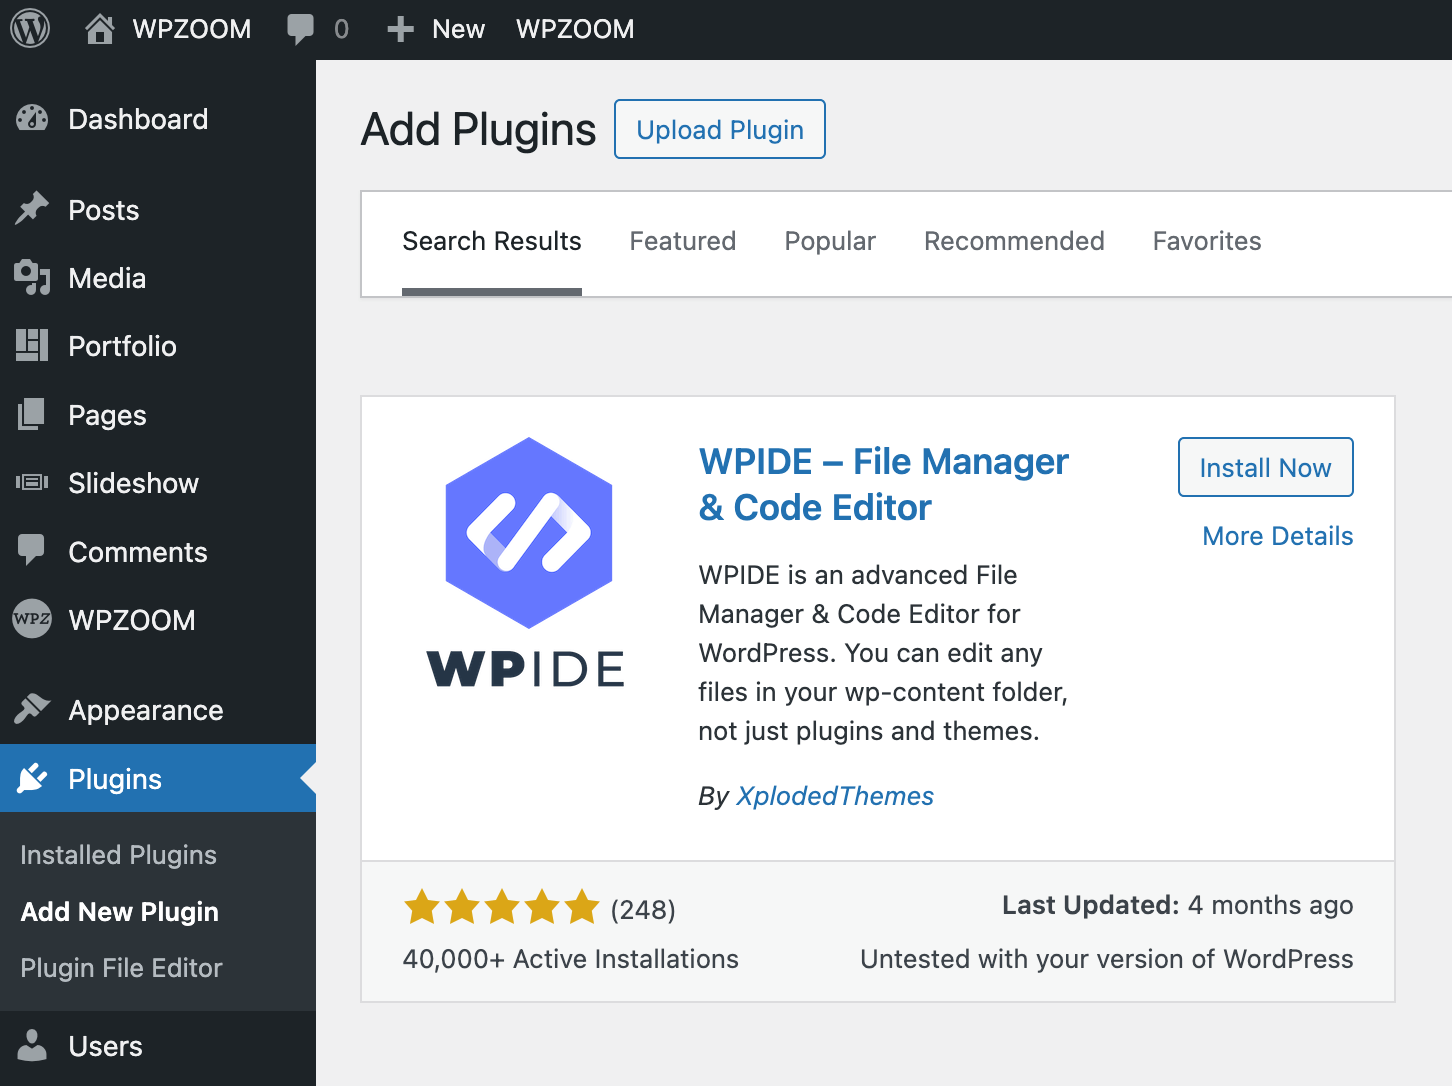
The easiest way to do this is by using the WPIDE plugin, which allows you to move files between theme directories and provides a better interface for editing theme files:
Install and activate the WPIDE plugin from Plugins > Add New Plugin.

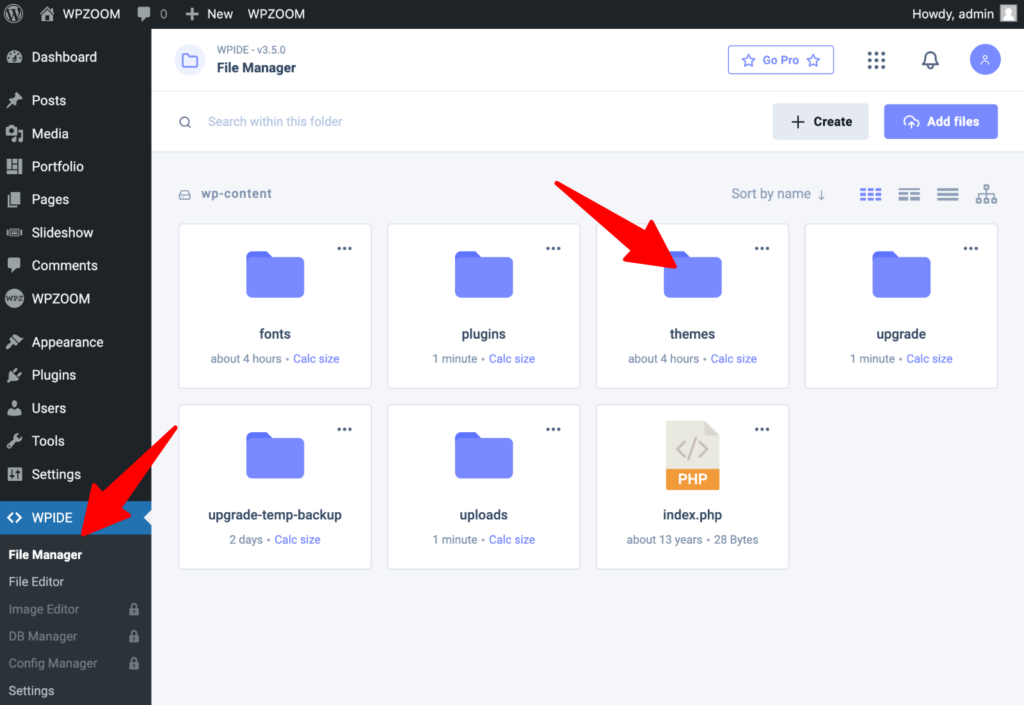
Navigate to WPIDE > File Manager, click on themes and navigate to your theme parent folder.

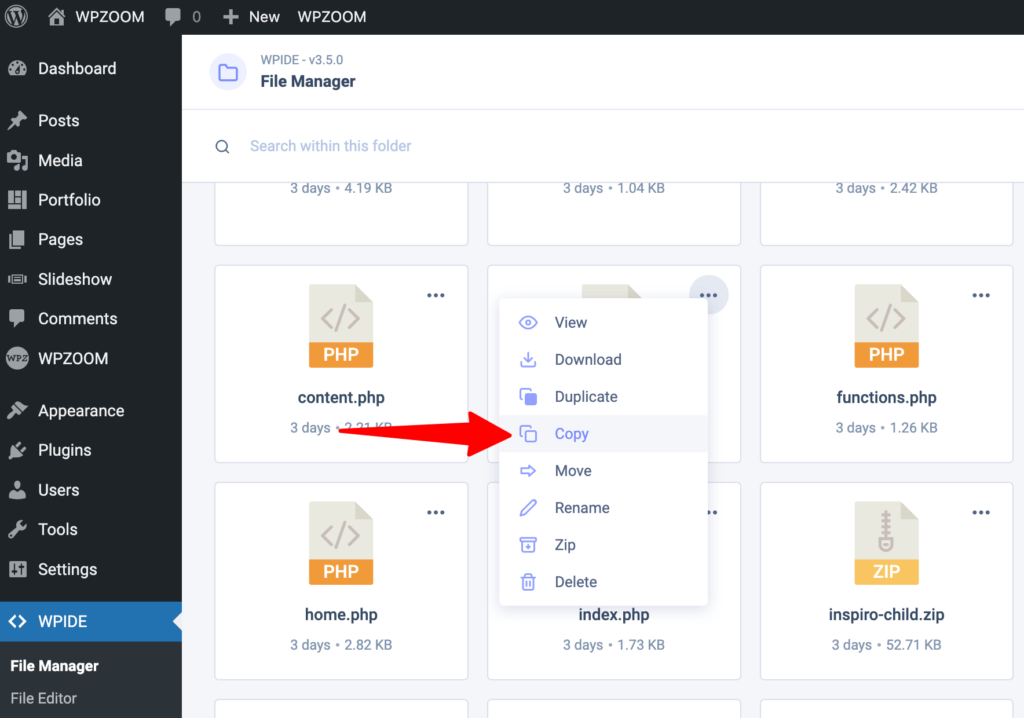
Locate footer.php, click the 3-dots icon, click Copy, choose your child theme folder to copy it their.

3. Edit the footer.php File.
Now that footer.php is safely in your child theme, you can edit it directly from the WordPress Theme File Editor:
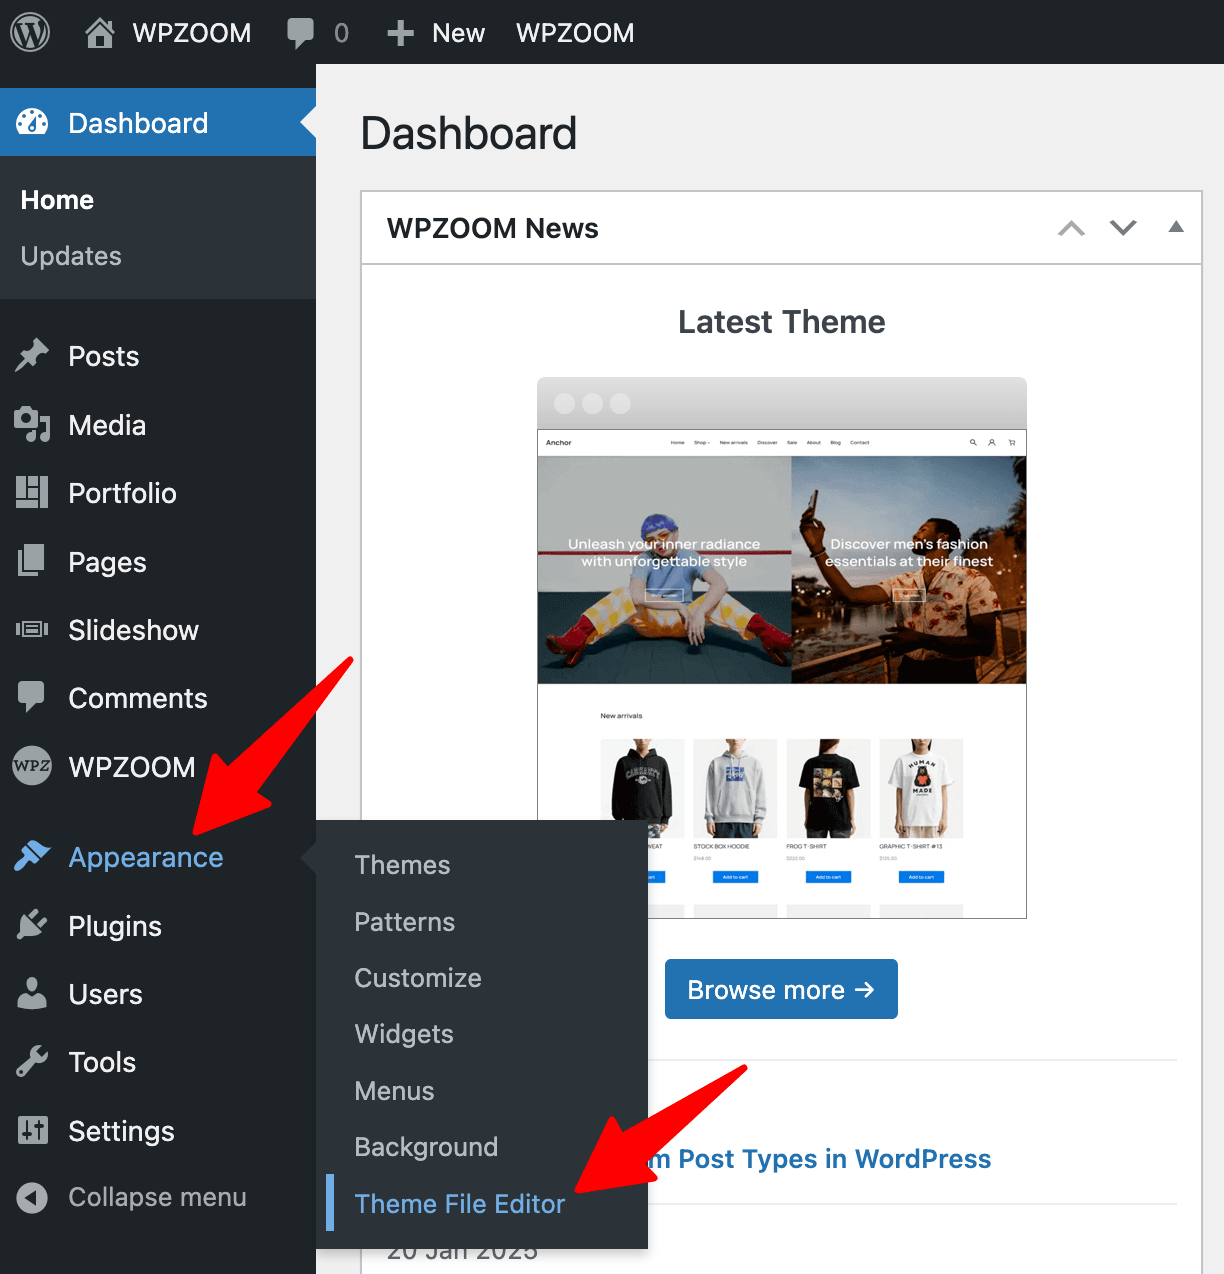
Go to Appearance > Theme File Editor.

Select your child theme from the dropdown.
Locate and open footer.php.


Edit the code as needed to remove “Powered by WordPress,” add custom elements, or even add code to the footer for advanced customization.
Click Update File to save your changes.
5. Test and Verify Changes. Visit your website to ensure the footer updates appear as intended. Verify that the edits do not interfere with your theme’s functionality or design.
If you’re using a block-based theme, the Theme File Editor has been moved under Tools > Theme File Editor instead of Appearance. However, manually editing footer.php in block themes is not practical because these themes rely on the Site Editor for managing footer content visually. Changes made directly in footer.php may not affect the footer’s appearance, making the Site Editor a better solution for block-based themes.
Now that you know how to edit your footer, let’s explore how you can customize your footer even further by adding navigation menus and widgets. These features allow you to provide quick access to important pages and add interactive elements, making your footer practical for your visitors.
Adding navigation menus to your footer is a simple yet powerful way to help visitors quickly find key pages on your site, like contact details, legal disclaimers, or important services. Depending on whether you’re using a standard theme or a block-based theme, the steps to set up a footer menu will differ slightly:
For Standard Themes
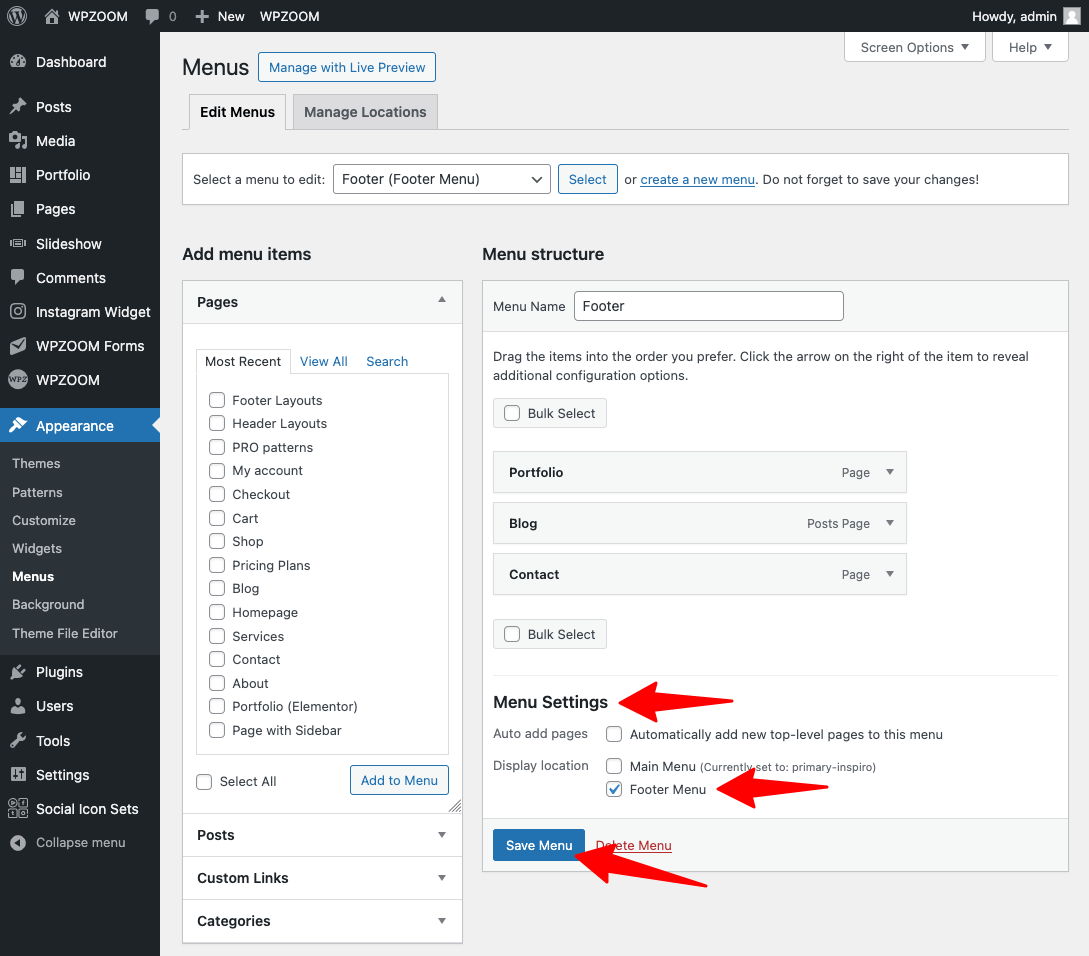
1. Navigate to Appearance > Menus.
2. Create a new menu or edit an existing one. Add the pages, categories, or custom links you want to include in the footer menu.
Click Save Menu to confirm changes.
3. Assign the menu to the Footer Menu location:
Look for a section labeled Menu Settings and select the Footer Menu checkbox.
Click Save Menu again to apply the changes.

For Block-Based Themes
1. Go to Appearance > Editor (Site Editor).
2. Scroll down in the page editor, select the footer and click the Edit button to start editing the footer.
3. Click the + Add Block button in the footer area.
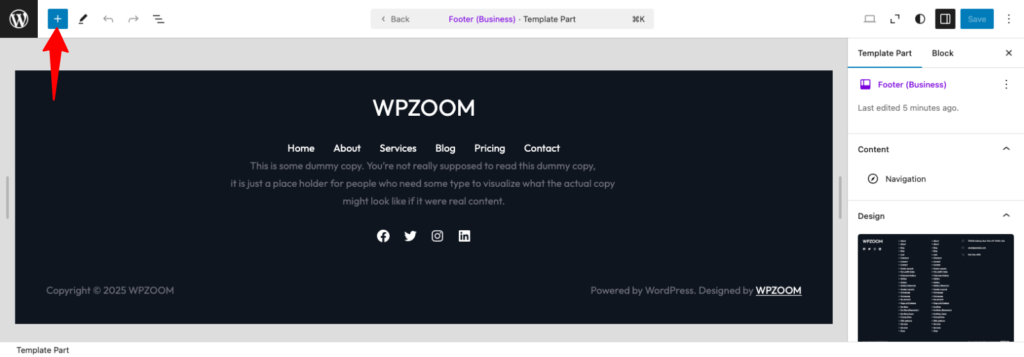

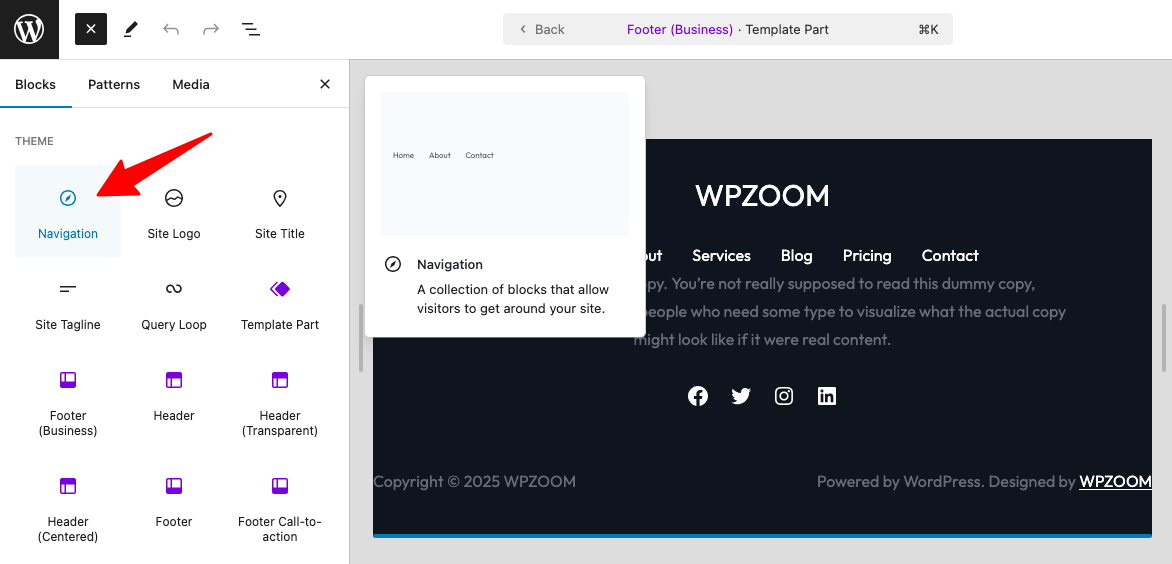
Search for the Navigation block and select it.

Customize the links and their order within the block settings.
4. Save your changes and preview your site to ensure the menu appears correctly.
Widgets are a fantastic way to enhance your footer with extra functionality and engaging content. You can use them to add social media icons, display recent posts, include custom HTML, or even add a contact form, making your footer more useful and interactive for your visitors.
For Standard Themes
1. Navigate to Appearance > Widgets.
2. Locate the footer widget area, usually containing “Footer” in its name.
3. Drag and drop a widget from Available Widgets to the footer widget area.
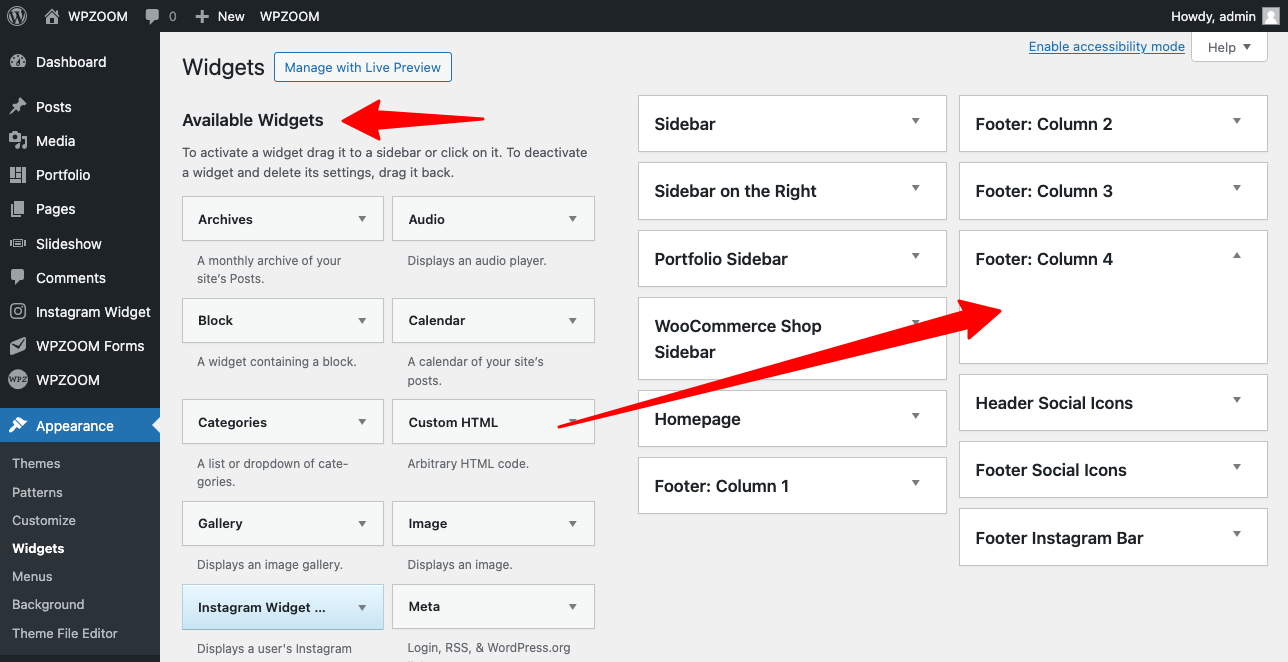

4. Save your changes and preview your website.
For Block-Based Themes
1. Go to Appearance > Editor (Site Editor).
2. Scroll down in the page editor, select the footer and click the Edit button to start editing the footer.
3. Click the + Add Block button and search for the Widgets blocks.
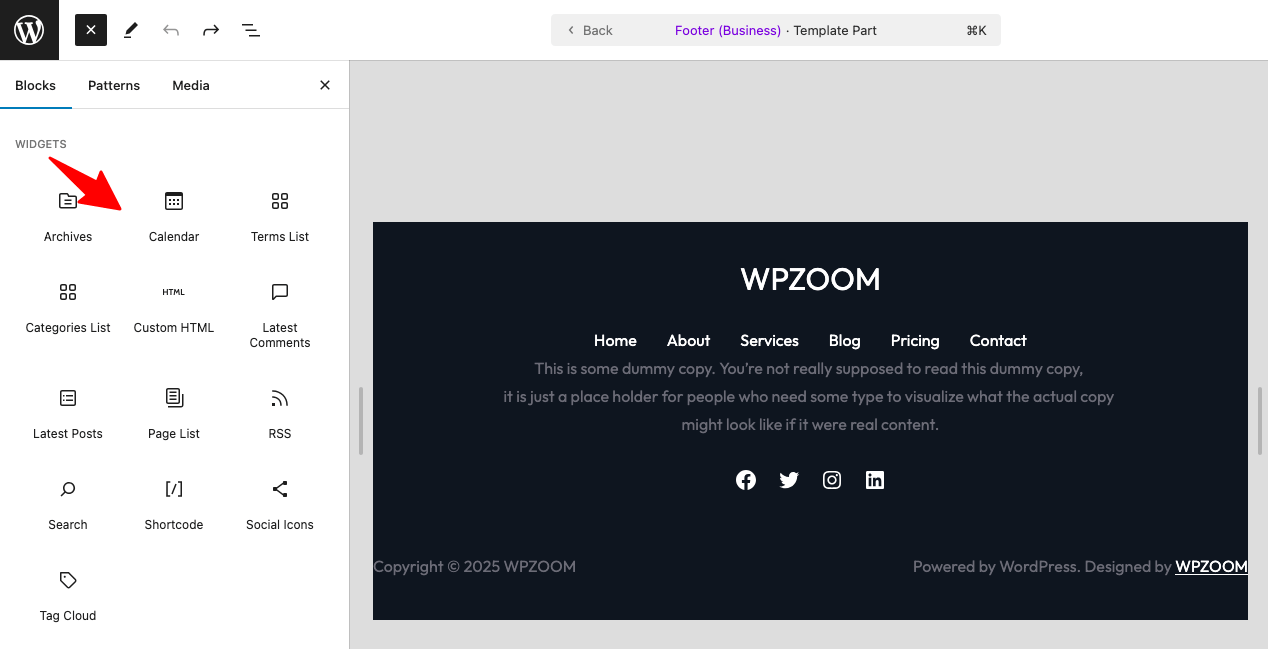

Drag and drop the blocks into the footer layout.
4. Customize the settings for each block, such as alignment, padding, or styling.
5. Save your changes and preview the site to ensure the widgets display correctly.
Plugins are a great way to simplify footer customization and add extra options to your WordPress footer. While they won’t allow you to fully edit or redesign your footer like some of the methods we’ve already covered, they can enhance it by offering additional ways to tweak and personalize specific elements.
Here are some popular WordPress plugins to help you further customize your footer:
- WPCode plugin is a powerful tool for managing custom code snippets. It lets you add custom HTML, CSS, or JavaScript to your footer without touching the theme files.
- Remove Footer Credit plugin is a simple solution for removing or replacing default footer text like “Powered by WordPress.” Perfect for creating a more professional look.
- Header Footer Code Manager plugin allows you to easily add custom footer scripts or HTML to your site’s footer without editing theme files.
Customizing your footer can be straightforward and even enjoyable with the right tools.
WPZOOM’s premium themes make it easy to create a footer that perfectly matches your website’s style and needs. Whether you want to add branding, enhance functionality, or make your site more user-friendly, these themes offer intuitive options for all skill levels.
Don’t settle for a generic footer—take control of this key design element and leave a lasting impression on your visitors.

