Sometimes your WordPress website needs a fresh start. Security breaches, performance problems, cluttered databases, or major rebranding projects can all signal it’s time to reset your site.
While this might sound intimidating, resetting WordPress is straightforward when you plan carefully and create proper backups first. You can accomplish this task using plugins or manual methods, both of which we’ll cover step-by-step.
Table of Contents
- Preparing to Reset Your WordPress Site
- Reset Your WordPress Site Using WP Reset Plugin
- Reset Your WordPress Site Manually
- Post-Reset Steps and Recommendations
- When to Reset Your WordPress Site
- When NOT to Reset Your WordPress Site
Preparing to Reset Your WordPress Site
Proper preparation protects your data and ensures recovery options if something goes wrong during the reset process.
- Backup your site completely before making any changes. A comprehensive backup includes WordPress files, database, themes, plugins, and media uploads. This backup serves as your safety net for restoration if needed.
- Document current settings to speed rebuilding. Take screenshots of dashboard settings, active plugins, and theme customizations. This documentation helps recreate your site efficiently after the reset.
For detailed backup instructions, check our comprehensive guide on How to Back up Your WordPress Site.
Reset Your WordPress Site Using WP Reset Plugin
The WP Reset plugin offers the safest and most user-friendly way to reset a wordpress site to default settings. This method gives you control over what gets deleted and provides safety features like snapshots.
Step 1: Install and Access WP Reset
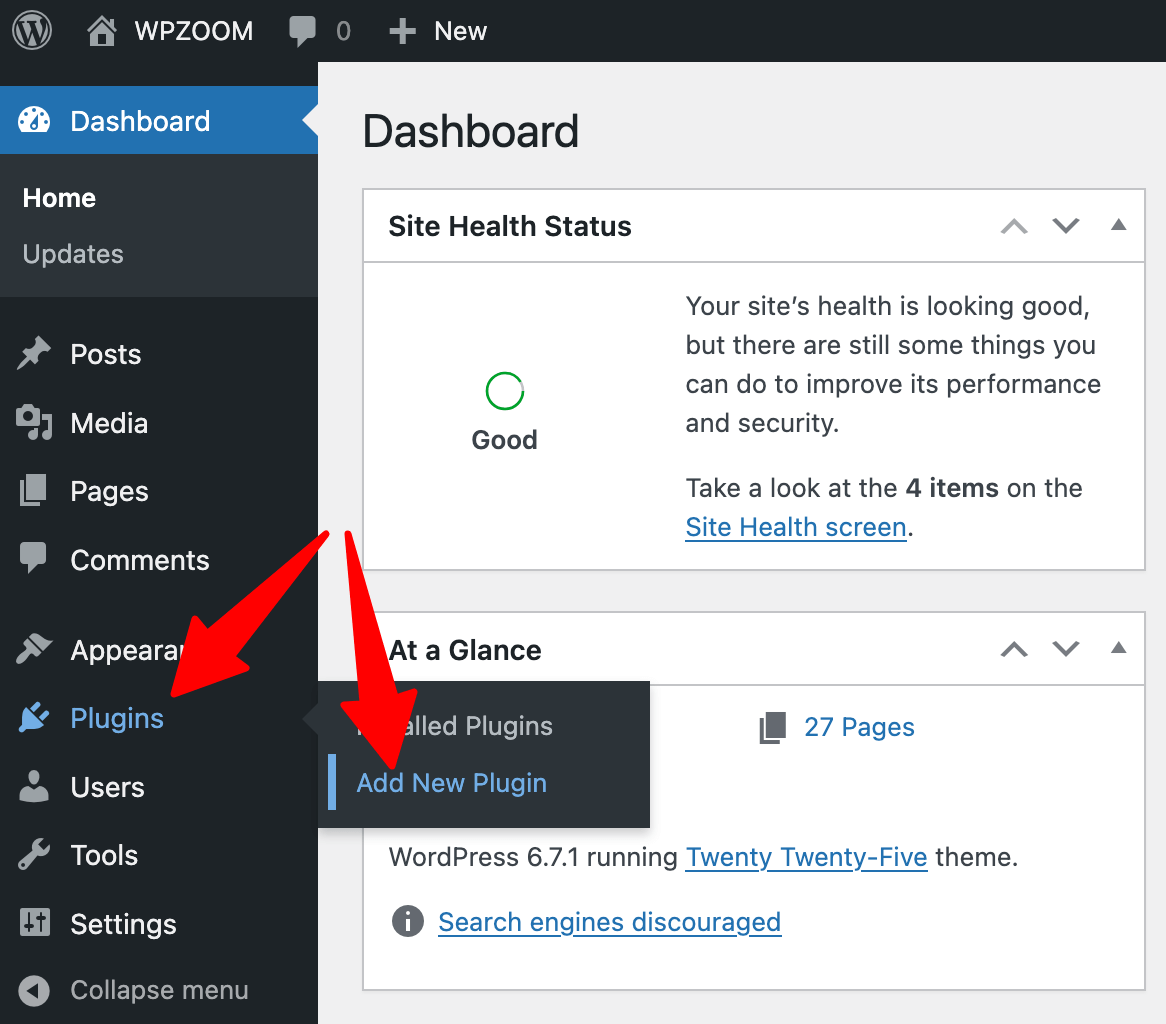
Navigate to Plugins > Add New in your WordPress dashboard.

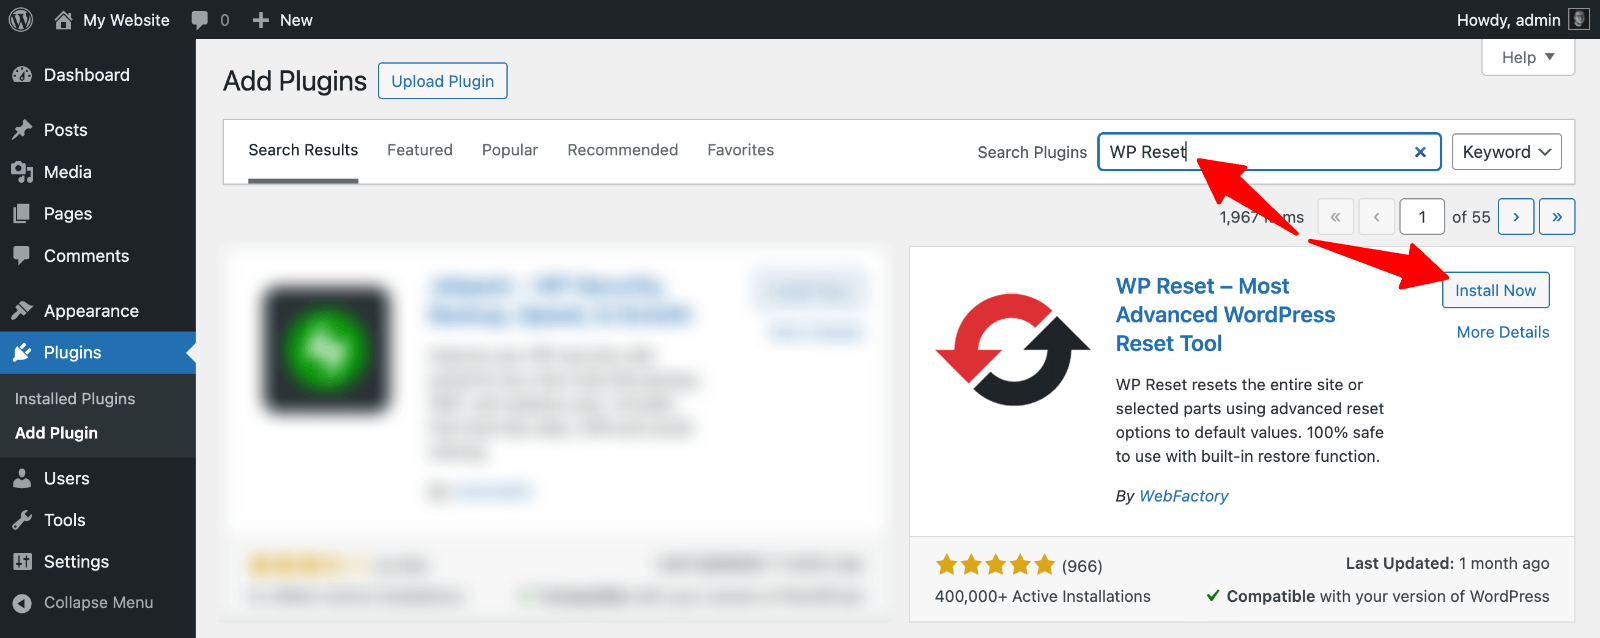
Search for “WP Reset”, click Install Now, and Activate to enable the plugin.

Step 2: Create a Safety Snapshot
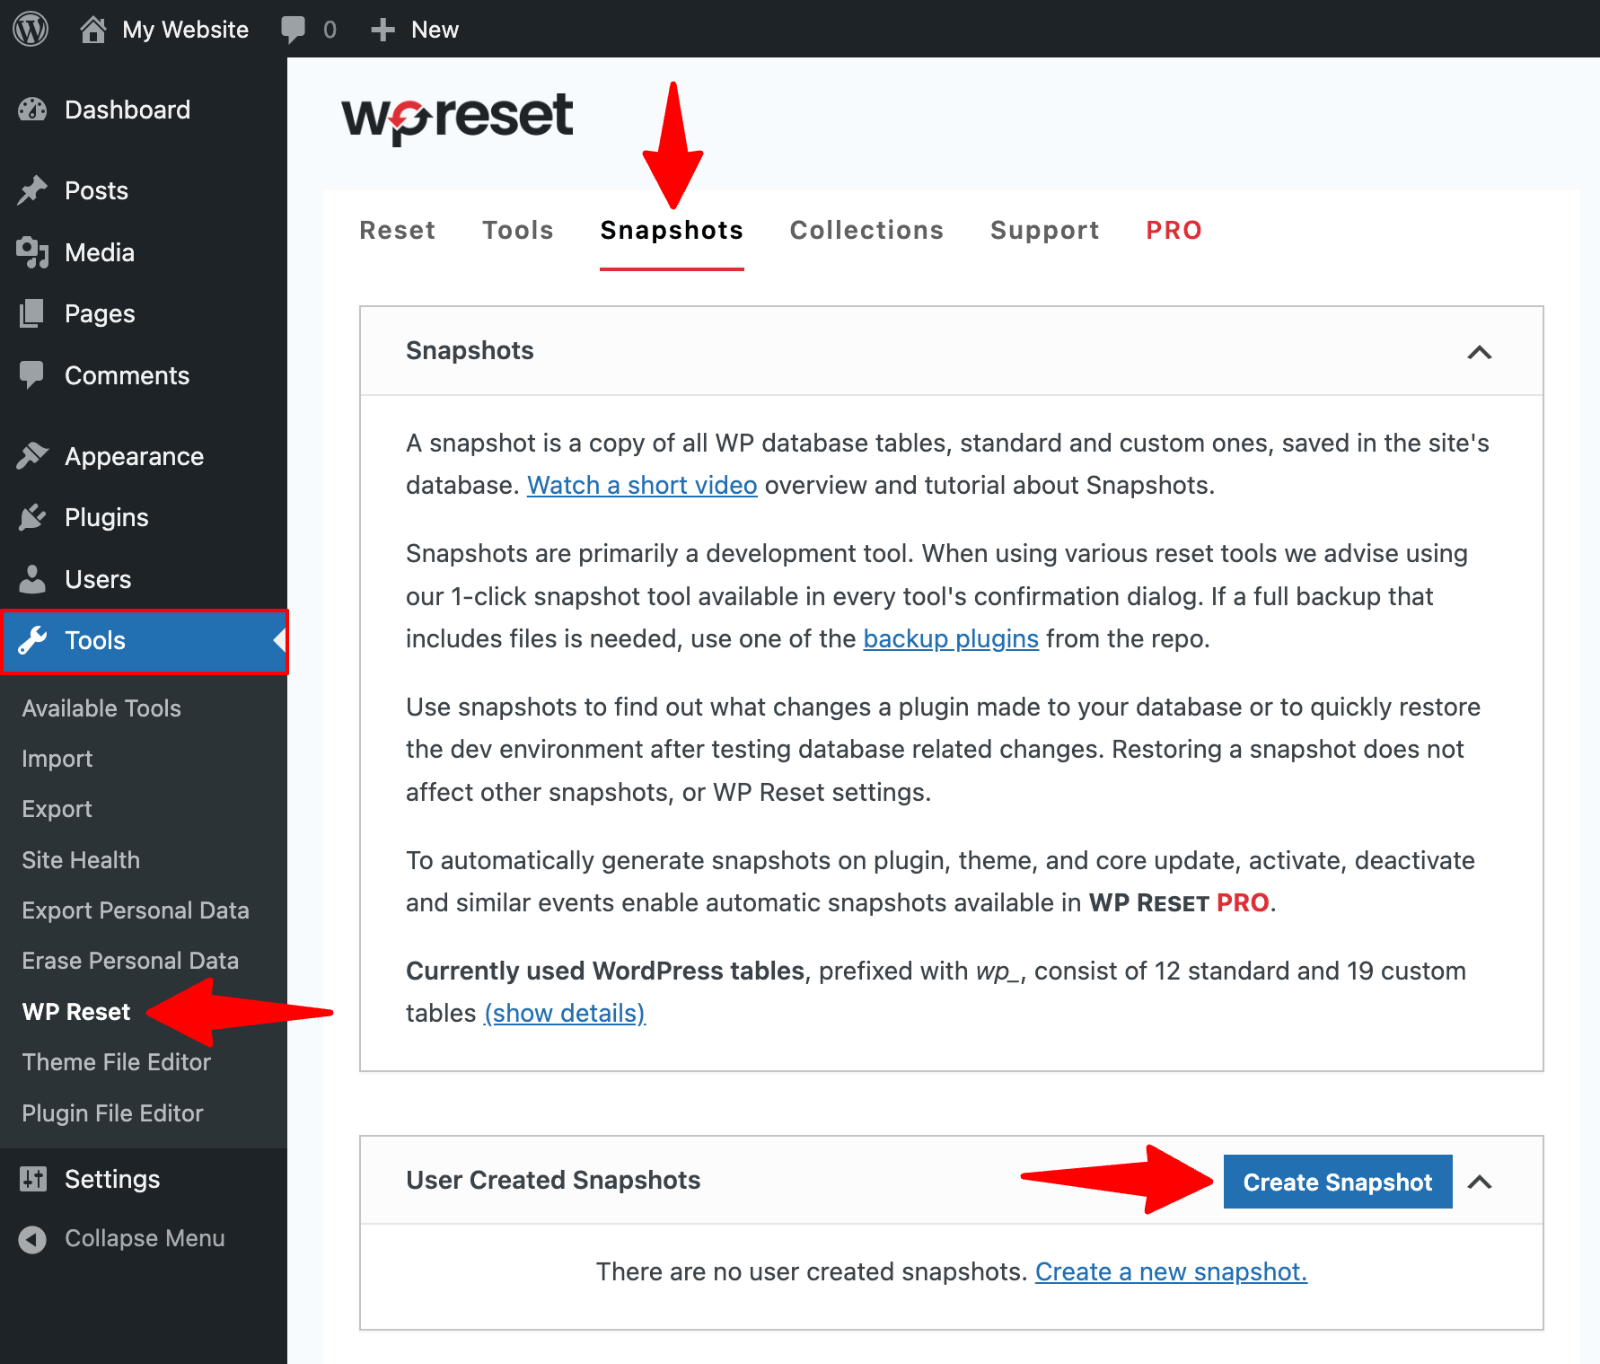
Go to Tools > WP Reset > Snapshots and click “Create Snapshot”.
 Snapshots” class=”wp-image-814477″ srcset=”https://b8f4g5a7.delivery.rocketcdn.me/wp-content/uploads/2025/05/WP-Reset-snapshots.png 1600w, https://b8f4g5a7.delivery.rocketcdn.me/wp-content/uploads/2025/05/WP-Reset-snapshots-734×626.png 734w, https://b8f4g5a7.delivery.rocketcdn.me/wp-content/uploads/2025/05/WP-Reset-snapshots-1024×873.png 1024w, https://b8f4g5a7.delivery.rocketcdn.me/wp-content/uploads/2025/05/WP-Reset-snapshots-1536×1309.png 1536w” sizes=”(max-width: 1600px) 100vw, 1600px”/>
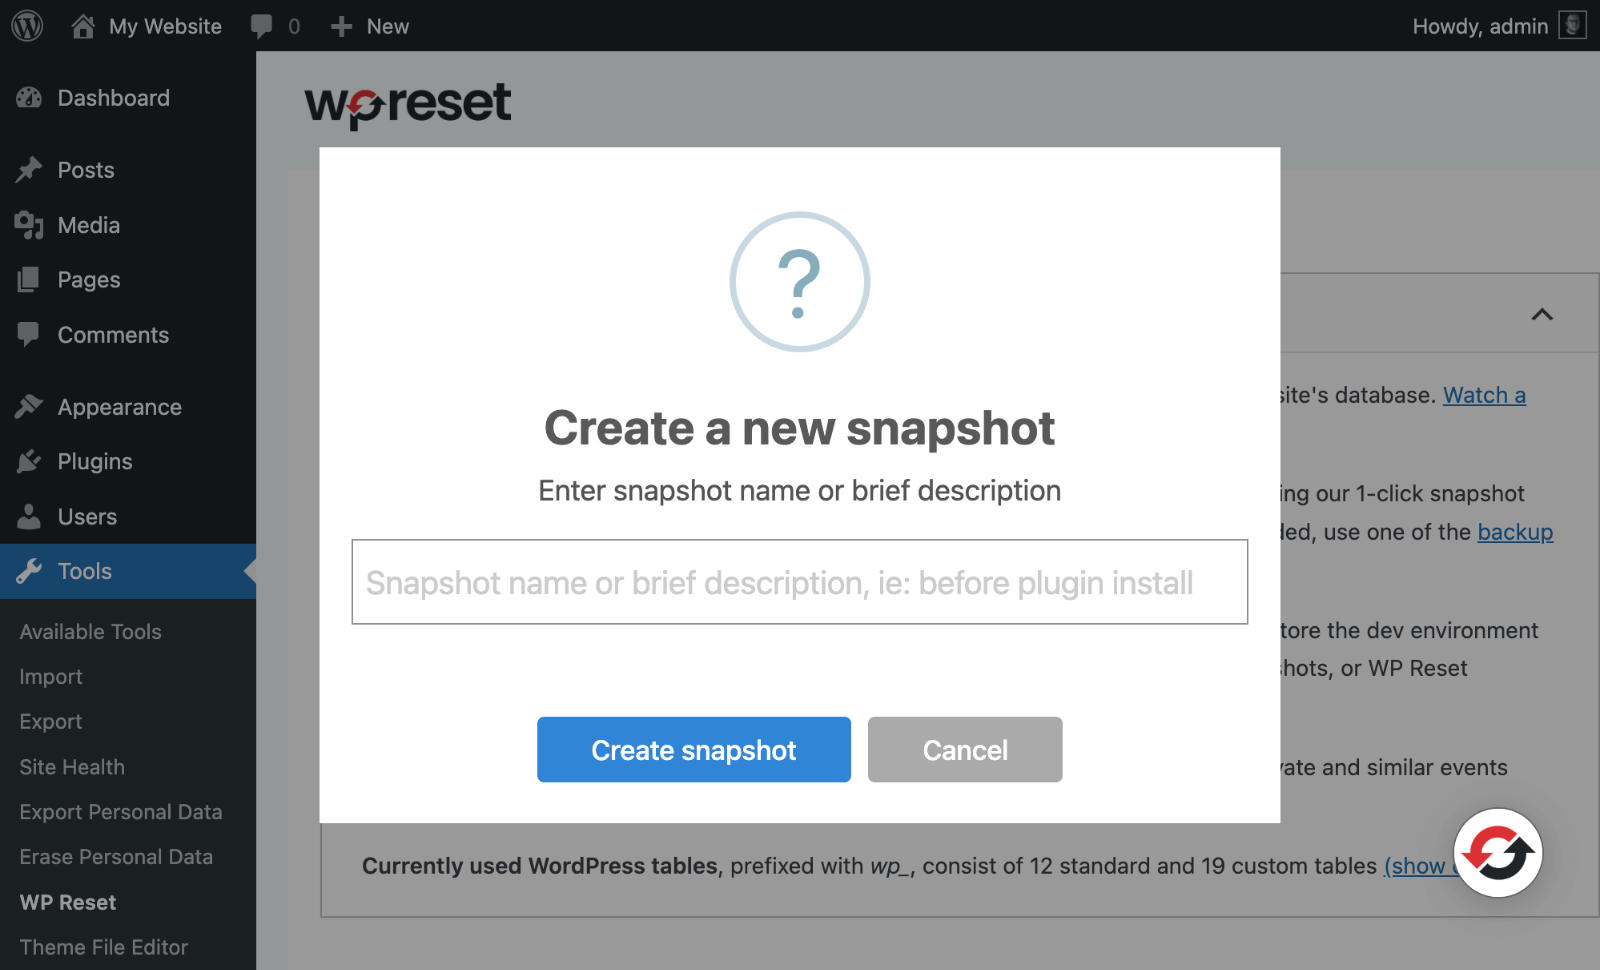
Give your snapshot a descriptive name like “Pre-reset backup” and click “Create snapshot“.
 Snapshot name” class=”wp-image-814478″ srcset=”https://b8f4g5a7.delivery.rocketcdn.me/wp-content/uploads/2025/05/WP-Reset-snapshot-name.png 1600w, https://b8f4g5a7.delivery.rocketcdn.me/wp-content/uploads/2025/05/WP-Reset-snapshot-name-734×445.png 734w, https://b8f4g5a7.delivery.rocketcdn.me/wp-content/uploads/2025/05/WP-Reset-snapshot-name-1024×621.png 1024w, https://b8f4g5a7.delivery.rocketcdn.me/wp-content/uploads/2025/05/WP-Reset-snapshot-name-1536×931.png 1536w” sizes=”(max-width: 1600px) 100vw, 1600px”/>
Wait for the snapshot creation to complete. This captures your current database state for potential restoration.
Step 3: Execute the Reset
Go to the “Reset” section and review what will be deleted and preserved during the reset.
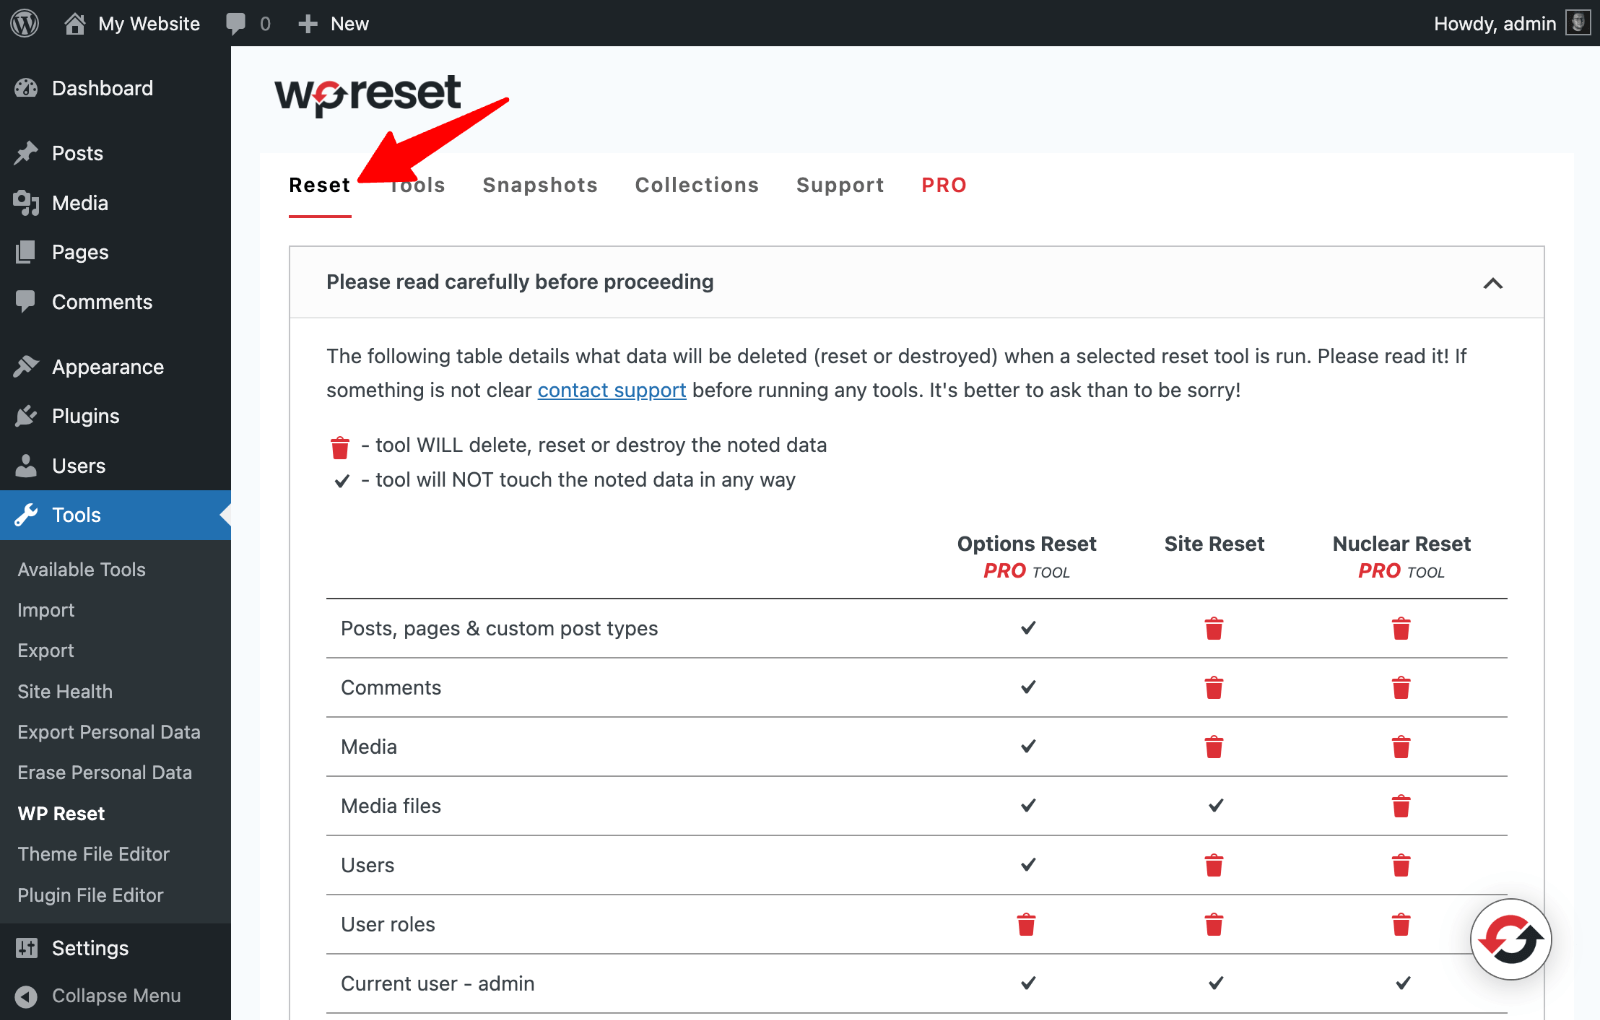

Scroll to the “Site Reset” section.
Choose whether to reactivate your current theme, active plugins, and the WP Reset plugin after reset.
Type “reset” in the confirmation field exactly as shown.
Click “Reset Site” button.
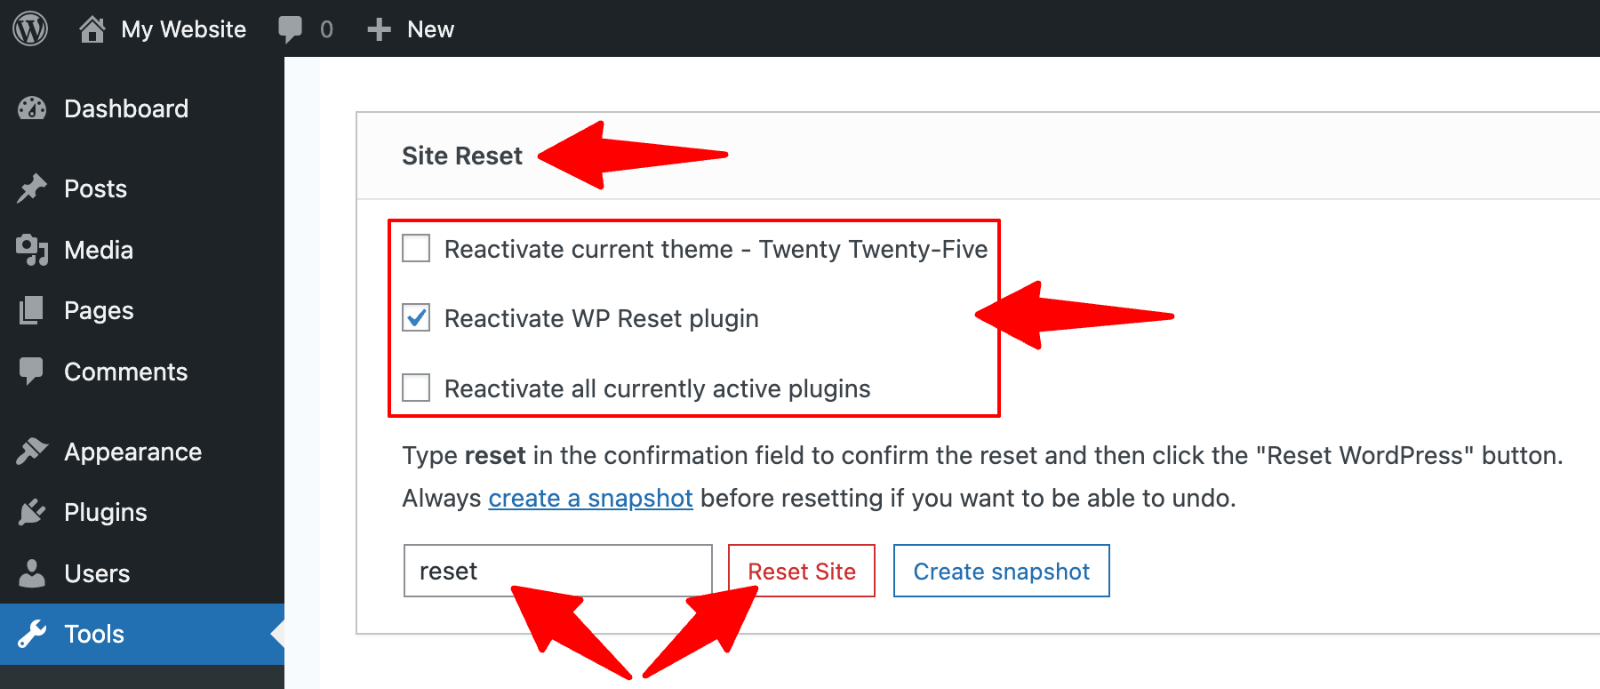 Site reset” class=”wp-image-814481″ srcset=”https://b8f4g5a7.delivery.rocketcdn.me/wp-content/uploads/2025/05/WP-Reset-site-reset.png 1600w, https://b8f4g5a7.delivery.rocketcdn.me/wp-content/uploads/2025/05/WP-Reset-site-reset-734×316.png 734w, https://b8f4g5a7.delivery.rocketcdn.me/wp-content/uploads/2025/05/WP-Reset-site-reset-1024×441.png 1024w, https://b8f4g5a7.delivery.rocketcdn.me/wp-content/uploads/2025/05/WP-Reset-site-reset-1536×661.png 1536w” sizes=”(max-width: 1600px) 100vw, 1600px”/>
Confirm the action in the pop-up dialog by clicking “Reset WordPress”.
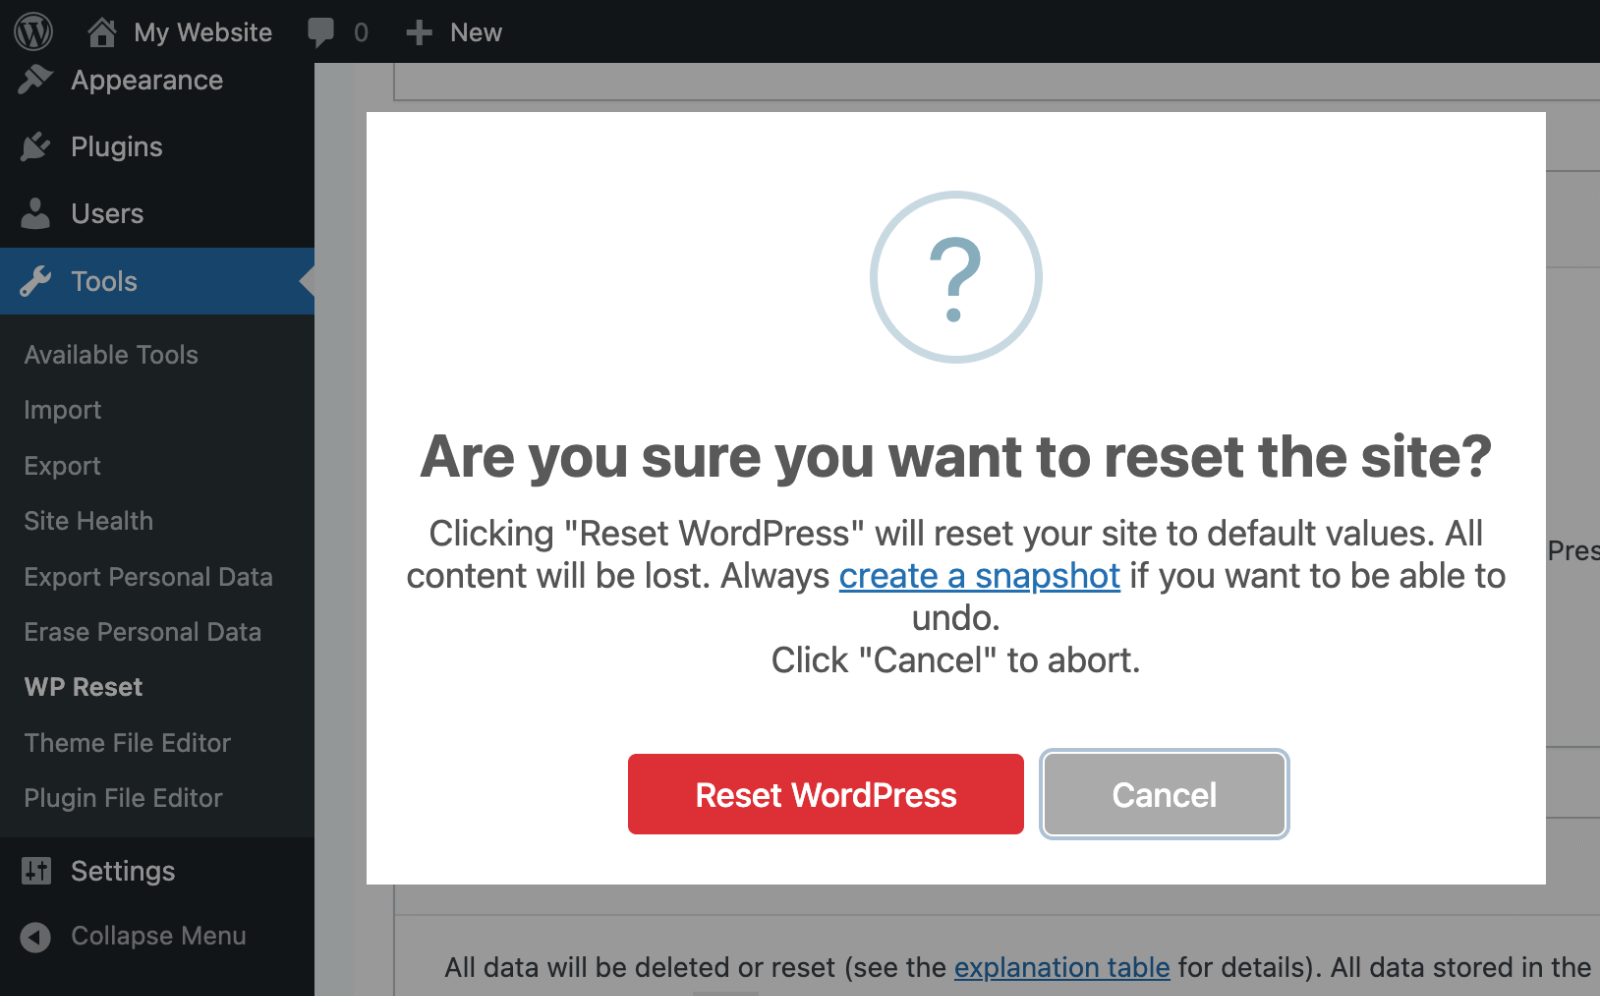 Confirm reset” class=”wp-image-814482″ style=”width:650px” srcset=”https://b8f4g5a7.delivery.rocketcdn.me/wp-content/uploads/2025/05/WP-Reset-confirm-reset.png 1600w, https://b8f4g5a7.delivery.rocketcdn.me/wp-content/uploads/2025/05/WP-Reset-confirm-reset-734×457.png 734w, https://b8f4g5a7.delivery.rocketcdn.me/wp-content/uploads/2025/05/WP-Reset-confirm-reset-1024×637.png 1024w, https://b8f4g5a7.delivery.rocketcdn.me/wp-content/uploads/2025/05/WP-Reset-confirm-reset-1536×956.png 1536w” sizes=”(max-width: 1600px) 100vw, 1600px”/>
Step 4: Complete the Process
Wait for the reset to complete (typically under one minute).
Log back in using your administrator credentials.
Verify that posts, pages, and media files have been removed.
Use the Tools section to delete remaining themes and plugins if desired.
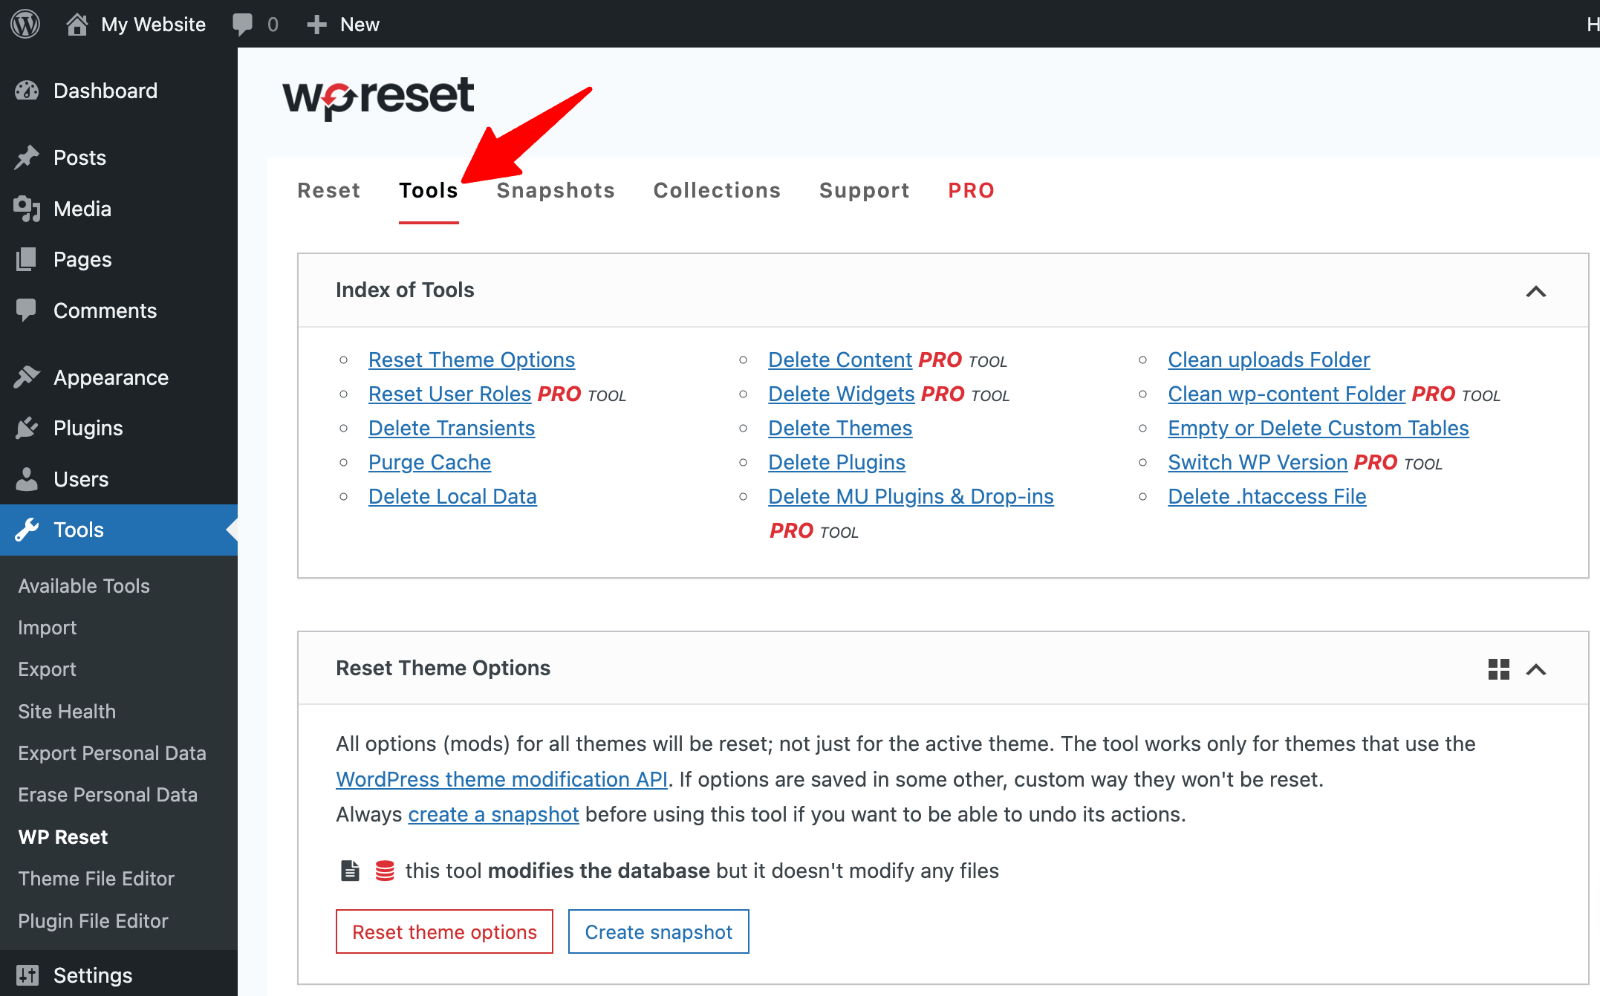 Tools” class=”wp-image-814485″ srcset=”https://b8f4g5a7.delivery.rocketcdn.me/wp-content/uploads/2025/05/WP-Reset-tools.png 1600w, https://b8f4g5a7.delivery.rocketcdn.me/wp-content/uploads/2025/05/WP-Reset-tools-734×457.png 734w, https://b8f4g5a7.delivery.rocketcdn.me/wp-content/uploads/2025/05/WP-Reset-tools-1024×637.png 1024w, https://b8f4g5a7.delivery.rocketcdn.me/wp-content/uploads/2025/05/WP-Reset-tools-1536×956.png 1536w” sizes=”(max-width: 1600px) 100vw, 1600px”/>
Step 5: Restore Data if Needed
Access the Snapshots section to view saved snapshots.
Restore individual database tables or complete snapshots.
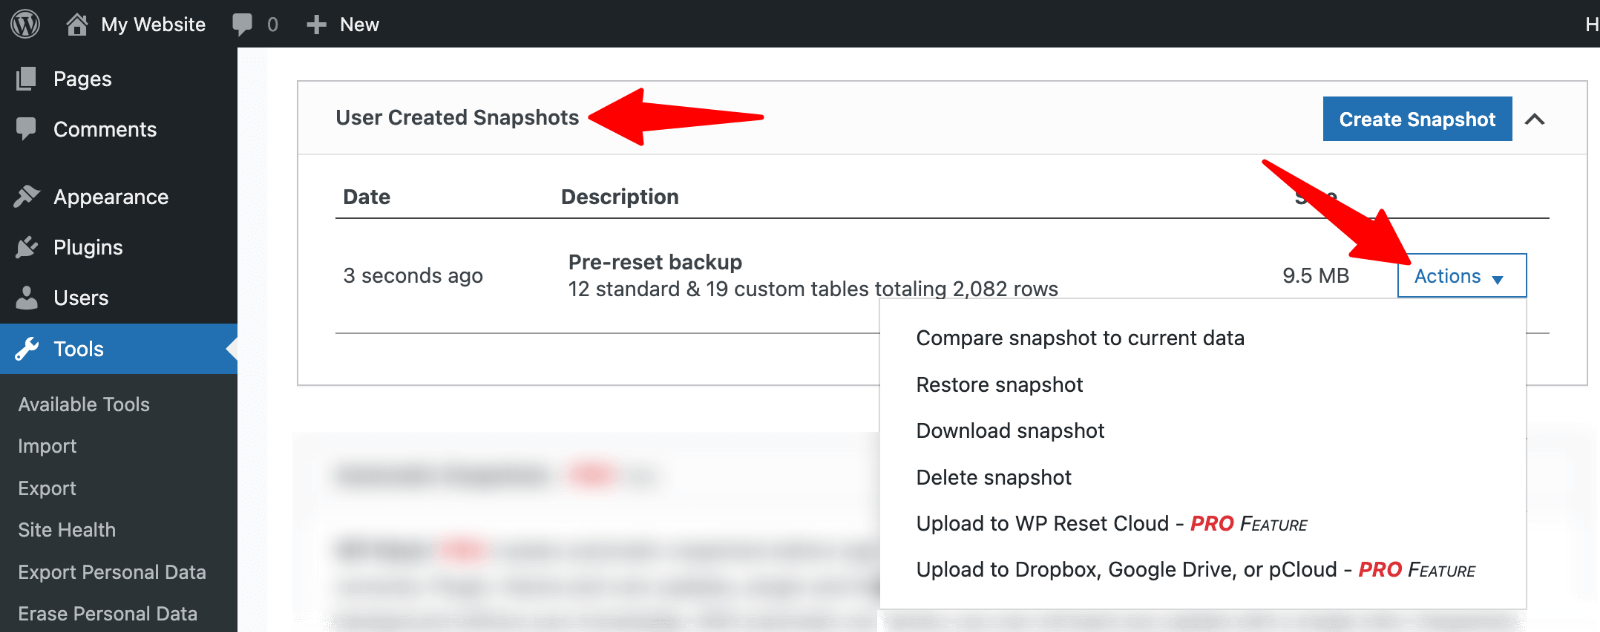 restore data” class=”wp-image-814489″ srcset=”https://b8f4g5a7.delivery.rocketcdn.me/wp-content/uploads/2025/05/WP-Reset-restore-snapshot.png 1600w, https://b8f4g5a7.delivery.rocketcdn.me/wp-content/uploads/2025/05/WP-Reset-restore-snapshot-734×290.png 734w, https://b8f4g5a7.delivery.rocketcdn.me/wp-content/uploads/2025/05/WP-Reset-restore-snapshot-1024×404.png 1024w, https://b8f4g5a7.delivery.rocketcdn.me/wp-content/uploads/2025/05/WP-Reset-restore-snapshot-1536×607.png 1536w” sizes=”(max-width: 1600px) 100vw, 1600px”/>
Use this feature for surgical precision in recovering specific elements.
Reset Your WordPress Site Manually
Manual WordPress reset provides complete control and the most thorough reset possible. This method requires more technical knowledge but ensures comprehensive cleanup.
Step 1: Deleting and Recreating the Database
1. Locate the wp-config.php file. Connect to your website using an FTP client like FileZilla or your hosting provider’s file manager. Navigate to your site’s root directory (usually public_html or www).
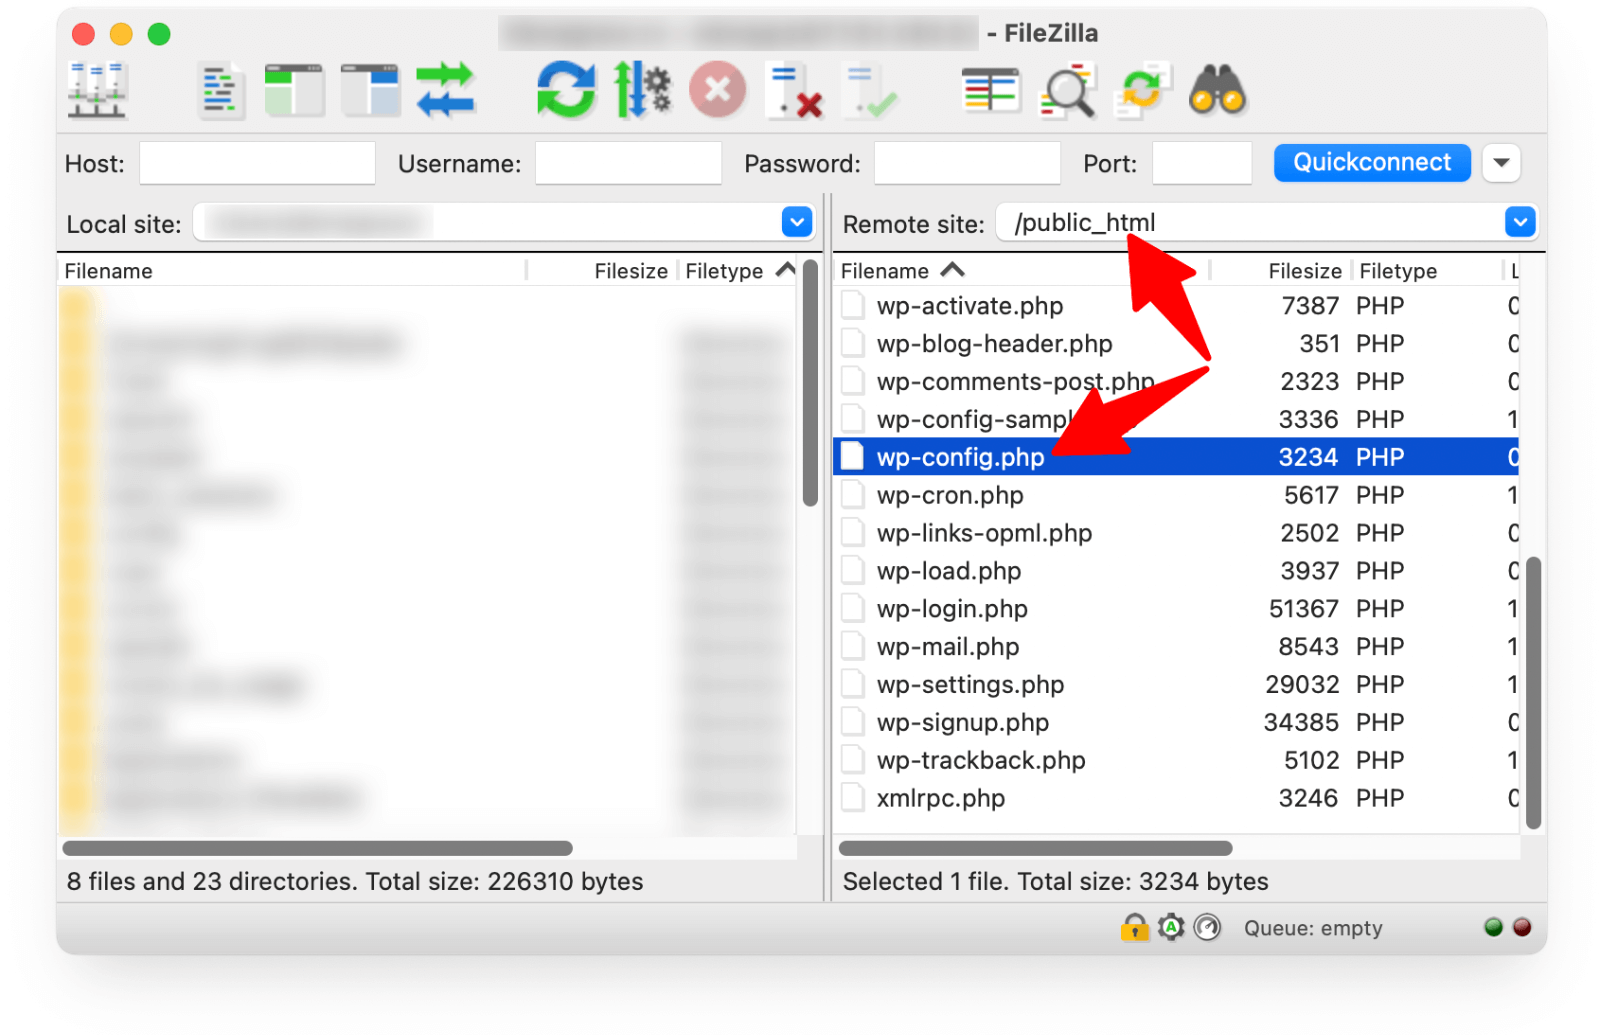 wp-config.php file” srcset=”https://b8f4g5a7.delivery.rocketcdn.me/wp-content/uploads/2025/03/filezilla-wp-config.png 1600w, https://b8f4g5a7.delivery.rocketcdn.me/wp-content/uploads/2025/03/filezilla-wp-config-734×475.png 734w, https://b8f4g5a7.delivery.rocketcdn.me/wp-content/uploads/2025/03/filezilla-wp-config-1024×662.png 1024w, https://b8f4g5a7.delivery.rocketcdn.me/wp-content/uploads/2025/03/filezilla-wp-config-1536×994.png 1536w” sizes=”(max-width: 1600px) 100vw, 1600px”/>
2. Identify your database name and note the username and password for later use.
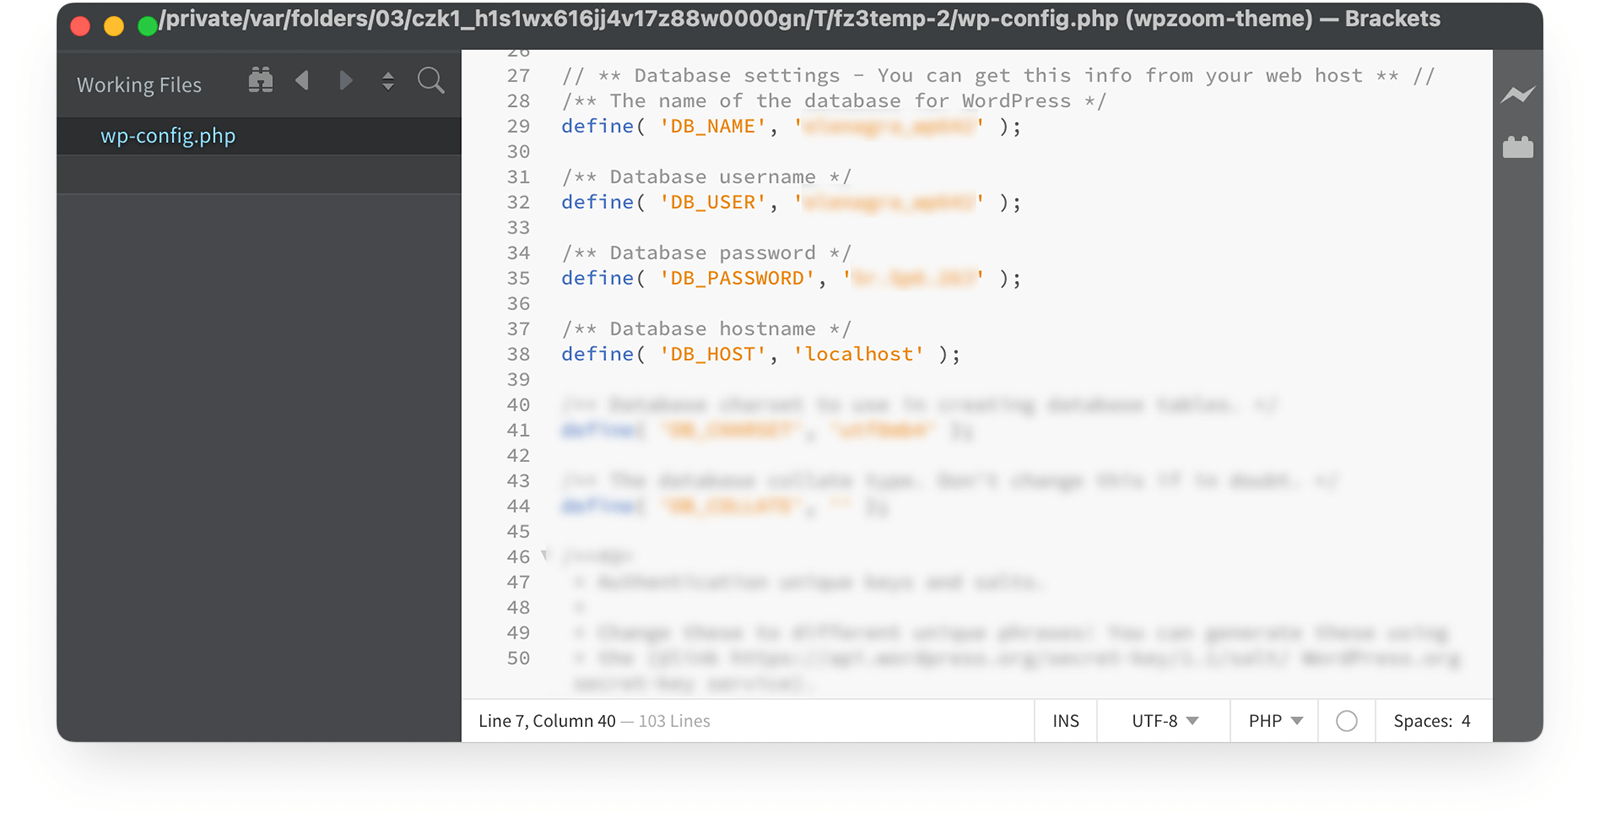

3. Log in to cPanel or your hosting control panel and navigate to “MySQL Databases” or “Database Manager”.


4. Delete the existing database by clicking “Delete” next to your WordPress database.
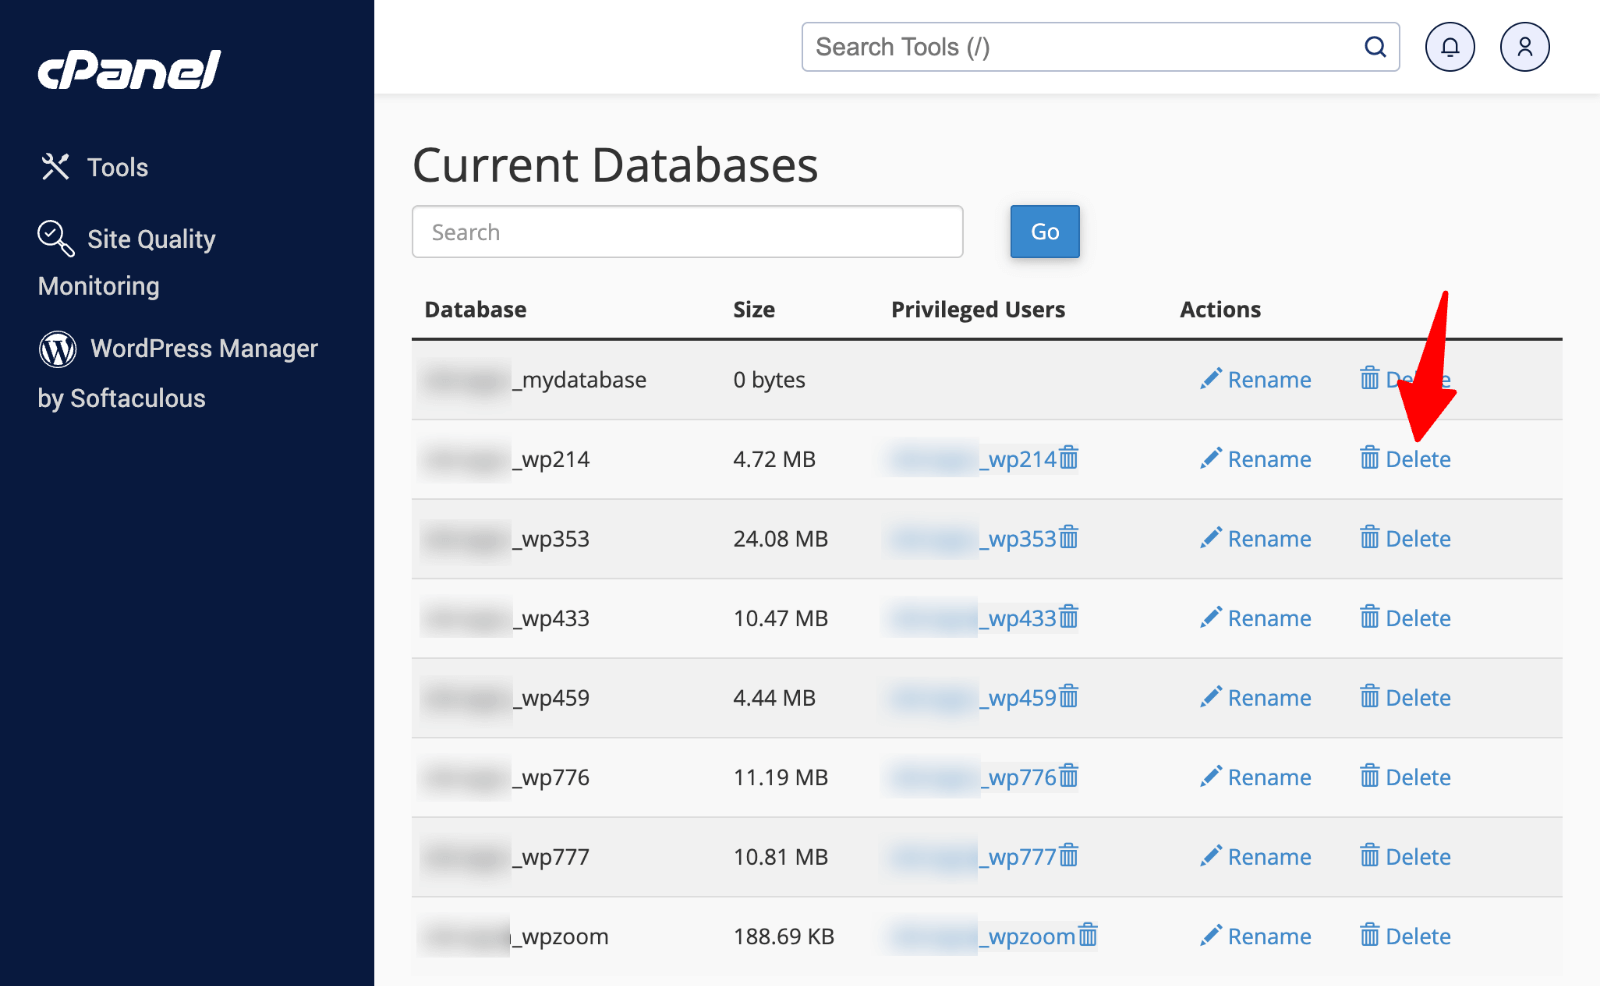 MySQL Databases > delete database” class=”wp-image-814500″ srcset=”https://b8f4g5a7.delivery.rocketcdn.me/wp-content/uploads/2025/05/cPanel-MySQL-Databases-dalete.png 1600w, https://b8f4g5a7.delivery.rocketcdn.me/wp-content/uploads/2025/05/cPanel-MySQL-Databases-dalete-734×452.png 734w, https://b8f4g5a7.delivery.rocketcdn.me/wp-content/uploads/2025/05/cPanel-MySQL-Databases-dalete-1024×631.png 1024w, https://b8f4g5a7.delivery.rocketcdn.me/wp-content/uploads/2025/05/cPanel-MySQL-Databases-dalete-1536×947.png 1536w” sizes=”(max-width: 1600px) 100vw, 1600px”/>
Confirm deletion when prompted (this removes all content permanently).
5. Create a new database with the same name in the “Create New Database” section.
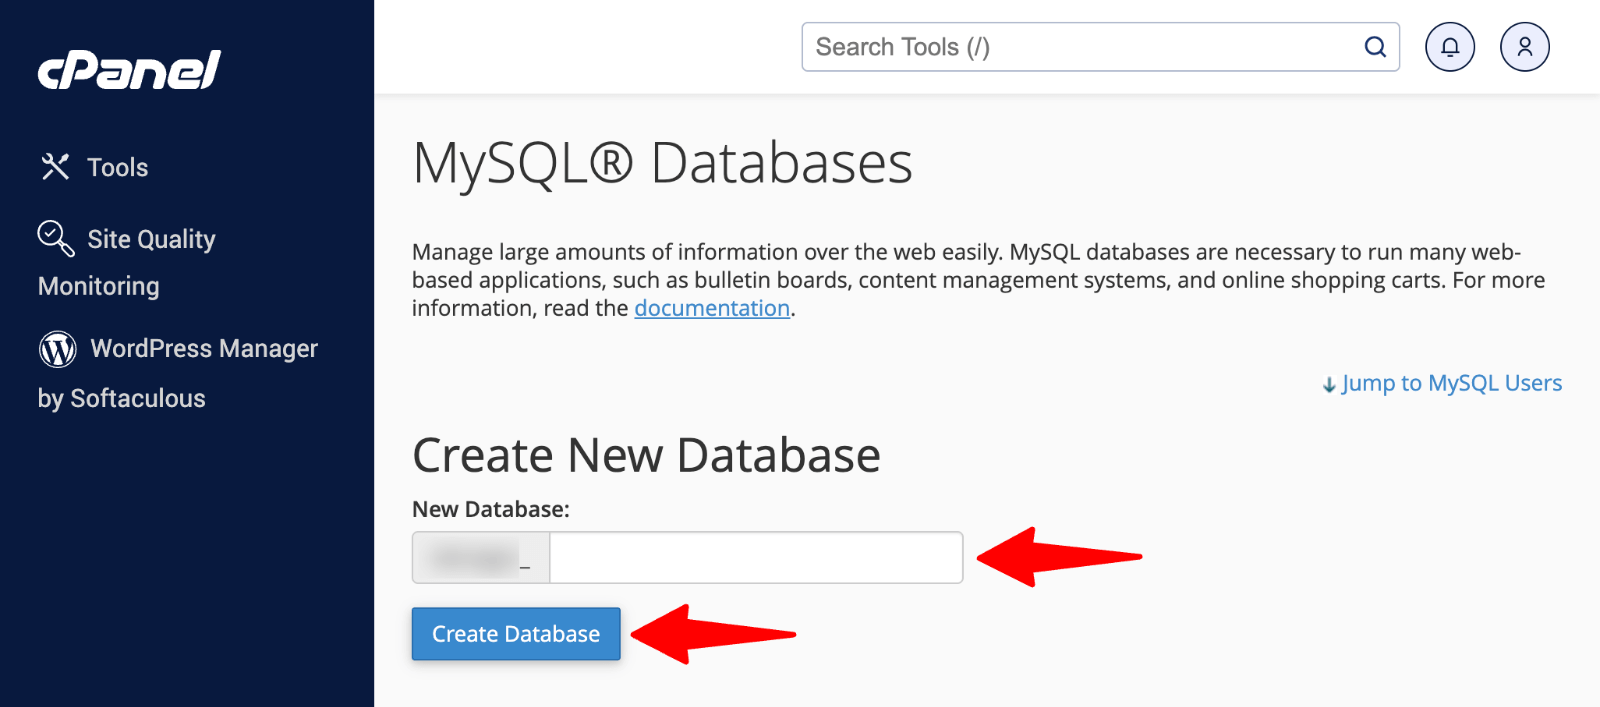 MySQL Databases > create database” class=”wp-image-814502″ srcset=”https://b8f4g5a7.delivery.rocketcdn.me/wp-content/uploads/2025/05/cPanel-MySQL-Databases-create.png 1600w, https://b8f4g5a7.delivery.rocketcdn.me/wp-content/uploads/2025/05/cPanel-MySQL-Databases-create-734×324.png 734w, https://b8f4g5a7.delivery.rocketcdn.me/wp-content/uploads/2025/05/cPanel-MySQL-Databases-create-1024×452.png 1024w, https://b8f4g5a7.delivery.rocketcdn.me/wp-content/uploads/2025/05/cPanel-MySQL-Databases-create-1536×679.png 1536w” sizes=”(max-width: 1600px) 100vw, 1600px”/>
6. In the “Add User To Database” section, add the user to the database by selecting your previous username and the new database.
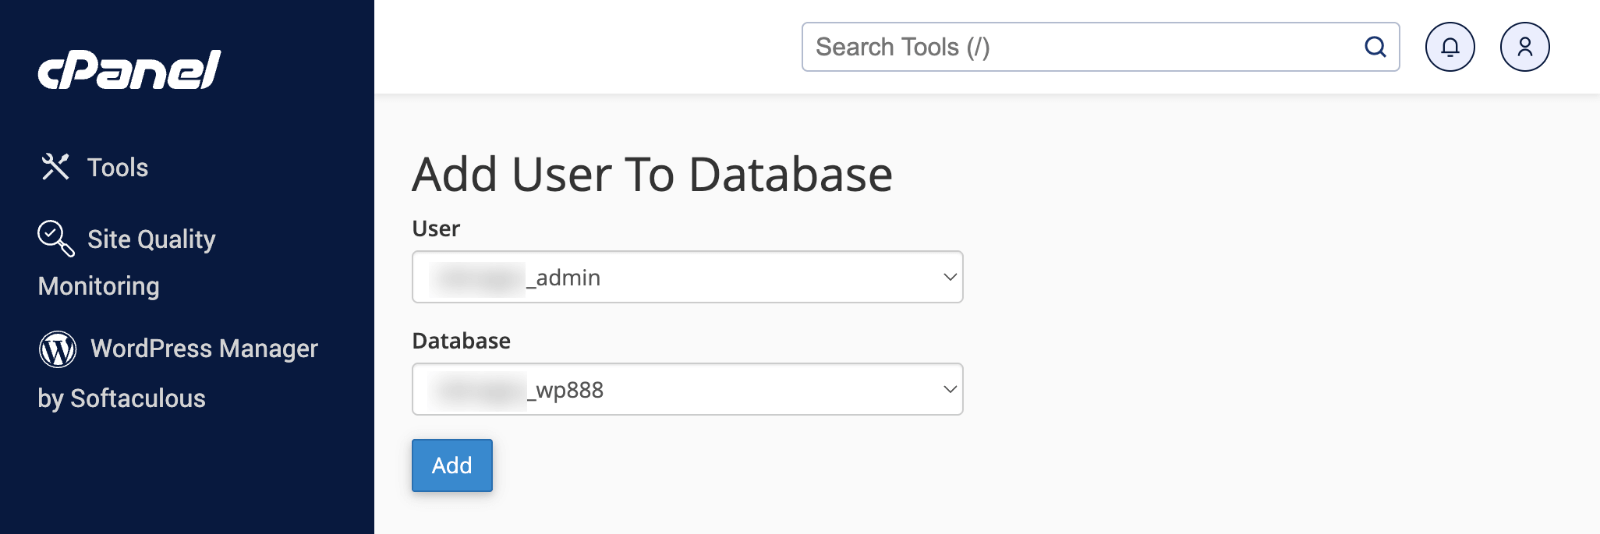 MySQL Databases > Add user” class=”wp-image-814504″ srcset=”https://b8f4g5a7.delivery.rocketcdn.me/wp-content/uploads/2025/05/cPanel-MySQL-Databases-add-user.png 1600w, https://b8f4g5a7.delivery.rocketcdn.me/wp-content/uploads/2025/05/cPanel-MySQL-Databases-add-user-734×245.png 734w, https://b8f4g5a7.delivery.rocketcdn.me/wp-content/uploads/2025/05/cPanel-MySQL-Databases-add-user-1024×342.png 1024w, https://b8f4g5a7.delivery.rocketcdn.me/wp-content/uploads/2025/05/cPanel-MySQL-Databases-add-user-1536×513.png 1536w” sizes=”(max-width: 1600px) 100vw, 1600px”/>
Grant all privileges by checking “ALL PRIVILEGES” and clicking “Make Changes“.
 MySQL Databases > user priveleges” class=”wp-image-814505″ srcset=”https://b8f4g5a7.delivery.rocketcdn.me/wp-content/uploads/2025/05/cPanel-MySQL-Databases-user-priveleges.png 1600w, https://b8f4g5a7.delivery.rocketcdn.me/wp-content/uploads/2025/05/cPanel-MySQL-Databases-user-priveleges-734×569.png 734w, https://b8f4g5a7.delivery.rocketcdn.me/wp-content/uploads/2025/05/cPanel-MySQL-Databases-user-priveleges-1024×794.png 1024w, https://b8f4g5a7.delivery.rocketcdn.me/wp-content/uploads/2025/05/cPanel-MySQL-Databases-user-priveleges-1536×1191.png 1536w” sizes=”(max-width: 1600px) 100vw, 1600px”/>
Step 2: Remove Your Server Files
1. Access the File Manager in cPanel or connect via an FTP client.
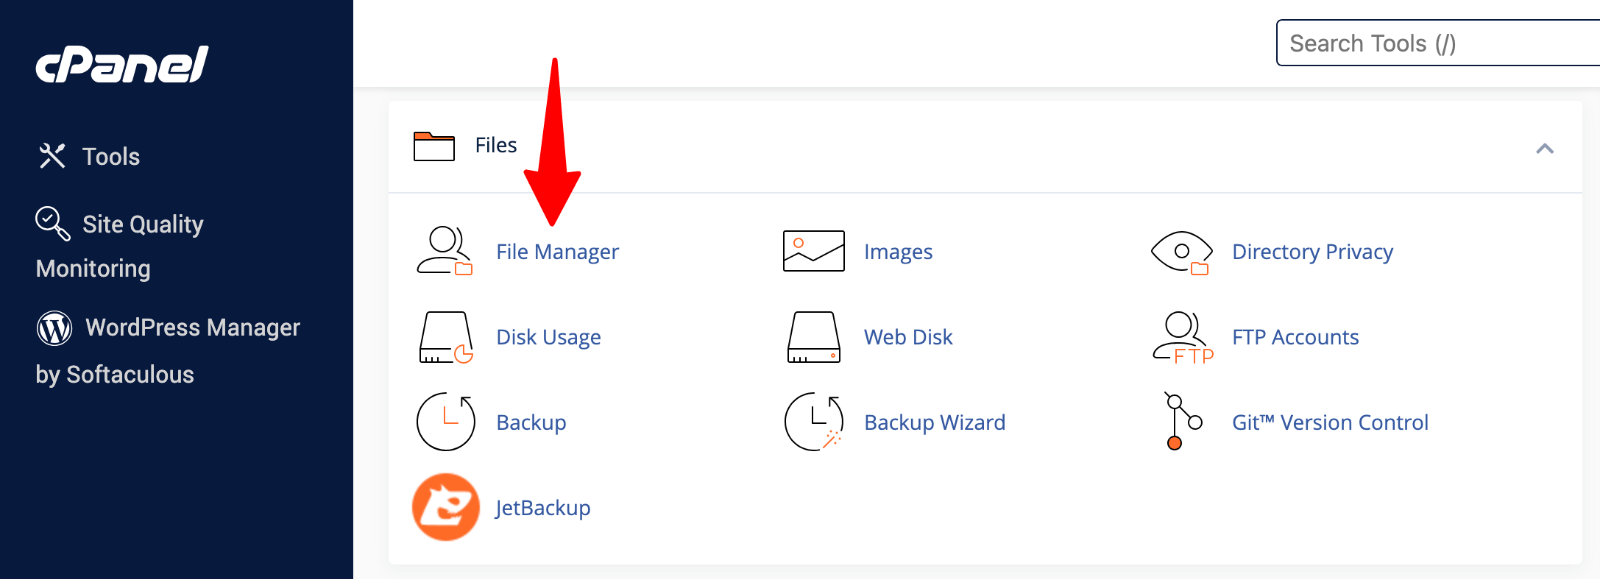 File Manager” class=”wp-image-809072″ srcset=”https://b8f4g5a7.delivery.rocketcdn.me/wp-content/uploads/2025/03/cpanel-file-manager.png 1600w, https://b8f4g5a7.delivery.rocketcdn.me/wp-content/uploads/2025/03/cpanel-file-manager-734×266.png 734w, https://b8f4g5a7.delivery.rocketcdn.me/wp-content/uploads/2025/03/cpanel-file-manager-1024×371.png 1024w, https://b8f4g5a7.delivery.rocketcdn.me/wp-content/uploads/2025/03/cpanel-file-manager-1536×556.png 1536w” sizes=”(max-width: 1600px) 100vw, 1600px”/>
2. Navigate to the root directory (usually public_html).
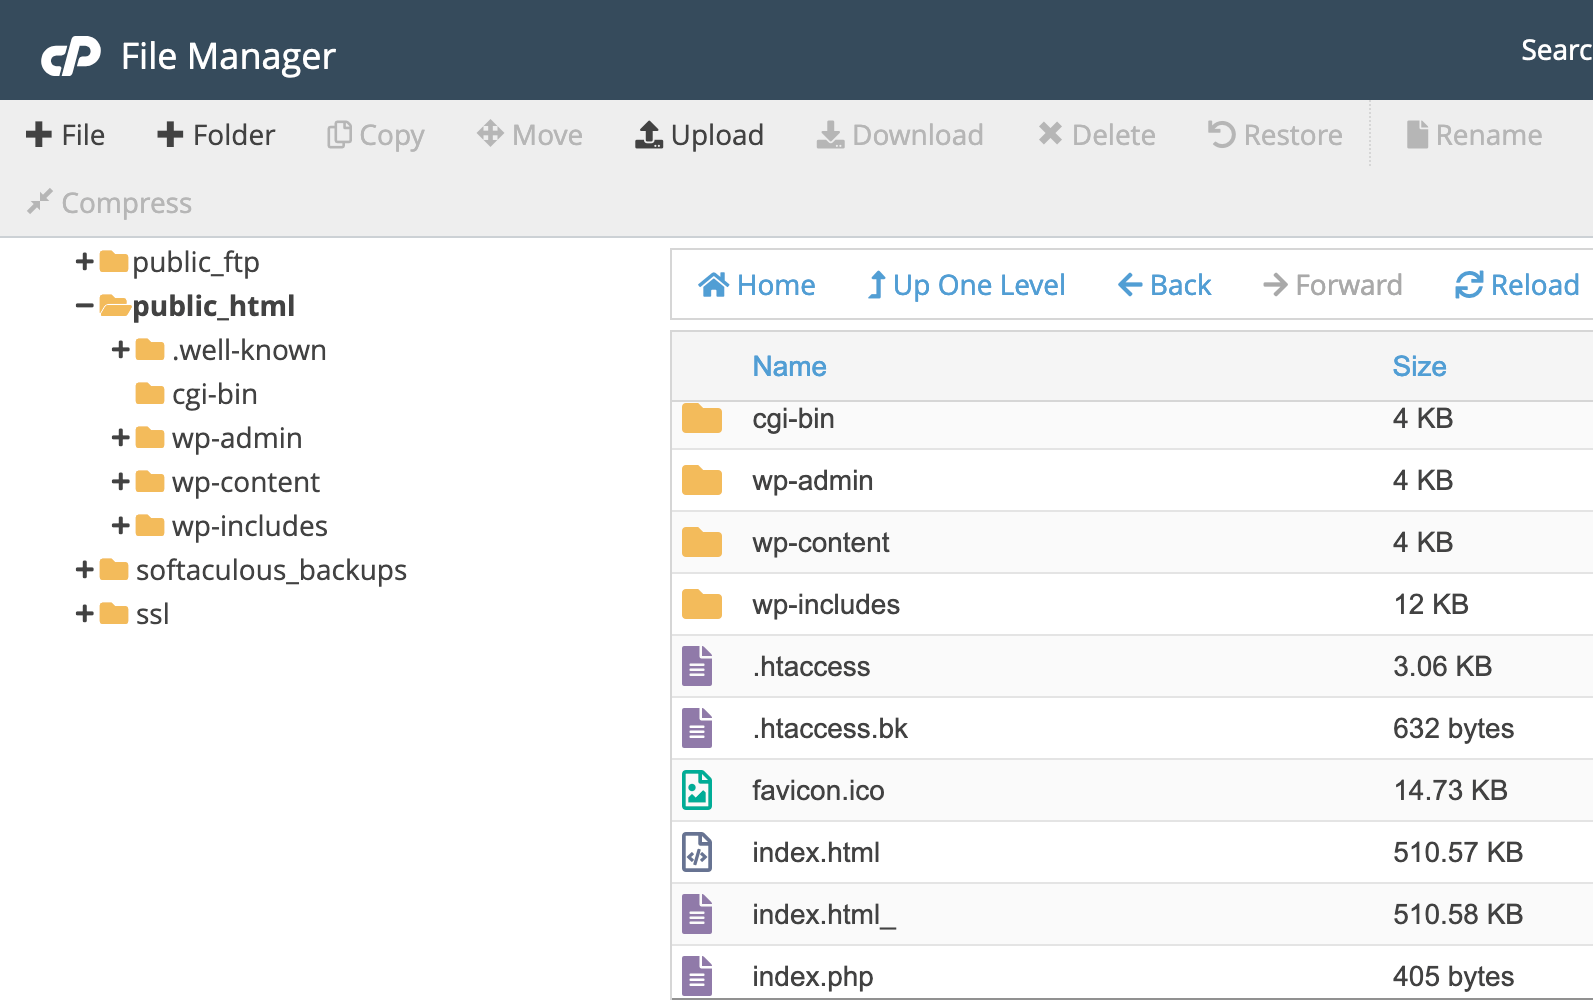

3. Delete the wp-content folder to remove themes, plugins, and media.
4. Remove other WordPress files (optionally keep wp-config.php).
Step 3: Reinstalling WordPress
- Download the latest WordPress from WordPress.org.
- Upload WordPress files to your server root directory.
- Run the installation by visiting yoursite.com/wp-admin/install.php.
- Complete setup with site title, admin credentials, and email.
- Log in to the fresh site using your new administrator account.
For detailed installation guidance, refer to our comprehensive tutorial “How to Install WordPress“.
Post-Reset Steps and Recommendations
After completing your WordPress reset, several essential tasks ensure your site runs smoothly and securely.
Test all functionality thoroughly before announcing your site is live. Check forms, user registration, and any custom features to catch problems early, when they’re easier to fix.
When to Reset Your WordPress Site
Several clear scenarios make resetting the right choice for your website situation.
- Security breaches require immediate action. When hackers compromise your site, they leave behind malicious code, backdoors, and infected files. A complete reset eliminates all attack traces and provides a secure foundation for rebuilding.
- Performance issues signal the need for a fresh start. Years of accumulated data, unused plugins, and bloated files drag down site performance. A reset wordpress approach clears digital clutter and restores speed potential.
- Major rebranding projects benefit from clean databases and file structures. Changing your business focus while keeping old content creates confusion and technical conflicts. Resetting provides the blank canvas your new brand identity needs.
- Website redesigns involving fundamental structure changes work better with fresh starts. A reset eliminates compatibility issues between old and new elements, ensuring smooth functionality.
When NOT to Reset Your WordPress Site
Many situations have better solutions than complete site resets.
- Minor redesigns don’t justify wiping your entire website. Theme changes, color updates, or navigation modifications can be accomplished without losing content or SEO rankings. Theme customization handles most design changes effectively.
- Website migration to new hosting doesn’t require resets. Migration plugins preserve your site exactly while moving to better servers, improving performance without destroying content.
- Temporary technical issues often resolve through targeted troubleshooting. Plugin conflicts or theme compatibility problems have specific solutions. Deactivating problematic plugins or switching themes temporarily solves most issues.
- Established websites with significant content represent too much value to reset casually. Years of blog posts, customer data, and SEO optimization shouldn’t be destroyed for convenience.
Instead, consider database cleanup plugins, selective content deletion, or professional troubleshooting services.
Ready to Rebuild Your WordPress Site?
Now that you’ve successfully reset your WordPress site, you need a professional theme that makes rebuilding quick and attractive. WPZOOM’s premium WordPress themes combine stunning design with powerful functionality, giving you the perfect foundation for your fresh start.
Our themes feature built-in customization options, responsive designs, and excellent support to help you create websites that stand out. Transform your clean slate into a beautiful, functional website that engages visitors and grows your business.
Subscribe to the WPZOOM newsletter.
Join 150,000 people. Get our latest news & releases delivered to your inbox.

