Do you want to show different navigation menu items for different pages in WordPress? Or display a different menu for logged in users?
WordPress allows you to show a navigation menu in a specific location in your theme, but by default, it will always show the same menu.
In this article, we will show you how to add conditional logic to menus in WordPress.
Why Add Conditional Logic to Menus in WordPress?
Navigation menus give your WordPress website structure and help visitors find what they’re looking for. By default, your WordPress website will display the same navigation menu to all users and on all posts and pages.
However, there may be times when you wish to display different menus to different users, or on different pages on your website.
Websites like an online store, a WordPress membership site community, or an online learning platform can all benefit from personalized navigation menus.
Using conditional logic, you could add extra menu items for logged in users so they can manage their accounts, renew their subscriptions, or view the online courses they purchased. You can think of it as WordPress menu access control.
With that being said, let’s take a look at how to add conditional logic to menus in WordPress. Here are the topics we’ll cover in this tutorial:
- Creating New Navigation Menus in WordPress
- Showing a Different Menu to Logged In Users in WordPress
- Showing a Different WordPress Menu Depending on User Role
- Showing a Different Menu for Different Pages in WordPress
- Hiding the Navigation Menu on Landing Pages in WordPress
- Doing More With WordPress Navigation Menus
Creating New Navigation Menus in WordPress
The first step is to create the additional navigation menus you wish to display in WordPress. After that, you can use conditional logic to decide when each menu will be displayed.
Simply head over to the Appearance » Menus page in the WordPress dashboard. If you already have a navigation menu that you use on your website for all users, then this can be your default menu.

Next, you need to click the ‘create a new menu’ link to create a new menu. For example, you could create one menu to show to logged in users, and another to display on a certain WordPress page or category.
On the left-hand side of the screen, you can see a list of your website pages. Simply check the box next to any page you want to add to your menu and click the ‘Add to Menu’ button.
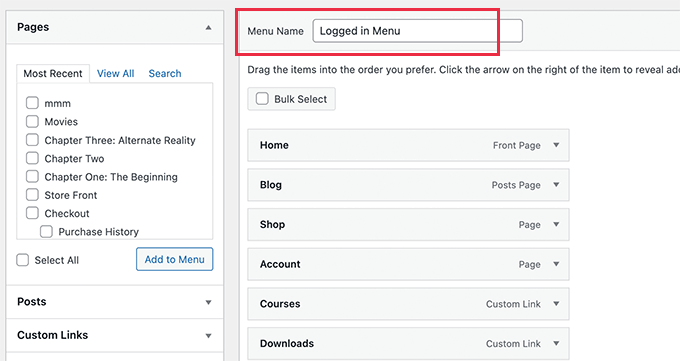
You can also drag and drop the menu items on the right side of the screen to rearrange them.
Further down the page, you can choose a location to display your menu. But, you don’t need to assign a location to this menu now. We’ll do that in the next step.
Don’t forget to click on the ‘Save Menu’ button to store your changes.
For more details on creating menus, you can take a look at our beginner’s guide on how to add a navigation menu in WordPress.
Showing a Different Menu to Logged In Users in WordPress
It’s often useful to display different navigation menus to users depending on whether they have logged in to your site or not.
For example, you can include login and registration links for logged out users and add a logout link to your menu for your logged in menu.
Or if you are running a WooCommerce store, then you could include items for your customers that are hidden from the general public.
First, you need to install and activate the Conditional Menus plugin. For more details, see our step-by-step guide on how to install a WordPress plugin.
Upon activation, you need to visit the Appearance » Menus page and switch to the ‘Manage Locations’ tab.
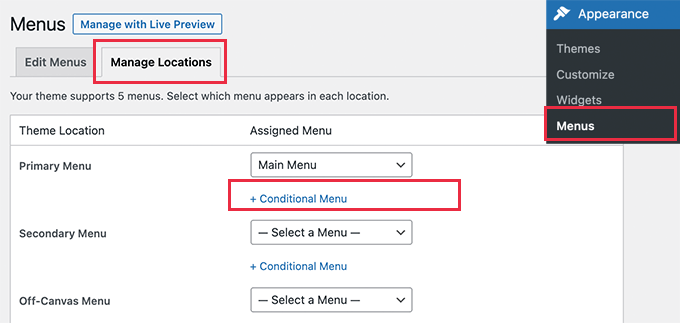
From here, you will see the list of available menu locations and the menus that are currently displayed. These will vary depending on the WordPress theme you are using.
For example, on our demo website, it is showing that our Primary Menu location is showing a navigation menu titled ‘Main Menu’.
We can tell the plugin to show a different menu when a certain condition is matched by clicking on the ‘+ Conditional Menu’ link and selecting another menu from the drop down menu. For this tutorial, we’ll select ‘Logged in Menu’.

Next, you need to click on the ‘+ Conditions’ link.
This will bring up a popup where you’ll see a bunch of conditions to choose from.
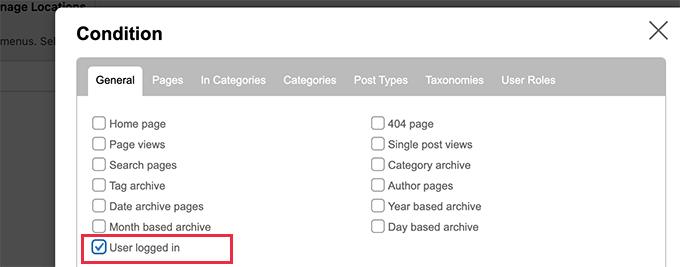
Simply check the box next to the ‘User logged in’ option, and then click on the ‘Save’ button.
You can now visit your website to see the logged in user menu in action. You can log out of your website to see the navigation menu that is shown to all other users.
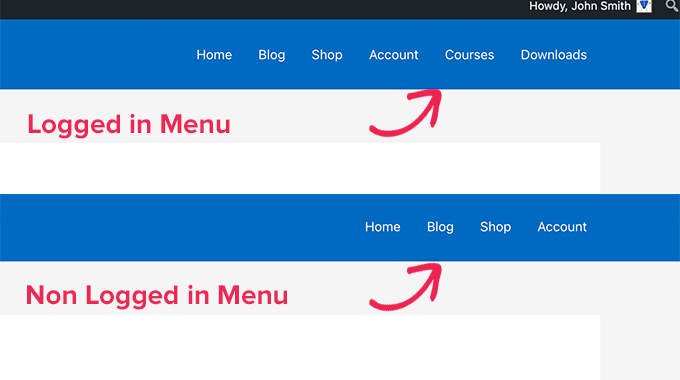
For more detailed instructions and to learn how to do this using code, take a look at our guide on how to show different menus to logged in users in WordPress.
Showing a Different WordPress Menu Depending on User Role
Once a user has logged in, you can also display a different navigation menu depending on the user role you have assigned to them.
For example, you could include extra menu items for an administrator and more limited items for a contributor. Or on a membership site, you could grant different levels of access to different membership levels.
As in the previous section, you need to install and activate the Conditional Menus plugin, then visit the Appearance » Menus page and switch to the ‘Manage Locations’ tab.
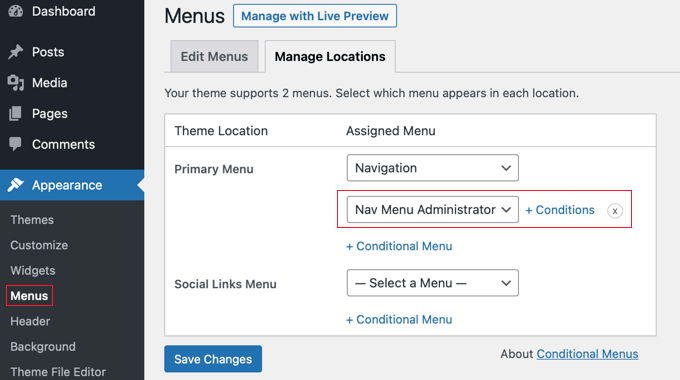
You should add the appropriate conditional menu for the user role you will select. For this tutorial, we’ve selected the ‘Nav Menu Administrator’ menu.
After that, you need to click the ‘+ Conditions’ link so you can choose the user role.
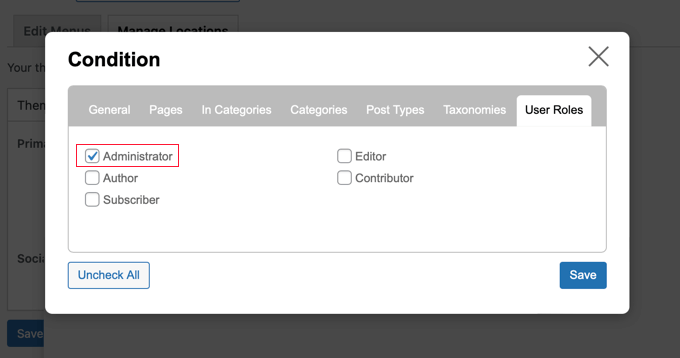
You will need to click on the ‘User Roles’ tab to see checkboxes for each user role on your website. Simply click the user roles that will see this menu, and then click the ‘Save’ button.
Showing a Different Menu for Different Pages in WordPress
You can display a different menu for different pages in WordPress. For example, you could display extra menu items on your privacy policy page, such as a link to your cookie notice.
To do this, you need to install and activate the Conditional Menus plugin, as shown above, then choose the appropriate navigation menu and click the ‘+ Conditions’ link.
This time you should click the ‘Pages’ tab. You will see a list of every page on your website.
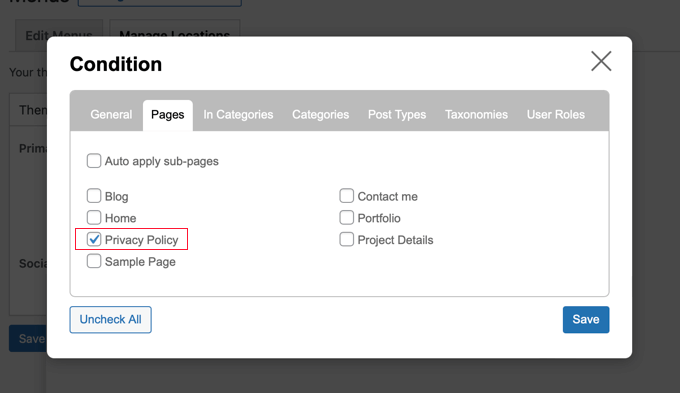
You need to place a checkmark next to each page where you wish to display the navigation menu, then click the ‘Save’ button.
Hiding the Navigation Menu on Landing Pages in WordPress
There may be pages on your website where you don’t want to display a navigation menu at all, such as your landing pages.
A landing page is designed to increase sales or generate leads for a business. On these pages, you will want to minimize distractions and provide users with all the information they need to take a specific action.
In our guide on how to increase your landing page conversions by 300%, we suggest that you can minimize distractions by removing navigation menus and other links from the page.
You can do that using the Conditional Menus plugin. When selecting the conditional menu, this time you need to choose ‘Disable Menu’ from the drop down menu.
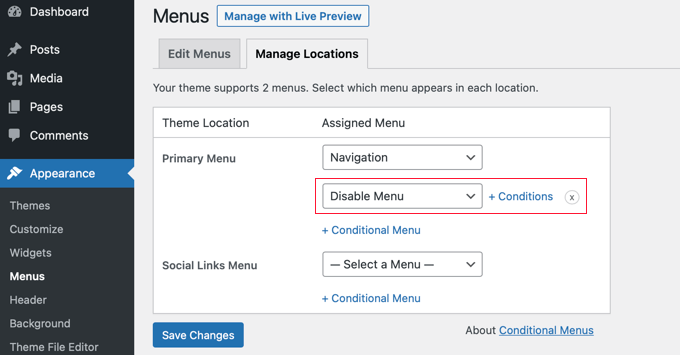
Next, you need to click the ‘+ Conditions’ link to choose when to display the menu.
You should click on the ‘Pages’ tab and place checkmarks next to your landing pages.
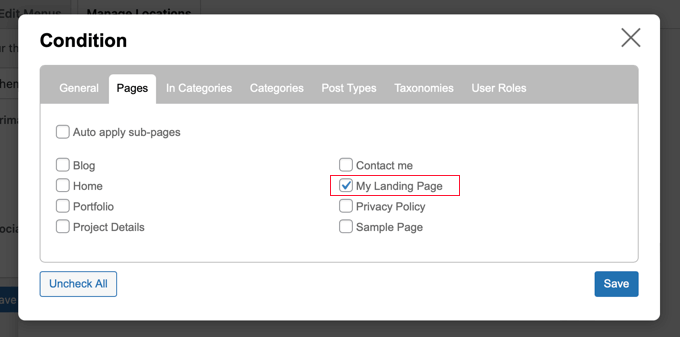
Don’t forget to click the ‘Save’ button to store your settings.
Doing More With WordPress Navigation Menus
Navigation menus are a powerful web design tool. They allow you to point users to the most important sections of your website.
Now that you are showing different navigation menus on different pages and for different users, you may be wondering how you can customize them further.
Try these useful tutorials to extend the functionality of the navigation menus on your WordPress website.
- How to add custom items to specific WordPress menus
- How to add custom navigation menus in WordPress themes
- How to add a fullscreen responsive menu in WordPress
- How to create a vertical navigation menu in WordPress
- How to add a mega menu to your WordPress site
- How to style WordPress navigation menus
We hope this tutorial helped you learn how to add conditional logic to menus in WordPress. You may also want to learn how to create automated workflows, or check out our list of the best social proof plugins for WordPress and WooCommerce.
If you liked this article, then please subscribe to our YouTube Channel for WordPress video tutorials. You can also find us on Twitter and Facebook.
The post How to Add Conditional Logic to Menus in WordPress first appeared on WPBeginner.

