Do you want to add an old post notification in WordPress?
If you have been producing content for some time now, then there is a chance that some of your content may be outdated.
In this article, we’ll show you how to easily add old post notification to your WordPress blog.
Why Add Old Post Notification to WordPress Blog Posts
Content decay (outdated blog posts) can be a bit of a problem for a growing WordPress blogs.
Depending on your niche, sometimes your content may become irrelevant, incorrect, or inappropriate over a period of time. This may cause a bad user experience, a higher bounce rate, and lower search rankings.
Ideally, you would want to edit those articles and update them with more useful, accurate, and up-to-date information.
But that’s not always possible because your site may have too many old articles, and you may not have enough resources to update them. In that case, adding an old post notification may be helpful for your users.
It will let them know that the content is a bit older, and they should keep this in mind when using the information presented on that page.
Another solution that many blogs use is by simply adding the ‘Last updated date’ instead of the publishing date.

That being said, let’s take a look at how you can add the old post notification in WordPress, and how to display the last updated date on your articles.
- Method 1. Display Old Post Notification Using a Plugin
- Method 2. Display Last Updated Date in WordPress
- Method 3. Display Old Post Notification without Plugin (Code Method)
Method 1. Display Old Post Notification Using Plugin
This method is easier and recommended for all users that want to display an old post notification.
First, you need to install and activate the DX Out of Date plugin. For more details, see our step-by-step guide on how to install a WordPress plugin.
Upon activation, you need to visit the Settings » Out of Date page to configure plugin settings.
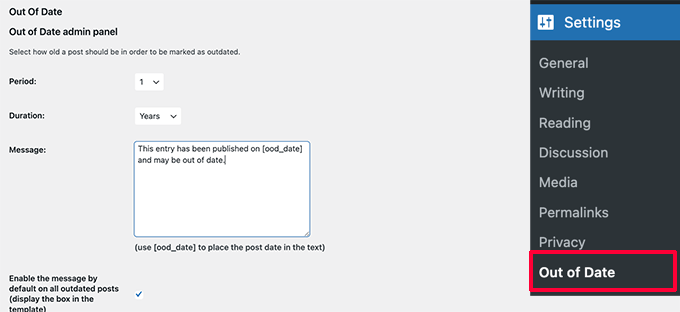
Here, you need to choose the period and duration. This is the time after which a post will be considered old by the plugin.
Below that you can provide a custom message to display on older posts and enable the notification to be displayed for all old posts. Don’t worry, you’ll be able to hide it for specific posts by editing them.
On the settings page, you can also choose post types, colors for the notification box, and add custom CSS if needed.
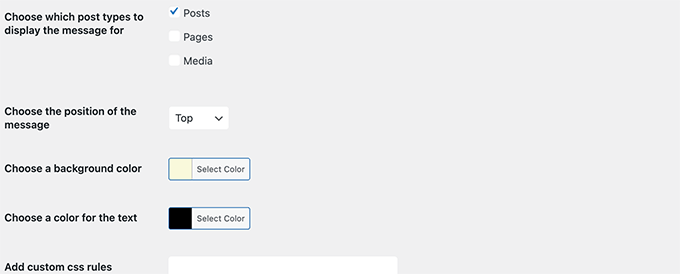
Don’t forget to click on the Save Changes button to store your settings.
You can now visit an old post on your website to see the plugin in action.
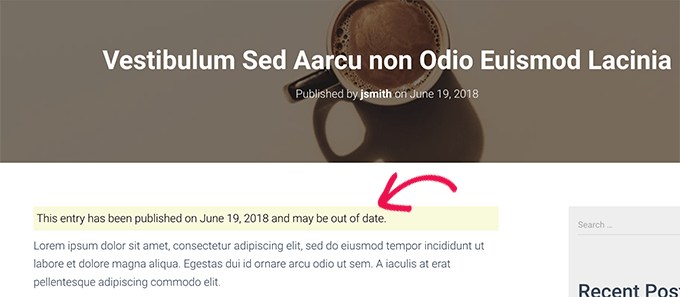
Hiding Old Post Notification on Individual Posts
Now let’s say you have an article that is older, but it is still accurate, up-to-date, and has great search rankings. You may want to hide the old post notification there.
Similarly, what if you have updated an old post with new information. The plugin will keep showing old post notification because it uses the post’s published date to determine its age.
To fix this, you can edit the post and scroll down to the ‘Out of Date Notification’ tab under the Post panel of the block editor. From here, simply uncheck the notification option and save your changes.
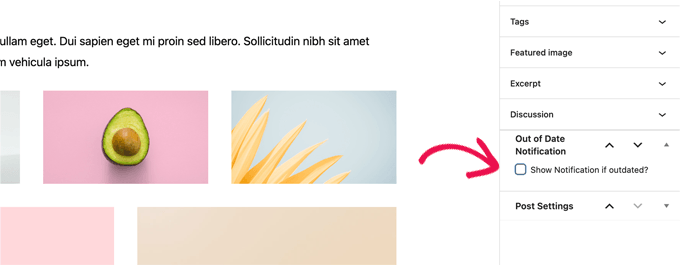
The plugin will now stop showing old post notification on this particular article.
Method 2. Display Last Modified Date for Your Posts
A lot of WordPress websites display the last modified date for their blog posts. Some replace the publish date with the last modified date as well.
The advantage of this method is that it shows users when a post was last updated without showing an old post message.
First, you need to install and activate the WP Last Modified Info plugin. For more details, see our step by step guide on how to install a WordPress plugin.
Upon activation, head over to Settings » WP Last Modified Info page to configure plugin settings.
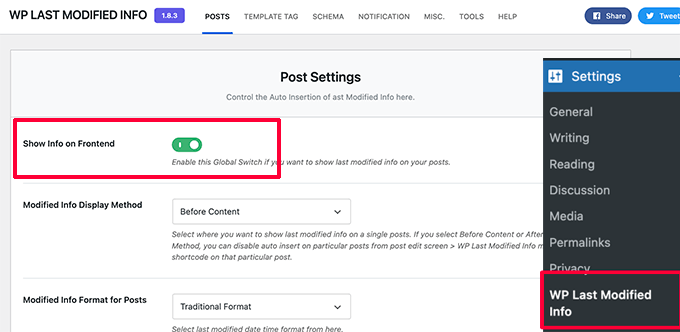
On the settings page, you need to turn on the Global display of the last modified info toggle. After that, you can choose how you want to display the modified date.
You can replace the published date, show it before or after the content, or manually insert it into a post.
Below that, you’ll find a bunch of options. If you are unsure, then you can leave them to default.
Don’t forget to click on the Save Settings button to store your changes.
You can now visit your website to see the last updated information for all your blog posts.
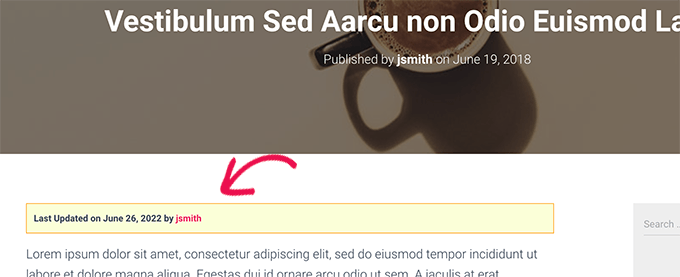
This problem with this method is that it will show the last updated date for all posts including the newer posts.
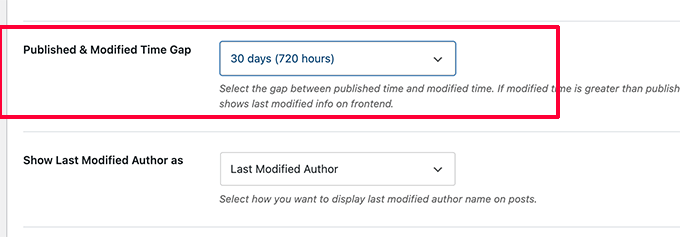
You can set a time gap under plugin settings. But this gap is only limited to 30 days.
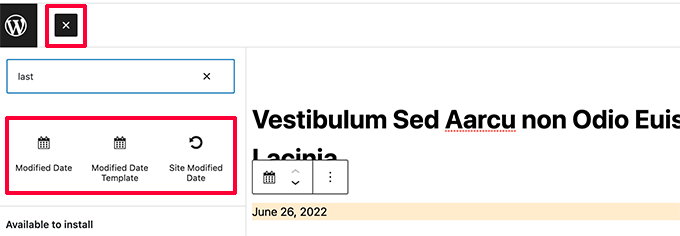
The plugin also provides three blocks that you can manually insert into a post or page to display last modified info.
You also have the option to use custom CSS to style your last updated date notice. We used the following custom CSS in the screenshots above.
p.post-modified-info {
    background: #fbffd8;
    padding: 10px;
    border: 1px solid orange;
    font-size: small;
    font-weight: bold;
}
Method 3. Add Old Post Notification Using Code
This method requires you to manually add code to your WordPress theme files. If you haven’t done this before, then take a look at our guide on how to add custom code snippets in WordPress.
Simply copy and paste the following code in your theme’s single.php template.
// Define old post duration to one year
$time_defined_as_old = 60*60*24*365;
// Check to see if a post is older than a year
if((date('U')-get_the_time('U')) > $time_defined_as_old) {
$lastmodified = get_the_modified_time('U');
$posted = get_the_time('U');
//check if the post was updated after being published
if ($lastmodified > $posted) {
// Display last updated notice
echo 'This article was last updated ' . human_time_diff($lastmodified,current_time('U')) . ' ago
';
} else {
// Display last published notice
echo 'This article was published ' . human_time_diff($posted,current_time( 'U' )). 'ago
';
}
}
This code defines old posts to be any articles published at least one year ago.
After that, it checks if a post is older than a year. If it is, then it checks if the post was updated after publication. Then it displays a notice based on those checks.
Here is how it looked on our demo website for post that is old and was never updated.

Here is how it looked for a post that is old, but it was updated after being published.

We customized the old post notification with the following custom CSS.
p.old-article-notice {
    background: #fbffd8;
    padding: 10px;
    border: 1px solid orange;
    font-size: small;
    font-weight: bold;
}
We hope this article helped you learn how to easily display old post notification on your WordPress blog. You may also want to see our WordPress SEO guide or see our pick of the best popular posts plugins for WordPress.
If you liked this article, then please subscribe to our YouTube Channel for WordPress video tutorials. You can also find us on Twitter and Facebook.
The post How to Add Old Post Notification on Your WordPress Blog first appeared on WPBeginner.

