When managing a WordPress website, one of the key decisions you may face is how to change a WordPress theme effectively. This decision is important as your theme determines your site’s visual appeal as well as its functionality and user experience. It’s not a decision to be taken lightly or executed quickly. It requires thoughtful consideration and a systematic approach.
This guide is designed to walk you through each step of the process, ensuring a smooth transition with minimal disruption to your site’s operation.
Table of Contents
- Understanding the Risks: A Thoughtful Approach to WordPress Theme Changes
- Getting Ready: Steps Before Switching WordPress Themes
- How to Change your WordPress Theme: Step-by-Step
Understanding the Risks: A Thoughtful Approach to WordPress Theme Changes
Switching themes of your WordPress site can be like rearranging the pieces of a complex puzzle. Your website’s appearance, functionality, and user experience are closely linked to the theme you choose. Some WordPress themes come with extensive customization options, and others are more rigid in their design and function.
When you switch themes, you risk disrupting these elements. Especially if your current theme has numerous customizations or is complex, a new theme might not align seamlessly with these changes. This can lead to issues like broken layouts, missing functionality, or even loss of content in some cases. The risk is higher if your site has been heavily customized with additional code, unique plugins, or specific custom widgets.
Understanding the complexity of your current theme and the potential impact of a change is essential. A methodical approach can help mitigate these risks, ensuring your website remains functional and appealing even after a theme change.
Getting Ready: Steps Before Switching WordPress Themes
Before you begin the process of changing your WordPress theme, there are several key steps you should take to prepare. These steps will ensure that the transition to your new theme is as smooth and trouble-free as possible.
- Choose the right theme. The first step is selecting the right theme for your website. Aesthetics are important, but you also need to ensure that the theme you choose is compatible with your website’s PHP version and meets all your functional requirements. Take the time to explore various options and decide on the theme that best suits your needs. For more detailed guidance on this, check out our article How to Choose a WordPress Theme.
- Keep track of customizations. Your current theme might have numerous customizations, like code snippets, custom CSS, sidebar modifications, widget areas, or third-party codes like the Google Analytics tracking code. It’s important to find and copy any custom code from your active theme. This will allow you to reapply these customizations to your new theme if necessary.
- Back up everything. Before making any changes, back up your entire website. This includes your database, WordPress files, themes, plugins, and uploads. Backing up ensures that you can restore your site to its original state if anything goes wrong during the theme change.
- Staging environment. Consider using a staging environment to test your new theme. A staging environment is a clone of your live website where you can make changes without affecting your live site. It’s an excellent way to test the new theme and make necessary adjustments before launching it live.
- Theme performance. Finally, before making the switch, test your old theme’s performance. This will give you a benchmark to compare against after you’ve implemented the new theme. Monitoring performance changes can help you understand the impact of the new theme on your site’s speed and user experience.
How to Change your WordPress Theme: Step-by-Step
Changing WordPress themes is a significant step that can redefine your website’s look and functionality.
Here’s a step-by-step guide to help you make this transition smoothly and effectively:
Step 1. Enable maintenance mode
This is essential to prevent your visitors from experiencing a broken or unfinished site. You can do this by creating a maintenance mode page or by using a maintenance mode plugin, which will display a user-friendly notice to your visitors while you work on your site. Two of the most popular plugins for this purpose are LightStart and Website Builder.
To enable the maintenance mode, go to your WordPress dashboard, install and activate your preferred maintenance mode plugin, and configure the maintenance message.
Step 2. Add the new theme to your WordPress
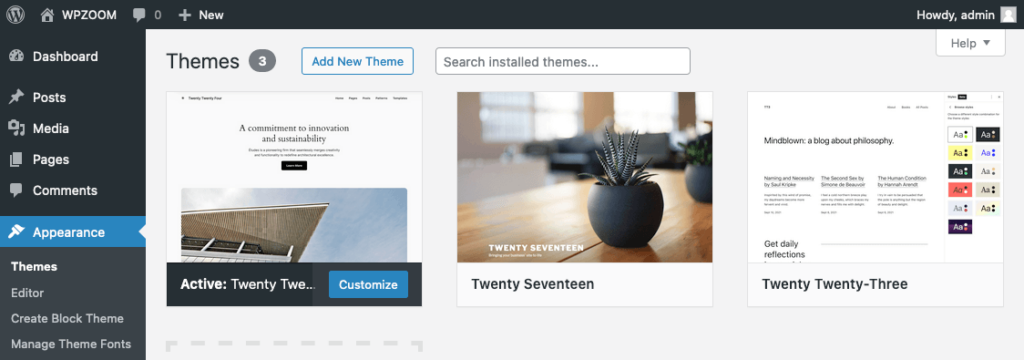
Go to Appearance > Themes in your WordPress dashboard and click Add New Theme.

Browse through the installed themes and click Install when you find the desired theme.

Or click Upload Theme, choose the zip file of your theme, and click Install Now.

For more detailed guidance, refer to our article about how to install a WordPress theme.
Step 3. Preview the new theme
Before activating your new theme, it’s a good idea to preview it to see how it looks with the site’s existing content.
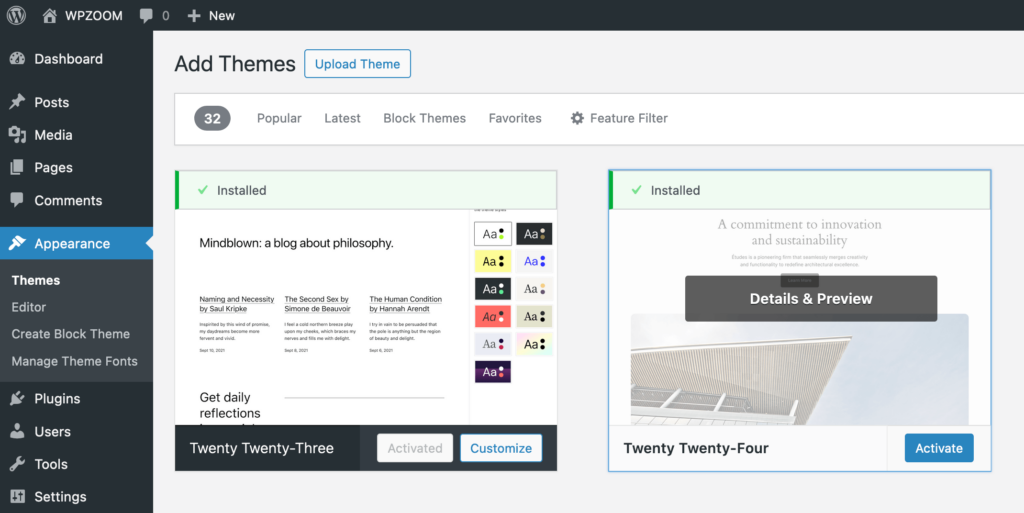
After you’ve installed the new theme, a Details & Preview link will appear over the theme’s thumbnail image.

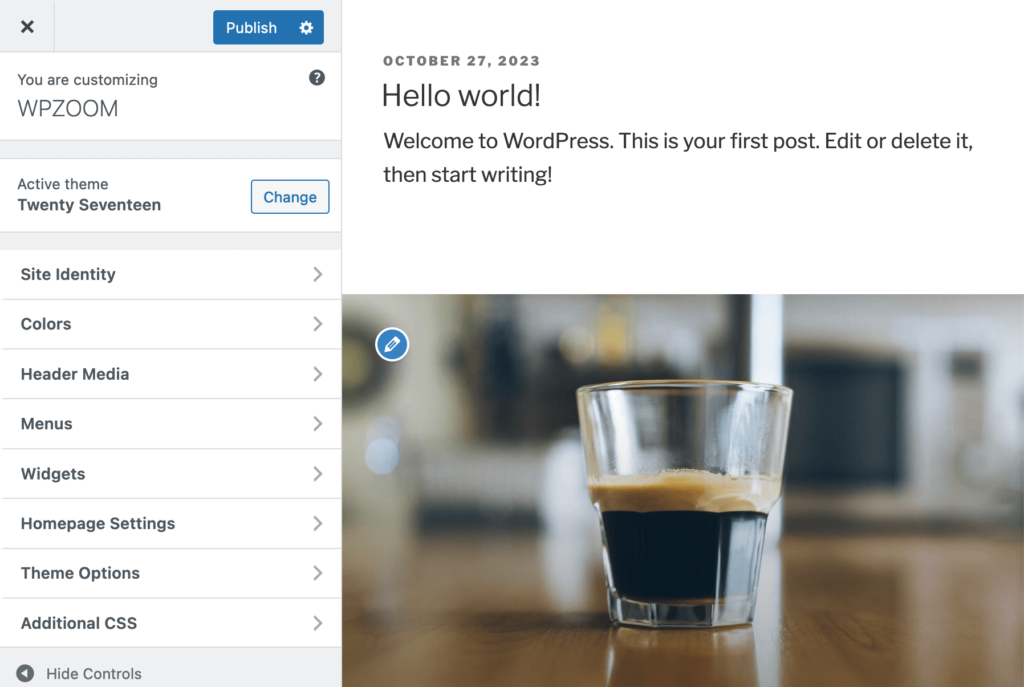
Click on it to preview the theme with your current content, without making any changes to your live site. This opens the WordPress theme customizer (for classic WordPress themes), where you can make basic adjustments to aspects like the logo, colors, and fonts, depending on the options the theme offers. You can experiment with different settings and see the changes in real-time.

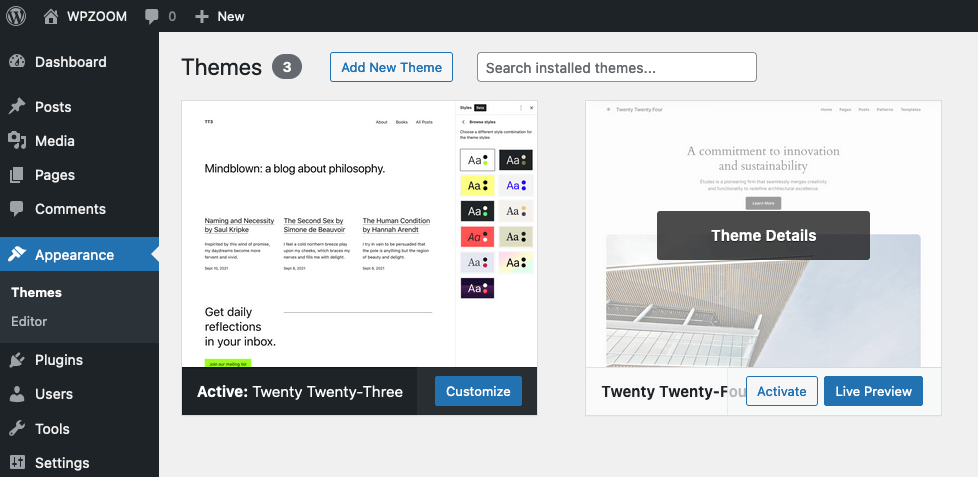
You can always preview a theme from Appearance > Themes, by hovering over an inactive theme and clicking Live Preview.
Step 4. Activate your theme
Once you’re satisfied with the live preview, click the Activate button to apply the new theme to your site.

Step 5. Customize the theme and re-add custom code
Now it’s time to tailor your new theme to match your preferences and branding. As you customize, remember to re-integrate any custom code you’ve previously noted from your old theme. It’s important to be aware that some custom code, such as custom CSS, might require adjustments to ensure compatibility with the new theme. This is because different WordPress themes can have varying structures and style definitions.
For guidance on customizing your new WordPress theme, refer to our article about how to customize a WordPress theme.
Step 6. Check functionality and resolve issues
Go through your website thoroughly to ensure all functionalities are working as expected. Resolve any issues that arise.
Step 7. Test the new theme’s performance
Compare the new theme’s performance with the old one. This can be done through speed tests like PageSpeed Insights and user experience assessments.
Step 8. Remove any unnecessary or duplicate plugins
Sometimes, a new WordPress theme may render certain existing plugins redundant. Remove or replace them as needed.
Step 9. Turn off maintenance mode
Once everything is in place and you’re happy with the new setup, turn off maintenance mode.
Step 10. Let Users Know About the New Theme
Consider informing your audience about the change. This can be done through a blog post, newsletter, or social media announcement.
Bottom Line
Switching themes is more than just a cosmetic update; it’s a strategic move that can significantly impact your website’s user experience and performance. While the process may seem challenging, following these structured steps will ensure a smoother transition. It’s important to choose the right theme, keep track of customizations, back up everything, and test thoroughly in a staging environment before going live.
The goal is not just to change the look of your website, but to enhance its functionality and performance.
By taking a methodical and informed approach to change WordPress themes, you can improve your website’s appeal and functionality, ensuring it continues to meet the evolving needs of your audience and your business.
Join 150,000 people. Get our latest news & releases delivered to your inbox.

