Creating a WordPress staging site is one of the smartest moves you can make before applying significant changes to your website. It’s like having a safety net that catches any potential issues before they impact your live site. If you’ve ever worried about updates or new plugins breaking your website, a staging site is your new best friend.
In this guide, we’ll walk you through step-by-step instructions on how to create a WordPress staging site.
Table of Contents
- What is a WordPress Staging Site?
- Why You Need a WordPress Staging Site
- Prerequisites Before Creating a Staging Site
- How to Create a WordPress Staging Site: 3 Methods
- Testing and Deploying Changes from Staging to Live Site
- Best Practices for Managing Your WordPress Staging Site
What is a WordPress Staging Site?
A WordPress staging website is essentially a copy of your live website that you can experiment with safely. Think of it as your personal playground where you can test out new ideas, fix bugs, or troubleshoot issues without affecting your visitors. If something goes wrong, no problem—your live site remains untouched and fully functional.
By using a staging environment, you can experiment with:
- WordPress Core Updates: Test new versions of WordPress to ensure compatibility with your site’s components.
- Theme and Plugin Modifications: Update or change themes and plugins without risking conflicts or errors on the live site.
- Custom Code Implementations: Safely add or modify custom code snippets and functions.
- Design Changes: Revamp layouts or styling elements to enhance user experience.
Creating a staging site is an essential practice for WordPress website maintenance and development. It acts as a sandbox, allowing you to identify and fix issues before they impact your visitors.
Why You Need a WordPress Staging Site
Making changes directly to your live site can feel like walking a tightrope without a safety net. One tiny mistake could send everything spiraling, leading to downtime, broken features, or even a complete site crash. Here’s why a staging website is a game-changer:
- Mitigate Risks: Think of your staging site as a testing ground. You can try out updates and tweaks without the stress of something going wrong on your live site. If something does break, no worries—you can fix it before it ever reaches your visitors.
- Zero Downtime: Imagine being able to make changes, experiment, and test thoroughly, all while your live site stays up and running smoothly for your visitors.
- Prevent Errors: Staging sites are like your personal safety inspector. They help catch issues related to plugin compatibility, theme updates, or custom code before they can mess things up on your live site.
- Streamlined Workflow: Developers and designers can work on new features, test ideas, and refine their work without disrupting your live site. It’s like having a backstage pass to try out new things without the audience ever knowing.
Whenever you’re dealing with plugin updates, theme changes, or major WordPress updates, a staging site is your best friend. It’s that extra layer of protection that gives you the confidence to make changes and improvements, knowing you’ve got everything under control.
Prerequisites Before Creating a Staging Site
Alright, before we dive into setting up your staging site, let’s ensure you’ve got everything lined up for a smooth ride. Here’s what you’ll need:
- Backup Your WordPress Site: This is your safety net. Always start by backing up your site. That way, if anything doesn’t go as planned, you can easily roll back to your previous setup.
- Access to Hosting Panel or FTP: If you’re planning to create your WordPress staging site manually or using your host’s tools, you’ll need access to your hosting panel (like cPanel) or an FTP client to manage your files and databases. Just make sure you’ve got the right credentials handy before you start.
- Check Server Resources: Staging sites require extra resources, such as storage and bandwidth. So, ensure your hosting plan has enough room to handle a staging environment without slowing things down.
- Disable Caching Plugins: Caching plugins are awesome for speeding up your site, but they can also interfere with the staging site creation process. Go ahead and temporarily disable them before you begin.
With these steps taken care of, you’re all set to create your staging site without any hiccups!
How to Create a WordPress Staging Site: 3 Methods
Now that you’re sold on the idea, let’s talk about how to create a WordPress staging site. There are a few different ways to go about it, each with its own pros and cons. Here’s a quick overview:
- Using a WordPress Staging Plugin: This is the easiest and most popular method, especially if you’re not very tech-savvy. There are plugins designed specifically to create staging sites with just a few clicks.
- Using Your Web Host’s Staging Feature: Many hosting providers offer built-in staging features that allow you to create a staging site with one click. This method is incredibly convenient if your host supports it.
- Creating a Staging Site Manually via cPanel: If you’re more comfortable with technical processes, you can manually set up a staging site through your hosting control panel (cPanel). This method gives you more control but requires more steps.
Method 1: Using a WordPress Staging Plugin
Several WordPress plugins are specifically designed to help you clone your site and set up a staging environment.
Here’s how you can set up a staging site using WP Staging, one of the most popular and reliable options:
Step 1: Install and Activate the WP Staging Plugin
- Log in to your WordPress dashboard.
- Navigate to Plugins > Add New.
- In the search bar, type WP Staging and hit Enter.
- Once you find the plugin, click Install Now, and after the installation is complete, click Activate.

This will add a new WP Staging option to your WordPress dashboard menu, making it easy to access the plugin’s features.
Step 2: Create Your Staging Site
1. Click on WP Staging in your WordPress dashboard.
2. Hit the Create Staging Site button.
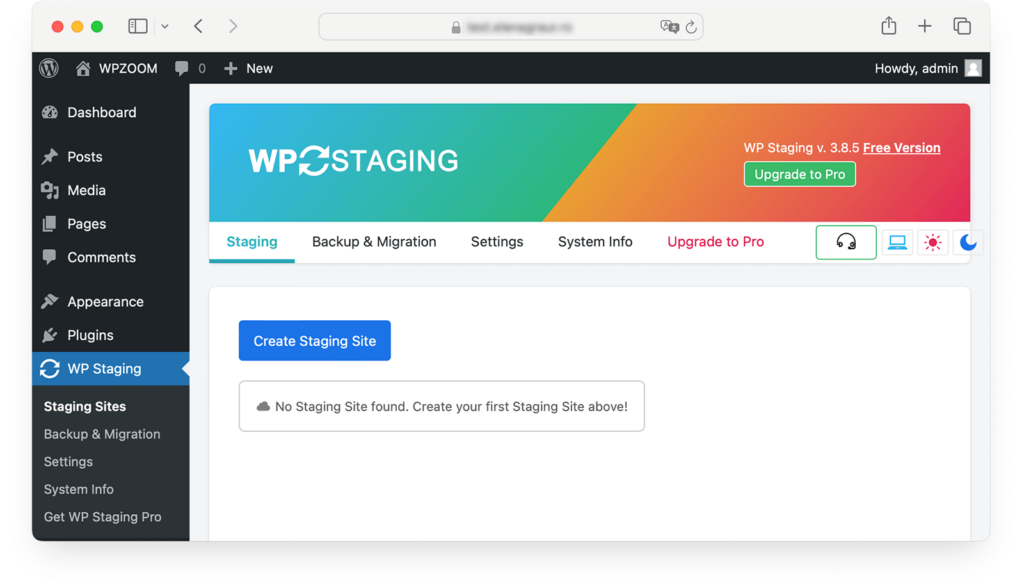
3. Name your staging site (something simple like “staging” is fine).
4. Click Start Cloning to begin the process.

The plugin will now clone your live website into a staging environment. Depending on the size of your site, this might take a few minutes. Grab a coffee and let the plugin do its magic!

Step 3: Access and Use Your Staging Site
Once the cloning process is complete, WP Staging will provide a link to access your new staging site. This link is typically something like yoursite.com/staging/.
- Click on the provided link to access your staging site.
- Log in using your regular WordPress credentials.
Now, you have a fully functional clone of your live website where you can make changes, test updates, and experiment with new features without any risk.
Remember, any changes you make here won’t affect your live site. This is a risk-free environment in which to do whatever you need.
Method 2: Using Your Web Host’s Staging Feature
If your web hosting provider offers a built-in staging feature, this is arguably the simplest way to create a WordPress staging site. Many managed WordPress hosts, like SiteGround, Bluehost, and WP Engine, provide one-click staging options. This method is perfect if you want a quick and easy setup with minimal technical know-how.
- Access your hosting account’s dashboard.
- Navigate to the section where you manage your websites (this may be labeled as “My Sites,” “Website Management,” or similar).
- Look for a Staging or Staging Environment option within your website management tools and click on it.
- You’ll typically be prompted to select the website you want to create a staging site for (if you manage multiple sites).
- Hit the Create button.
Here is how it looks on Siteground:
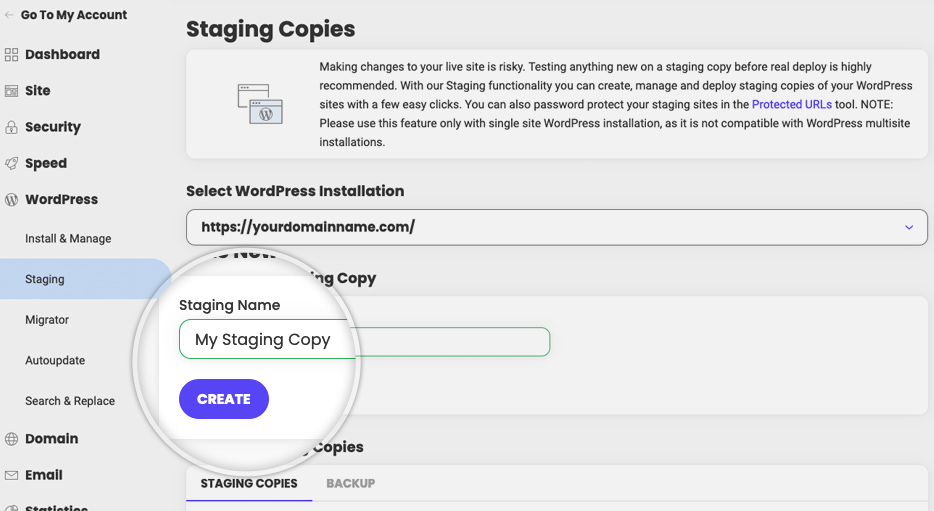
The hosting platform will now create a clone of your live site in a staging environment. This process usually takes just a few minutes.
Once the staging site is ready, you’ll receive a notification or see a new link appear in your hosting dashboard. Click on the provided link to access your staging site.
Just like with other methods, your staging site will be a fully functional clone of your live website. You can log in using your normal WordPress credentials and start making changes or testing updates.
Method 3: Creating a Staging Site Manually via cPanel
If you prefer a more hands-on approach or want more control over the staging process, creating a staging site manually through your hosting control panel (cPanel) is an excellent option. While this method requires a bit more technical knowledge, it offers a high degree of customization.
Step 1: Create a Subdomain
1. Log in to your hosting cPanel.
2. Navigate to the Domains section and click on Domains.

3. Click on Create a New Domain.

4. In the Domain field, enter the name of your subdomain (e.g., “staging.yourwebsite.com“).
5. Click Submit.

You’ve now created a subdomain staging.yourwebsite.com, which will serve as the location for your staging site.
Step 2: Copy Your Files to the Subdomain
1. In the cPanel, go to the File Manager.
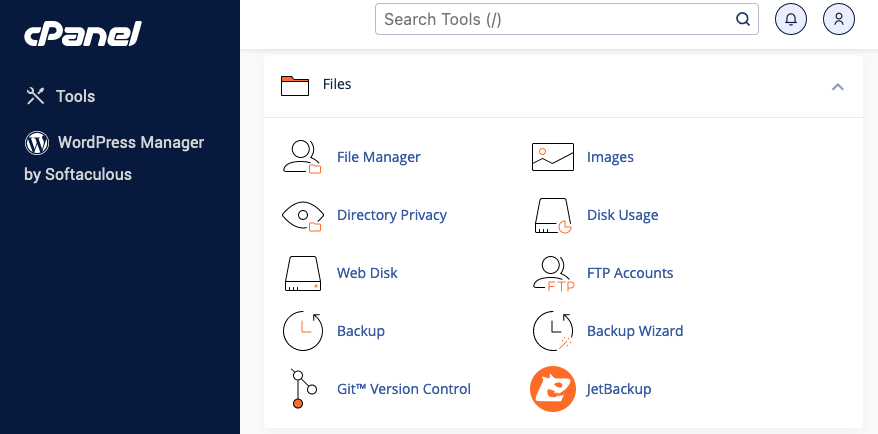
2. Navigate to the root directory of your live site (usually public_html).

3. Select all files and click on Copy.
4. Paste these files into the folder corresponding to your new subdomain (e.g., public_html/staging/).
This step essentially duplicates your live site’s files into the subdomain’s directory.
Step 3: Export and Import Your Database
1. In cPanel, go to phpMyAdmin.

2. Select your live site’s database.

3. Go to the Export section and click the Export button and save the file to your computer.
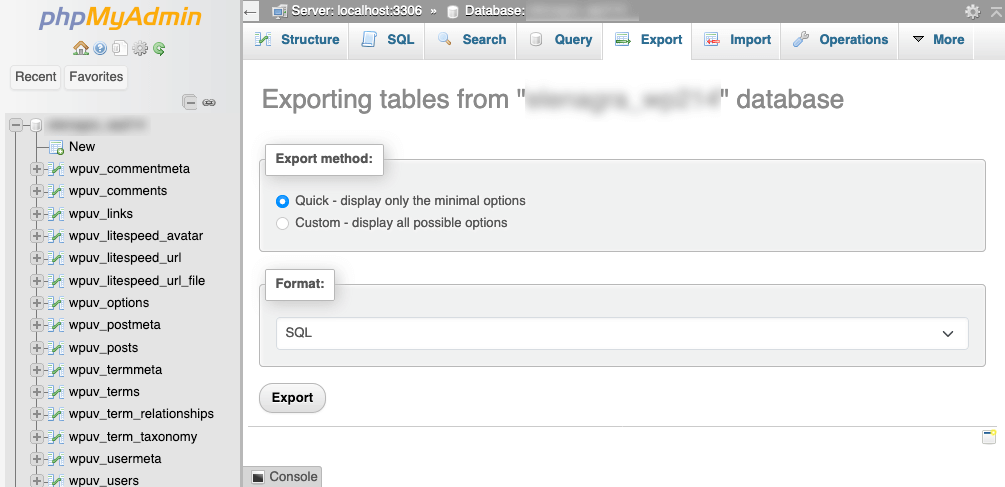

4. Create a new database for your staging site by going to MySQL Databases or MySQL Database Wizard in cPanel.
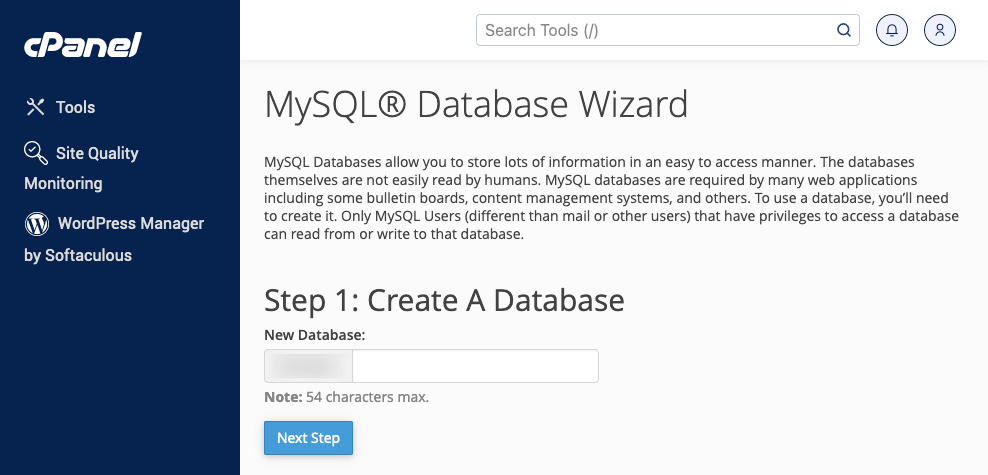

5. Import the saved database file into the new database through phpMyAdmin.

Now, your staging site has a copy of your live site’s database.
Step 4: Update the Database Connection
1. In the File Manager, locate the wp-config.php file in your staging site’s directory.
2. Edit the file to update the database name, username, and password to match the new staging database you just created.

3. Save the changes.
Your staging site is now connected to its own database, separate from the live site.
Step 5: Update URLs
1. Go back to phpMyAdmin and select the staging site’s database.
2. Locate the wp_options table.

3. Update the siteurl and home fields to reflect the new subdomain (e.g., https://staging.yourwebsite.com).
Now, your staging site will use the subdomain URL instead of the live site URL, ensuring there’s no overlap between the two environments.
Testing and Deploying Changes from Staging to Live Site
Now that you’ve created your staging site and made the necessary changes, it’s time to test and deploy those changes to your live site. This step is crucial to ensure everything works perfectly before going live.
Step 1: Thoroughly Test Your Staging Site
Before you deploy any changes, take the time to test your staging site thoroughly. Here’s a quick checklist:
- Check Plugin Compatibility: Make sure all your plugins work as expected after updates.
- Test Core Functionality: Ensure that your site’s key features, such as forms, shopping carts, and login systems, function correctly.
- Review Design Elements: Verify that your site’s design remains intact, with no broken layouts or missing elements.
- Cross-Browser Testing: Test your site on different browsers (Chrome, Firefox, Safari, etc.) and devices (desktop, tablet, mobile) to ensure it’s responsive and looks great everywhere.
Step 2: Push Changes from Staging to Live
Once you’re satisfied with how your staging site performs, it’s time to push those changes to your live site. The method for doing this will depend on how you created your staging site:
- Using a Staging Plugin: If you used a plugin like WP Staging, the pro version allows you to push changes directly. Simply go to the plugin’s dashboard, review the changes, and click Push Changes.
- Manual Method via cPanel: If you set up your staging site manually, you’ll need to copy WordPress files and export/import databases from the staging environment back to the live site. This can be done through the cPanel’s File Manager and phpMyAdmin tools.
- Hosting Provider’s Staging Tool: To use your web host’s staging feature, return to the Staging section of your hosting dashboard and click Deploy to Live.
Step 3: Post-Deployment Checks
After pushing the changes live, it’s essential to do a final round of checks:
- Clear Caches: Clear any caching plugins or server-level caches to ensure visitors see the most up-to-date version of your site.
- Recheck Key Functions: Quickly run through your site’s main features again to confirm everything works smoothly.
- Monitor Performance: Monitor your site’s performance and load times, especially if you’ve made significant updates or added new features.
Best Practices for Managing Your WordPress Staging Site
Creating a WordPress staging site is just the beginning. To get the most out of your staging environment, follow a few best practices.
- Regularly Sync Staging with Live Site. To keep your staging site as accurate as possible, regularly sync it with your live site. This ensures that any new content, updates, or changes on the production site are reflected in the staging environment. Depending on the tool you’re using, this can often be done with a single click.
- Keep the Staging Site Secure. Just like your live site, your staging site needs to be secure.
- Password Protect the Staging Site: Use .htaccess or a plugin to restrict access to your staging site. This keeps it private and prevents unauthorized access.
- Use SSL: Ensure your staging site is secured with an SSL certificate, especially if you’re testing e-commerce functionalities.
- Delete Outdated Staging Sites. Once you’ve deployed changes and no longer need the staging site, consider deleting it. Old, unused staging sites can take up server resources and may pose a security risk if not properly managed.
Bottom Line
Creating a WordPress staging site is one of the best ways to ensure that your website remains functional and secure, no matter what changes or updates you plan to implement. By testing everything in a controlled environment, you can avoid unexpected downtime, broken features, or other issues that might disrupt your live site. With a staging site in place, you can confidently experiment with new ideas, knowing that your live site and your visitors are fully protected.

