Most web hosting companies limit the amount of storage they’ll allow on any given individual hosting account. If you run into a situation where you start hitting these hosting disk space limits and you don’t want to upgrade to a higher plan, then the best thing to do is find and remove large files that you’re no longer using. The process to do this will vary based on your hosting company and the control panel they include with your plan.
One of the most popular control panels that many hosting companies rely on is cPanel. It’s used by some of the most well-known names in the hosting industry. These include Bluehost, Namecheap, GreenGeeks, A2 Hosting, and others. Keep in mind that it might not be available on all plans. If you’re unsure whether it’s part of your plan, talk to support and find out.
Once you’ve confirmed that you have access to cPanel, log in and follow the steps below to find and remove large files from your cPanel hosting account.
The process explained
Although many hosts provide their clients with cPanel as I just explained, they don’t necessarily provide you with the same path to get into your cPanel account.
For instance, I used to have a hosting plan with HostGator and the way I accessed cPanel was through the server hostname. It looked something like: https://gator123.hostgator.com:2083
These days I use Namecheap. They make it much easier by letting me get into cPanel directly from the Namecheap dashboard:
If you have a shared web hosting plan with Namecheap then you can do the same. For those of you who host your websites elsewhere, I did a little digging and I found the Knowledge Base articles that explain how to access cPanel for seven popular hosting companies.
If yours is on the list – great!
If it isn’t then hopefully you know how to get into cPanel on your own. Otherwise you can do some research to find the relevant instructions. In a worst case scenario, there’s always customer support as a fallback option.
Once you’re logged into cPanel, look around until you find the Disk Usage option. Click on it.

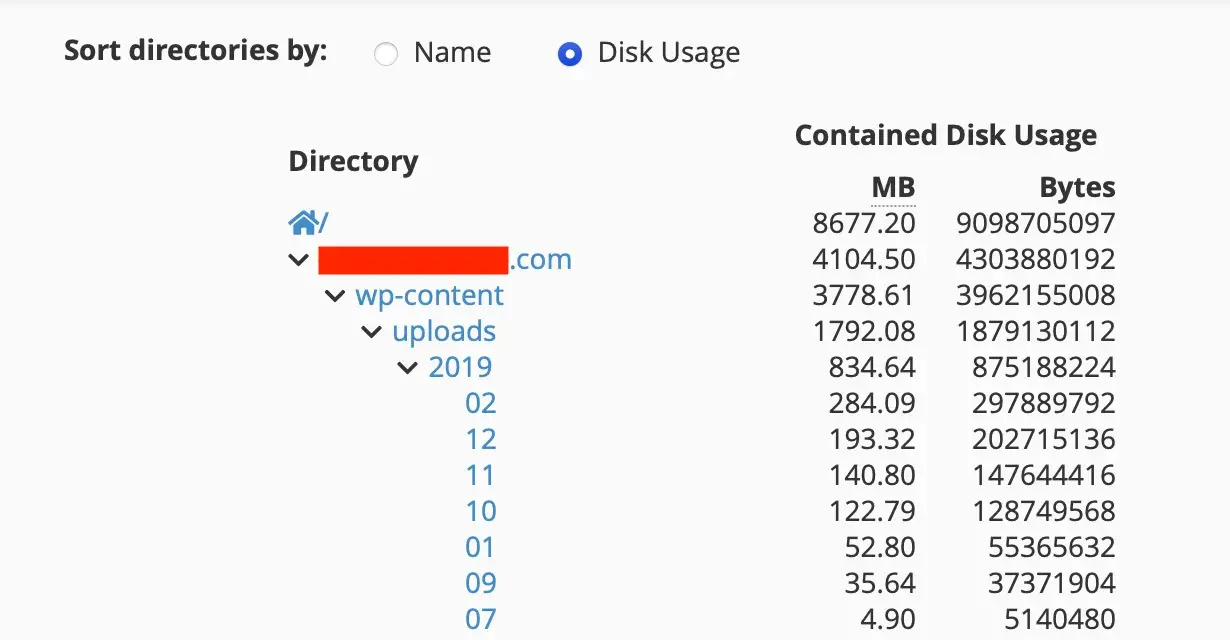
On the next page scroll down until you see the directory. Then toggle the radio button from Name to Disk Usage:

This will arrange the directories from largest to smallest.
Next, you can start drilling down into the directories that contain the largest files:

When you find one that catches your eye or that you want to investigate further, simply click on it and it will bring you into the cPanel file manager.
Once there, click on the Size heading to organize all of the files in the directory from largest to smallest. You may need to click it twice if the initial click organizes the files in reverse (from smallest to largest).

Examine the files and if you notice any that you aren’t using anymore then click on them and use the Delete button to remove them.
Quick note; if you come across any issues with not having permissions to delete some files, read this.
It’s as simple as that!
Just be sure to double check the files before deleting them to be 100% certain that they are not being used.
🎥 If you prefer to learn by watching a video, below is an older YouTube tutorial from one of the original founders of WPShout doing a walk-through of the process above.
Hopefully the instructions were clear to you. If you have any other questions about removing large files on cPanel hosting please ask in the comments below. I’ll be happy to assist.
…
Don’t forget to join our crash course on speeding up your WordPress site. Learn more below:
Or start the conversation in our Facebook group for WordPress professionals. Find answers, share tips, and get help from other WordPress experts. Join now (it’s free)!

