Don’t know how to hide theme details in WordPress? Then, you’ve landed in the right place.
Not hiding your theme details might make your site vulnerable to hacking. Don’t worry, below, we’ve mentioned different methods on how to hide theme details in WordPress.
But before anything else, here are some crucial points on why you should hide theme details. Without further ado, let’s get started.
Why is it Necessary to Hide Theme Details in WordPress?
All WordPress themes have been given some name by their developers. On top of that, when you install them, their default name appears on your site’s footer. We all know, one theme can be installed by many. Hence, all those who installed the same theme might end up having the same default name.
What’s more, is that the theme’s name can be spotted in the theme’s code and folders. This might look unprofessional. Not to mention, hackers, with the help of the theme’s name, can hack your site at any time.
And that’s why it’s necessary to hide or rename theme details to make the website your own. So that it can represent your brand, along with that, it makes your site more secure and protected.
If you’re not sure whether it’s legal to rename the theme name/details or not. Then, let’s tell you, WordPress is open-source software. Therefore, it’s totally fine to hide the WordPress theme details.
Now that we understand the importance of hiding theme details let’s dive into the methods of how to hide theme details in WordPress.
How to Hide Theme Name from Source Code?
Method 1: Remove Your WordPress Theme Name from Footer
The first method on how to hide theme details in WordPress is by removing the WordPress theme name from the footer. For this tutorial, we’re going to use the theme Zakra.
Zakra is a popular multipurpose theme suitable for any type of niche WordPress website. It has 65+ demos that you can import with a single click.
Below are some of the key features of theme Zakra:
- Highly customizable: Zakra has a fully customizable interface. Hence, you can customize it as per your requirement.
- Translation-ready: Built a multilingual WordPress site effortlessly with the help of Zakra.
- Seamless WooCommerce integration: It offers WooCommerce integration so that you can easily create an eCommerce site.
- Responsive design: With Zakra, your website will look great on every device like mobile, laptop, tablet, and so on.
- Compatible with page builders: Easily create pages of your choice with popular page builders like Elementor and more.
Now that we know how multi-purpose this theme is, all there’s left to do is install and activate the theme.
After you activate the theme, import a theme demo of your choice. Now, if you see the live preview of your website, you can observe ‘Powered by Zakra and WordPress’ written at the footer.
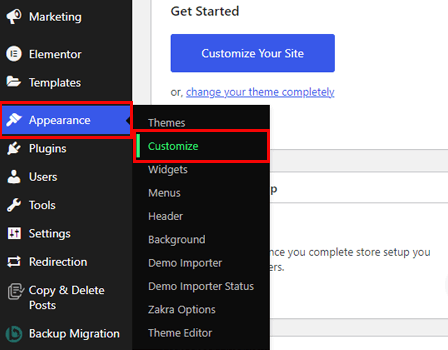
You can either completely remove or replace it with something else using the theme customizer. In order to do that, go to Appearance >> Customize from your dashboard.
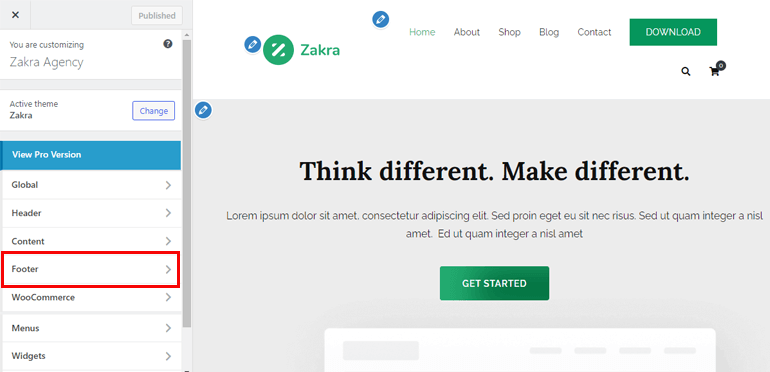
It takes you to the theme customization page. From the menu options, select Footer.
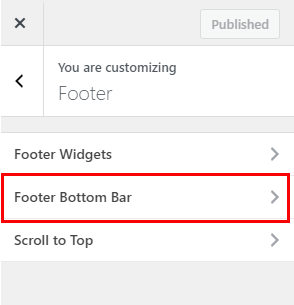
Further, you’ll find three more options. Simply, click on the Footer Bottom Bar.
Now, select the Left Content dropdown option. If you want to remove the footer credit section then, click on the None option.
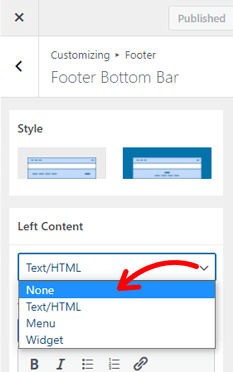
However, if you want to modify the footer credit section, then, under the Text/HTML for Left Content filed, add your own copyright content.
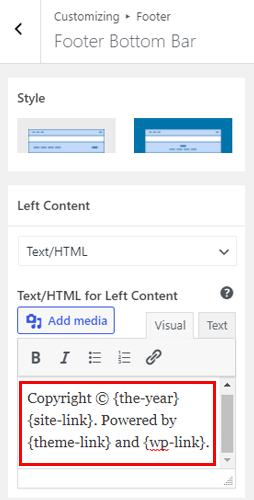
Lastly, hit the Publish button at the top to save all the changes.
If you want a full guide, here’s an article on how to Remove Proudly Powered by WordPress footer link.
Method 2: Using a WordPress Plugin (WP Hide & Security Enhancer)
The next method on how to hide theme details in WordPress is by using a WordPress plugin. Among thousands of plugins, WP Hide & Security Enhancer is the one we’re going to use.
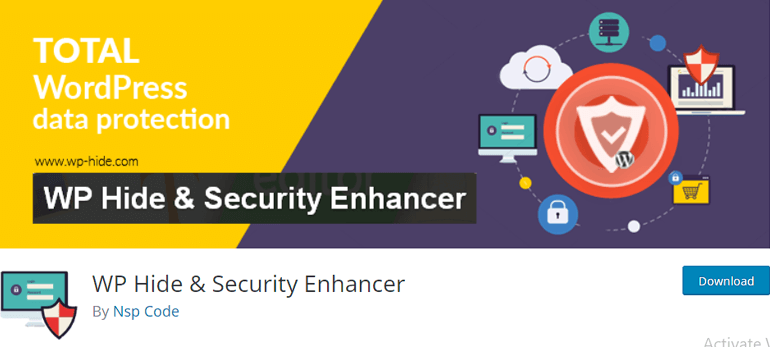
Here are some of the key features of the WP Hide & Security Enhancer plugin:
- The plugin allows hiding WordPress core files and plugins. You can change the default admin’s URLs from wp-login.php and wp-admin to whatever you want. Doing such will prevent hackers from having access to information of any theme.
- Another great feature of this plugin is, everything is done automatically. The users don’t need to modify or touch anything.
- WP Hide & Security Enhancer uses a rewriting URL method and filtering WordPress. It makes the necessary changes without changing the files and directory.
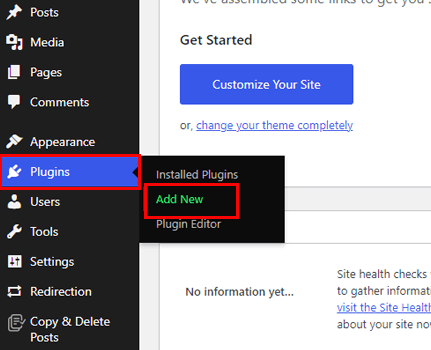
With that said, let’s install and activate the plugin. For that, navigate to Plugins >> Add New from the sidebar of your WordPress dashboard.
Now, type the plugin’s name on the search box. Once it appears, click on the Install button and finally hit the Activate button.
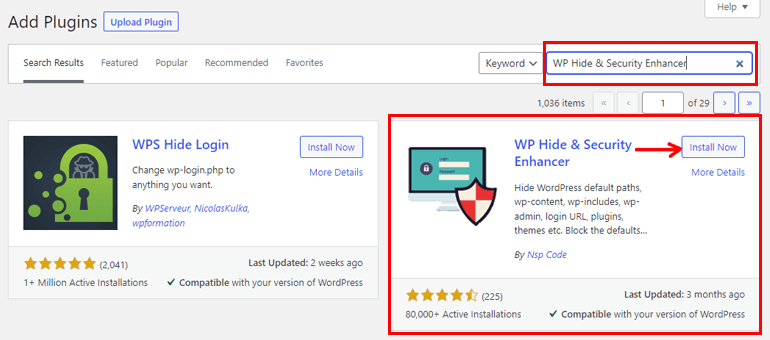
And that’s it. The plugin will do the rest of the work i:e hide your WordPress theme details.
Method 3: Whitelabel
Whitelabel is yet another method to hide theme details in WordPress. This method is specifically for developers.
For example, a client wants a developer to create a WordPress website. Instead of creating a site from scratch, the developer can use a pre-built template. And we know that there are theme details and theme names visible on pre-built themes.
Therefore, developers can use the Whitelabel method to hide the theme name and make-believe clients that the site has been created specifically for them. Basically, Whitelabel allows developers to conceal product information to make the website more professional.
Below are the benefits provided by Whitelabel
- Hides theme author
- Allows to create customized login page and dashboard
- Allows to personalize the back-end and much more
One of the easiest ways to Whitelabel clients’ sites is by using a plugin. There are quite a few plugins available in the market. We suggest using White Label CMS plugin.
This plugin enables you to add the client’s brand to the admin bar, header, and footer. Apart from that, you can create a simplified dashboard for your client. Not to mention, adding personalized menus on the dashboard is also possible.
Install White Label CMS
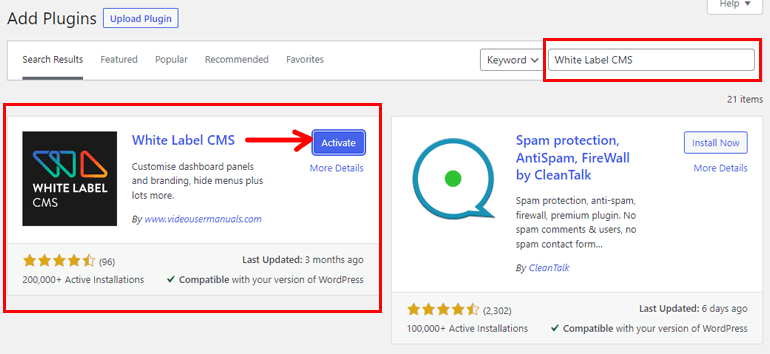
To begin with, Install and Activate the plugin as instructed in the above method.
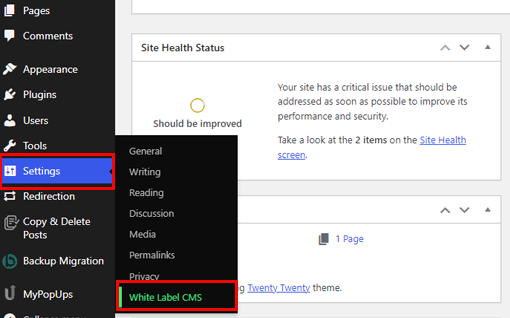
After the plugin activation, navigate to Settings >> White Label CMS.
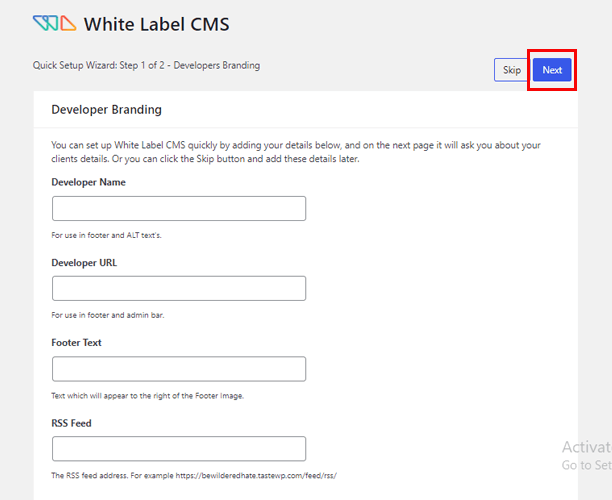
Next, it takes you to the Quick Setup Wizard page. From here you can add Developer Name, Developer URL, Footer Text, and RSS Feed. Thereafter, select the Next button located at the top right.
In the next step, the plugin allows you to add Clients Business Name and Login Logo. Finally, Save all the changes.
Configure White Label CMS Settings
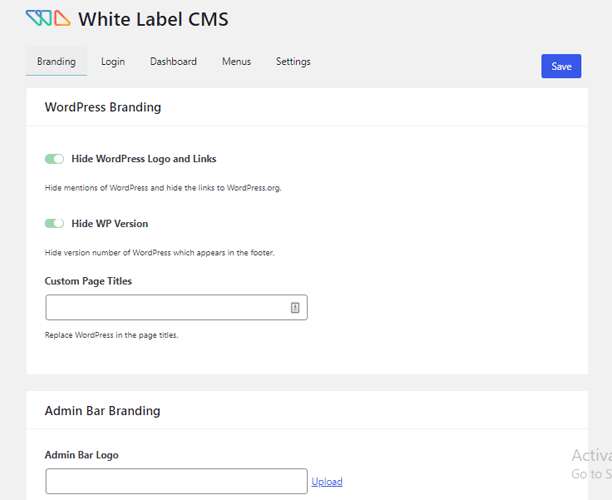
Then, on the next page, 5 more configuration options appear – Branding, Login, Dashboard, Menus, and Settings.
Under the Branding option, you can configure settings such as WordPress branding, Admin Bar branding, Side Menu branding, Gutenberg branding, and Footer branding. Adjust the settings as per your requirements.
The Login option allows you to configure all the necessary settings related to the Logo and Background. Further, you can also add Custom CSS and JavaScript.
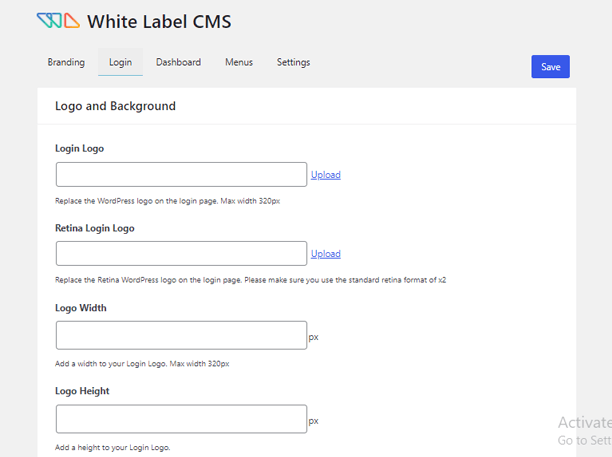
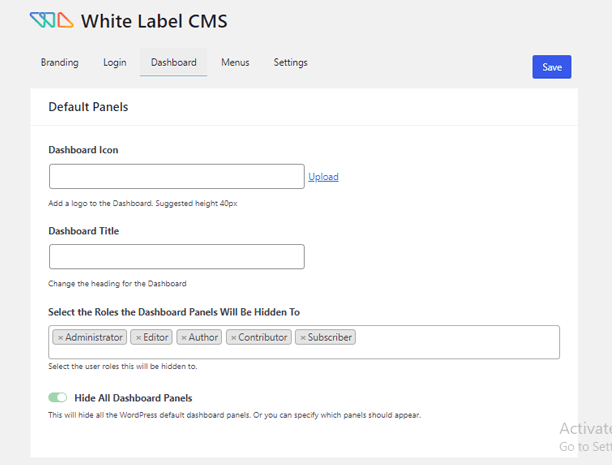
Likewise, with the help of the Dashboard option, you can configure Default Panels. Additionally, you can also create Custom Welcome Dashboard Panel and Add Your own RSS Panel.
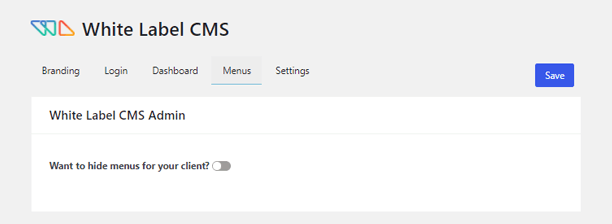
The Menus option enables you to hide the menus from your client.
Lastly, the Settings option allows you to configure Admin Bar, Admin Settings, and Nag Messages. Along with that, you can add Custom CSS for Admin and Custom Editor StyleSheet.
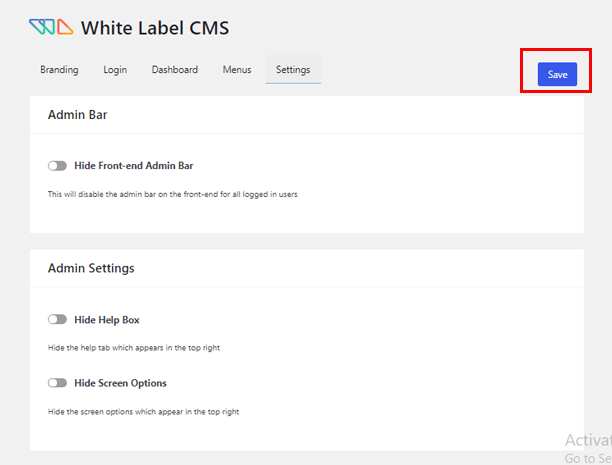
Once you’re satisfied with the setting options, don’t forget to hit the Save button as shown in the above image.
Method 4: Manually Hide Theme Name in WordPress
The last method on how to hide theme details in WordPress is manual. For some of you, this method might not be your cup of tea. Hence, feel free to choose any one of the above methods. Nevertheless, we’re here to help you learn something new today.
For this method, you can either use cPanel or FTP. FileZilla is one of the best FTP clients in the market; hence, we’ll use FileZilla in this section.
First of all, download FileZilla on your computer and open it. Then, fill up Host, Username, and Password credentials. Lastly, hit the Quick Connect button.

On the left panel, you can see all your local files. Likewise, on the right panel, all your site’s files are located. Now, find and double-click the public_html and then wp-content folder from the right panel.
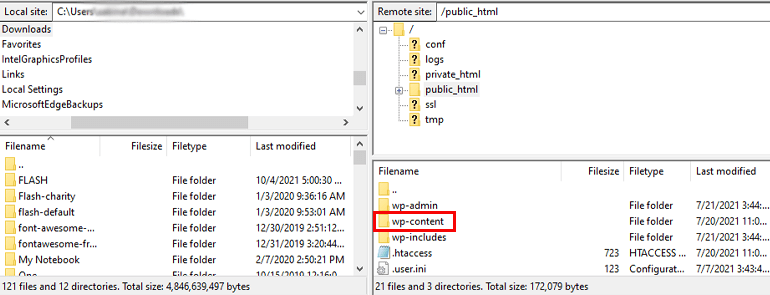
Next, select the themes folder.
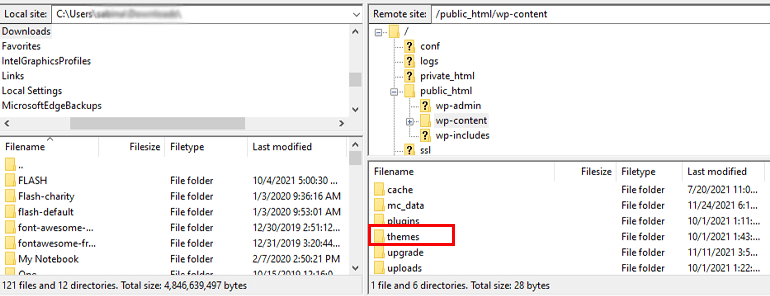
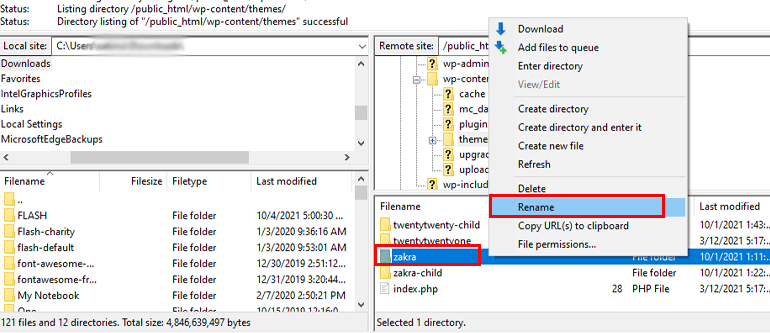
In this folder, you can find the themes you’ve installed on your WordPress website. Hover over to the active theme on your site (Zakra) then, right-click and select the Rename option. You can rename the theme folder as per your wish.
Thereafter, open the newly named theme folder. Search for Style.CSS file then, right-click on it and select the Edit option.
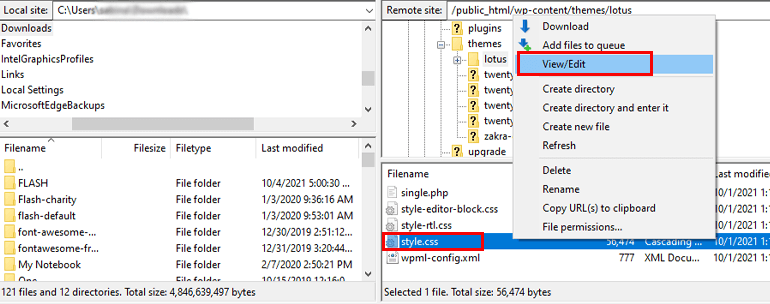
Now, rename the Theme Name of your choice and click Save and Close button.
To check if the name has been changed or not, go to your WordPress dashboard. Navigate to Appearance >> Themes look at the theme folder name.
Wrapping It Up!
And that’s it on how to hide theme details in WordPress. We’ve mentioned 4 simple and easy methods to hide the WordPress theme name.
Also, please remember we’ve used the Zakra theme here. Zakra offers effortless theme customization options. However, the customization options and the process might be different on other themes.
Apart from that, we used WP Hide & Security Enhancer plugin to hide the WordPress theme name. Using Whitelabel or hiding the theme name manually are the other two options you can choose from.
Having said that, it’s finally a wrap. Hope this article was helpful for you. And, if it was, please take a moment to share it on your social media. You can also follow us on Twitter and Facebook for future updates.


