Want to experiment with WordPress without worrying about breaking your live website? Installing WordPress on localhost allows you to test new features, learn the platform, and develop websites offline in a safe environment. Setting up a local development environment gives you the freedom to experiment without consequences.
This guide walks you through the complete process of installing WordPress locally on your computer. For Windows users, we’ll show you how to use XAMPP, while Mac users will learn the process with MAMP.
Let’s begin creating your own WordPress testing ground on your personal computer!
Table of Contents
- What is Localhost?
- Step 1: Choose a Local Server Environment
- Step 2: Download and Install XAMPP
- Step 3: Configure Your Local Server
- Step 4: Create a Local Database
- Step 5: Download and Add WordPress Files
- Step 6: Run WordPress Installation Wizard
- Step 7: Accessing and Testing Your Local Site
- Troubleshooting Common Localhost Issues
- Optimizing Your Localhost WordPress Installation
- How to Migrate Your Local WordPress to a Live Server
- Why Install WordPress Locally?
What is Localhost?
When you hear “localhost,” it simply refers to your own computer acting as a web server. Instead of your website files living on a remote hosting server somewhere on the internet, they exist right on your personal device. The term literally means “this computer” – the one you’re using right now.
Step 1: Choose a Local Server Environment
To create this local server environment, you’ll need software that simulates all the components of a web server. Several excellent options are available, each with its own strengths:
- XAMPP is one of the most popular cross-platform solutions, working on Windows, Mac, and Linux. The name stands for Cross-Platform (X), Apache, MySQL, PHP, and Perl. It’s particularly user-friendly for beginners and offers a comprehensive package with all the components WordPress needs.
- MAMP (Mac, Apache, MySQL, PHP) is optimized specifically for macOS users, though a Windows version is also available. Many Mac users prefer MAMP for its native macOS integration and intuitive interface.
- WAMP (Windows, Apache, MySQL, PHP) is designed exclusively for Windows systems. Some Windows users find it more streamlined than XAMPP since it’s built specifically for their operating system.
- Local by Flywheel. For those wanting a more modern, user-friendly approach, Local by Flywheel offers a beautiful interface designed specifically for WordPress development. It handles all the technical details behind the scenes, making it perfect for beginners.
For this tutorial, we’ll provide detailed instructions for both XAMPP (Windows users) and MAMP (macOS users). However, the general process remains similar regardless of which solution you choose.
Step 2: Download and Install XAMPP / MAMP
For Windows Users (XAMPP)
Here’s how to get XAMPP up and running:
1. Visit the Apache Friends website and download download the Windows version.
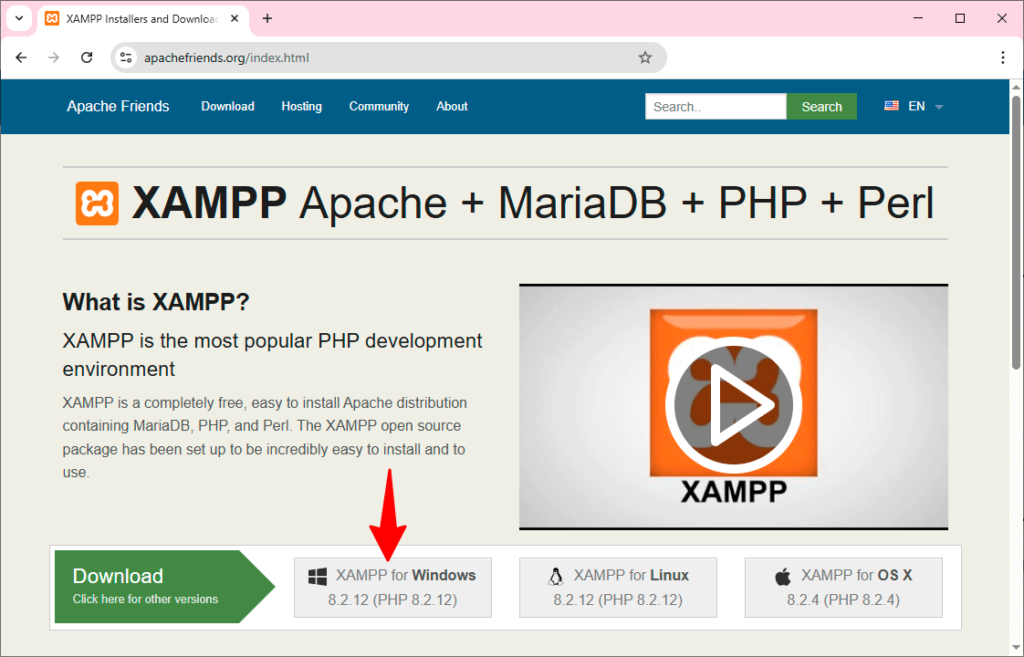

2. Run the installer after downloading.
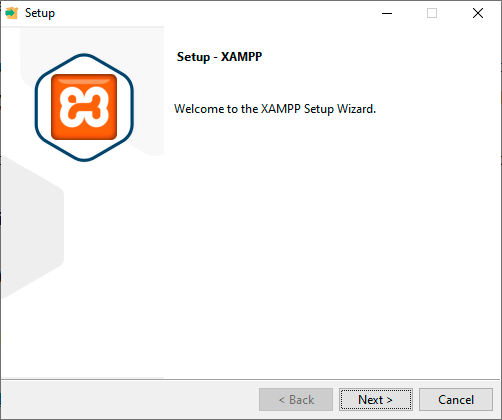

You might see security warnings – simply allow the application to make changes to your device.
3. During installation, you’ll see checkboxes for different components. At minimum, make sure Apache, MySQL, PHP, and phpMyAdmin are selected. These components are essential for WordPress.
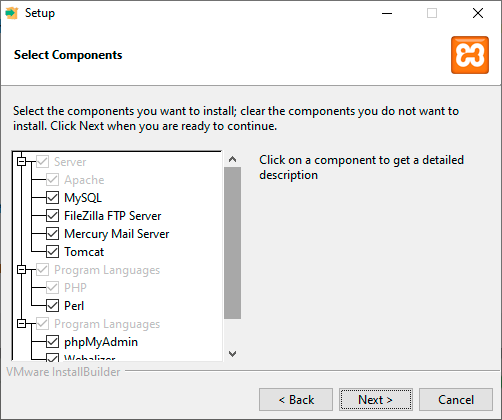 Choosing components” class=”wp-image-809271″/>
4. Choose your installation folder. The default location (typically C:xampp) works fine for most users.
5. Complete the installation process by following the prompts.
For Mac Users (MAMP)
Here’s how to install MAMP on your Mac:
1. Visit the MAMP website and download the Mac version.
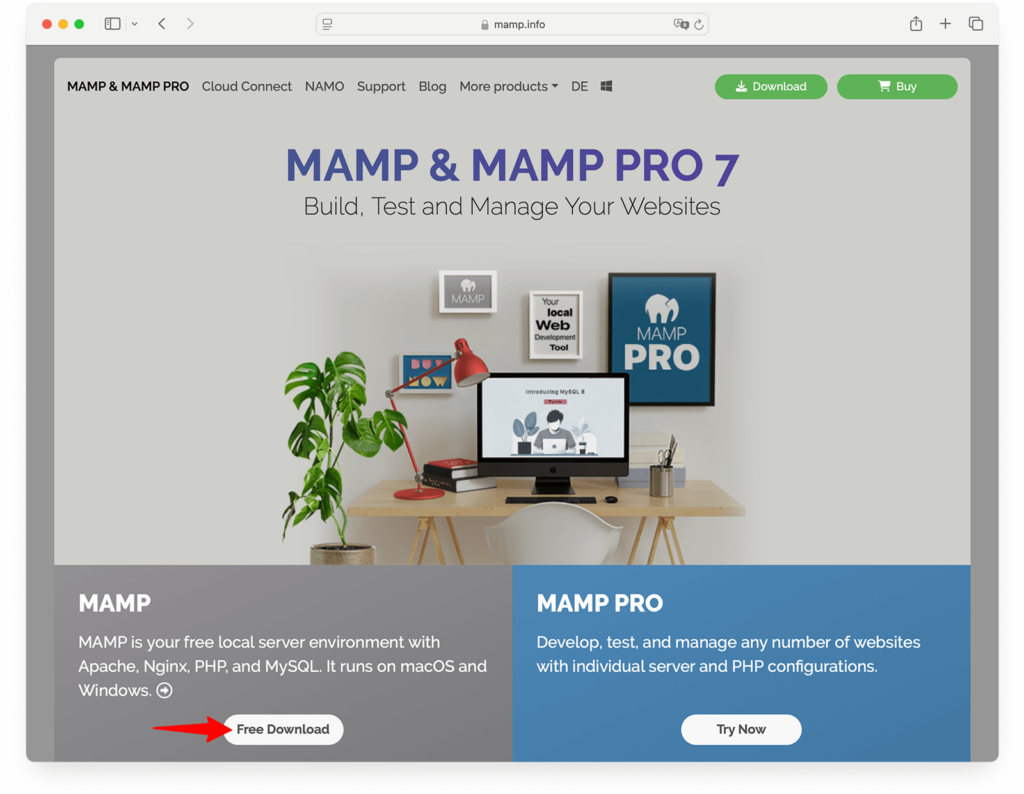

2. Open the downloaded .pkg file and follow the installation wizard.
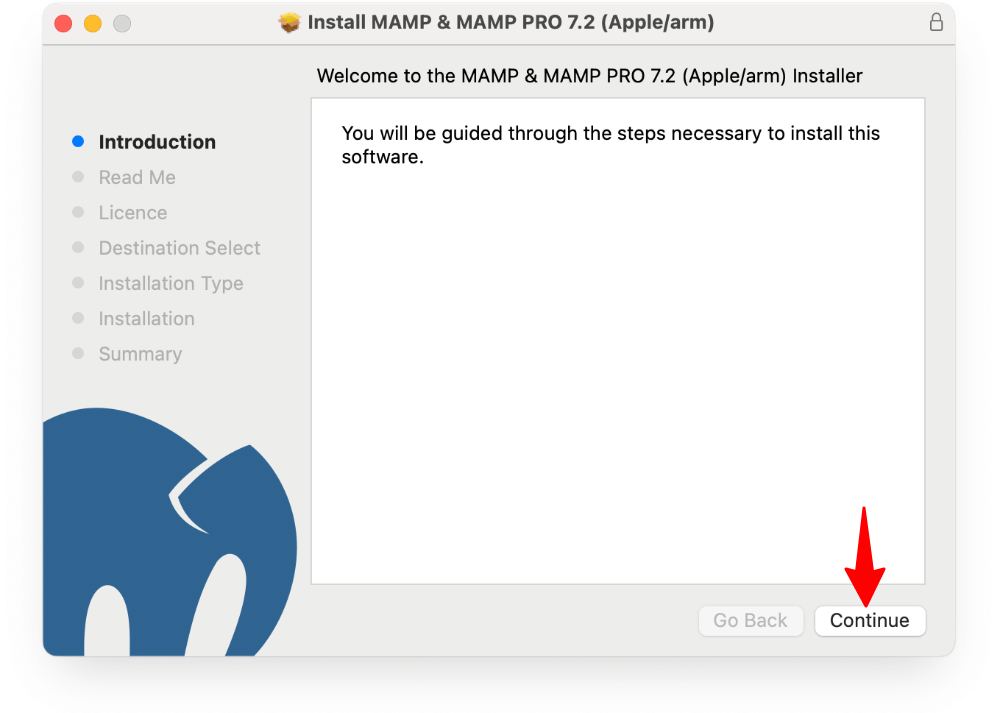

3. When prompted to select the installation type, choose the standard MAMP installation (not MAMP PRO).
4. Drag the MAMP icon to your Applications folder when prompted.
Step 3: Configure Your Local Server
For Windows Users (XAMPP)
Now that you have XAMPP installed, you need to start the necessary services:
1. Open the XAMPP Control Panel if it’s not already running. This panel serves as your command center for managing your local server.
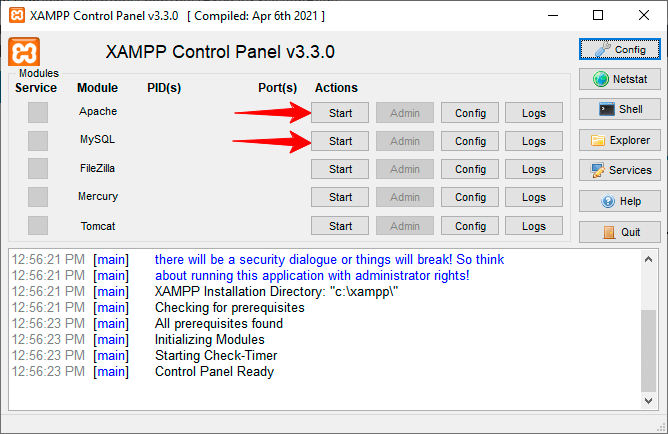
2. Start the Apache and MySQL services by clicking the “Start” buttons next to them. When running correctly, their status indicators will turn green.

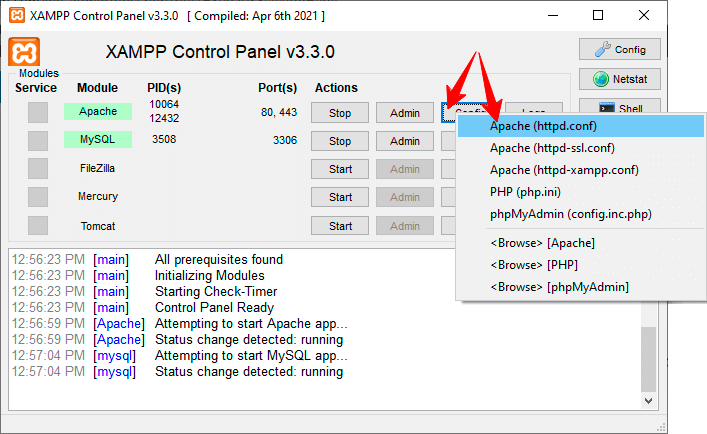
3. If you encounter any port conflicts (common when other software might use port 80), you can modify the ports in the configuration files. Click on “Config” next to Apache, select “httpd.conf” and change instances of port 80 to another number like 8080.

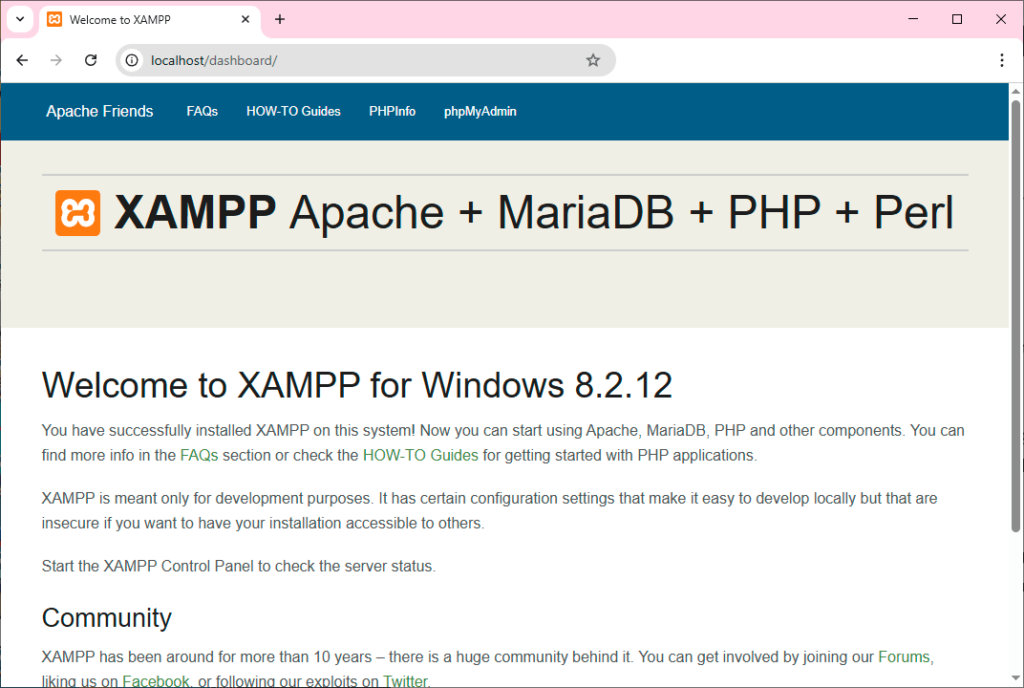
4. Test that your server works by opening a web browser and navigating to http://localhost. You should see the XAMPP dashboard page, indicating your web server is functioning properly.

For Mac Users (MAMP)
After installing MAMP, you’ll need to configure it properly:
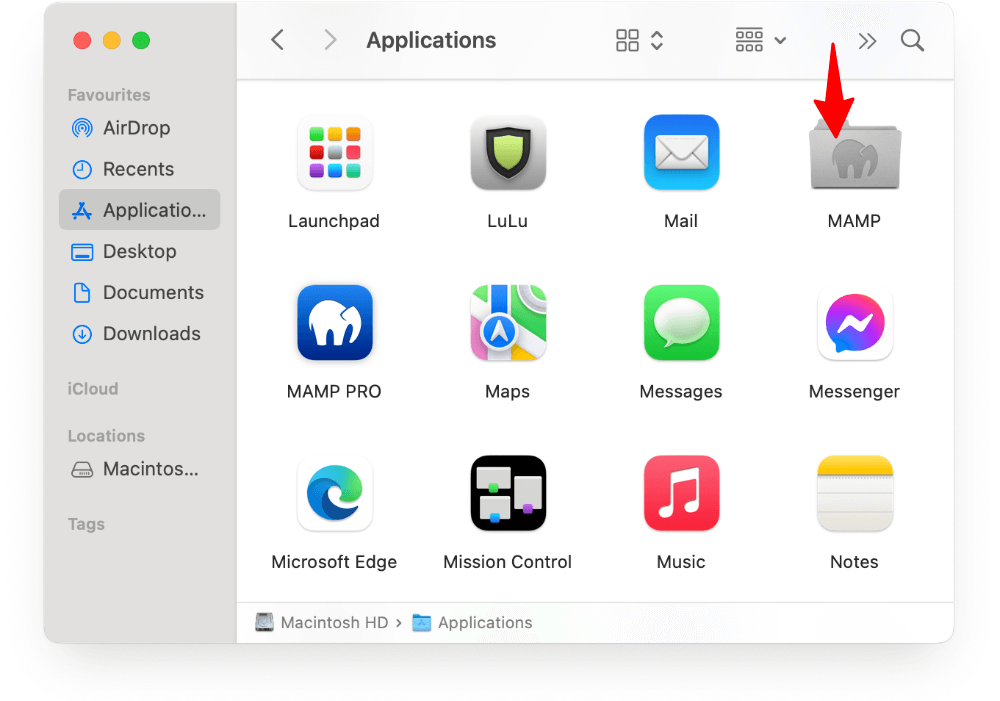
1. Launch MAMP from your Applications folder (make sure you’re opening MAMP, not MAMP PRO).

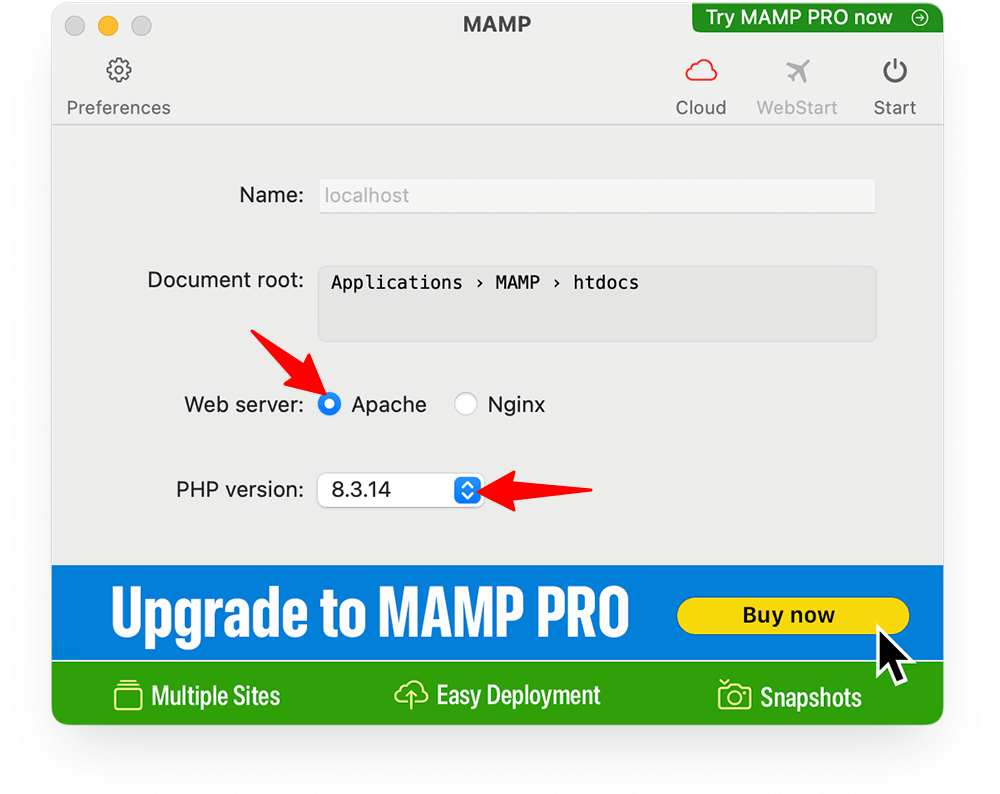
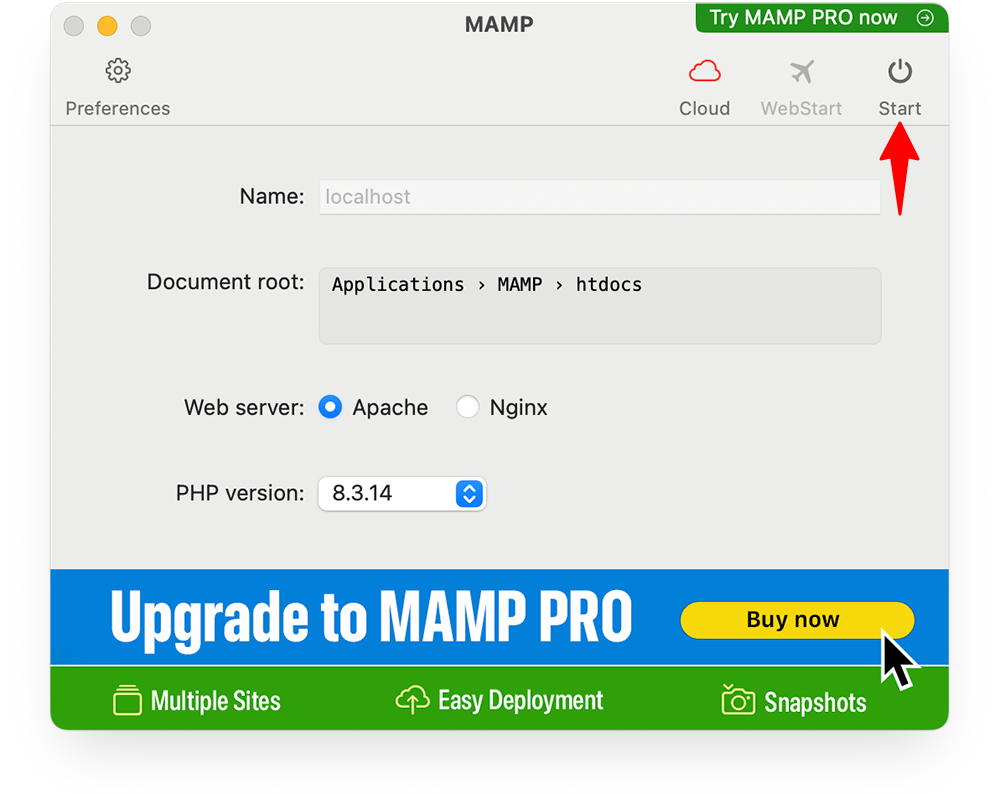
2. In the MAMP window, make sure Apache is selected for “Web server“.
Under “PHP version” , select the recommended PHP version (7.4 or higher for current WordPress versions).

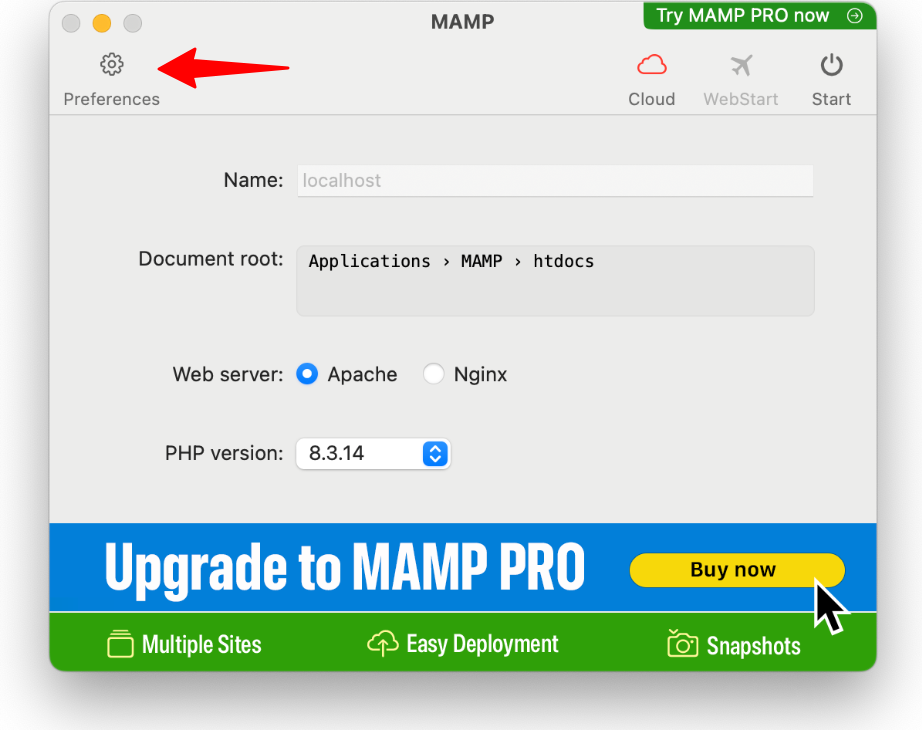
4. Click on “Preferences” to adjust your settings.
 Open Preferences” srcset=”https://b8f4g5a7.delivery.rocketcdn.me/wp-content/uploads/2025/03/mamp-open-preferences.png 1000w, https://b8f4g5a7.delivery.rocketcdn.me/wp-content/uploads/2025/03/mamp-open-preferences-734×583.png 734w” sizes=”(max-width: 1000px) 100vw, 1000px”/>
5. Under the “Ports” tab, you can view or modify your ports. The default ports are typically 8888 for Apache and 8889 for MySQL. Note these down as you’ll need them when configuring WordPress.
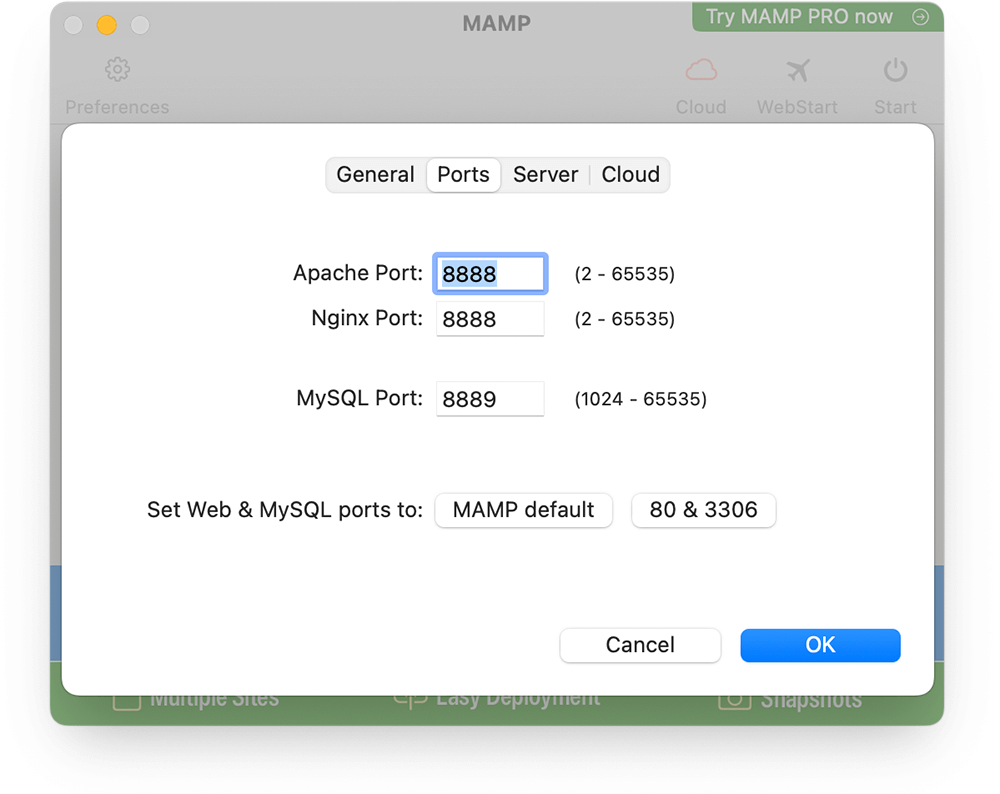 Preferences” srcset=”https://b8f4g5a7.delivery.rocketcdn.me/wp-content/uploads/2025/03/mamp-preferences-ports.png 1000w, https://b8f4g5a7.delivery.rocketcdn.me/wp-content/uploads/2025/03/mamp-preferences-ports-734×583.png 734w” sizes=”(max-width: 1000px) 100vw, 1000px”/>
Click “OK” to save your settings.
6. Click “Start” on the main MAMP window.

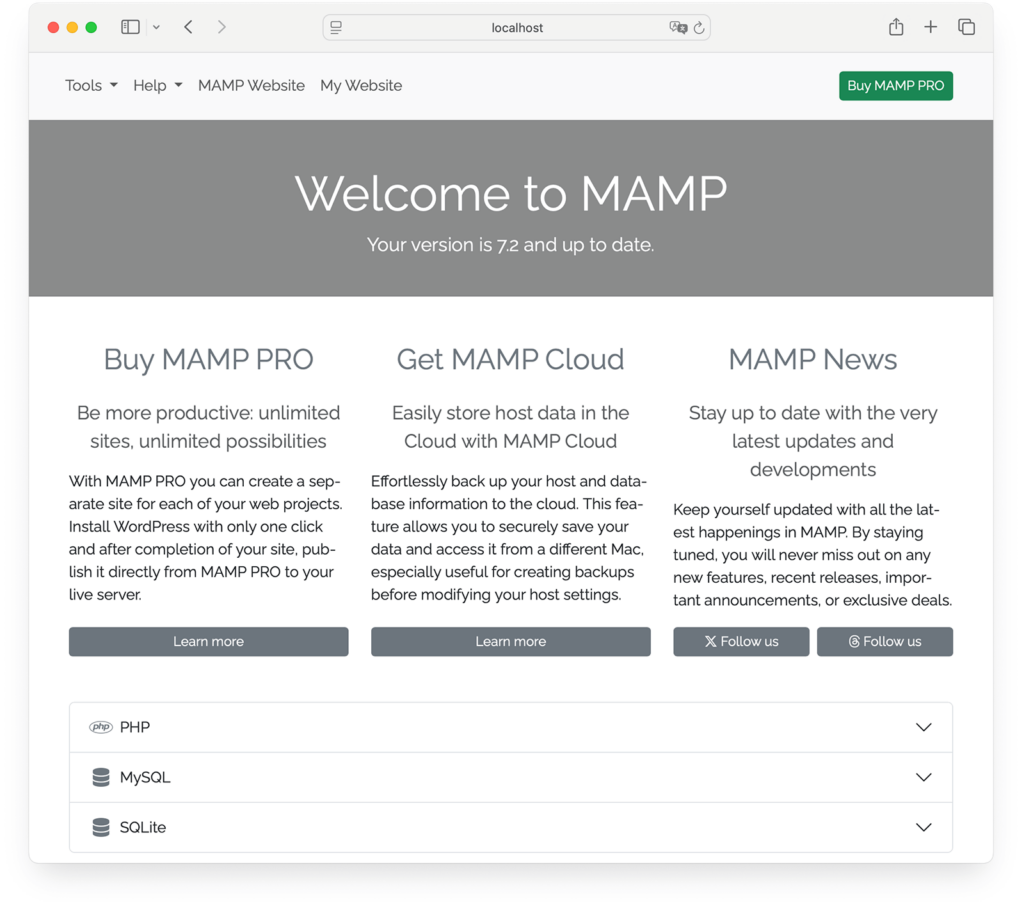
7. Verify your server is running by opening http://localhost:8888 in your browser (note the port number). You should see the MAMP start page.

The document root folder (where you’ll install WordPress) in MAMP is typically located at /Applications/MAMP/htdocs/.
Step 4: Create a Local Database
WordPress stores all its content and settings in a database. Before installing WordPress, you need to create this database:
1. With your server running, open phpMyAdmin:
Windows (XAMPP):
Click the “Admin” button next to MySQL in the XAMPP Control Panel, or visit http://localhost/phpmyadmin in your browser
Mac (MAMP):
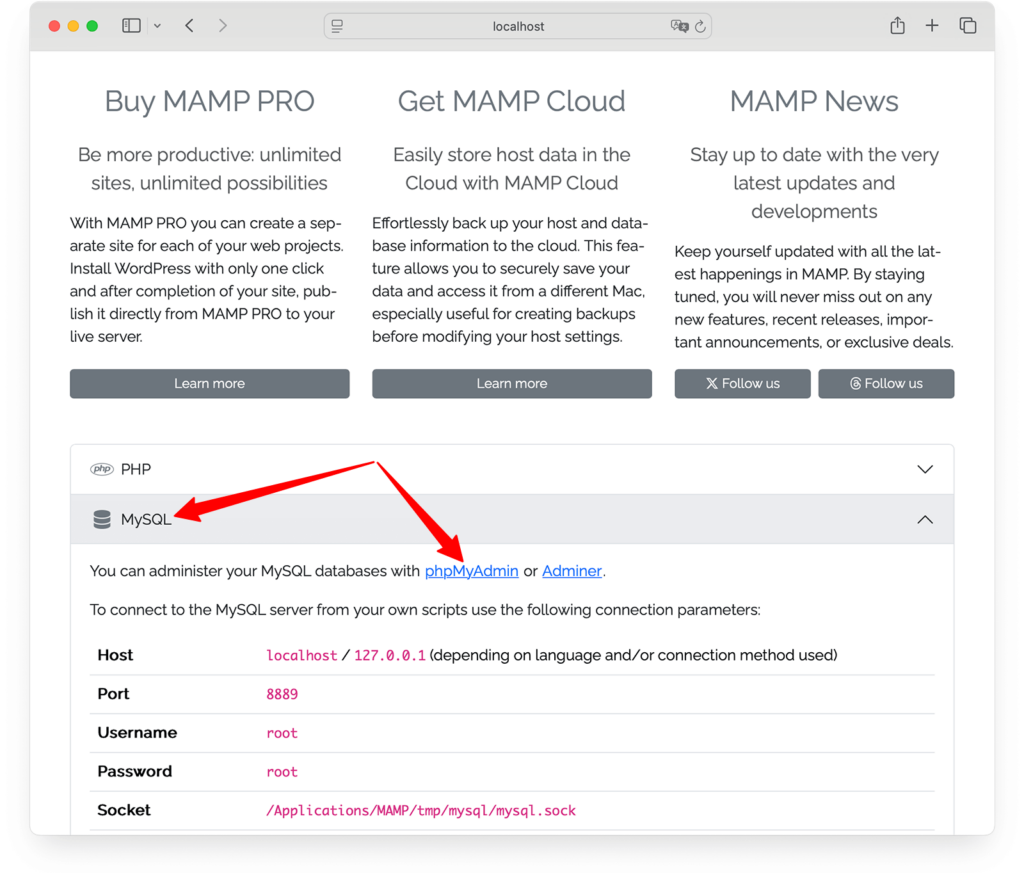
Click “WebStart” in the MAMP window, then click the phpMyAdmin link, or visit http://localhost:8888/phpMyAdmin
 Open PHPMyAdmin” srcset=”https://b8f4g5a7.delivery.rocketcdn.me/wp-content/uploads/2025/03/mamp-localhost-open-phpmyadmin-1024×873.png 1024w, https://b8f4g5a7.delivery.rocketcdn.me/wp-content/uploads/2025/03/mamp-localhost-open-phpmyadmin-734×626.png 734w, https://b8f4g5a7.delivery.rocketcdn.me/wp-content/uploads/2025/03/mamp-localhost-open-phpmyadmin-1536×1309.png 1536w, https://b8f4g5a7.delivery.rocketcdn.me/wp-content/uploads/2025/03/mamp-localhost-open-phpmyadmin.png 1600w” sizes=”(max-width: 1024px) 100vw, 1024px”/>
2. In the phpMyAdmin interface, click “Databases” in the top navigation menu.
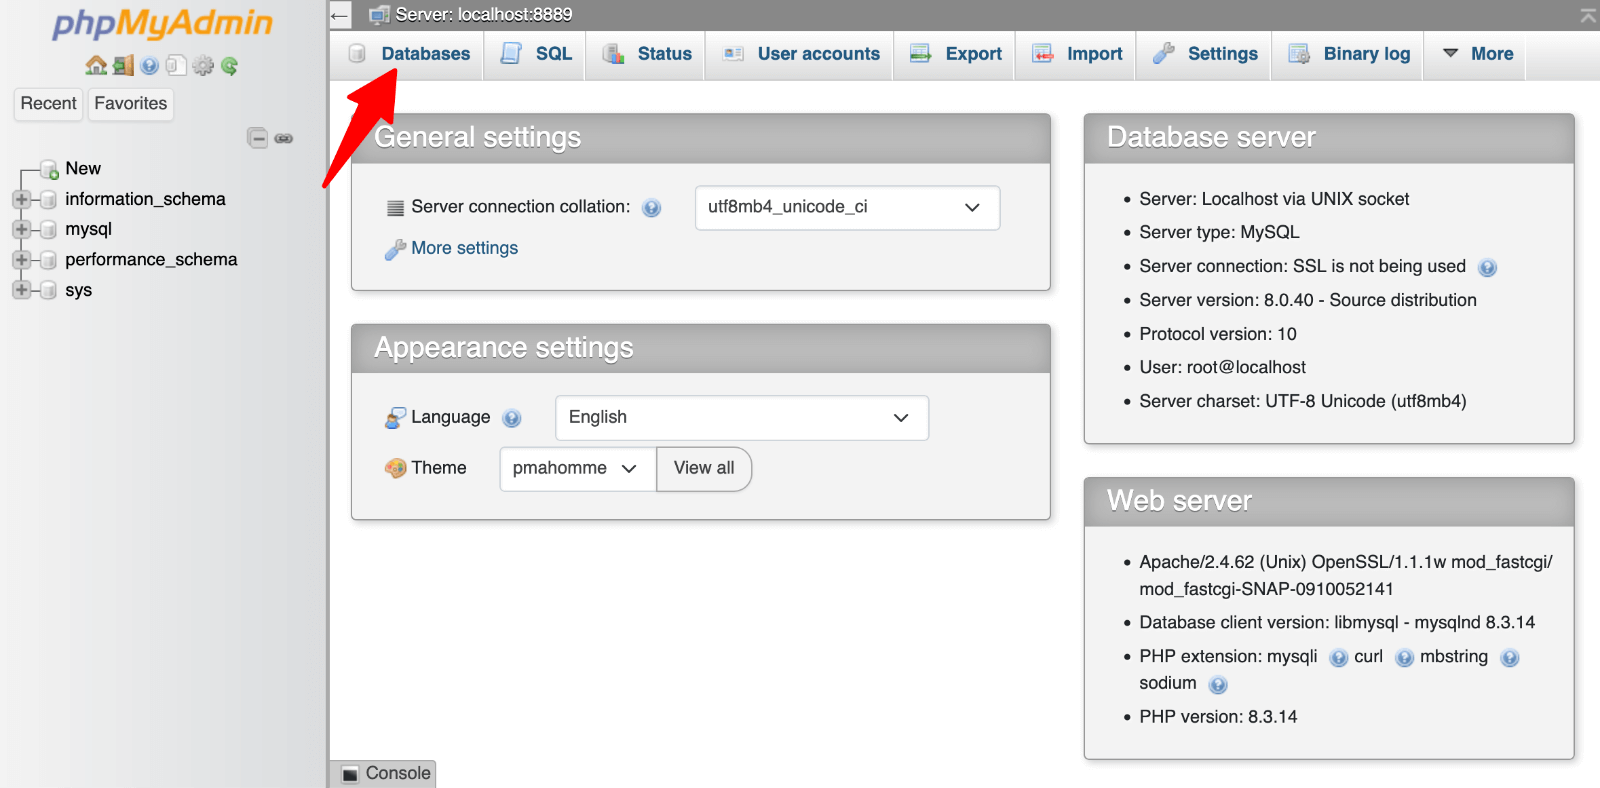 open Databases” class=”wp-image-809248″ srcset=”https://b8f4g5a7.delivery.rocketcdn.me/wp-content/uploads/2025/03/phpmy-admin-databases.png 1600w, https://b8f4g5a7.delivery.rocketcdn.me/wp-content/uploads/2025/03/phpmy-admin-databases-734×361.png 734w, https://b8f4g5a7.delivery.rocketcdn.me/wp-content/uploads/2025/03/phpmy-admin-databases-1024×504.png 1024w, https://b8f4g5a7.delivery.rocketcdn.me/wp-content/uploads/2025/03/phpmy-admin-databases-1536×756.png 1536w” sizes=”(max-width: 1600px) 100vw, 1600px”/>
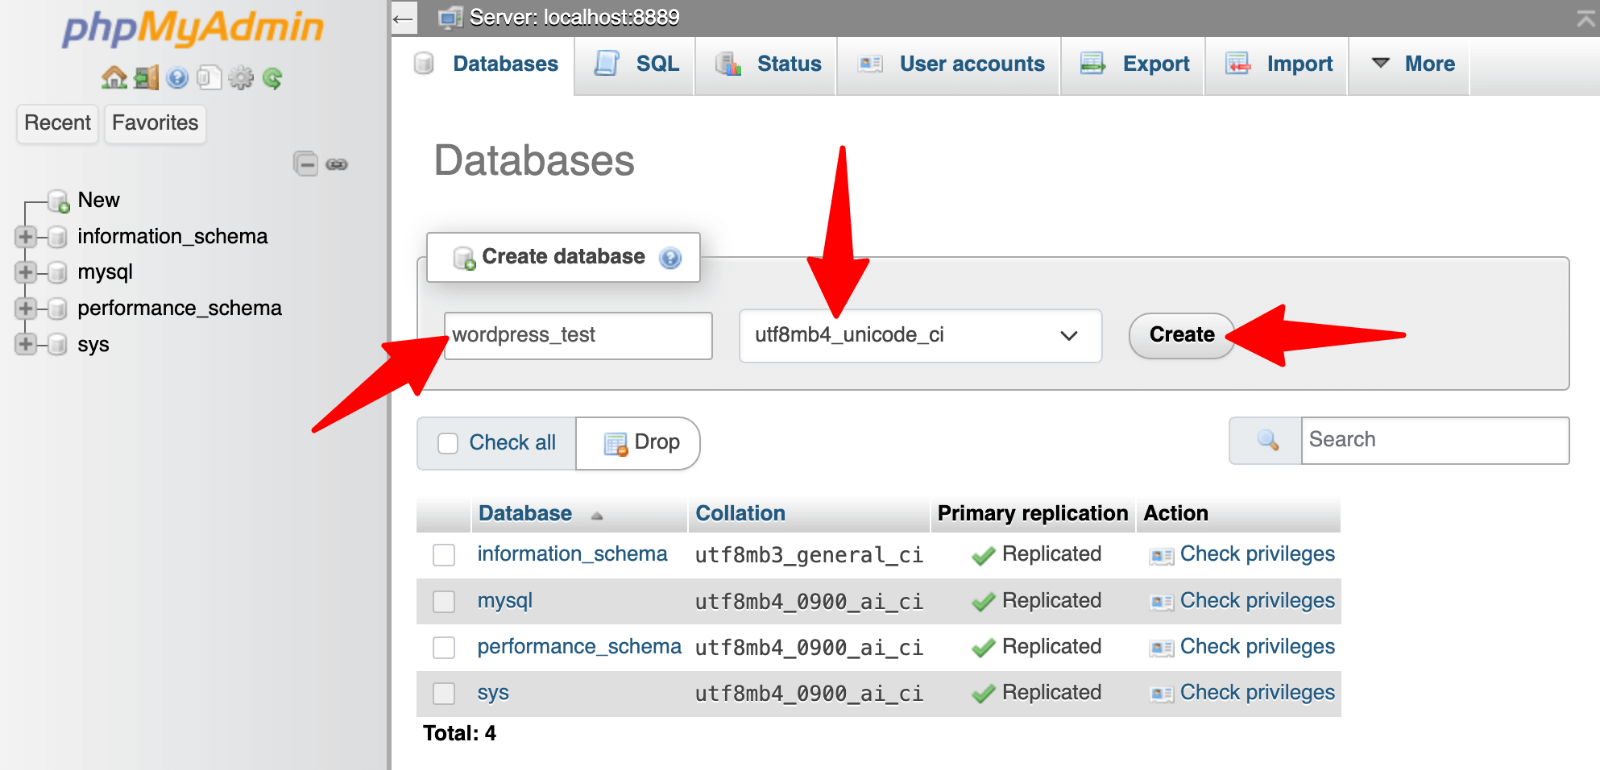
3. Under “Create database,” enter a name for your WordPress database. Choose something descriptive like “wordpress_test” or “local_wp_site“.
For the collation, select “utf8mb4_unicode_ci” from the dropdown menu. This setting ensures proper character encoding for your WordPress content.
Click “Create” to generate your empty database. You’ll see it appear in the list of databases on the left side of the screen.
 Create database” srcset=”https://b8f4g5a7.delivery.rocketcdn.me/wp-content/uploads/2025/03/phpmyadmin-create-database.png 1600w, https://b8f4g5a7.delivery.rocketcdn.me/wp-content/uploads/2025/03/phpmyadmin-create-database-734×353.png 734w, https://b8f4g5a7.delivery.rocketcdn.me/wp-content/uploads/2025/03/phpmyadmin-create-database-1024×493.png 1024w, https://b8f4g5a7.delivery.rocketcdn.me/wp-content/uploads/2025/03/phpmyadmin-create-database-1536×739.png 1536w” sizes=”(max-width: 1600px) 100vw, 1600px”/>
Keep the database name handy, as you’ll need it during the WordPress installation process. Note these default database credentials:
- Windows (XAMPP): Username “root” with an empty password
- Mac (MAMP): Username “root” with password “root”
Step 5: Download and Add WordPress Files
With your local server running and database created, it’s time to get the WordPress software itself:
1. Visit WordPress.org and download the latest version of WordPress. Look for the big blue “Download WordPress” button.
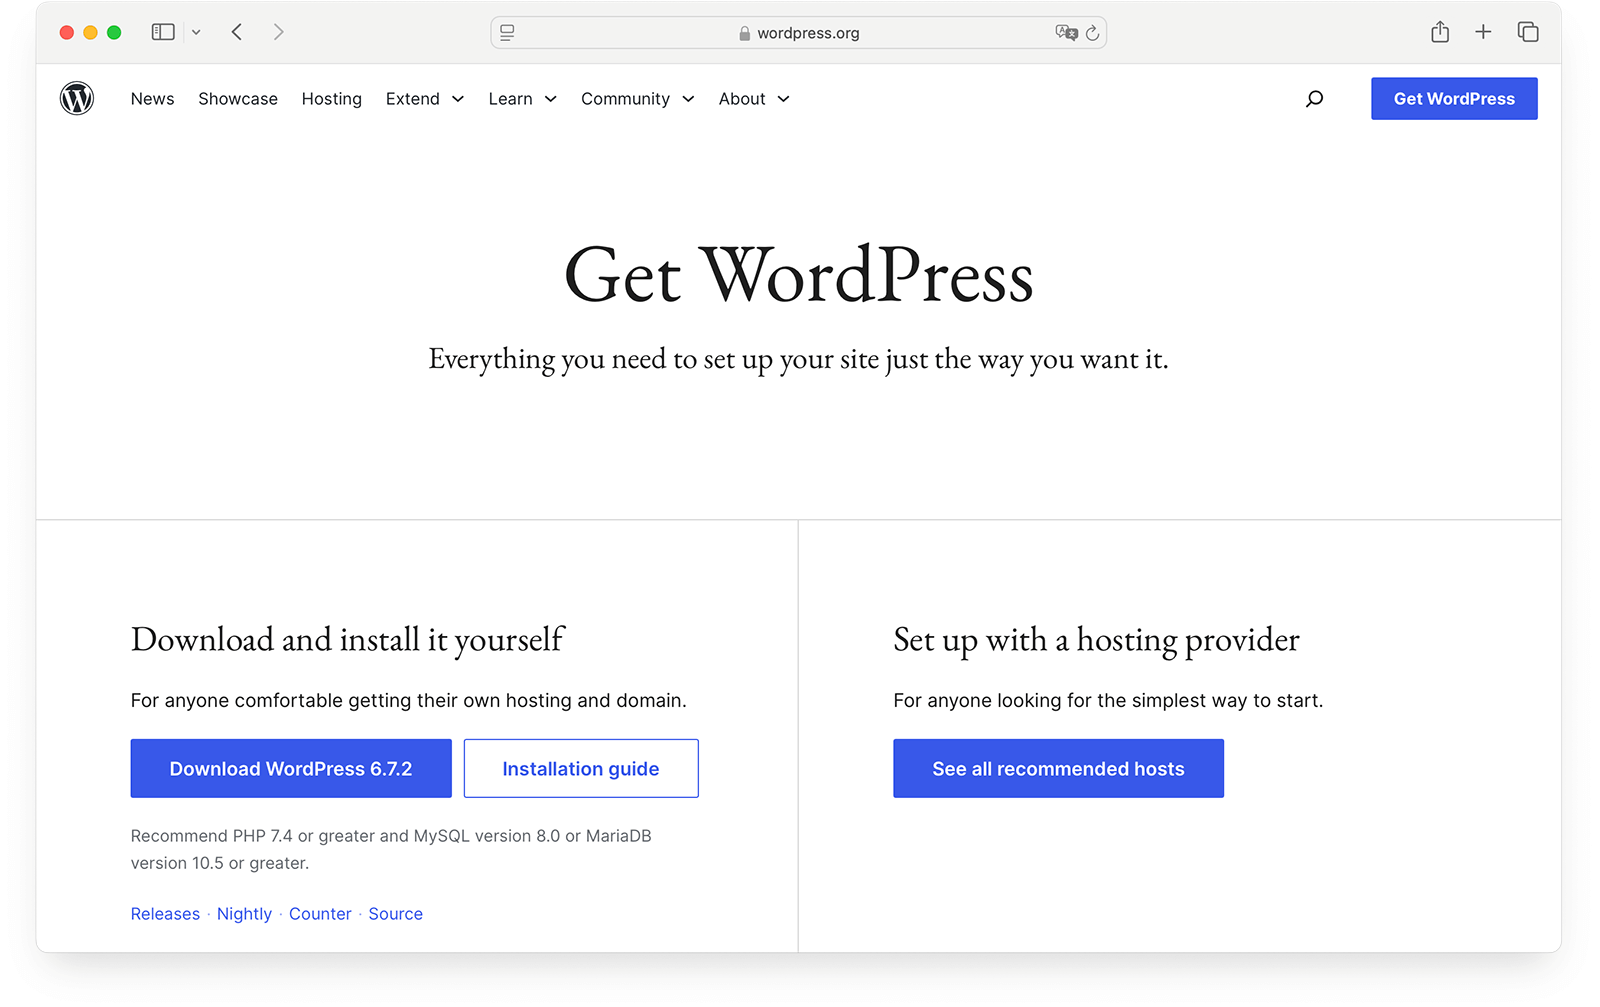

2. After downloading, unzip the WordPress package to extract all files.
3. Navigate to your server’s document root folder. By default, this is:
Windows (XAMPP): C:xampphtdocs
Mac (MAMP): /Applications/MAMP/htdocs/
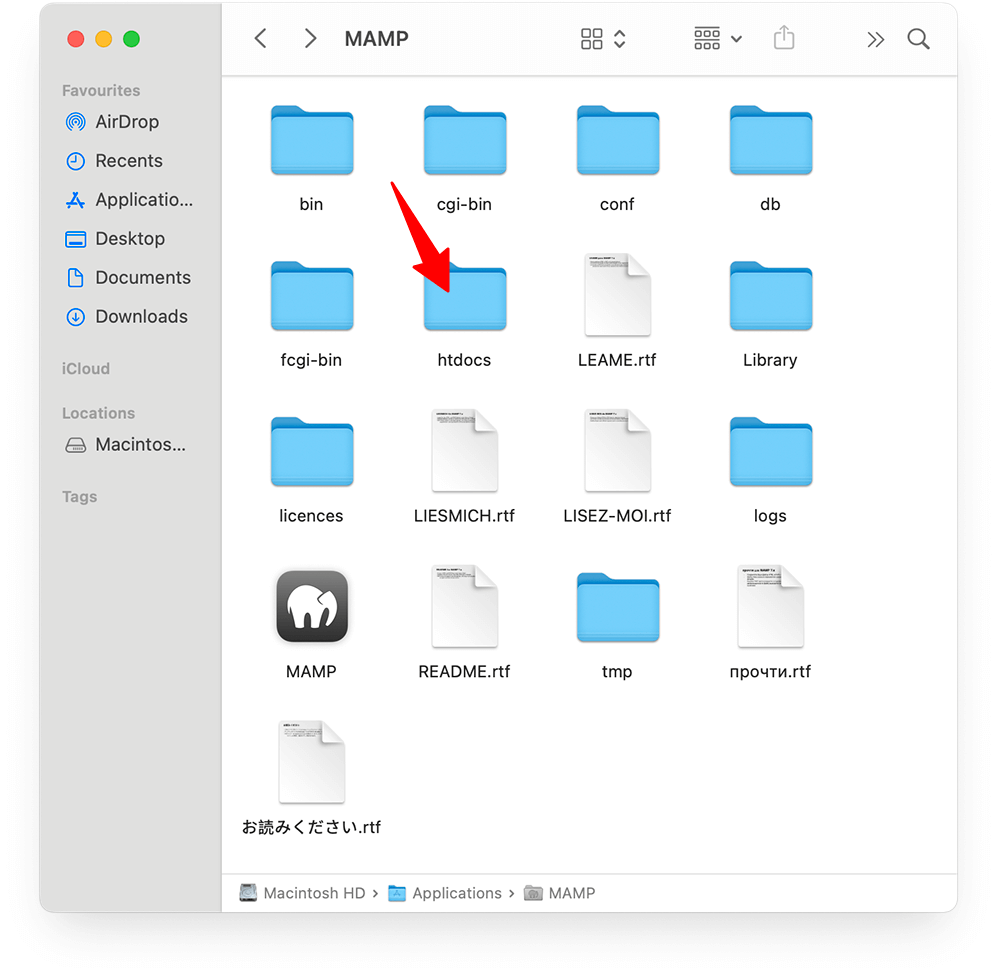

4. Create a new folder within the document root directory. Name it something related to your project (e.g., “mysite” or “wordpress-test”).
5. Copy all the extracted WordPress files into this new folder.
This folder name becomes part of your local site’s URL. For instance, if you named the folder “mysite,” you’ll access your WordPress installation at:
- Windows (XAMPP): http://localhost/mysite
- Mac (MAMP): http://localhost:8888/mysite
The port number (8888) may vary depending on your MAMP configuration. Check your MAMP preferences if you’re unsure about the port.
Step 6: Run WordPress Installation Wizard
Now comes the exciting part – running the WordPress installer and setting up your local site:
1. Open your web browser and navigate to http://localhost/your-folder-name (replace “your-folder-name” with whatever you named your folder in htdocs).
2. You should see the WordPress installation welcome screen. Select your preferred language and click “Continue.”
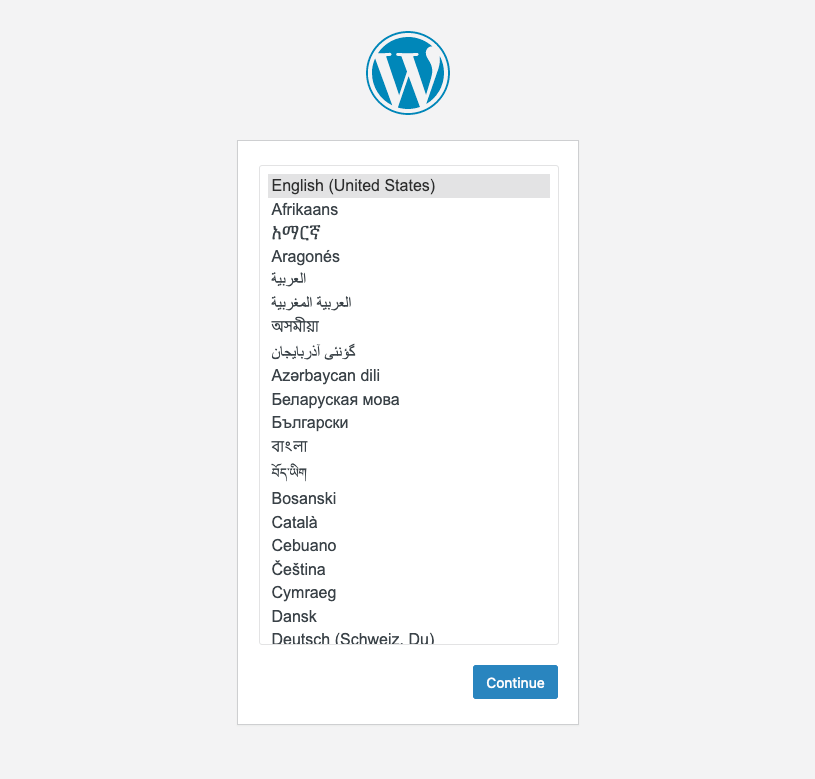

3. WordPress will prompt you to gather your database connection information. Click “Let’s go!” to proceed.
4. On the database configuration page, enter:
- Database Name: The name you created in Step 3
- Username: “root” (the default MySQL username in XAMPP)
- Password: Leave blank (unless you specifically set a password for MySQL)
- Database Host: “localhost”
- Table Prefix: Keep the default “wp_” or change it if desired
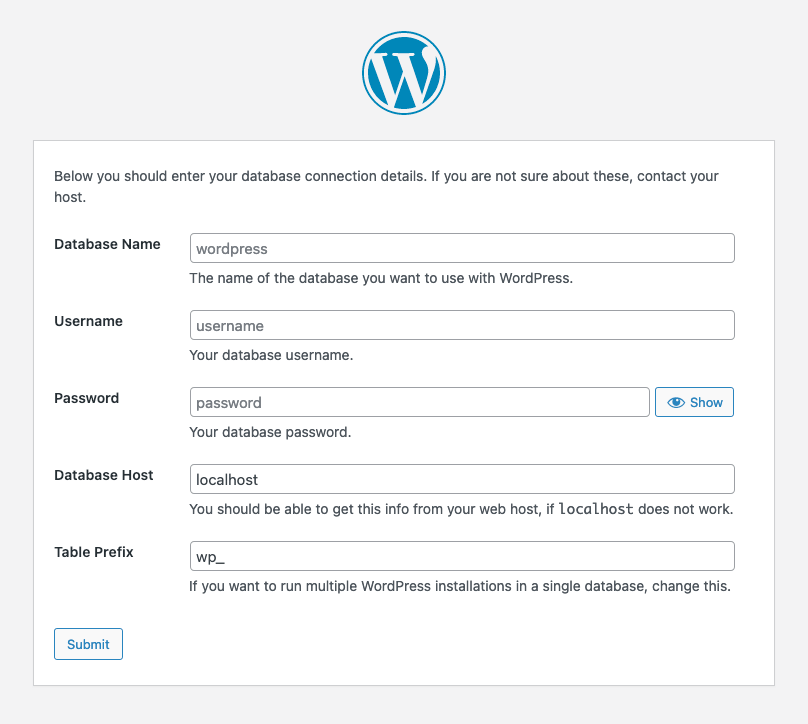

Click “Submit” to proceed.
5. If all your database details are correct, you’ll see a “Success!” message. Click “Run the installation.“
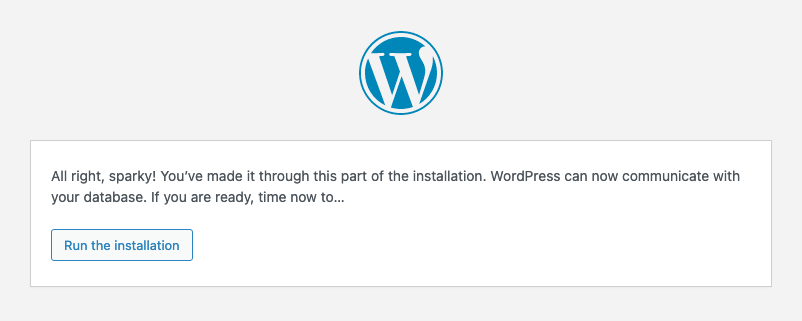

6. On the following screen, provide information for your site:
- Site Title: Name your WordPress site
- Username: Create an admin username (avoid using “admin” for security reasons)
- Password: Set a strong password (note this down)
- Your Email: Enter your email address
- Search Engine Visibility: Check this box to discourage search engines from indexing your local site.
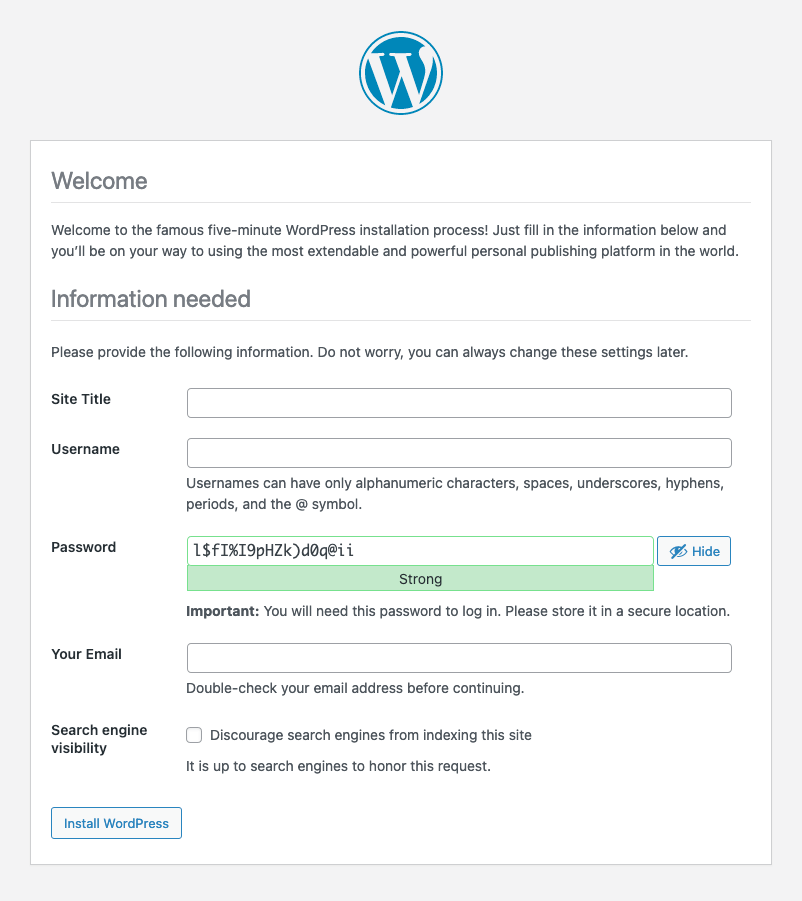

Click “Install WordPress” to complete the setup process.
Congratulations! WordPress is now installed on your localhost. After installation is complete, you can log in with your username and password to access the WordPress dashboard.
Step 7: Accessing and Testing Your Local Site
Now that you’ve successfully installed WordPress locally, here’s how to work with your new site:
1. Access your WordPress site anytime by:
- Windows (XAMPP): Open XAMPP, start Apache and MySQL services, and visit http://localhost/your-folder-name in your browser
- Mac (MAMP): Open MAMP, start servers, and visit http://localhost:8888/your-folder-name in your browser
2. To log into the WordPress dashboard, either click the login link on the installation success page or visit your site’s admin URL:
- Windows (XAMPP): http://localhost/your-folder-name/wp-admin
- Mac (MAMP): http://localhost:8888/your-folder-name/wp-admin
Remember that any changes you make exist only on your computer. No one else can see your local WordPress site unless they have access to your computer network.
When working with your local WordPress installation, keep your server software running with both Apache and MySQL services active. If you shut down your computer or close the application, you’ll need to restart these services before accessing your site again.
Troubleshooting Common Localhost Issues
Even with careful setup, you might encounter some hiccups with your local WordPress installation. Here are solutions to the most common problems:
1. Database Connection Errors
If you see “Error establishing a database connection,” check these potential fixes:
- Verify both Apache and MySQL are running in the XAMPP Control Panel.
- Double-check your database name, username, and password in the wp-config.php file located in your WordPress root folder.
- Try accessing phpMyAdmin to confirm that your database exists and that the MySQL server is responsive.
- If nothing works, recreate your database and run the WordPress installation again.
2. 404 Page Not Found Errors
When pages return a 404 error despite existing:
- Check if your .htaccess file is properly configured. Sometimes, WordPress permalink settings require Apache mod_rewrite to be enabled.
- In the XAMPP Control Panel, click “Config” next to Apache, select httpd.conf, and ensure the line LoadModule rewrite_module modules/mod_rewrite.so is uncommented (no # at the start).
- Restart Apache after making changes.
3. Apache Shuts Down Unexpectedly
If the Apache service keeps stopping:
- Another program might be using port 80. Common culprits include Skype, IIS, or other web servers.
- Change Apache’s port by clicking “Config” > httpd.conf in the XAMPP Control Panel, then find the line with “Listen 80” and change it to another port like “Listen 8080“.
- After changing ports, you’ll access your site via http://localhost:8080/your-folder-name.
4. Maximum Execution Time Exceeded
For timeout errors during plugin installations or updates:
- Find the php.ini file by clicking “Config” next to Apache in XAMPP, then select “PHP (php.ini).”
- Search for “max_execution_time” and increase its value (e.g., 30 to 120 seconds).
- Save changes and restart Apache.
5. Permission Issues
If WordPress asks for FTP credentials when installing plugins or themes:
1. Open wp-config.php in your site’s root directory.
2. Add this line before “That’s all, stop editing!“:
define('FS_METHOD', 'direct');3. Save the file and refresh WordPress.
Most localhost issues stem from configuration mismatches or services not running. When troubleshooting, always check first that both Apache and MySQL are active in the XAMPP Control Panel.
Optimizing Your Localhost WordPress Installation
To make your local development environment run smoothly and efficiently, try these optimization techniques:
1. Disable Unnecessary Plugins. Unlike production sites, your local installation doesn’t need SEO plugins, caching solutions, or security tools. Keep active plugins to a minimum for faster performance and less complexity.
2. Increase PHP Memory Limit. Give WordPress more resources by editing the wp-config.php file in your site’s root directory. Add this line before “That’s all, stop editing!”:
define('WP_MEMORY_LIMIT', '256M');3. Use a Lightweight Theme. During development, consider using a simple theme rather than complex premium themes with many features. This approach reduces load times and makes it easier to identify issues.
4. Enable Debug Mode. Add these lines to wp-config.php to help identify errors during development:
define('WP_DEBUG', true);
define('WP_DEBUG_LOG', true);
define('WP_DEBUG_DISPLAY', false);
This configuration logs errors to a debug.log file without displaying them on-screen.
5. Optimize Database Periodically. As you work on your site, the database accumulates data. Use a plugin like WP-Optimize to clean up unnecessary information, or run this directly through phpMyAdmin.
6. Disable Automatic Updates. Add this line to wp-config.php to prevent WordPress from attempting to update itself:
define('AUTOMATIC_UPDATER_DISABLED', true);These optimizations make your local WordPress installation run faster and more efficiently while you develop and test.
How to Migrate Your Local WordPress to a Live Server
When your local site is ready for the world to see, you’ll need to move it to a live web server. Here’s how to make that transition smooth:
Using Migration Plugins
The easiest method uses WordPress plugins designed for migration:
Duplicator: This free plugin creates a package containing your site files and database.
- Install Duplicator on your local site
- Create a package
- Upload the installer and archive to your live server
- Run the installer by visiting yourdomain.com/installer.php
All-in-One WP Migration: Another user-friendly option that exports your entire site.
- Install the plugin on both your local and live WordPress installations
- Export your site from localhost
- Import the package on your live site
Manual Migration
For those comfortable with technical processes:
- Export your local database through phpMyAdmin
- Create a database on your live server
- Import the database file
- Copy all WordPress files to your live server via FTP
- Update the wp-config.php file with new database details
- Update site URLs in the database if necessary
Whichever method you choose, remember to:
- Test all functionality after migration
- Update permalinks
- Check that media files display correctly
- Verify forms and interactive elements work
Once migration is complete, your website transitions from a private testing ground to a public-facing site, ready for visitors from around the globe.
Why Install WordPress Locally?
Setting up WordPress on localhost offers several key benefits:
- Safe Testing Environment. Your local WordPress site serves as a private sandbox where you can freely experiment with themes, plugins, and code changes. If something breaks, only you will see it, and your live site remains untouched.
- Work Offline. With a local installation, you can build and modify WordPress sites without an internet connection. This setup proves invaluable when traveling or working in areas with unreliable connectivity.
- Perfect Learning Platform. For WordPress beginners, localhost provides an ideal environment to learn the platform’s features before committing to a hosting plan. You can practice building websites, customizing themes, and testing functionality without any cost.
- Faster Development. Local development environments typically load much faster than live websites since there’s no network latency. This speed boost makes the development process significantly more efficient.
- Private Experimentation. Unlike a live site that might get indexed by search engines, your localhost WordPress installation remains completely private. This privacy makes it perfect for developing client sites or working on projects that are not yet ready for public viewing.
Test Locally, Shine Globally with WPZOOM Themes
After mastering WordPress on localhost, pair your skills with WPZOOM’s exceptional themes for a website that truly stands out.
Our themes are designed with the same attention to detail that you’ve put into your local development. They load quickly, adapt perfectly to all devices, and offer customization options that let your creativity shine. WPZOOM themes undergo rigorous testing – just like your localhost site – ensuring they perform flawlessly when you go live. Ready to showcase your work? Choose WPZOOM and make a lasting impression.

