This isn’t about some special promo rate or using a coupon code. The catch is that this solution does require a bit more effort and tech savviness to pull off compared to signing up for some simple shared hosting plan with pre-installed WordPress. It also has some limitations (though there are workarounds) and might not be the best choice for every type of site.
However, if you have the patience to work through the guide in front of you and your site doesn’t need certain functionalities, then you will not only save a lot of money, but you will also be rewarded with an incredibly fast-loading, ultra-secure WordPress site that can handle virtually unlimited traffic without slowing down.
And without keeping you in suspense any longer, what I’m going to show you today, is how to build a WordPress site on your own computer using Local by Flywheel, convert it to static HTML files using the Simply Static plugin, and then host those files completely free on Cloudflare Pages. Your only ongoing cost? The $10.44 per year that Cloudflare charges for a .com domain.
If all that sounds good to you, then let’s get started.
Understanding what you’re really getting into
As I just mentioned in the intro, going the static site route is an excellent choice for some types of sites, but not all. It largely comes down to whether the strengths and limitations associated with launching a static WordPress site are specifically applicable to you. So let’s review those first and then if you’re still on board, I’ll walk you through the process.
Benefits of static sites
- Lightning-fast load times – Static sites serve pre-rendered HTML files directly to visitors without database queries or server-side processing. This means your pages load almost instantly, which visitors love and search engines reward with better rankings.
- Rock-solid security – No database? No PHP? No problem! The majority of WordPress hackers target vulnerabilities in the database or PHP code. By removing these elements from your production site, you’ve essentially eliminated most potential attack vectors. Hackers can’t breach what isn’t there.
- Virtually unlimited traffic handling – Traditional hosting plans often buckle under sudden traffic spikes (like when your content goes viral). Static sites on Cloudflare Pages can handle massive traffic surges without breaking a sweat – or charging you extra.
- Global CDN distribution – Your static site on Cloudflare Pages is automatically distributed across 275+ data centers worldwide. This means visitors from Tokyo to Toronto all get the same blazing-fast experience.
Limitations of static sites
- No dynamic WordPress features – This is the biggest trade-off. Comments, user accounts, search functionality, and contact forms don’t work out-of-the-box with static sites since they typically require server-side processing. You’ll need third-party solutions for these features.
- Manual update process – You can’t just hit “Publish” and have your changes instantly appear. This process takes a minute or two rather than a few seconds. Each time you update your site, you’ll need to:
- Make changes in your local WordPress setup.
- Generate new static files.
- Run a script to deploy the updated site.
- Limited plugin compatibility – Many WordPress plugins rely on server-side PHP and database access to function. While the Simply Static plugin does a great job converting most content, plugins with heavy dynamic elements won’t work in the static version.
- Steeper learning curve – This approach requires familiarity with several tools (Local by Flywheel, WordPress, GitHub, Cloudflare) and concepts that beginners might find challenging. It’s not rocket science, but it’s definitely more involved than a one-click WordPress install.
- Content limitations – Membership areas, ecommerce functionality, personalized content, and other advanced features that require user state tracking are extremely difficult (if not impossible) to implement with a purely static approach.
The ideal use cases for this approach
The WordPress-to-static solution works best for the following types of websites:
- Personal blogs – If you publish content relatively infrequently (less than daily) and don’t need native comments, this setup is perfect.
- Portfolio websites – Showcasing your work rarely requires dynamic features. A static portfolio site loads lightning-fast, letting your designs or photography take center stage without waiting for database queries.
- Small business websites – Most small businesses need a digital storefront with information about services, contact details, and perhaps a blog. The static approach handles these perfectly while ensuring your site loads quickly for potential customers.
- Documentation sites – Technical documentation or knowledge bases that don’t require user logins are excellent candidates. You can still use WordPress to organize complex information hierarchies, then deliver them as ultra-fast static pages.
- Brochure sites – Any “set it and forget it” informational website that doesn’t change frequently will benefit from the simplicity and performance of this approach.
- Marketing landing pages – When speed and uptime are critical to conversion rates, static sites deliver reliable performance that dynamic sites struggle to match.
The common thread among all of these is that their content doesn’t change frequently and they don’t require complex user interactions or personalization. If your site falls into any of the above and you implement what I’m about to teach you, then you will save a whole lot of money while actually improving your website’s performance.
Launch a static WordPress site: step-by-step guide
To get started, you’ll need to download Local by Flywheel and register for accounts with GitHub and Cloudflare. You’ll also need the Simply Static plugin but you can install and activate it on your local WordPress site so there’s no need to download it beforehand.
🥳 All of these tools and accounts are free (or have a free version).
You’ll also need a domain name. If you don’t already have one, you can buy a new one right inside your Cloudflare account:
And with that out of the way, here are the steps (at a high level):
- Create a local WordPress site
- Install and configure the Simply Static plugin and some wp-admin settings + export your site files to your hard drive
- Set up a GitHub repository and connect it to your local repository (i.e., your exported site)
- Transfer your WordPress site to Cloudflare Pages
- Create an efficient update workflow
Phase one: create a local WordPress site
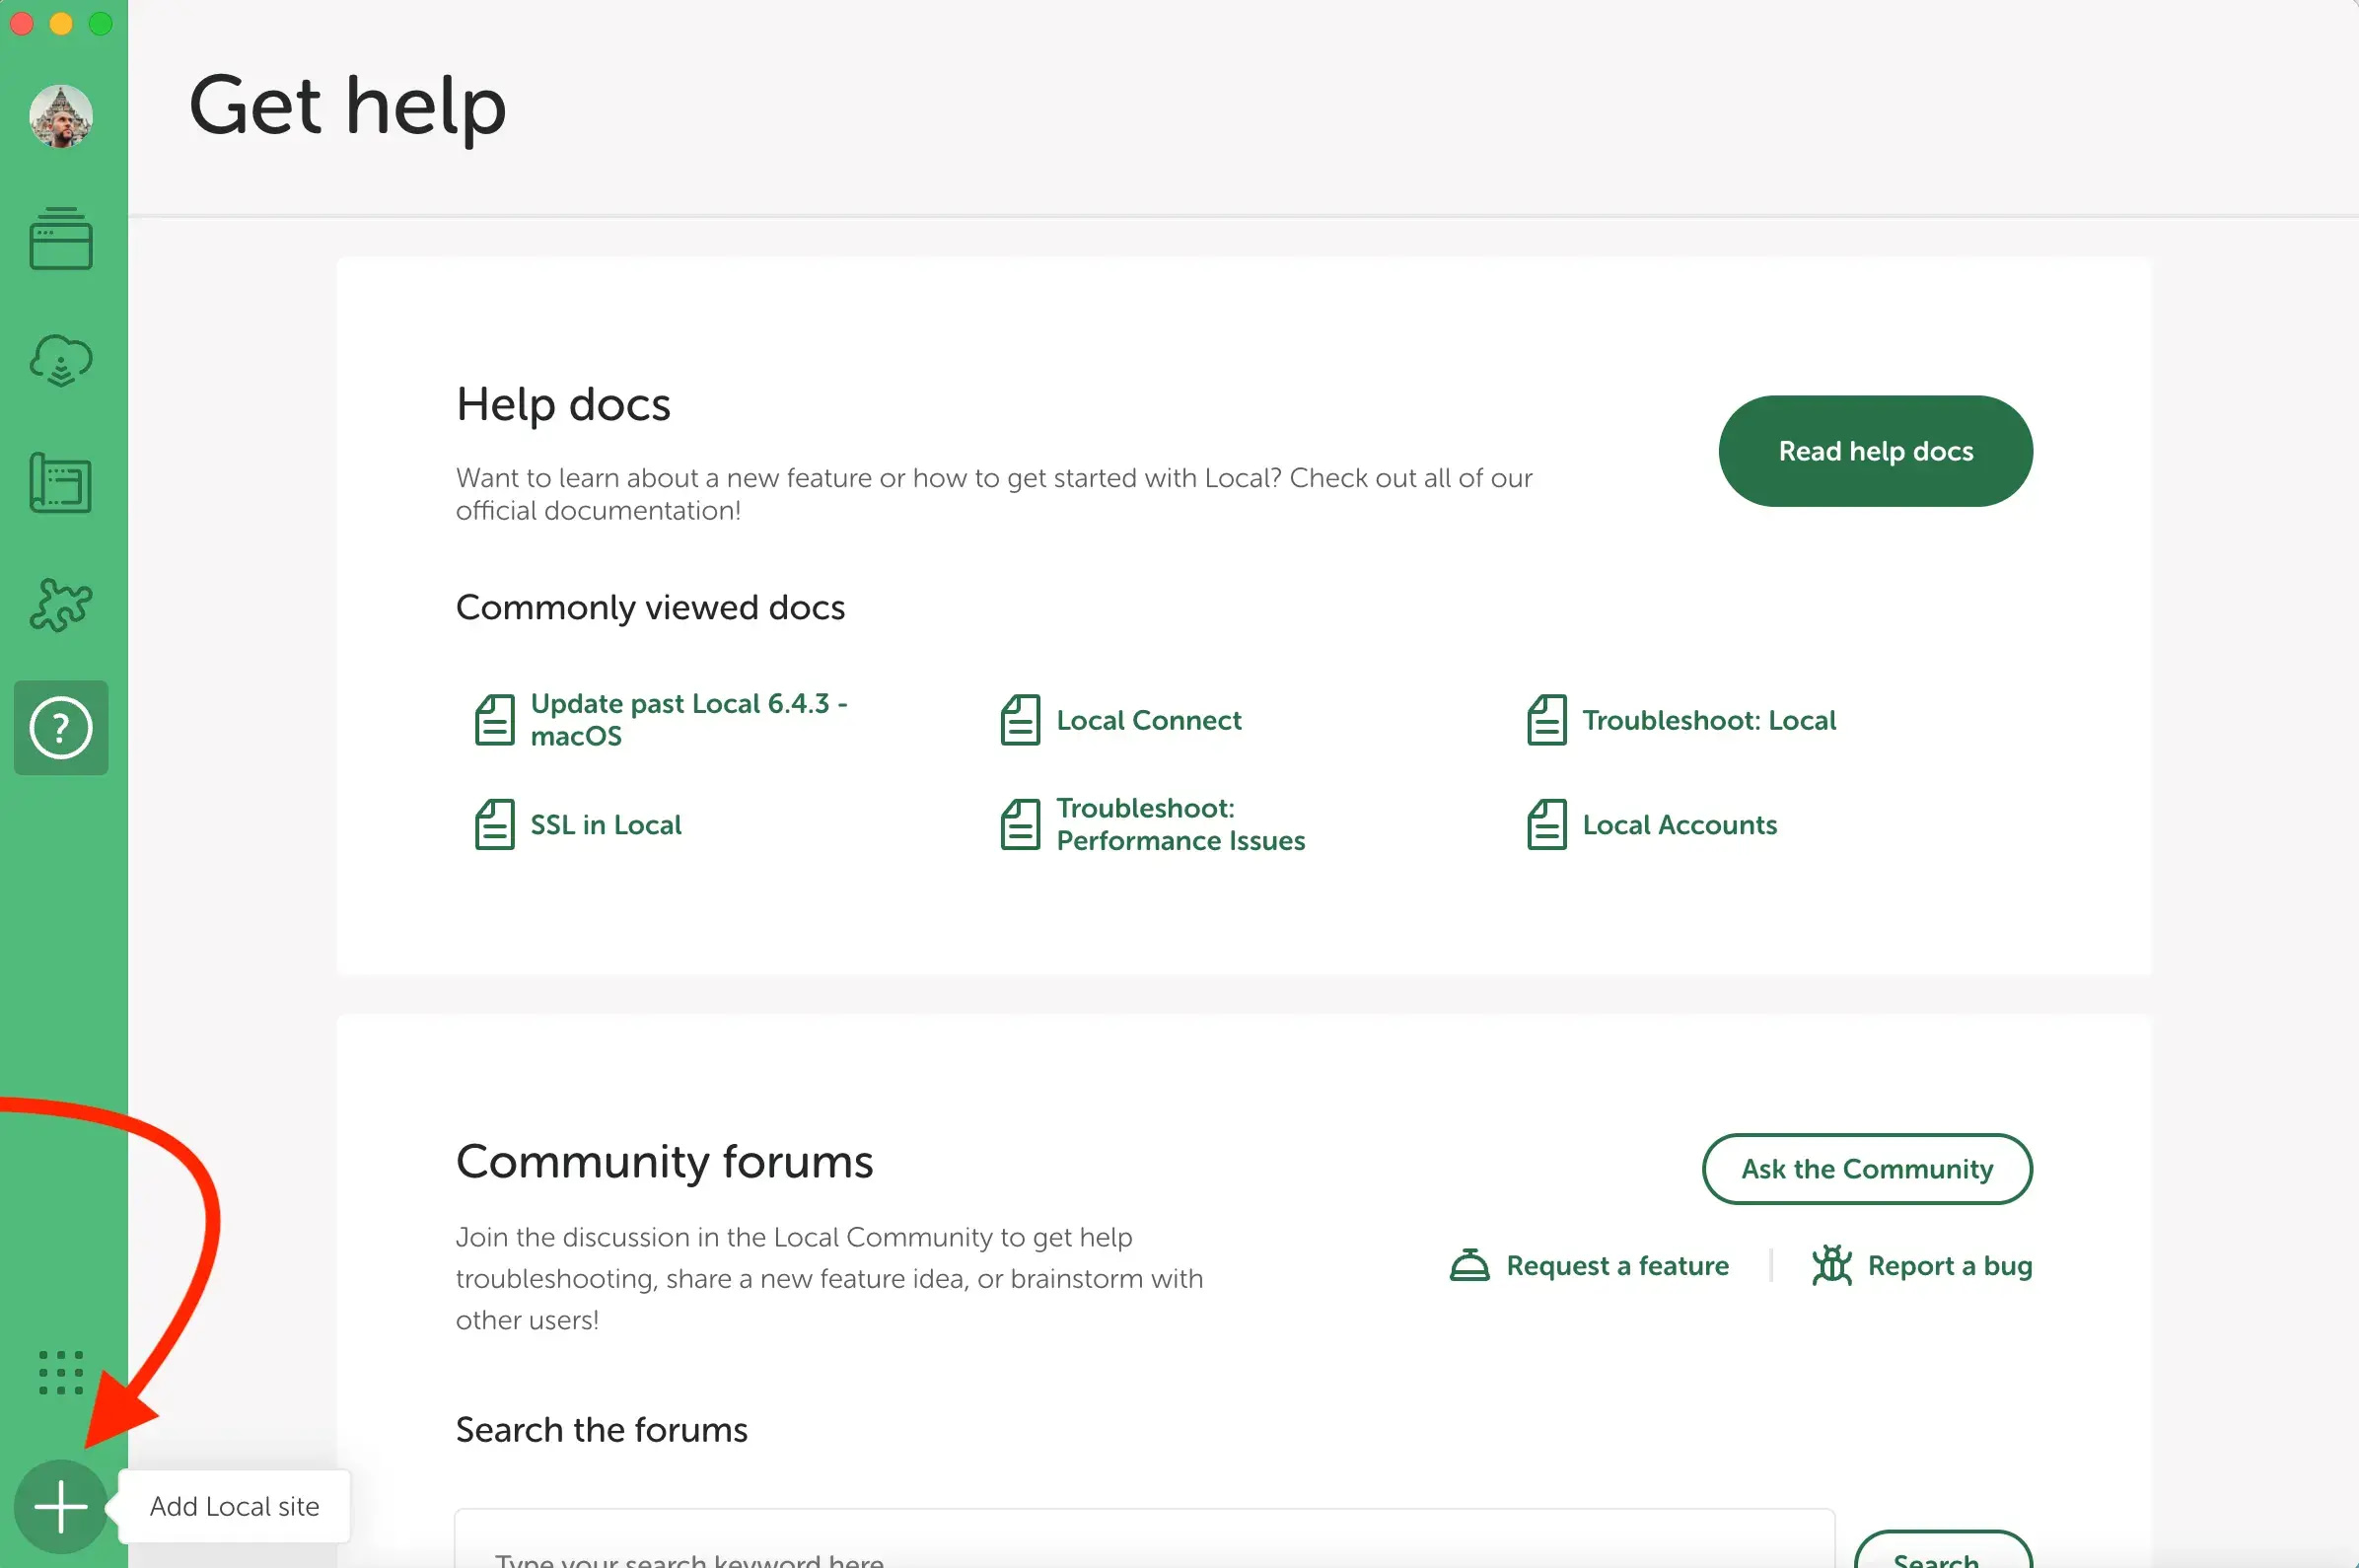
After you download Local by Flywheel and open it, you’ll see an interface like the one below. On the bottom left there is a + icon inside of a circle. Click it to begin:
This will launch a setup wizard. Click on Create a new site and then Continue on the bottom right.
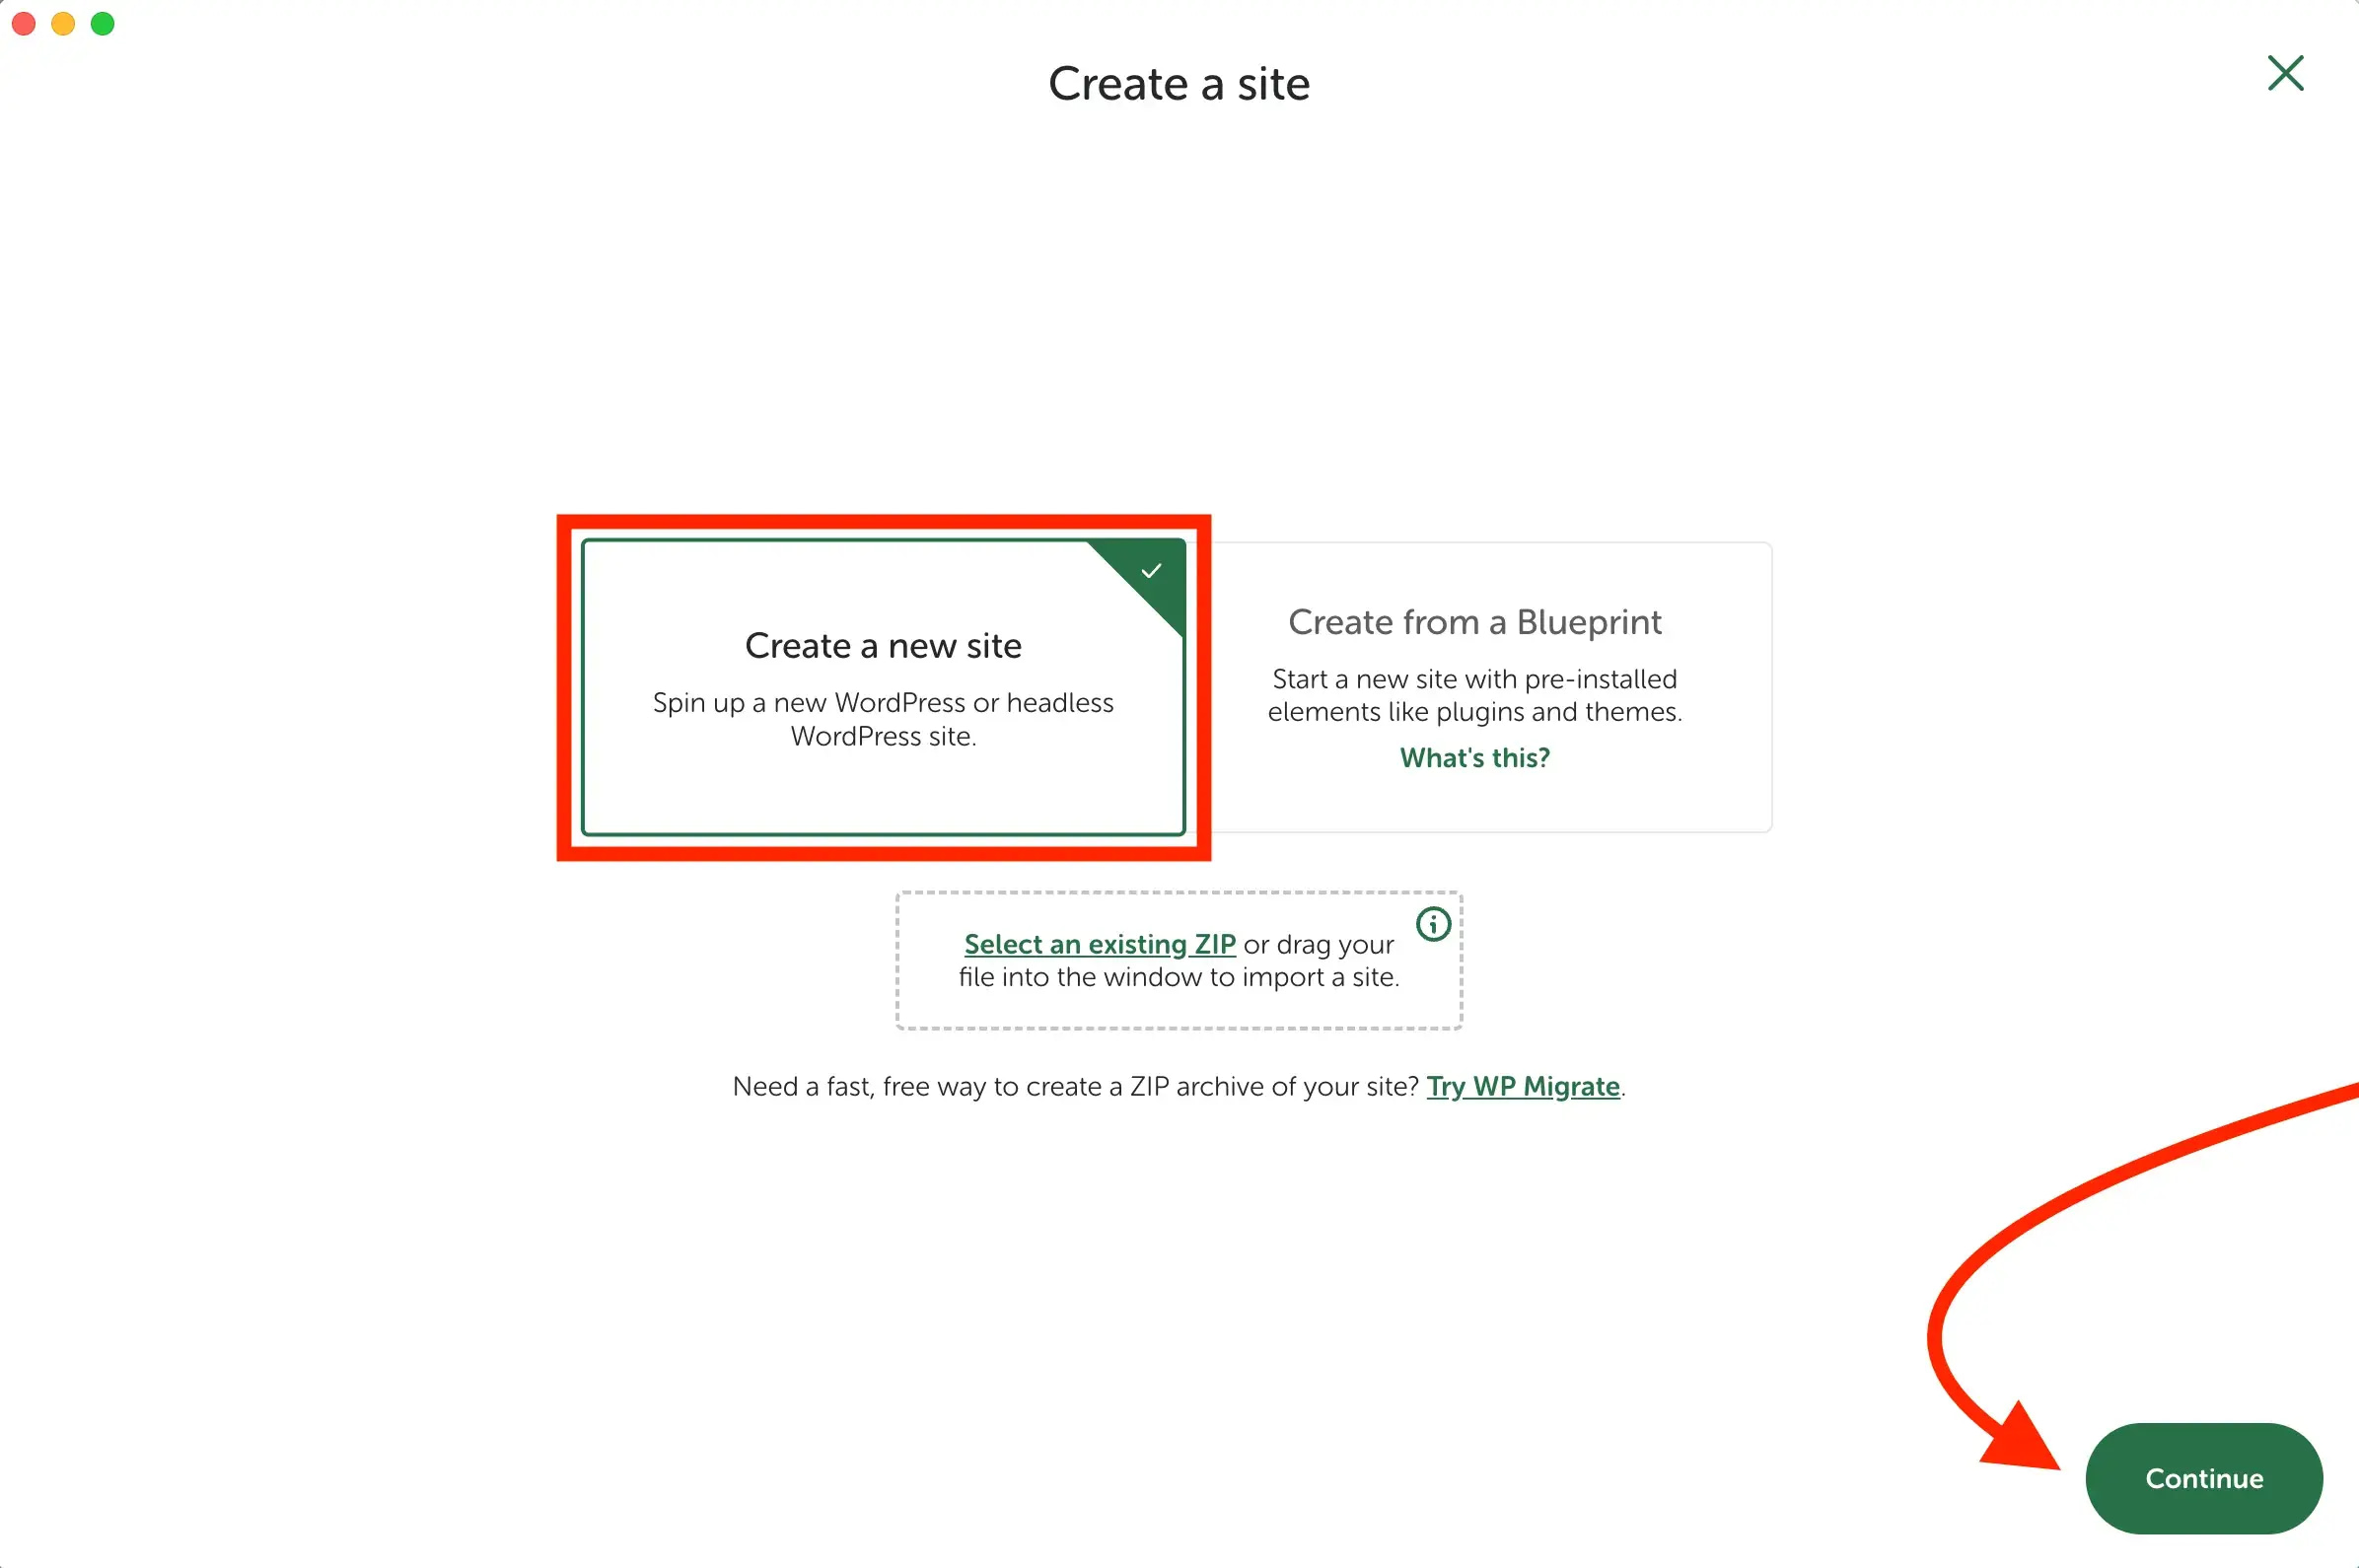
On the next screen (not shown here), it’ll ask you if you want to install the Preferred setup, or if you want to use a Custom one. Unless you have some compelling reason to go with Custom, just choose Preferred.
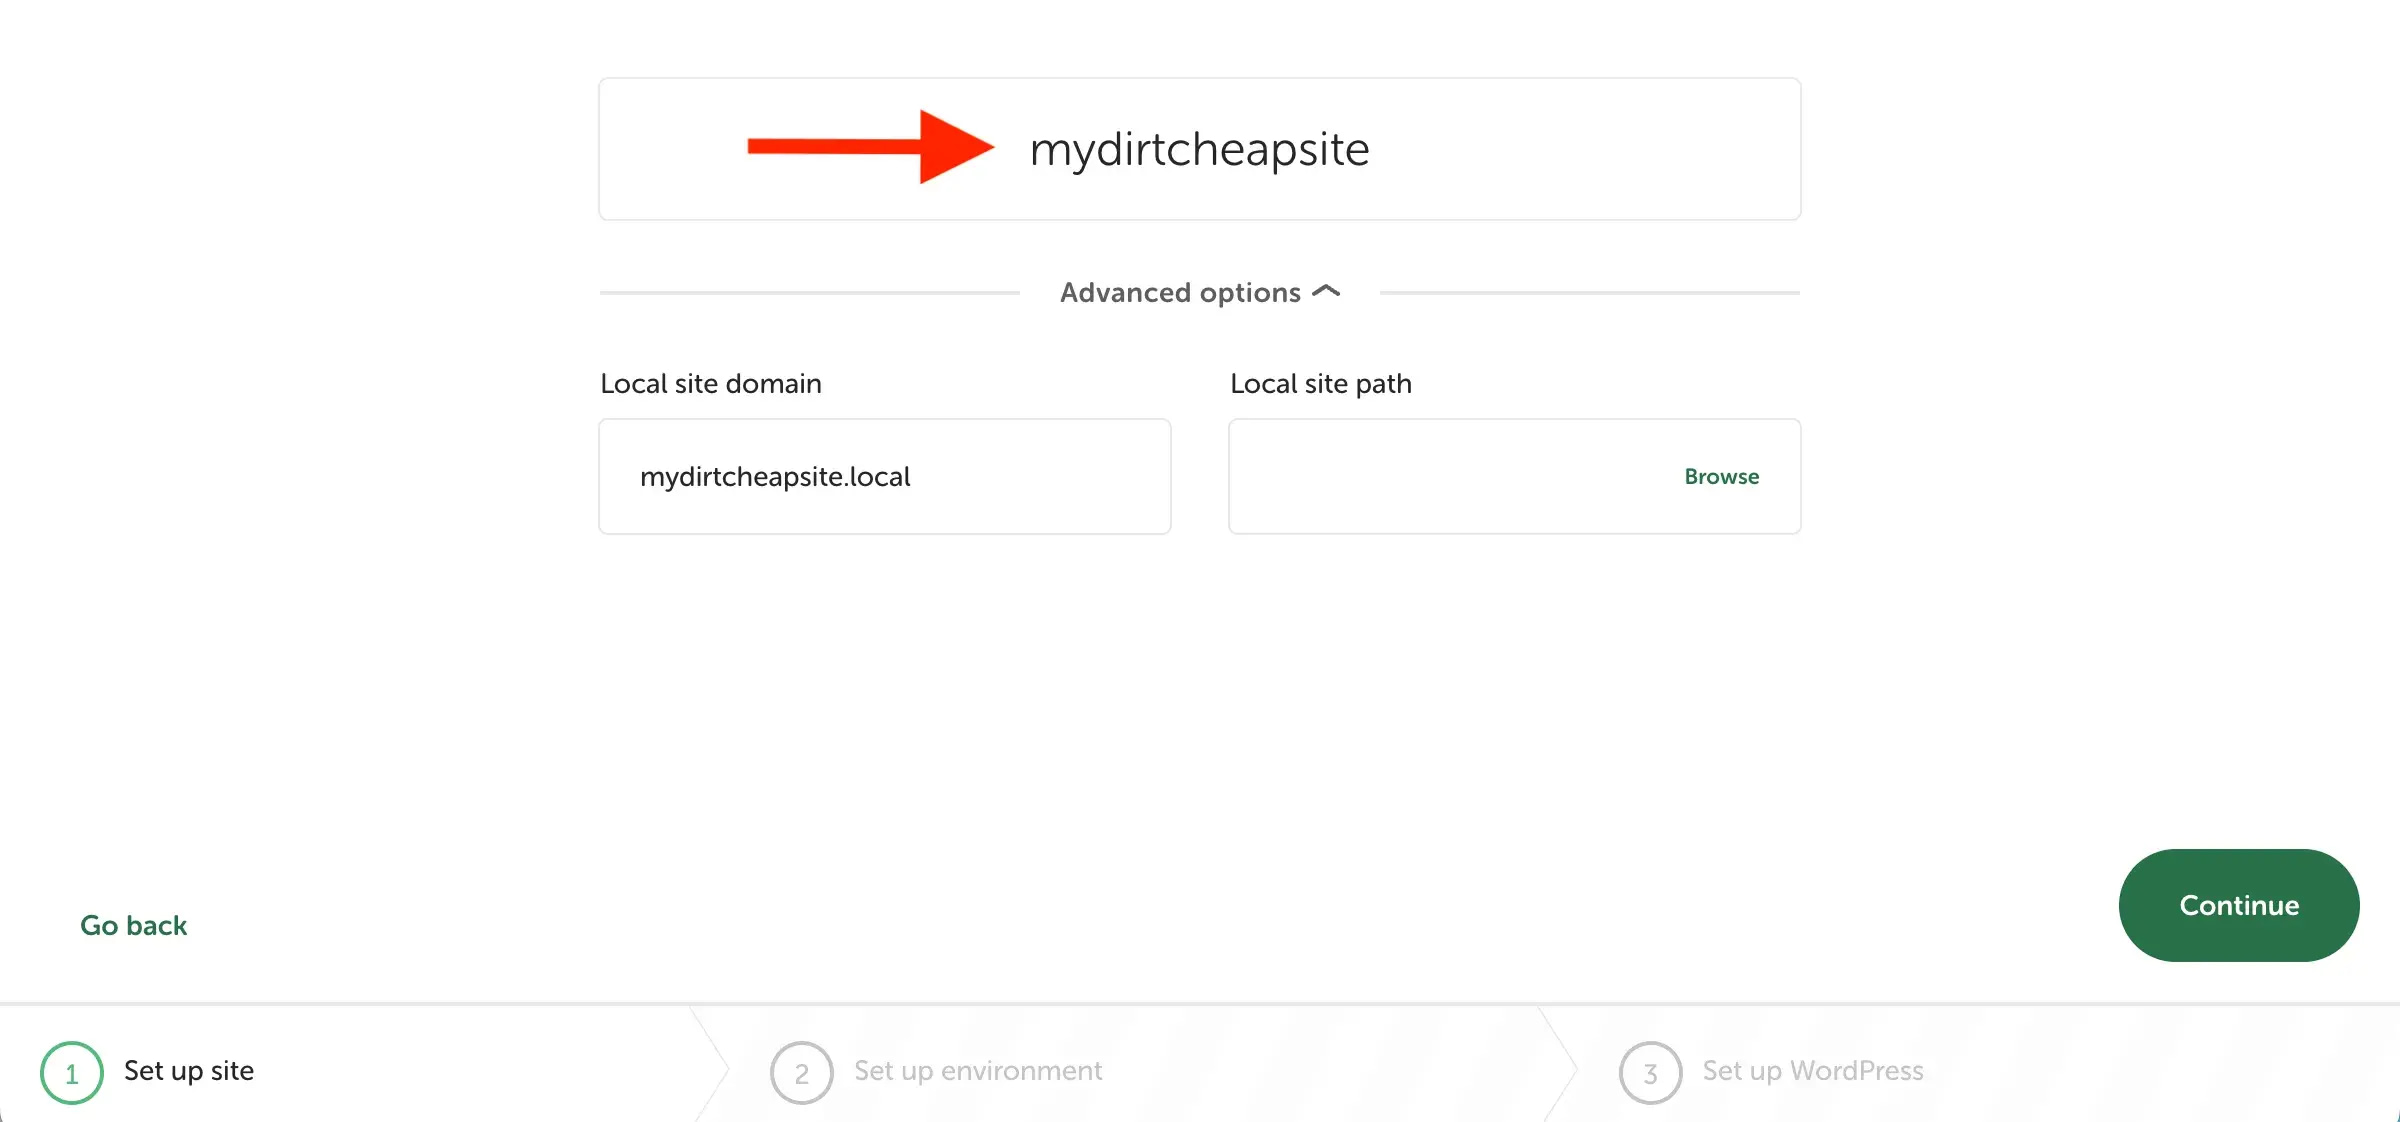
The following step is where you’ll give your website a name.
You can always change this later, but I recommend putting the name that you actually plan on using. One of the reasons is because many configuration files in WordPress reference your site name and URL. When you eventually migrate your site to Cloudflare Pages, having consistent naming from the beginning reduces the number of database search-and-replace operations needed to update these references.
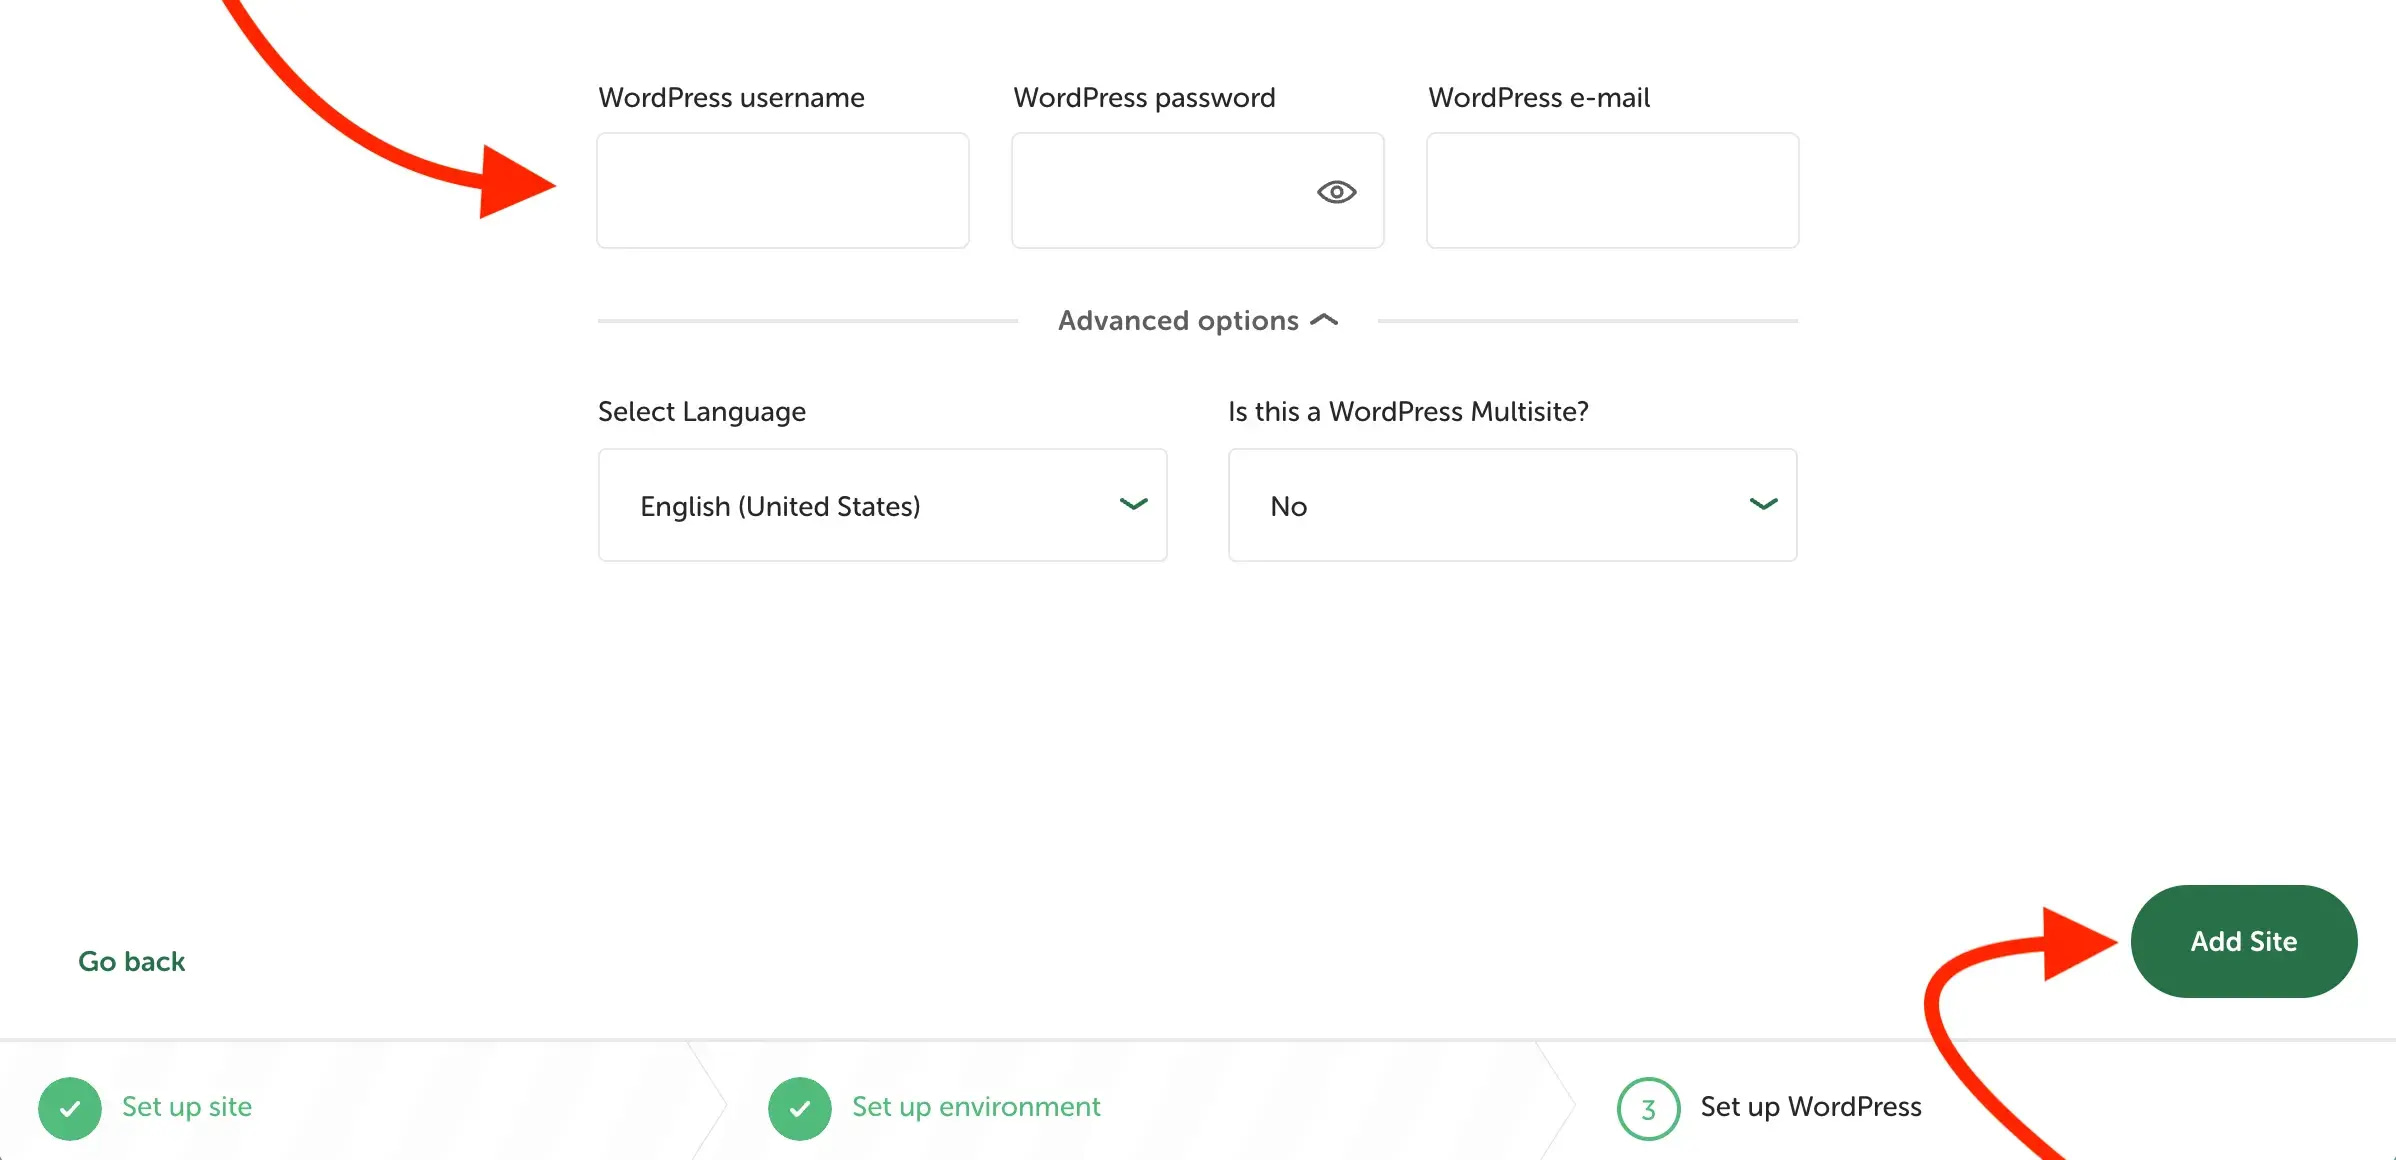
On the final screen, you’ll be asked for a username, a password, and an email address.
💡 Quick tip: While your development site is isolated on your computer now, it’s good practice to avoid “admin” as a username and to use a strong password. These credentials will eventually be used on your live WordPress site, and even though you can change them before you deploy to Cloudflare Pages, with everything else you’ll be doing, you might forget. And if you’re concerned that a complex password is going to slow down your workflow – it won’t. I’ll show you how to bypass the login screen altogether in just a moment.
Tap on Add Site on the bottom right when you’re done:
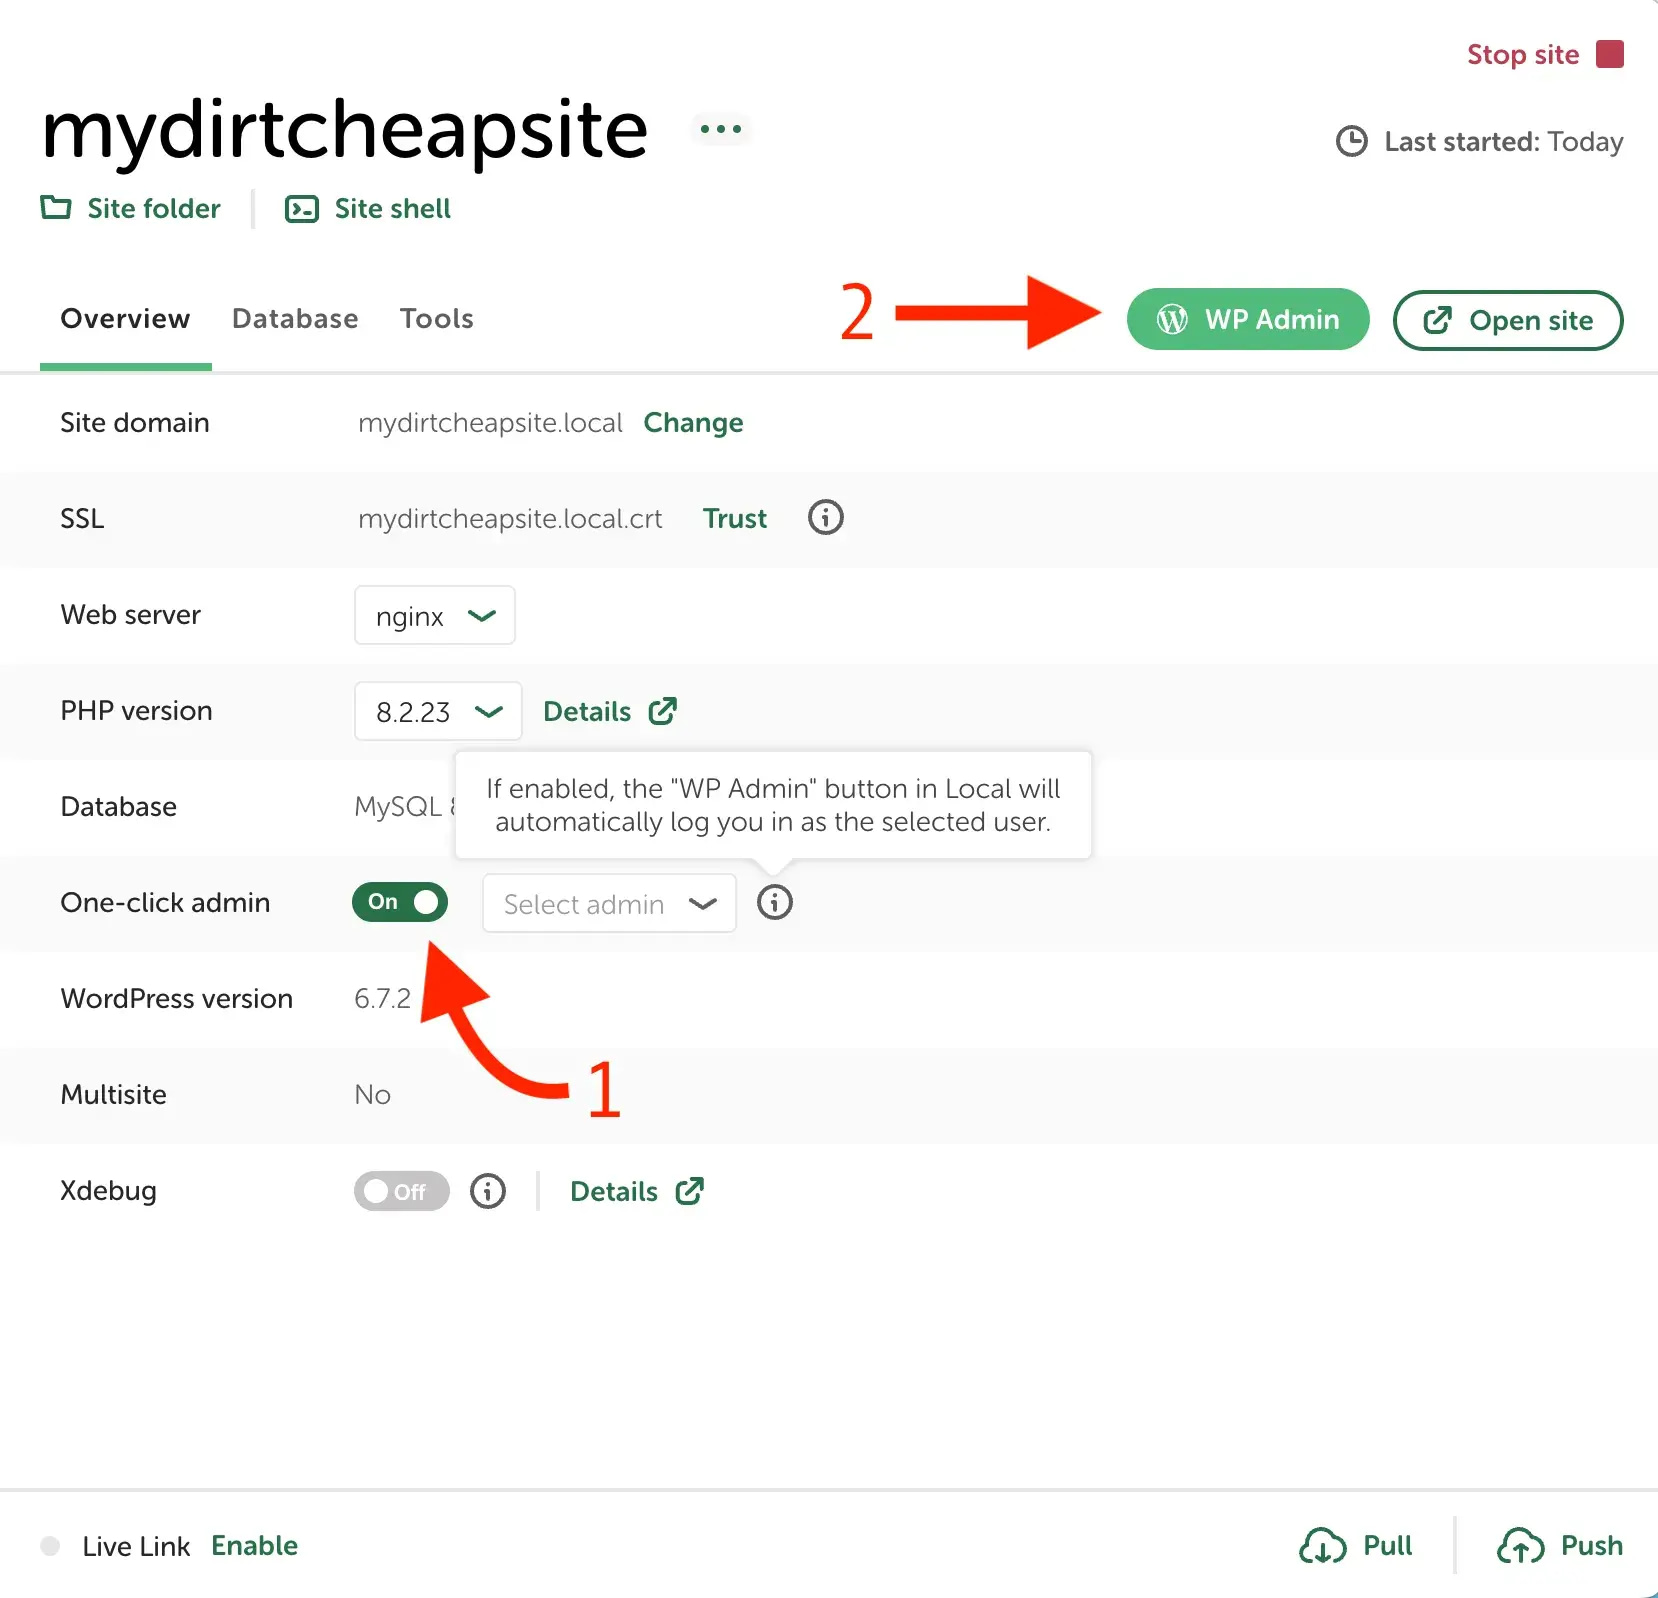
With your basic WordPress site set up, the next step is to access it so you can start building. You can do that by clicking on the WP Admin button. However, before you do that, turn on the One-click admin toggle. This is the not-so-secret tip I just mentioned, which will allow you to bypass the login screen and go directly into your site:
Phase two: configure the Simply Static plugin and wp-admin settings + export your site
💡 Quick note: You probably noticed already that I did not include a step about installing a theme, other plugins, or the general process of building a WordPress site. I’m assuming that you already know how to do that, but just in case you don’t, we have one of the most comprehensive tutorials on the web about the topic.
It was also updated recently so the information in it is spot on. You can use this link to access it. It’ll skip over the beginning and take you straight to the WordPress interface section, where you’ll be able to familiarize yourself with what everything does and how to set up your site.
1. Install Simply Static
The “install” part of this step is the same as installing any other plugin:
- From the wp-admin interface, go to Plugins → Add New Plugin.
- Then type “simply static” into the Search Plugins window.
- When you see the plugin populate in the results, tap on Install Now → Activate.

Once the plugin has been activated, access its settings from the sidebar by going to Simply Static → Settings.
2. Configure the general settings
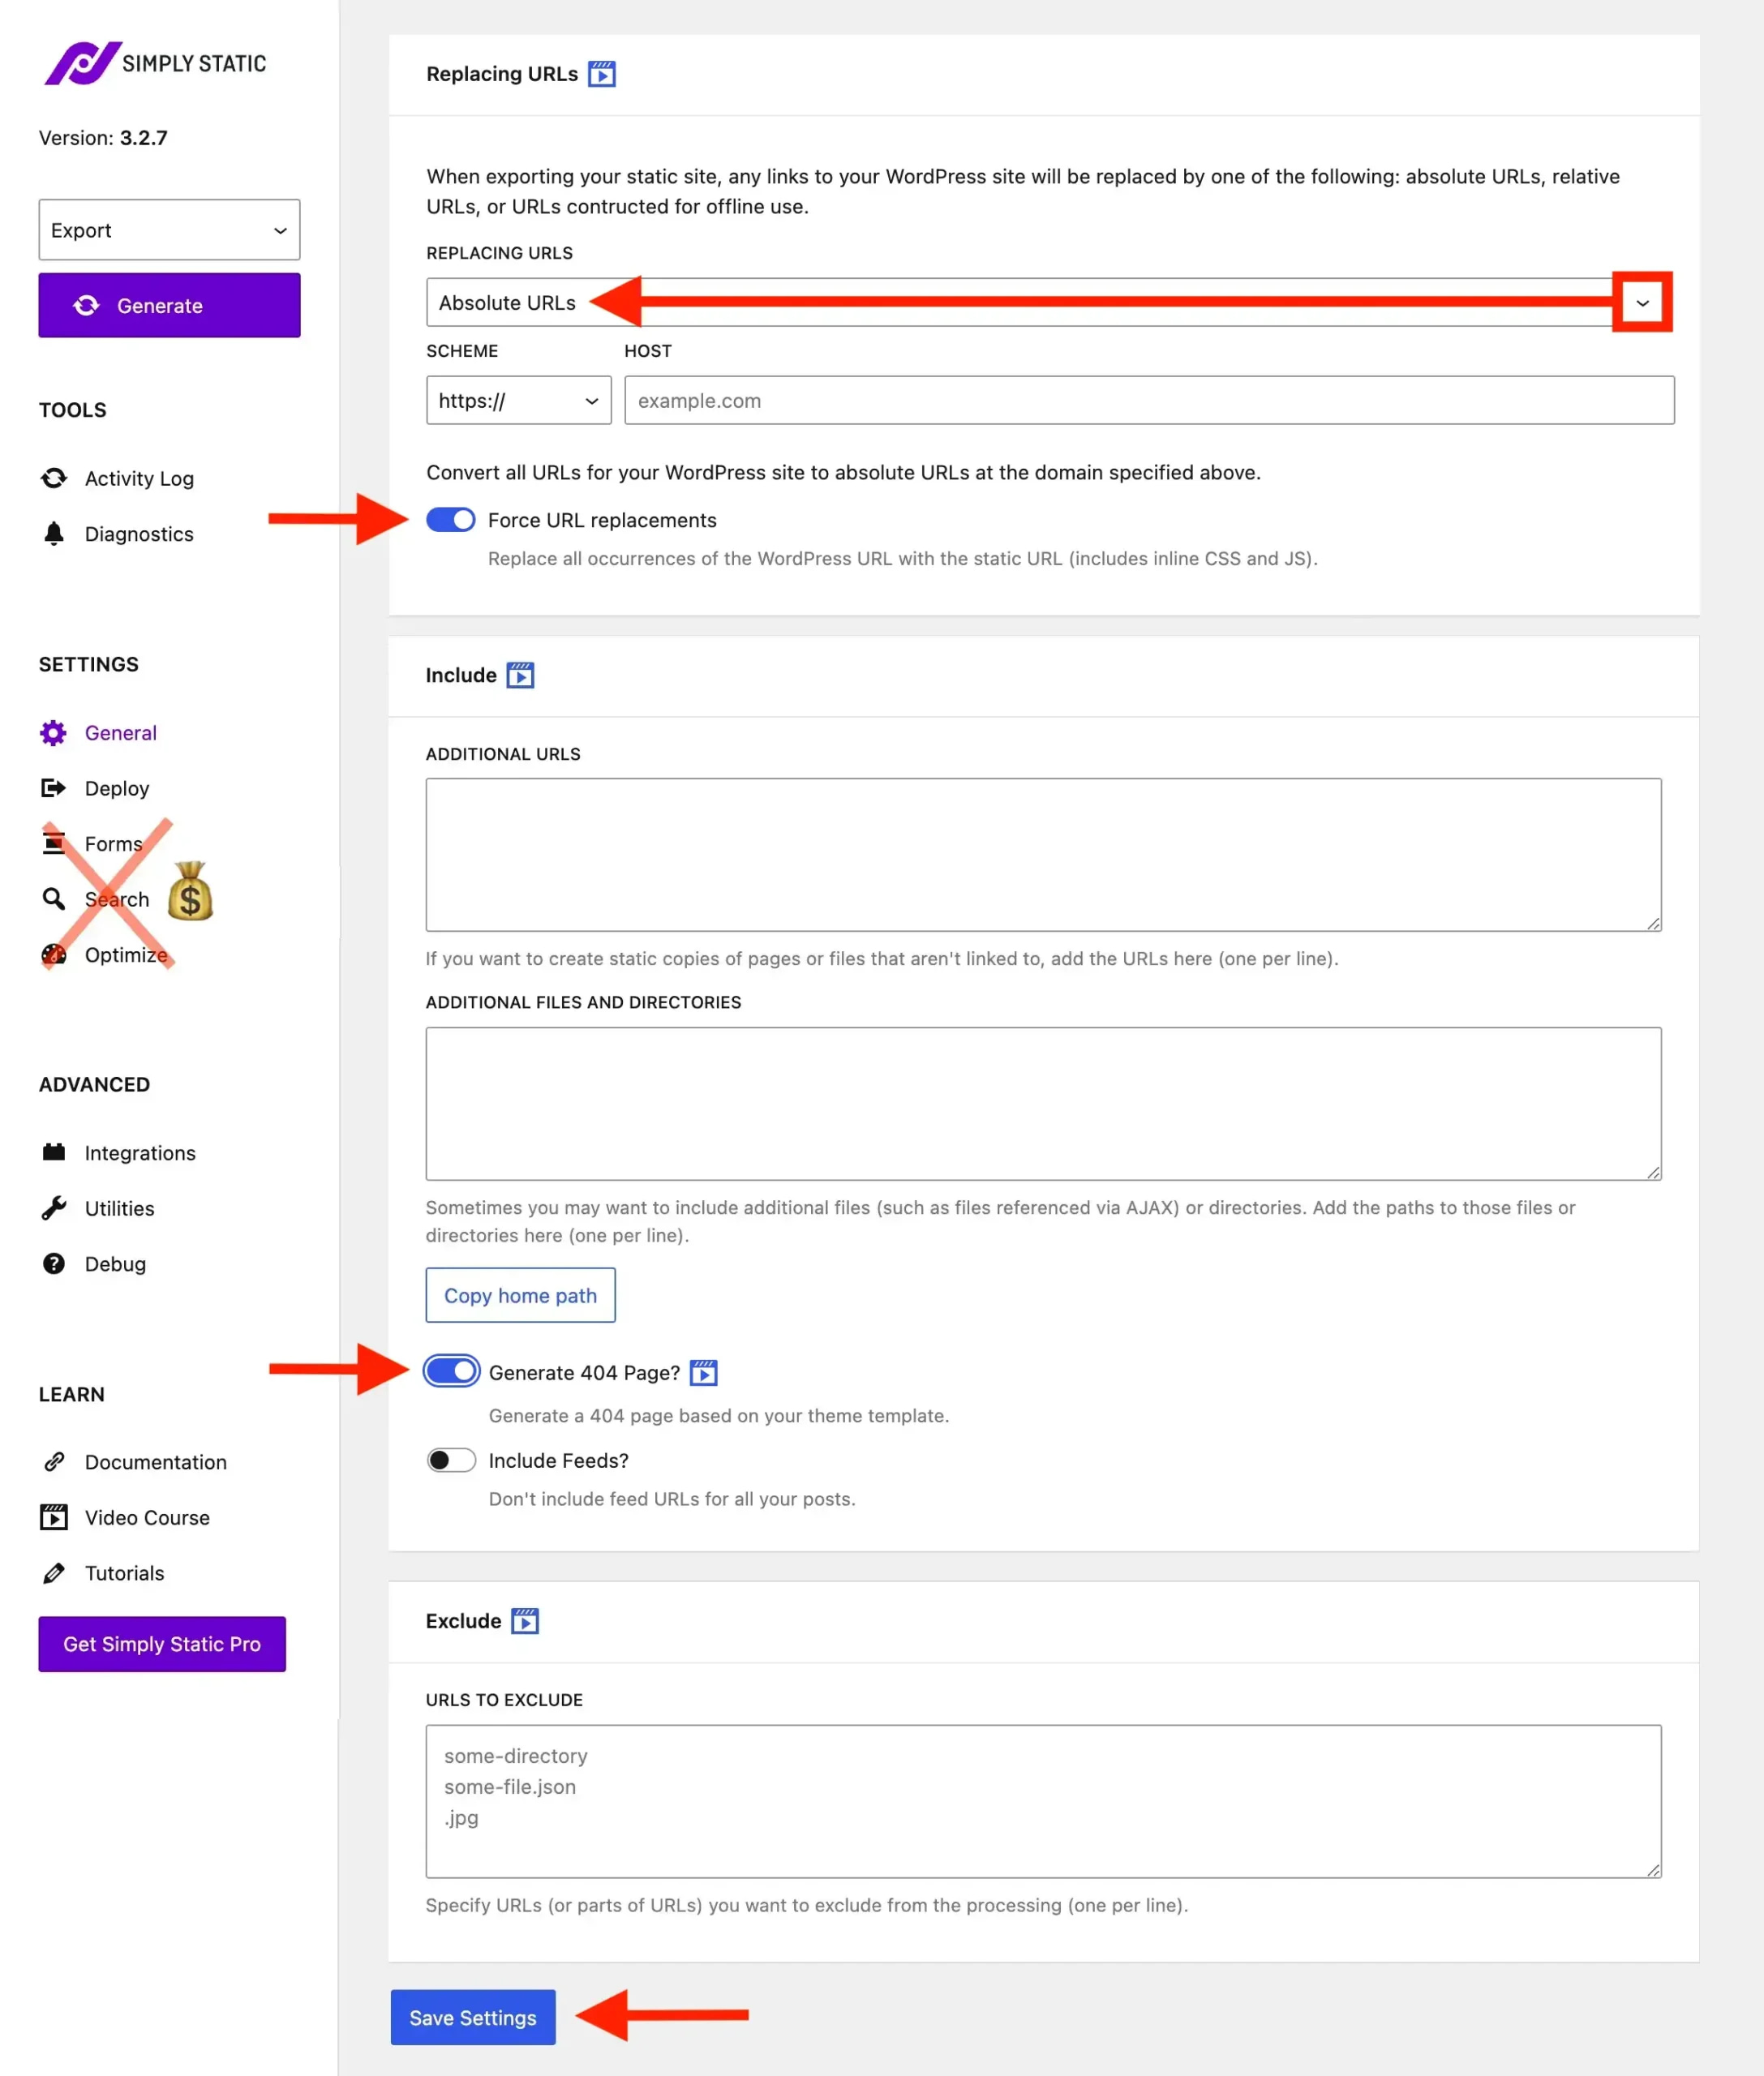
In the General section, you’ll see three main areas: Replacing URLs, Include, and Exclude.
You’ll also notice a series of additional options on the left. Most of them are available in the free version, with the exception of three: Forms, Search, and Optimize. You can click on them, but all of the features are hidden behind Simply Static’s paywall. Luckily, some of them have workarounds (e.g., you can optimize your images before adding them to your site with Optimole’s free image compressor).
But back to the three sections you need to take care of…
Replacing URLs
There are four subsections here. Here’s how to handle them:
- Replacing URLs: The default setting here is Relative Path. Change it to Absolute URLs.
- Scheme: Ensure that
https://is selected. Cloudflare Pages is going to give you a free SSL certificate for your site sohttps://is the correct choice. - Host: Write whatever your final domain name is going to be when you deploy your site on Cloudflare Pages.
- Force URL replacements: Turn this on. This ensures all instances of your WordPress URL (including those in CSS and JavaScript) are properly converted to work in your static environment.
Include
This section helps capture content that Simply Static might miss during its automatic crawl:
- Additional URLs: Only add pages that aren’t linked from anywhere else on your site, such as thank you pages or hidden landing pages.
- Additional Files and Directories: You typically don’t need to modify this unless you have custom asset directories or receive “missing file” errors after your first generation attempt.
- Generate 404 Page: Turn this on but check your website’s theme to see if the 404 page contains a search bar. Search isn’t supported by default in static sites, which means that if your theme does have one, then you’ll need to either replace it with a workaround solution (Simply Static has a nice tutorial) or remove it altogether. To check if your theme’s 404 page has one, simply go to a page on your site that doesn’t exist (i.e.,
mysite.com/this-page-does-not-exist). This will cause the 404 page to appear and you can check if there’s a search bar on it. If there is, use the solution below to remove it.
- Include Feeds: This should be left off. RSS feeds (which is what ‘Include Feeds?’ refers to) are only necessary if your site has subscribers who follow your content through RSS readers or if you’ve set up email subscriptions that rely on these feeds. Most modern websites don’t rely heavily on RSS feeds anymore, so keeping this option off will reduce unnecessary files in your static export.
Exclude
For most simple WordPress sites, you don’t need to modify the exclusion settings. The Simply Static plugin already handles excluding WordPress-specific admin areas automatically, and the Diagnostics check helps identify incompatible plugins:
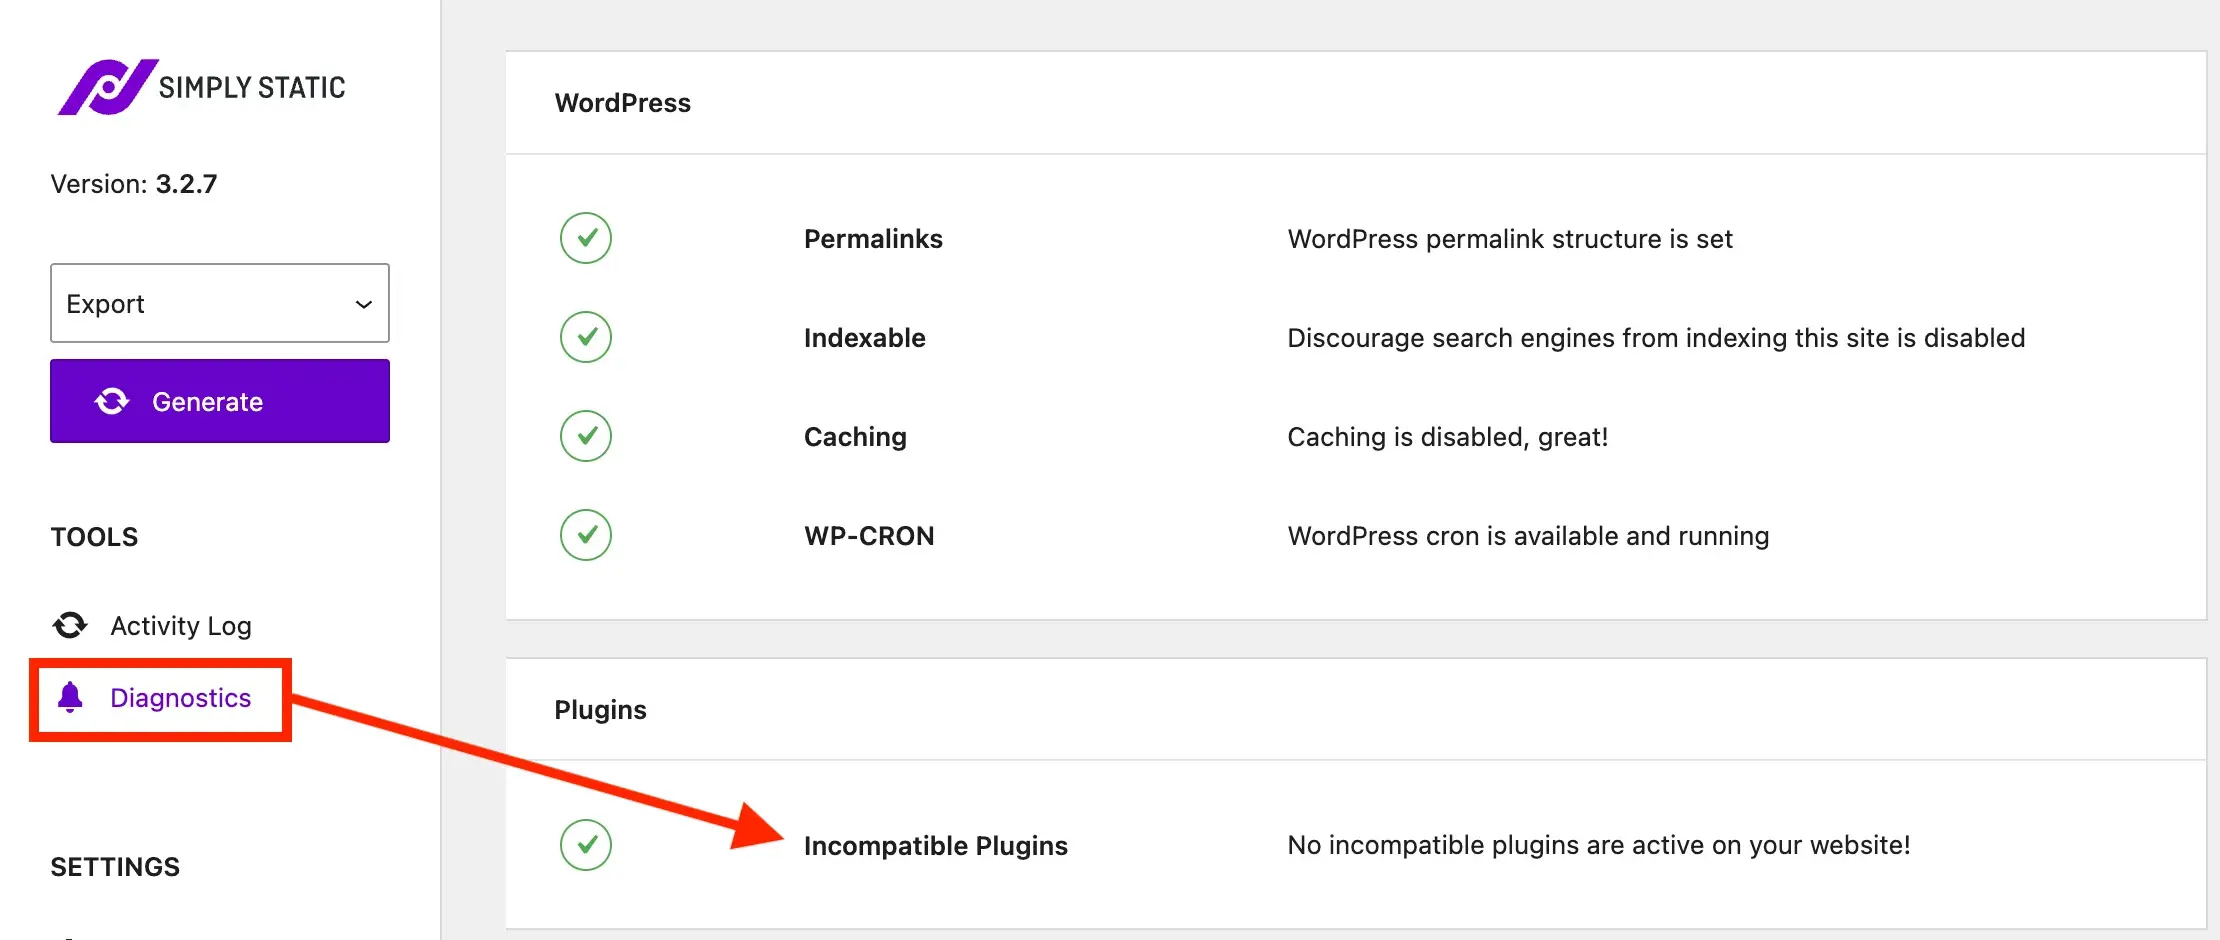
Only add exclusions if you have specific content you don’t want in your static site.
3. Configure the integrations settings
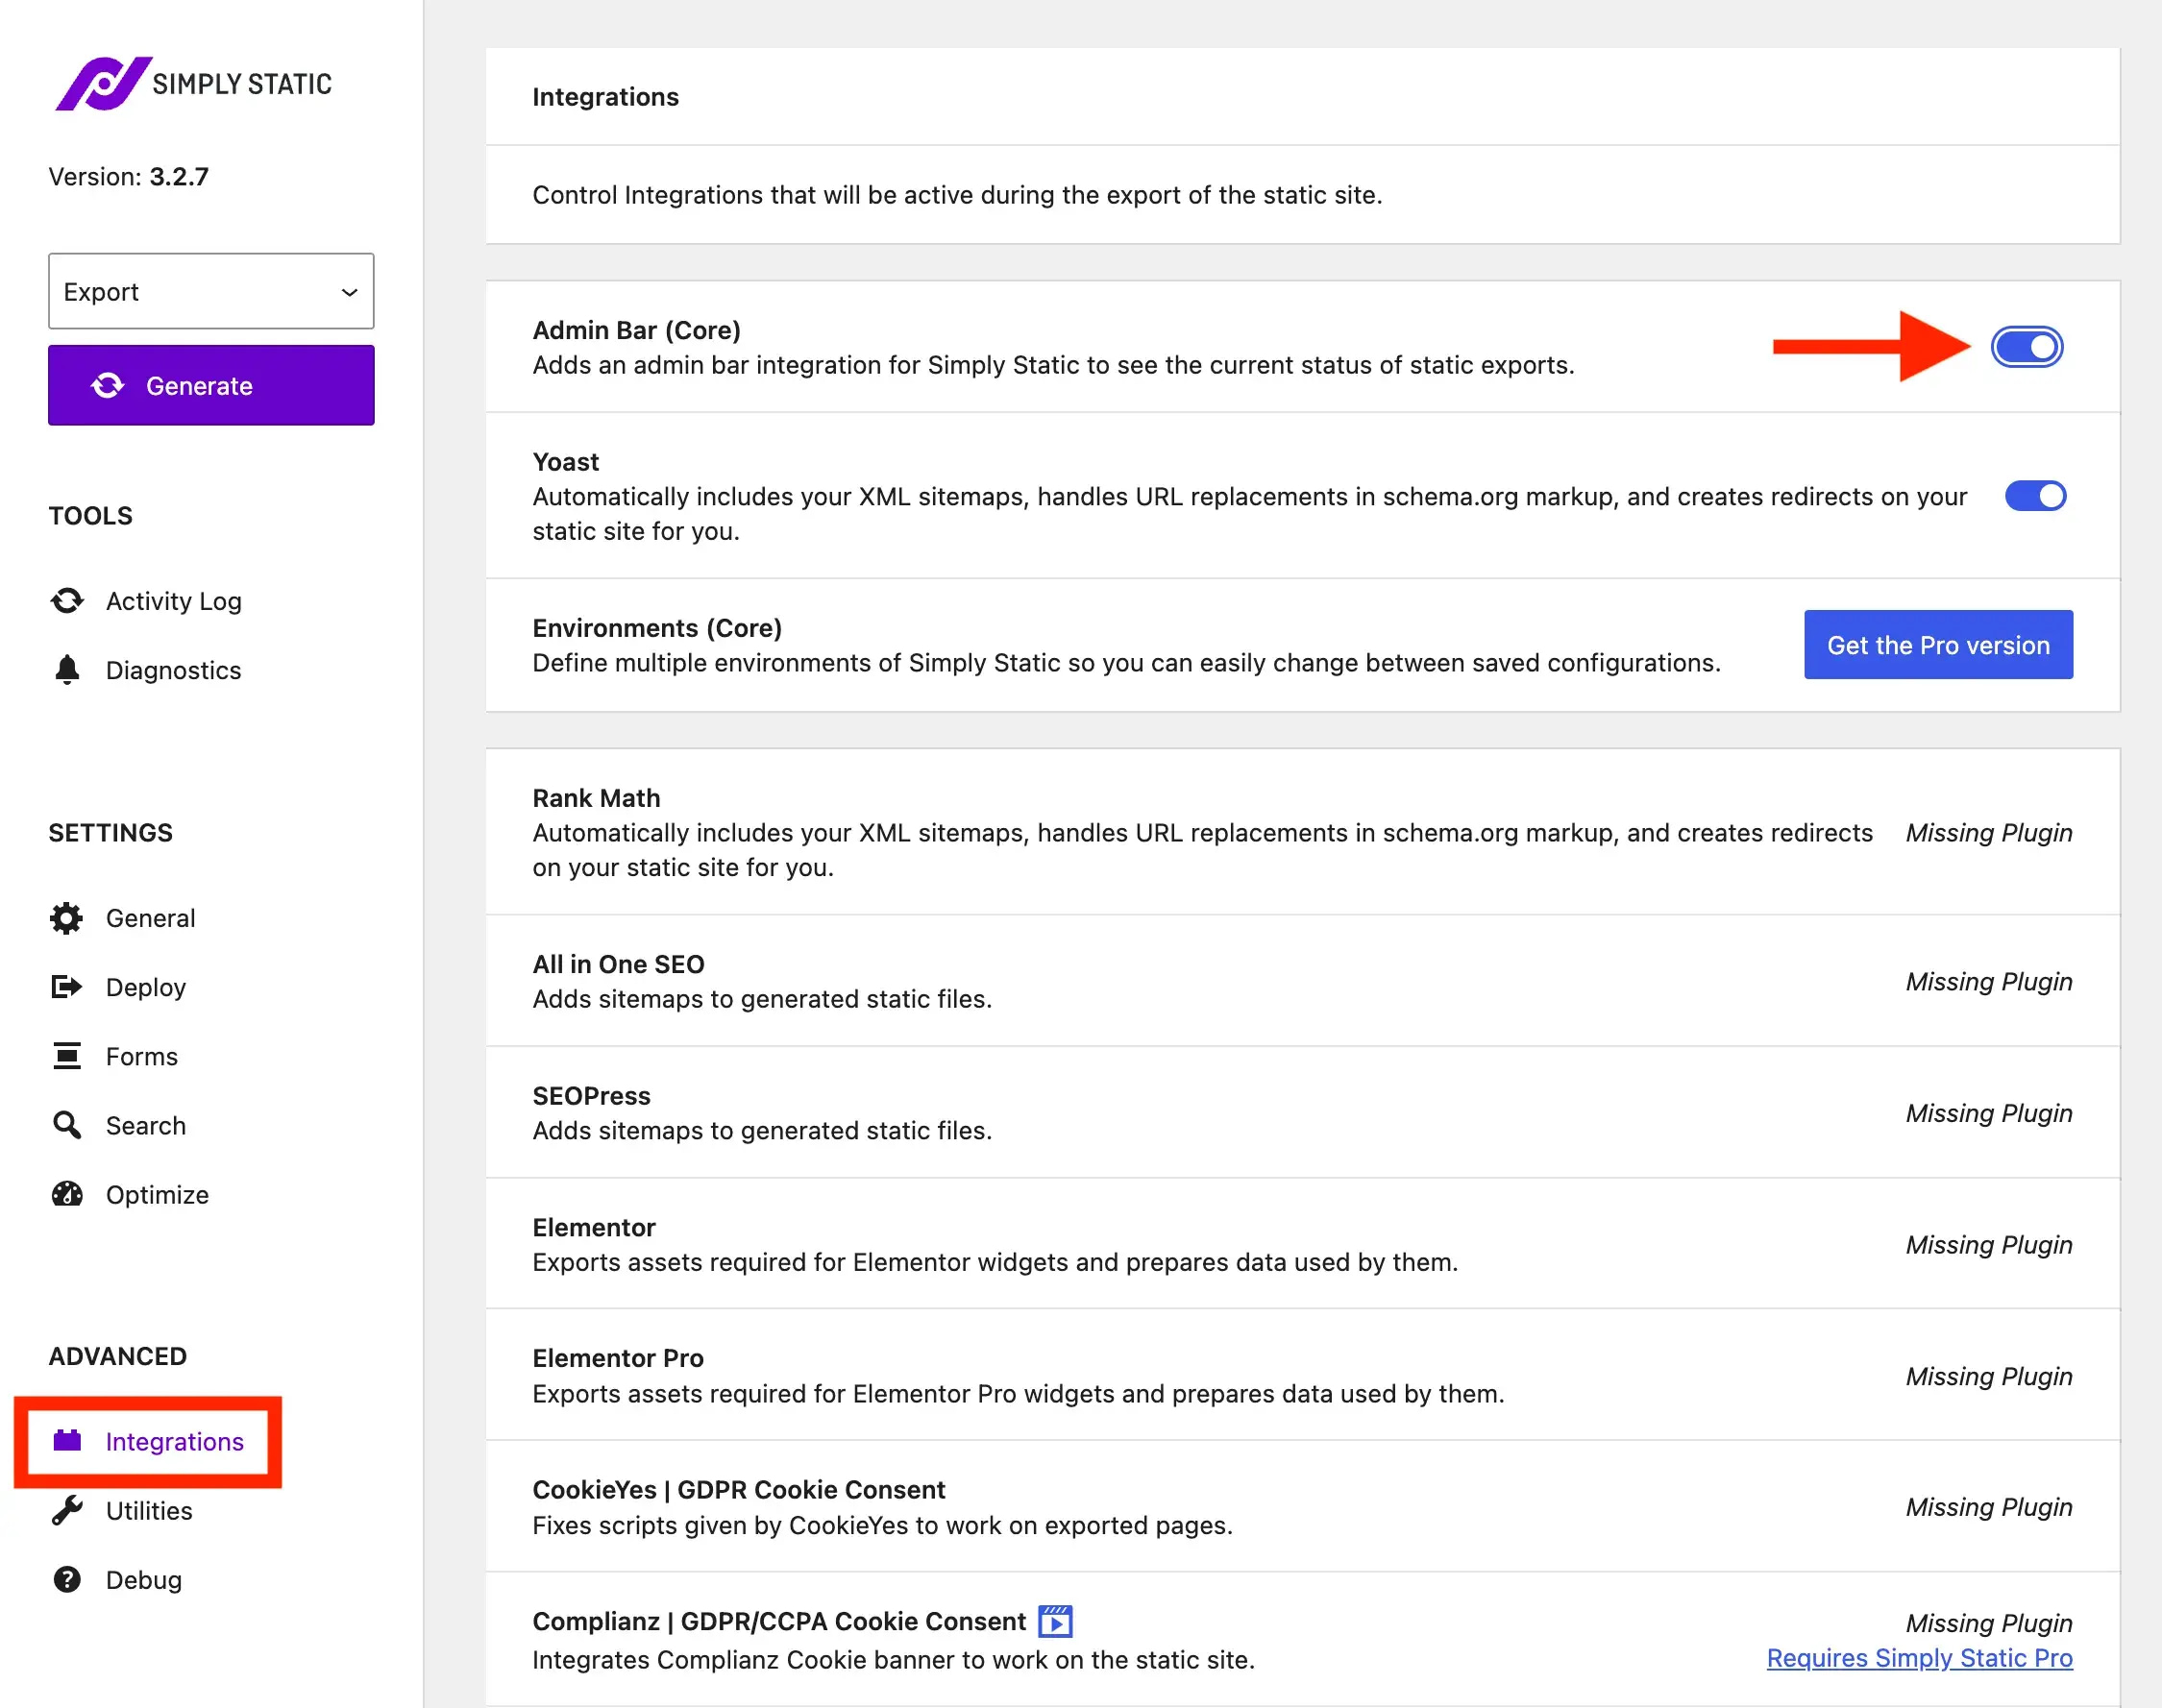
The Integrations section shows how Simply Static interacts with other plugins on your WordPress site. Any plugins that you see listed here and that you also have installed will be toggled on by default – with the exception of the paywalled ones.
The only action you really need to take here is to toggle on the Admin Bar (Core) at the top.
This will add a small Simply Static icon to your WordPress admin bar at the top of the screen. It will show the current status of your static exports and give you quick access to Simply Static settings.
4. Configure the deploy settings
Now we need to set up where Simply Static will save your static site files – and then generate them.
Navigate to Deploy in the sidebar.
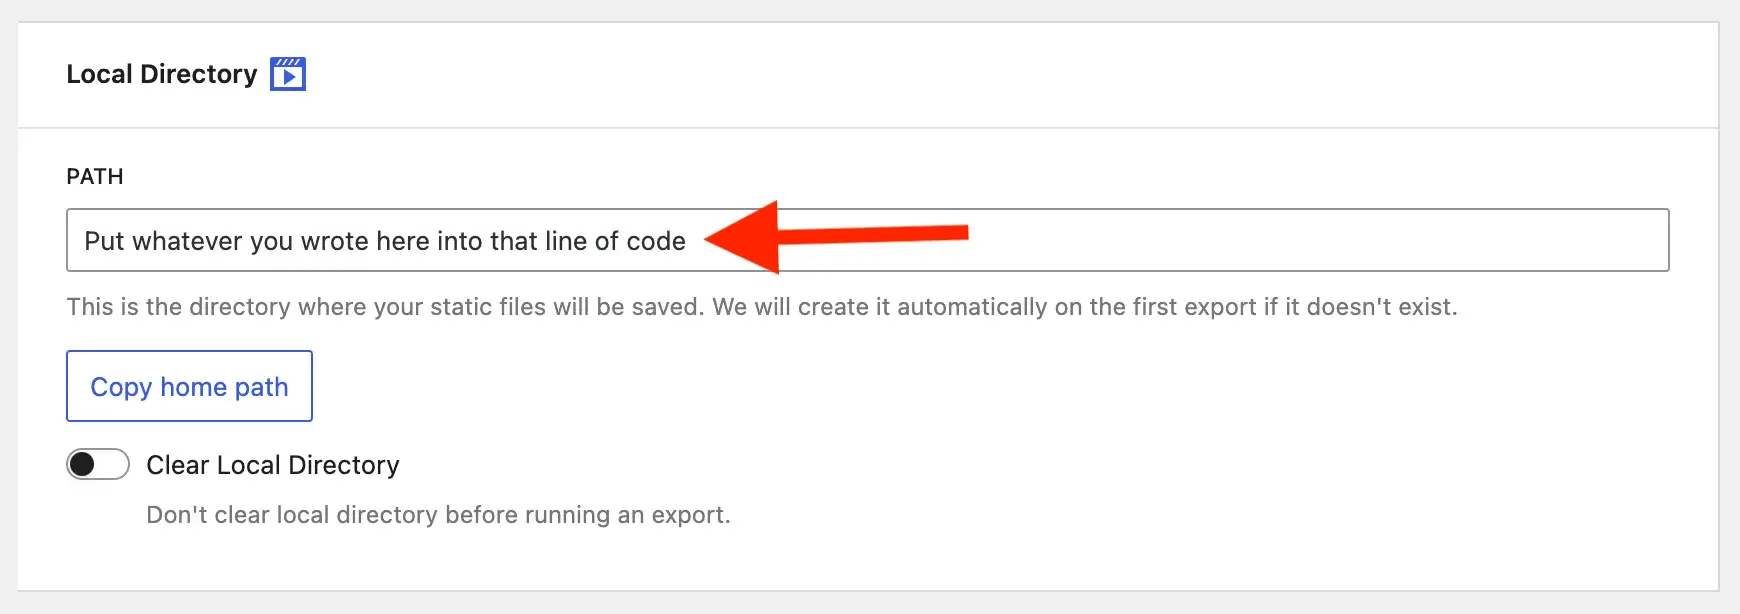
From the DEPLOYMENT METHOD dropdown, select “Local Directory.” This tells Simply Static to save all your static files to a folder on your computer.
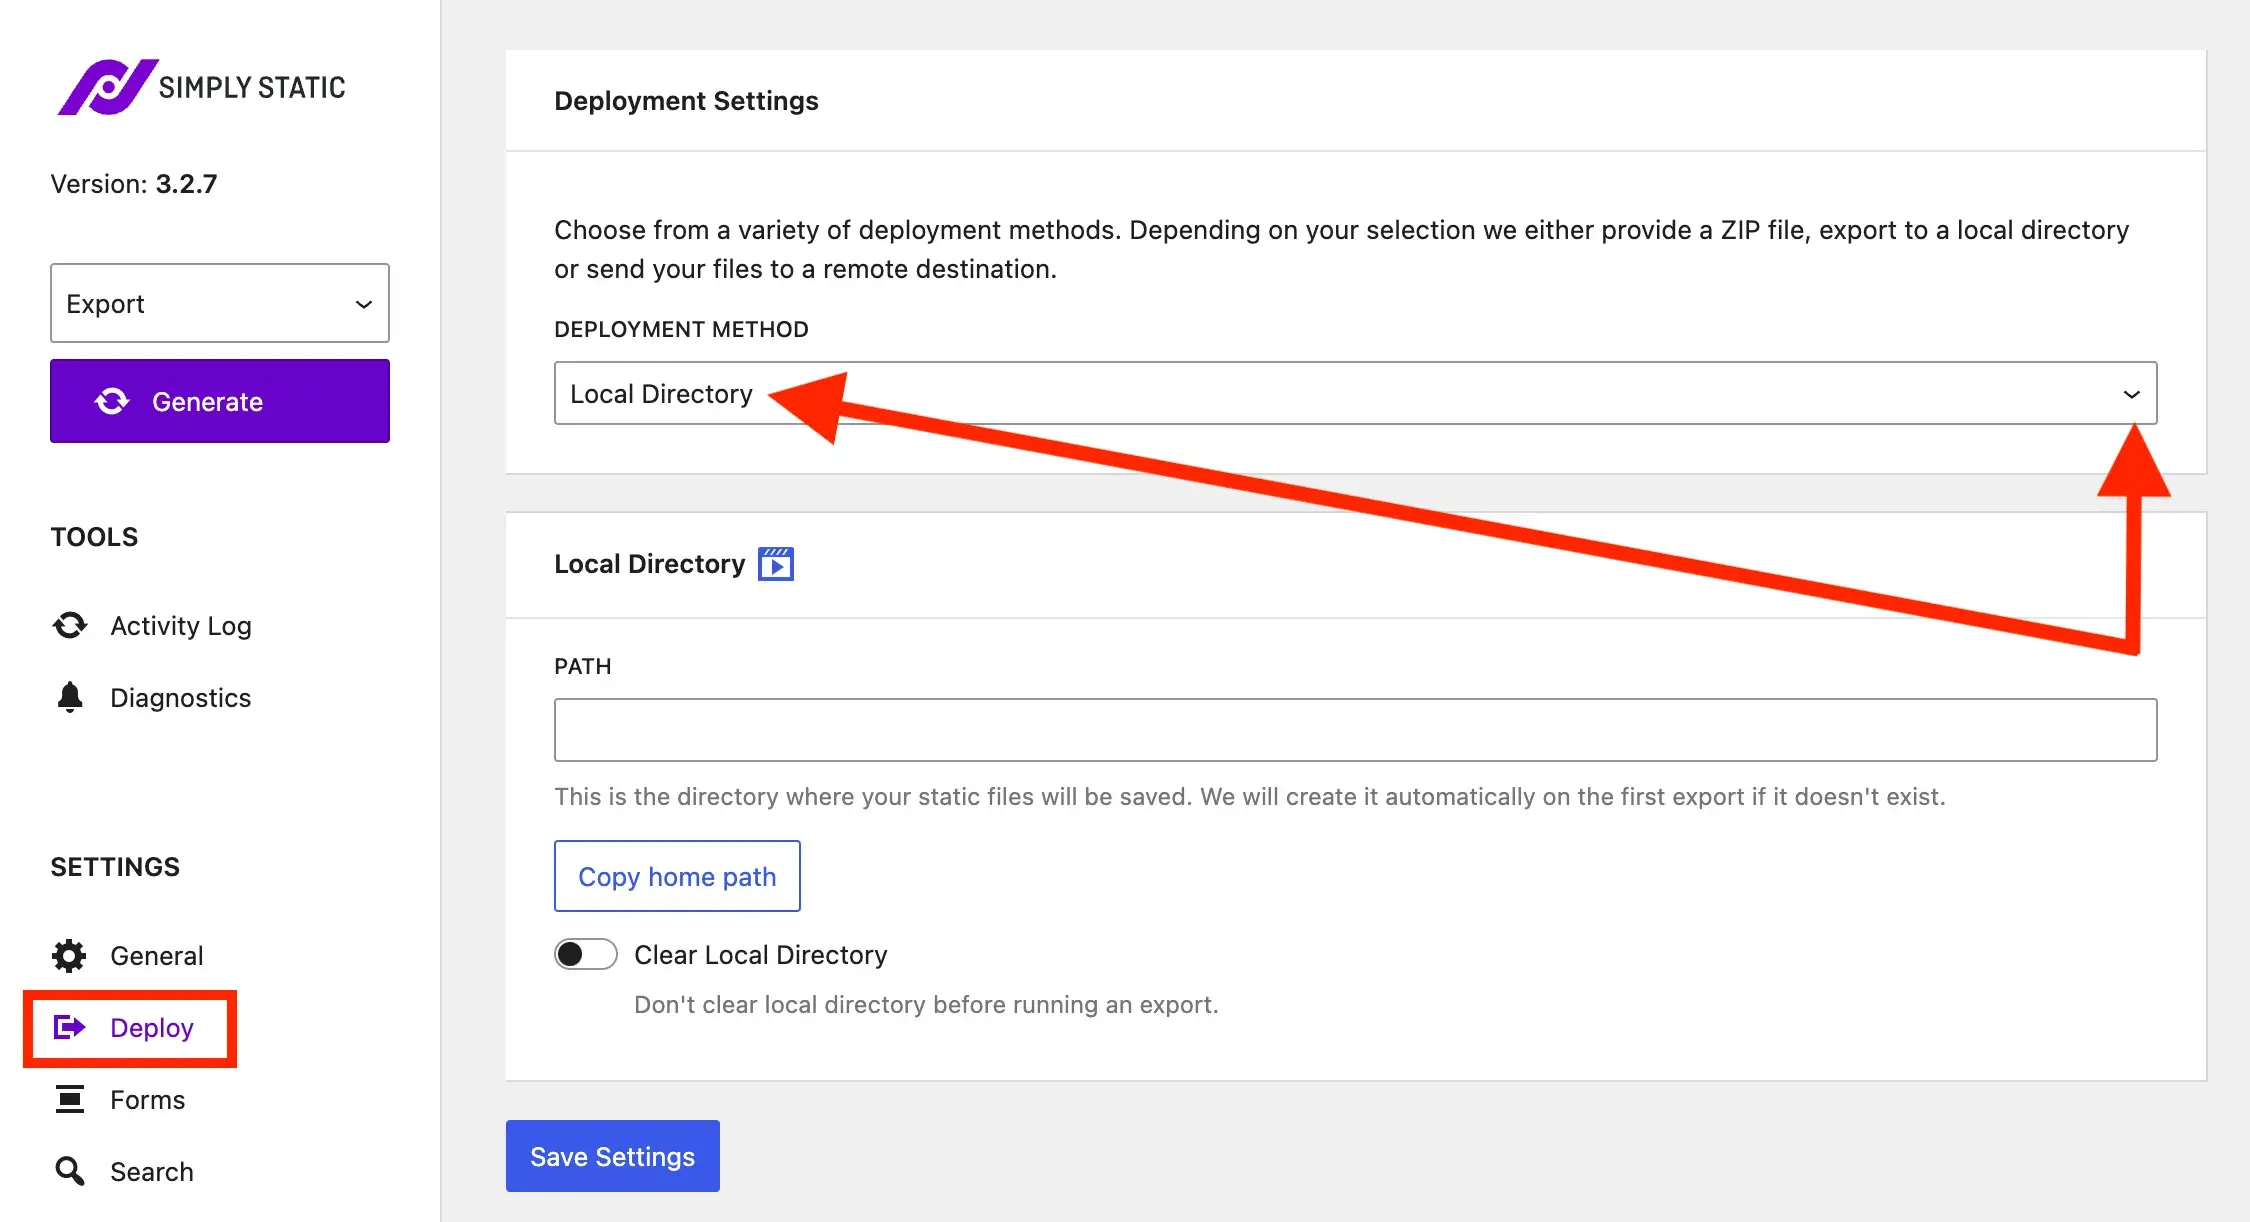
Below that, choose a path for your static files in the PATH field. In simple terms, you need to specify where on your computer the static files should be saved.
At first glance, it might seem like the easiest thing to do is nothing and let the plugin automatically create a folder for you. However, I’ve personally found that creating the directory manually beforehand and placing it outside your WordPress installation provides the most reliable results.
- If you’re using a Mac, open up the Terminal app and type in:
mkdir ~/Desktop/static-site. - For Windows users, open Windows Command Prompt and type:
mkdir %USERPROFILE%Desktopstatic-site.
This will create the directory on your desktop, which will make it easier to find. However, you are welcome to create it somewhere else. When you’re done, return to Simply Static’s Deploy settings and enter the full path to your newly created folder:
- For Mac users:
/Users/yourusername/Desktop/static-site - For Windows users:
C:UsersyourusernameDesktopstatic-site
Replace “yourusername” with your actual username.
💡 Quick tip: Whichever way you decide to handle this part, I recommend copying and saving the directory somewhere (e.g., a blank document or an email draft). Having it readily on hand will make things go faster when you get to the GitHub section.
Finally, at the bottom you’ll see Clear Local Directory. It should be turned off by default. Leave it that way and click Save Settings.
5. Customize wp-admin settings
You’re almost ready to export your site, but there is one important mini-configuration you need to make beforehand.
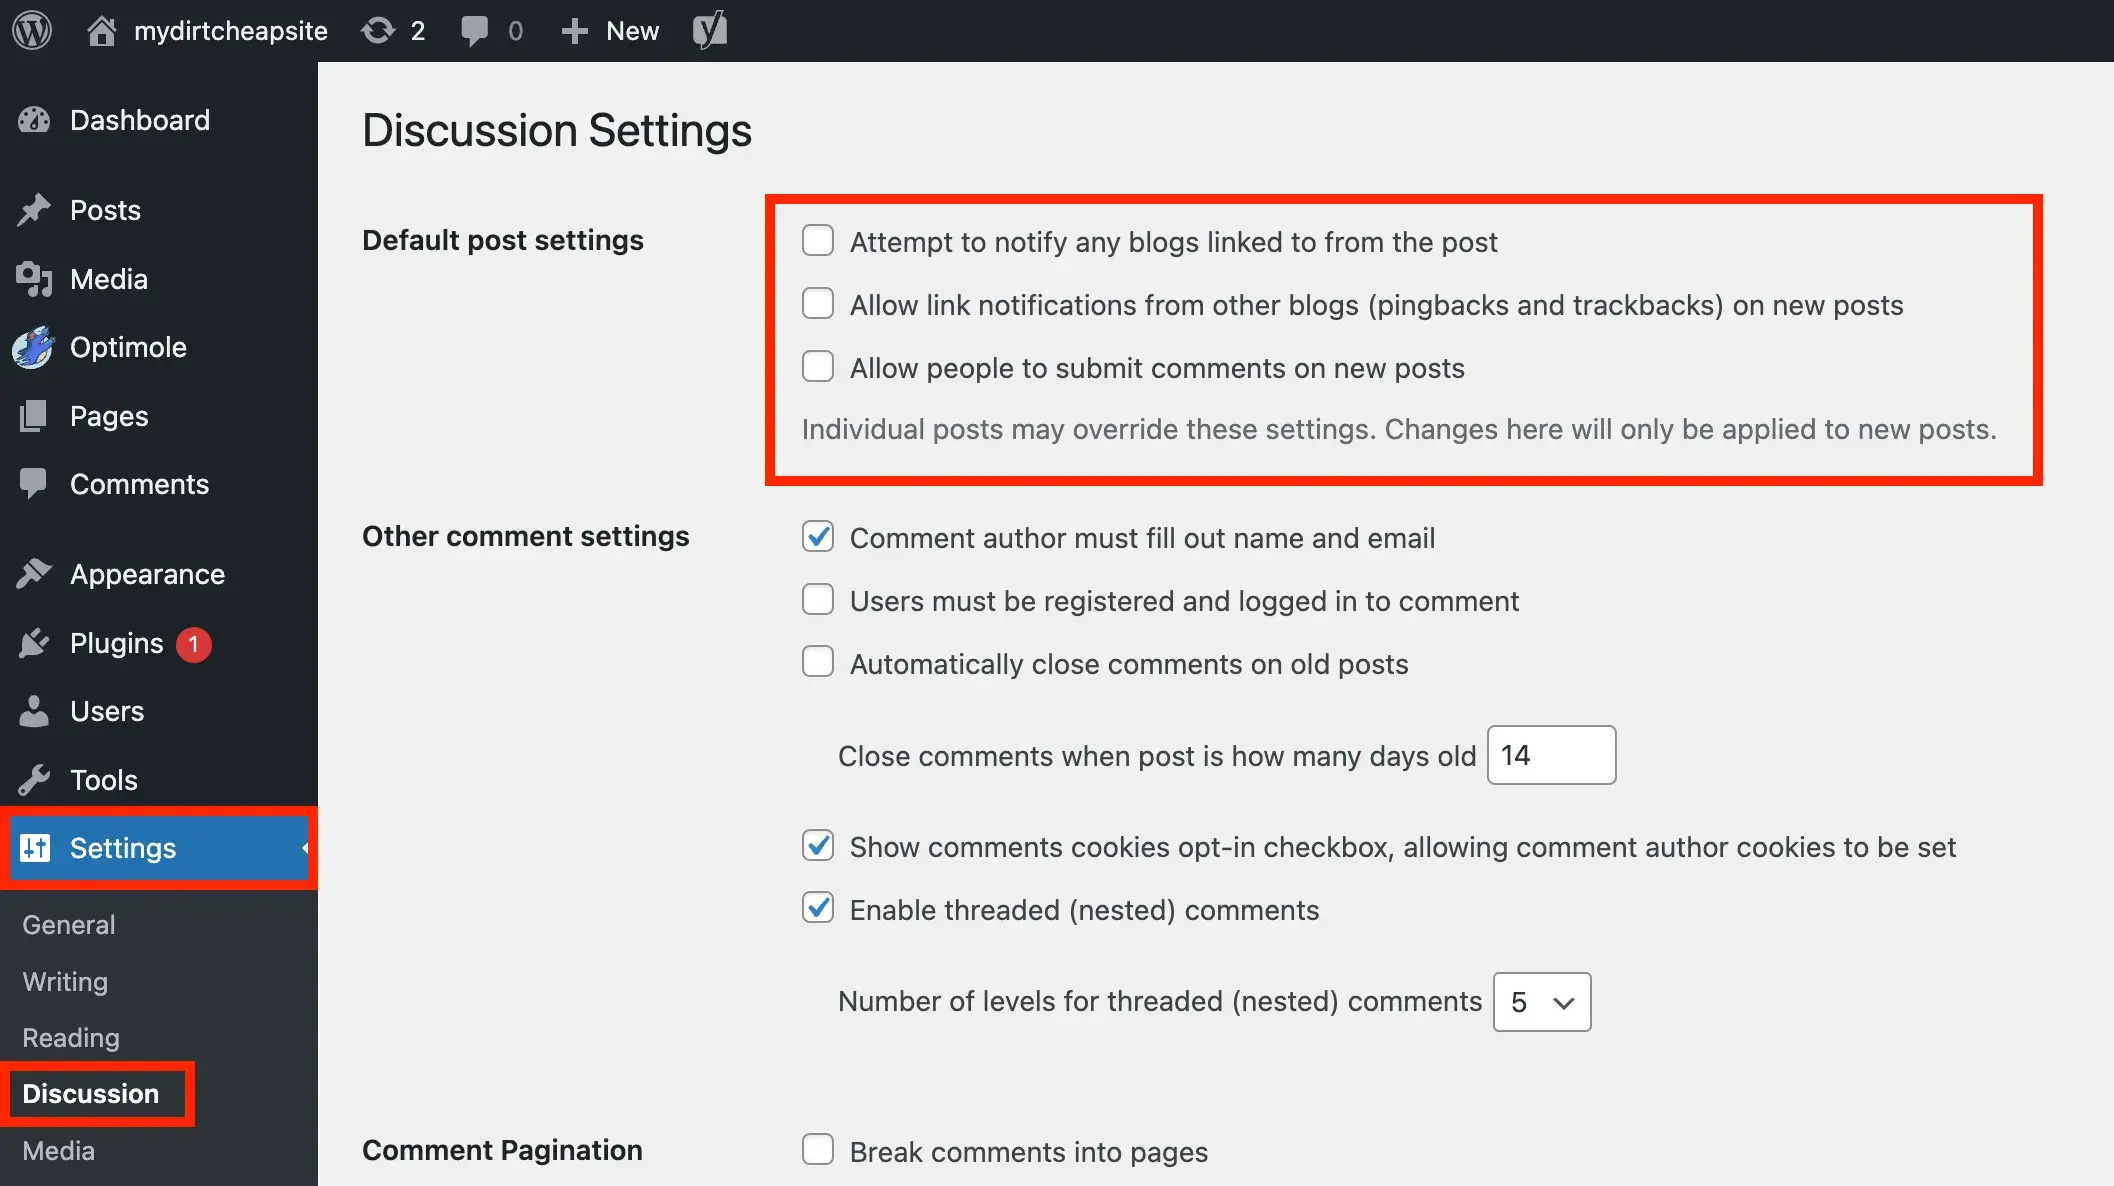
It’s to disable comments because they are not supported on static sites.
From your WordPress dashboard, go to Settings → Discussion. Then in the very first section titled Default post settings, simply uncheck all three options. Scroll to the bottom and click Save Changes when done.
6. Generate (export) your static site to your hard drive
🎉 Now comes the exciting part – generating the actual static site!
Before you tap the purple Generate button though, do a quick check in that Diagnostics section I showed you before. This is to ensure that the plugin isn’t flagging any issues. If you do encounter some, I would recommend checking out the troubleshooting section of Simply Static’s docs page or drop a comment at the bottom of this post and I’ll do my best to help you.
Otherwise, if everything looks good, you can click Generate. You can also watch the entire process unfold and get the details by going into the Activity Log section beforehand:
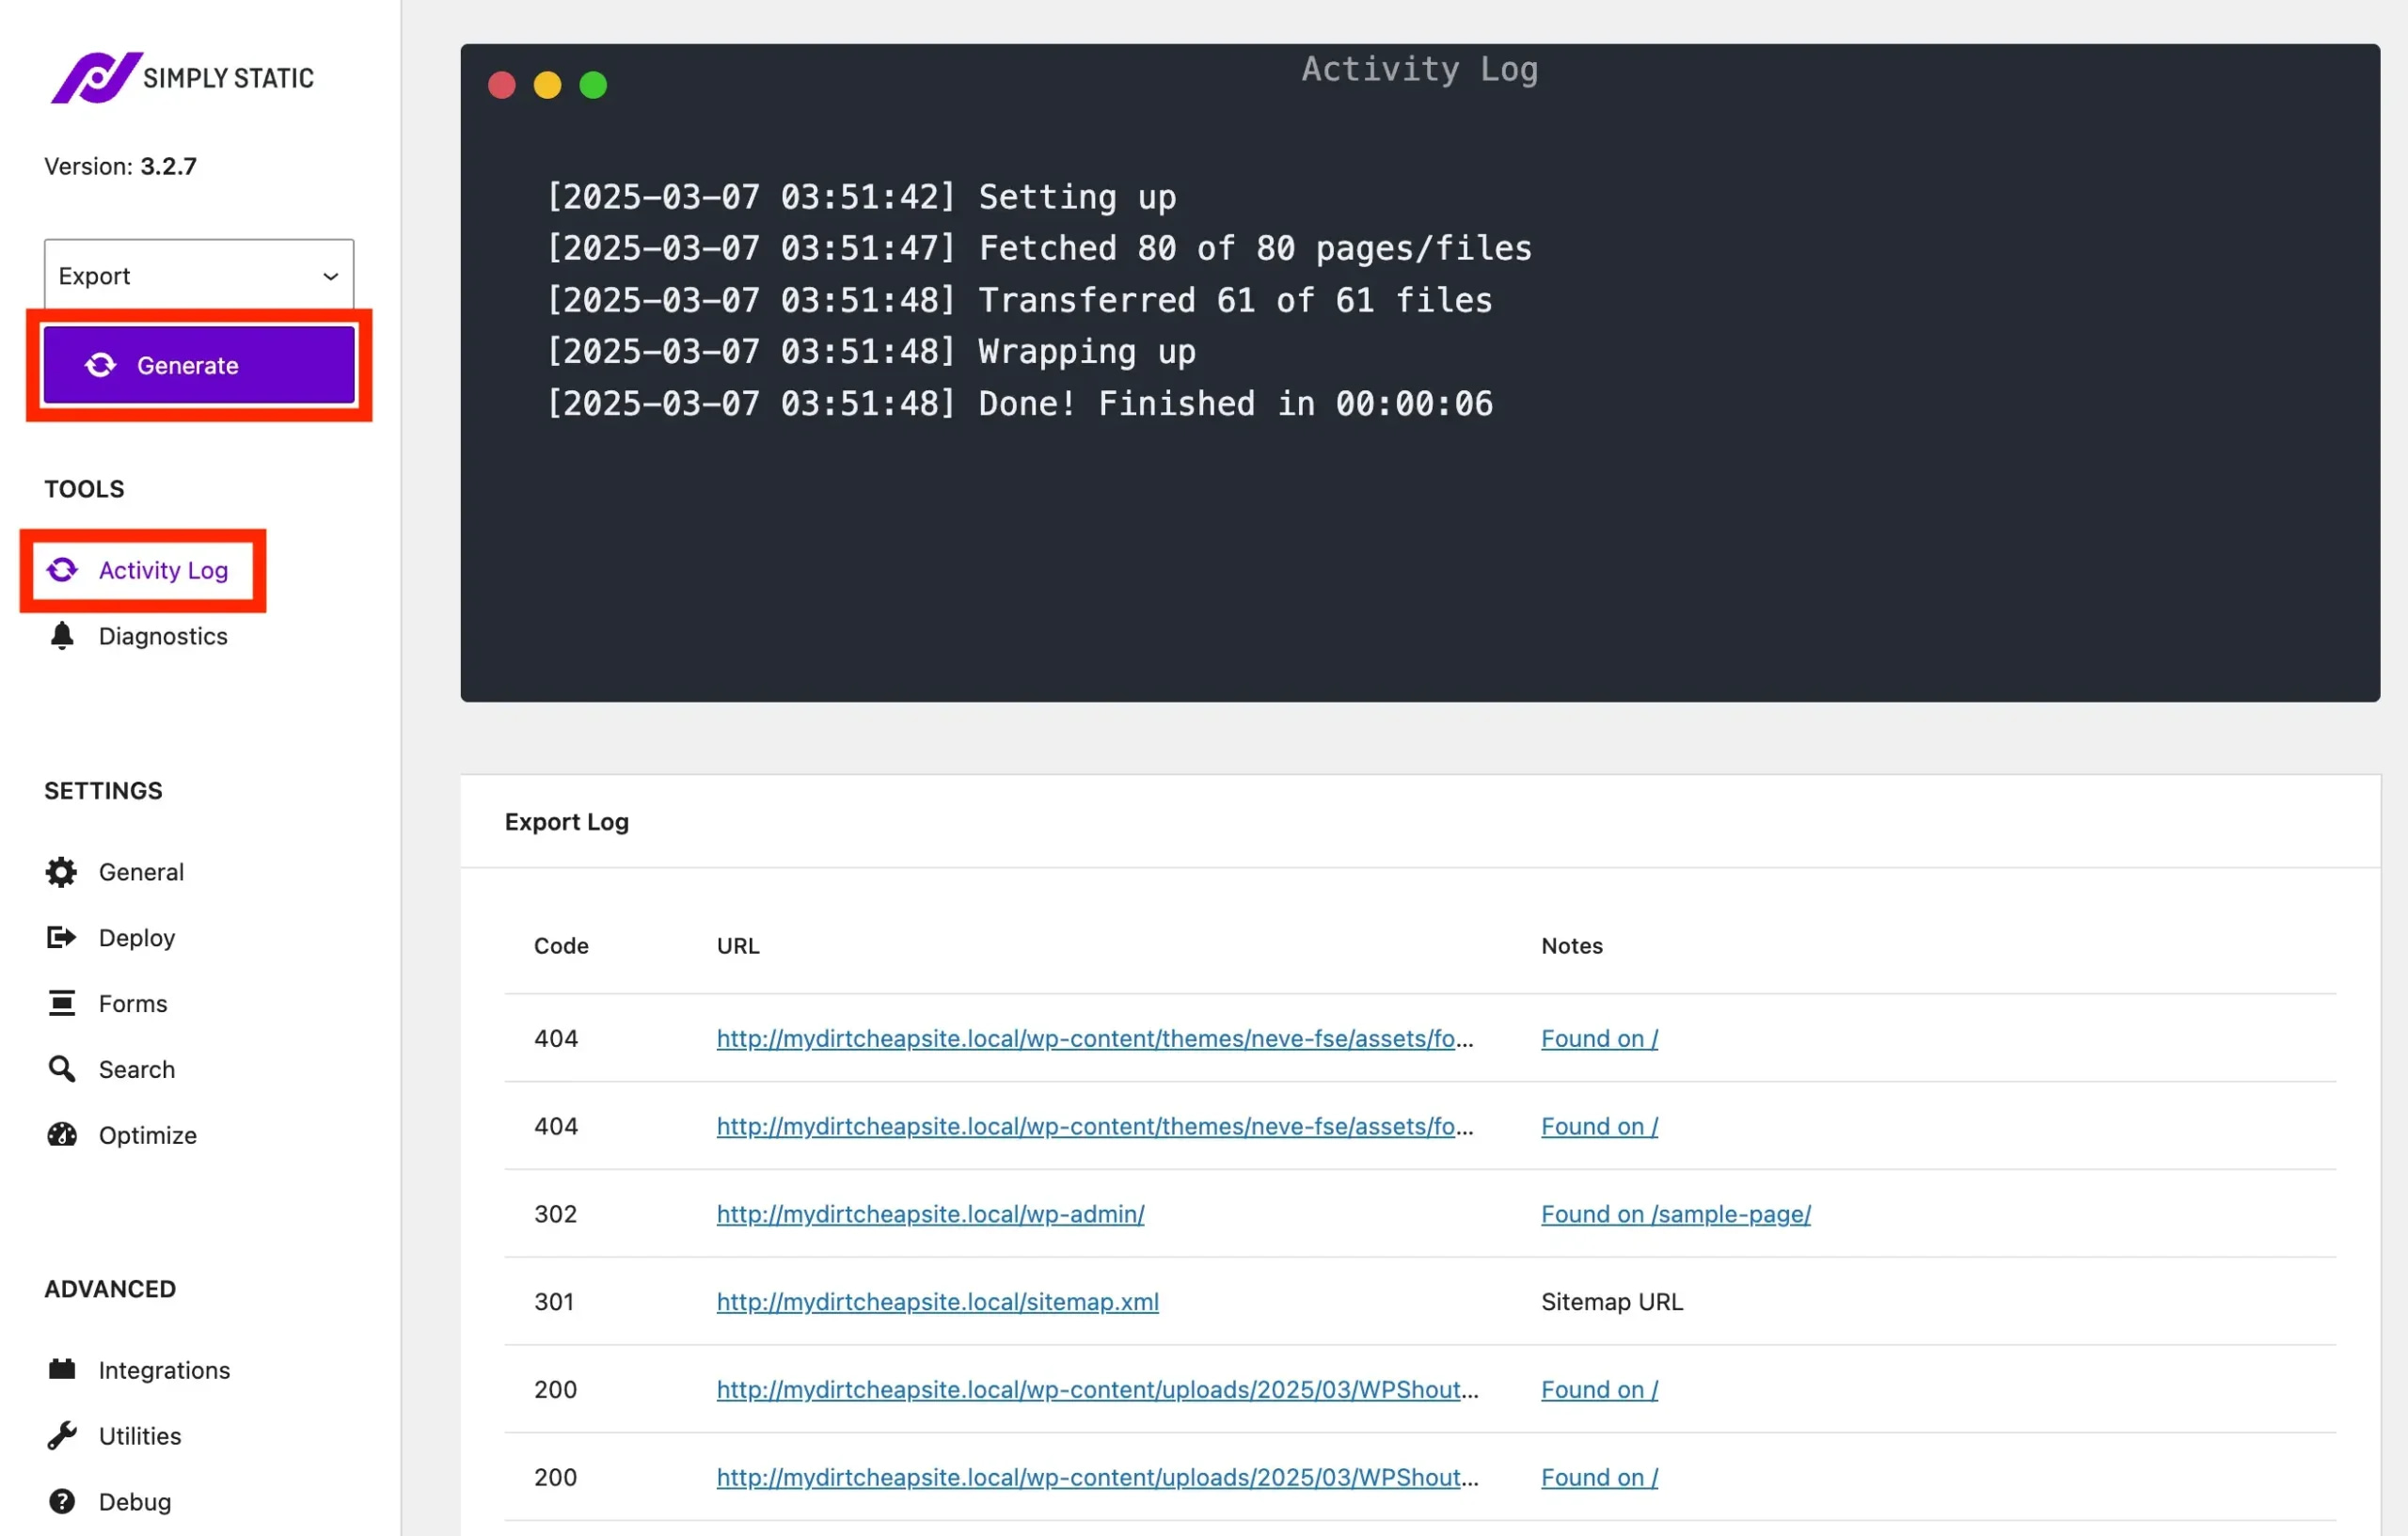
Once the process finishes, you’ll find all your static site files in the local directory path you specified earlier in the Deploy settings. These files represent a complete, static version of your WordPress site ready for deployment.
You’re now ready for the next stage of the workflow – setting up a GitHub repository.
Phase three: set up a GitHub repository and connect it to your local repository
GitHub is going to serve as the bridge between your local development and Cloudflare’s hosting platform.
It will do that by storing your static site files in a repository, which Cloudflare Pages will then connect to, in order to automatically deploy your site whenever you make changes. Let’s walk through the process of setting up this repository.
1. Install Git (if you haven’t already)
Before creating a repository, make sure Git is installed on your computer:
- Windows: Download and install Git from git-scm.com
- Mac: Open Terminal and type
git --version. If it’s not installed, you’ll be prompted to install it
2. Initialize a Git repository in your static site directory
Open your Terminal or Command Prompt and navigate to the directory where Simply Static saved your static site files by typing:
cd path/to/your/static/site/directoryCode language: JavaScript (javascript)Replace path/to/your/static/site/directory with the actual path you configured in Simply Static’s Deploy settings.
💡 Remember the quick tip I provided about copying it and setting it aside somewhere? This was why.
Once you’re in the correct directory, initialize a new Git repository:
git initYou should see a message like “Initialized empty Git repository in [your directory path].”
3. Create a .gitignore File
Before adding files to your repository, it’s a good practice to create a .gitignore file to exclude unnecessary files from being tracked:
- On Mac type:
touch .gitignoreinto Terminal. - On Windows type:
echo. → .gitignoreinto Command Prompt.
Next, you need to reveal your system’s hidden files. This is because .gitignore won’t show by default.
On Mac, type this into Terminal:
defaults write com.apple.finder AppleShowAllFiles true
killall FinderCode language: CSS (css)
On Windows, type this into Command Prompt:
dir /aThen find the .gitignore file in your file directory and open it with any text editor (e.g., Notepad, TextEdit, Sublime Text, etc.). Paste the following into the file and save it:
.DS_Store
Thumbs.db


.idea/
.vscode/
*.swp
*.swo


*.log
tmp/Code language: PHP (php)
4. Stage and commit your files
Now it’s time to add all your static site files to the repository (excluding those in your .gitignore file):
git add .Next, create your first commit with a descriptive message:
git commit -m "Initial commit of static site"Code language: JavaScript (javascript)With that out of the way, it’s head on over to GitHub and create a new repository to store your files.
5. Create a new repository on GitHub
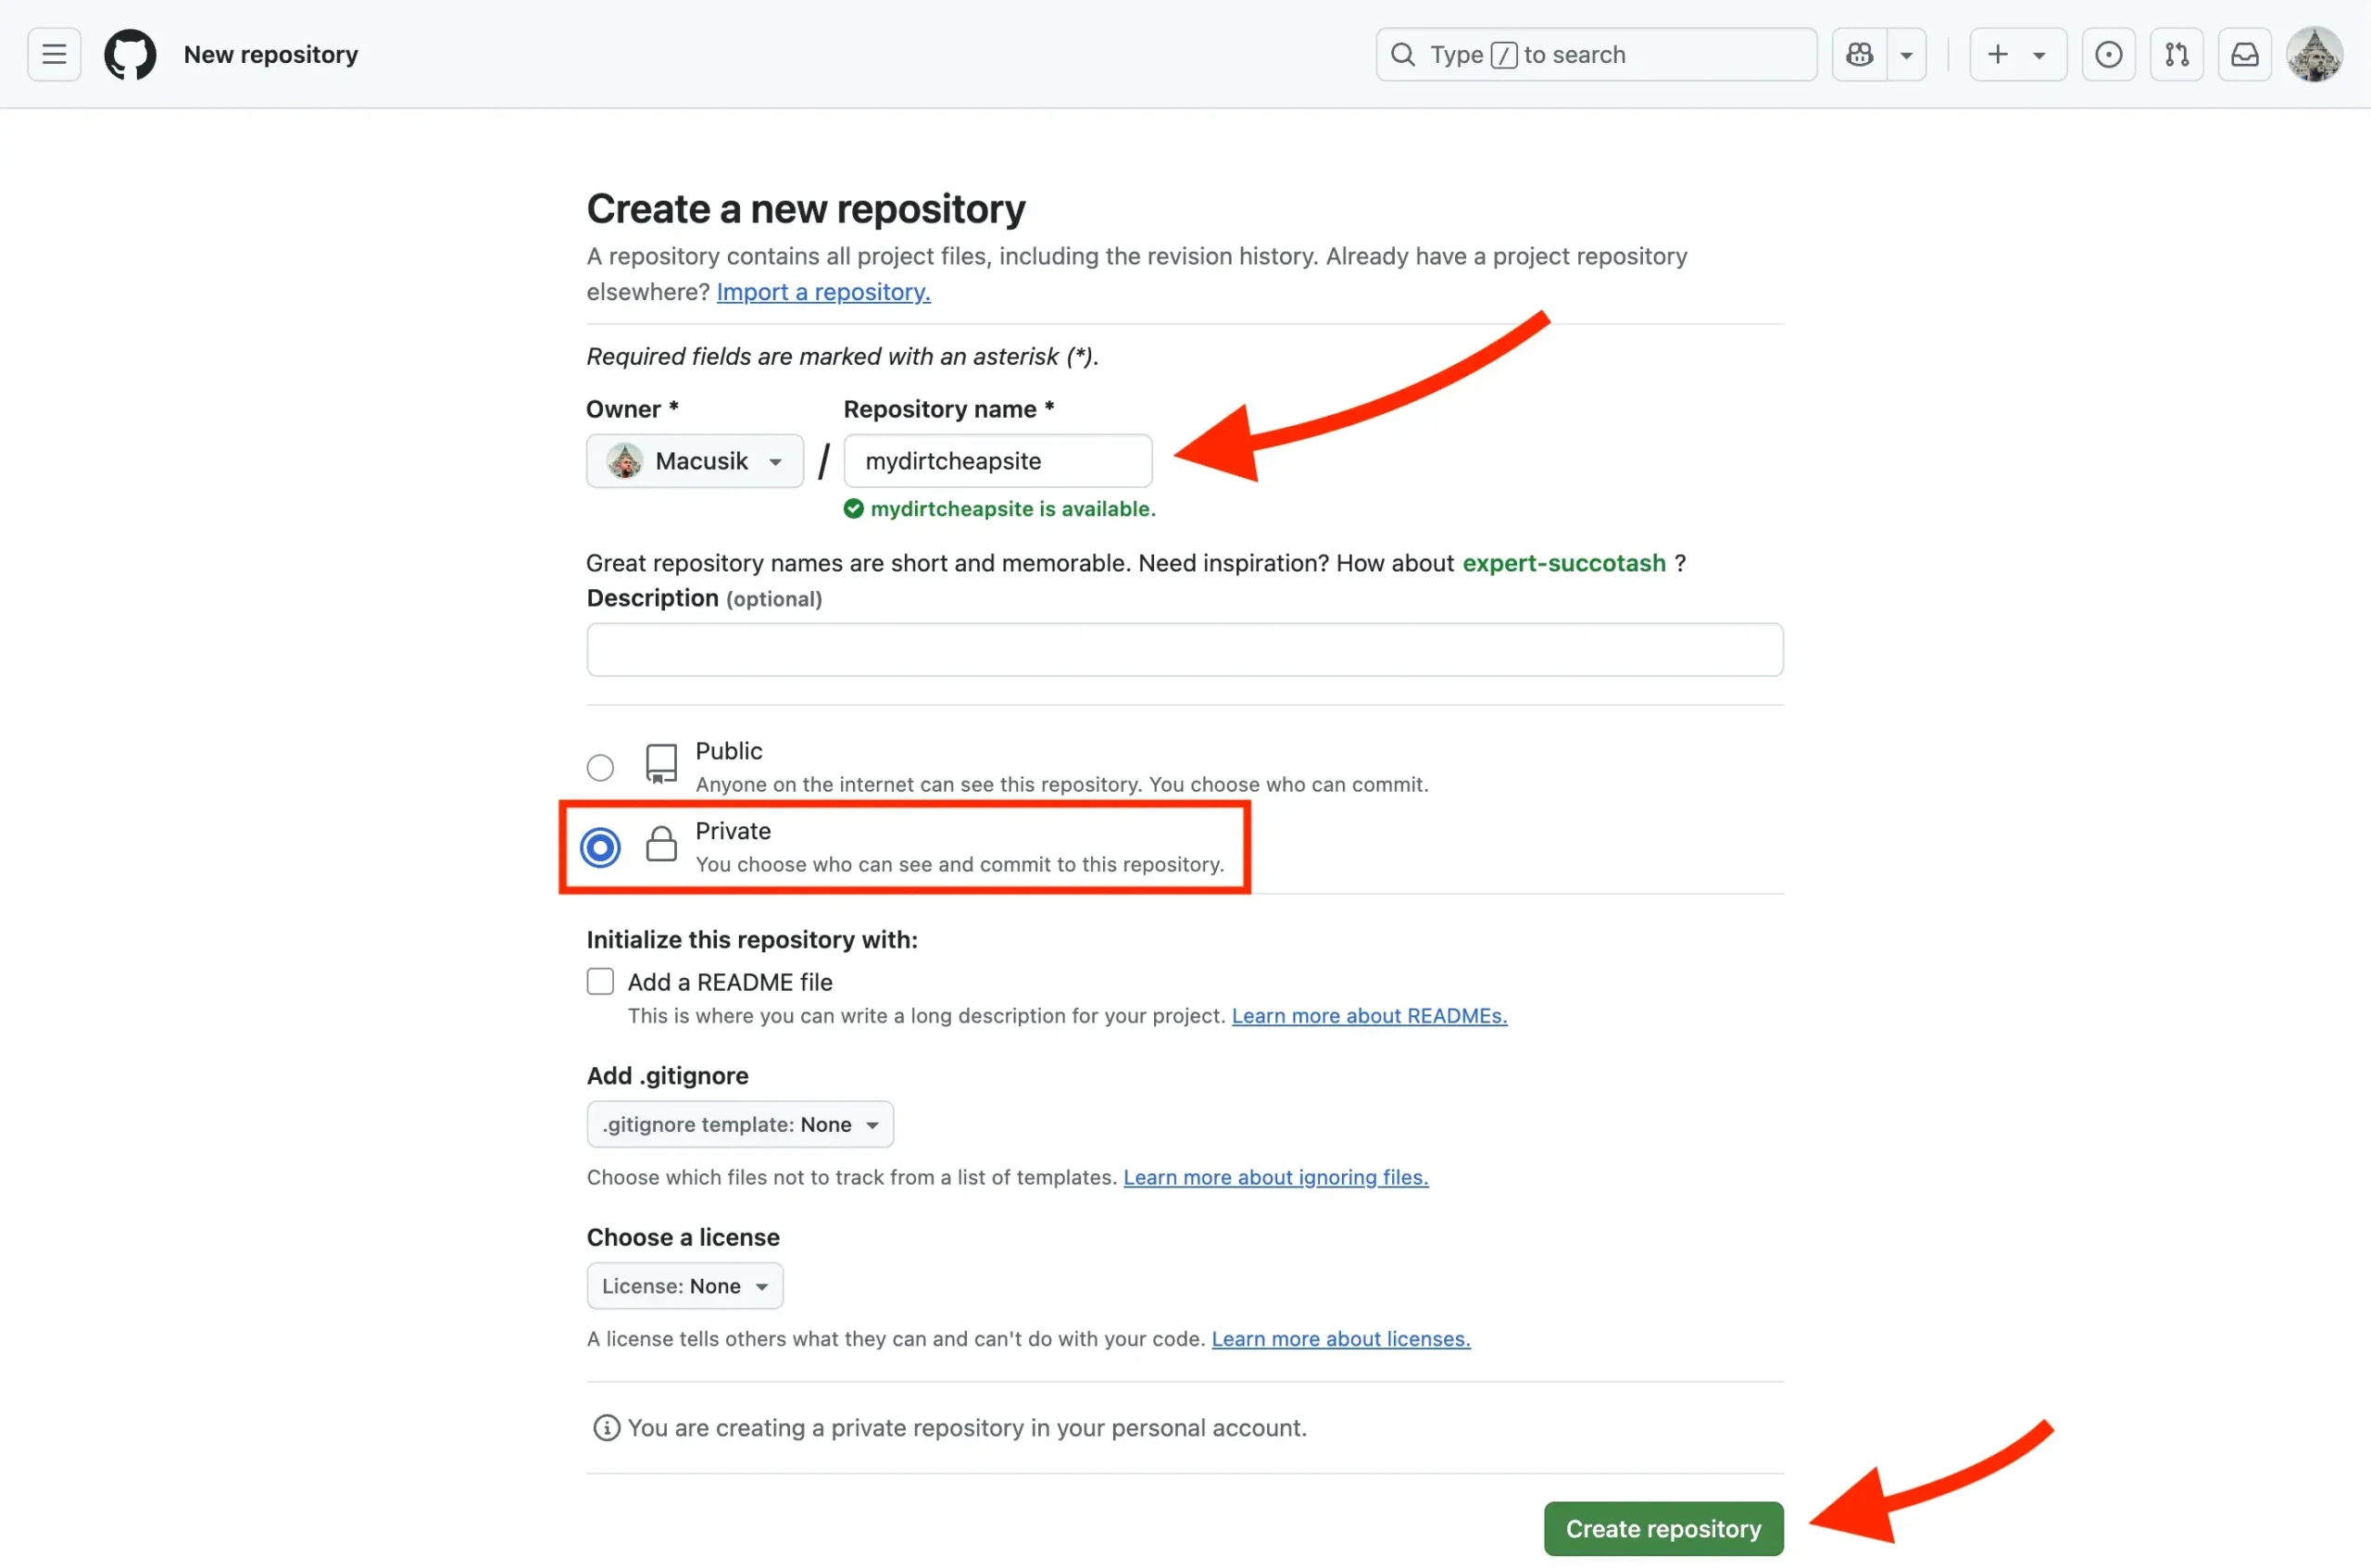
Go to github.com and sign in (or create an account if you don’t have one). Click the + icon in the top right corner and select New repository:
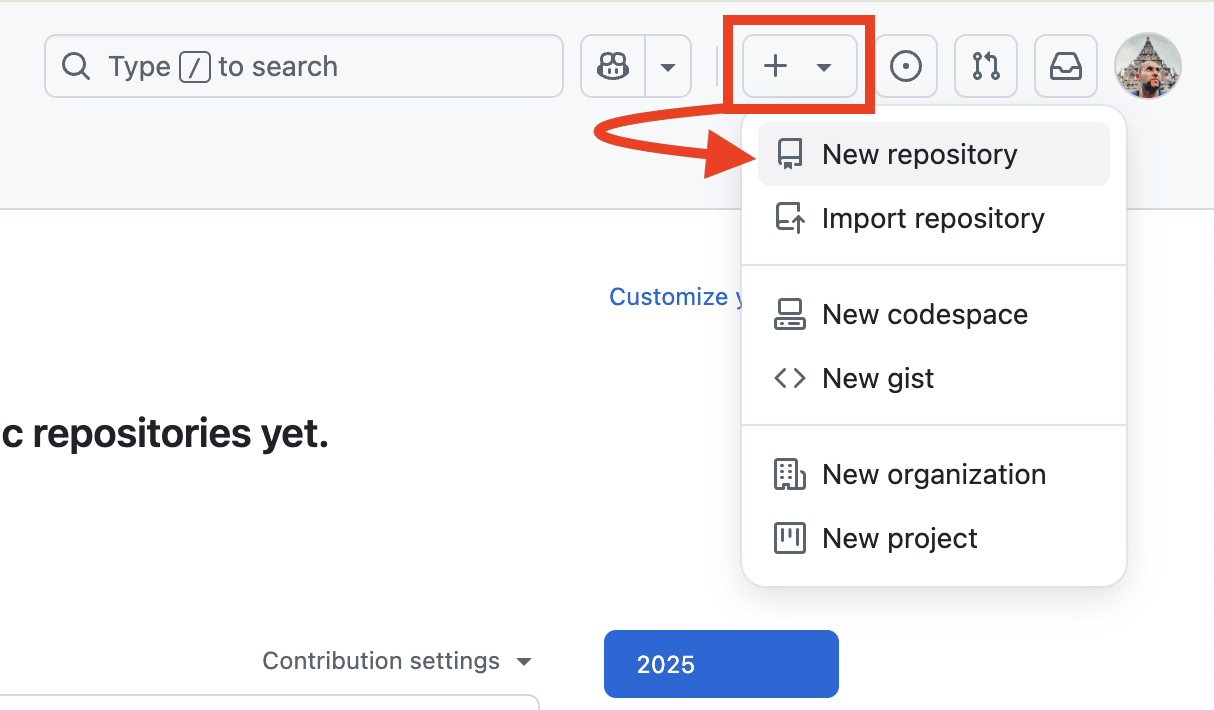
Name your repository (e.g., my-static-site). For the purposes of this tutorial I’ve named mine “mydirtcheapsite.”
Mark the repository as Private (unless you have specific reasons to make it public – such as using it as an example of your work for a job application).
⚠️ Don’t add a .gitignore file, README file, or a license. We already created our own .gitignore file earlier and it will be imported into the repository. The other two aren’t necessary either since this will be a private repository and not an open-source project meant to be shared with the internet.
Click Create repository when you’re done:
6. Connect your local repository to GitHub
Next it will ask you how you want to create this new repository.
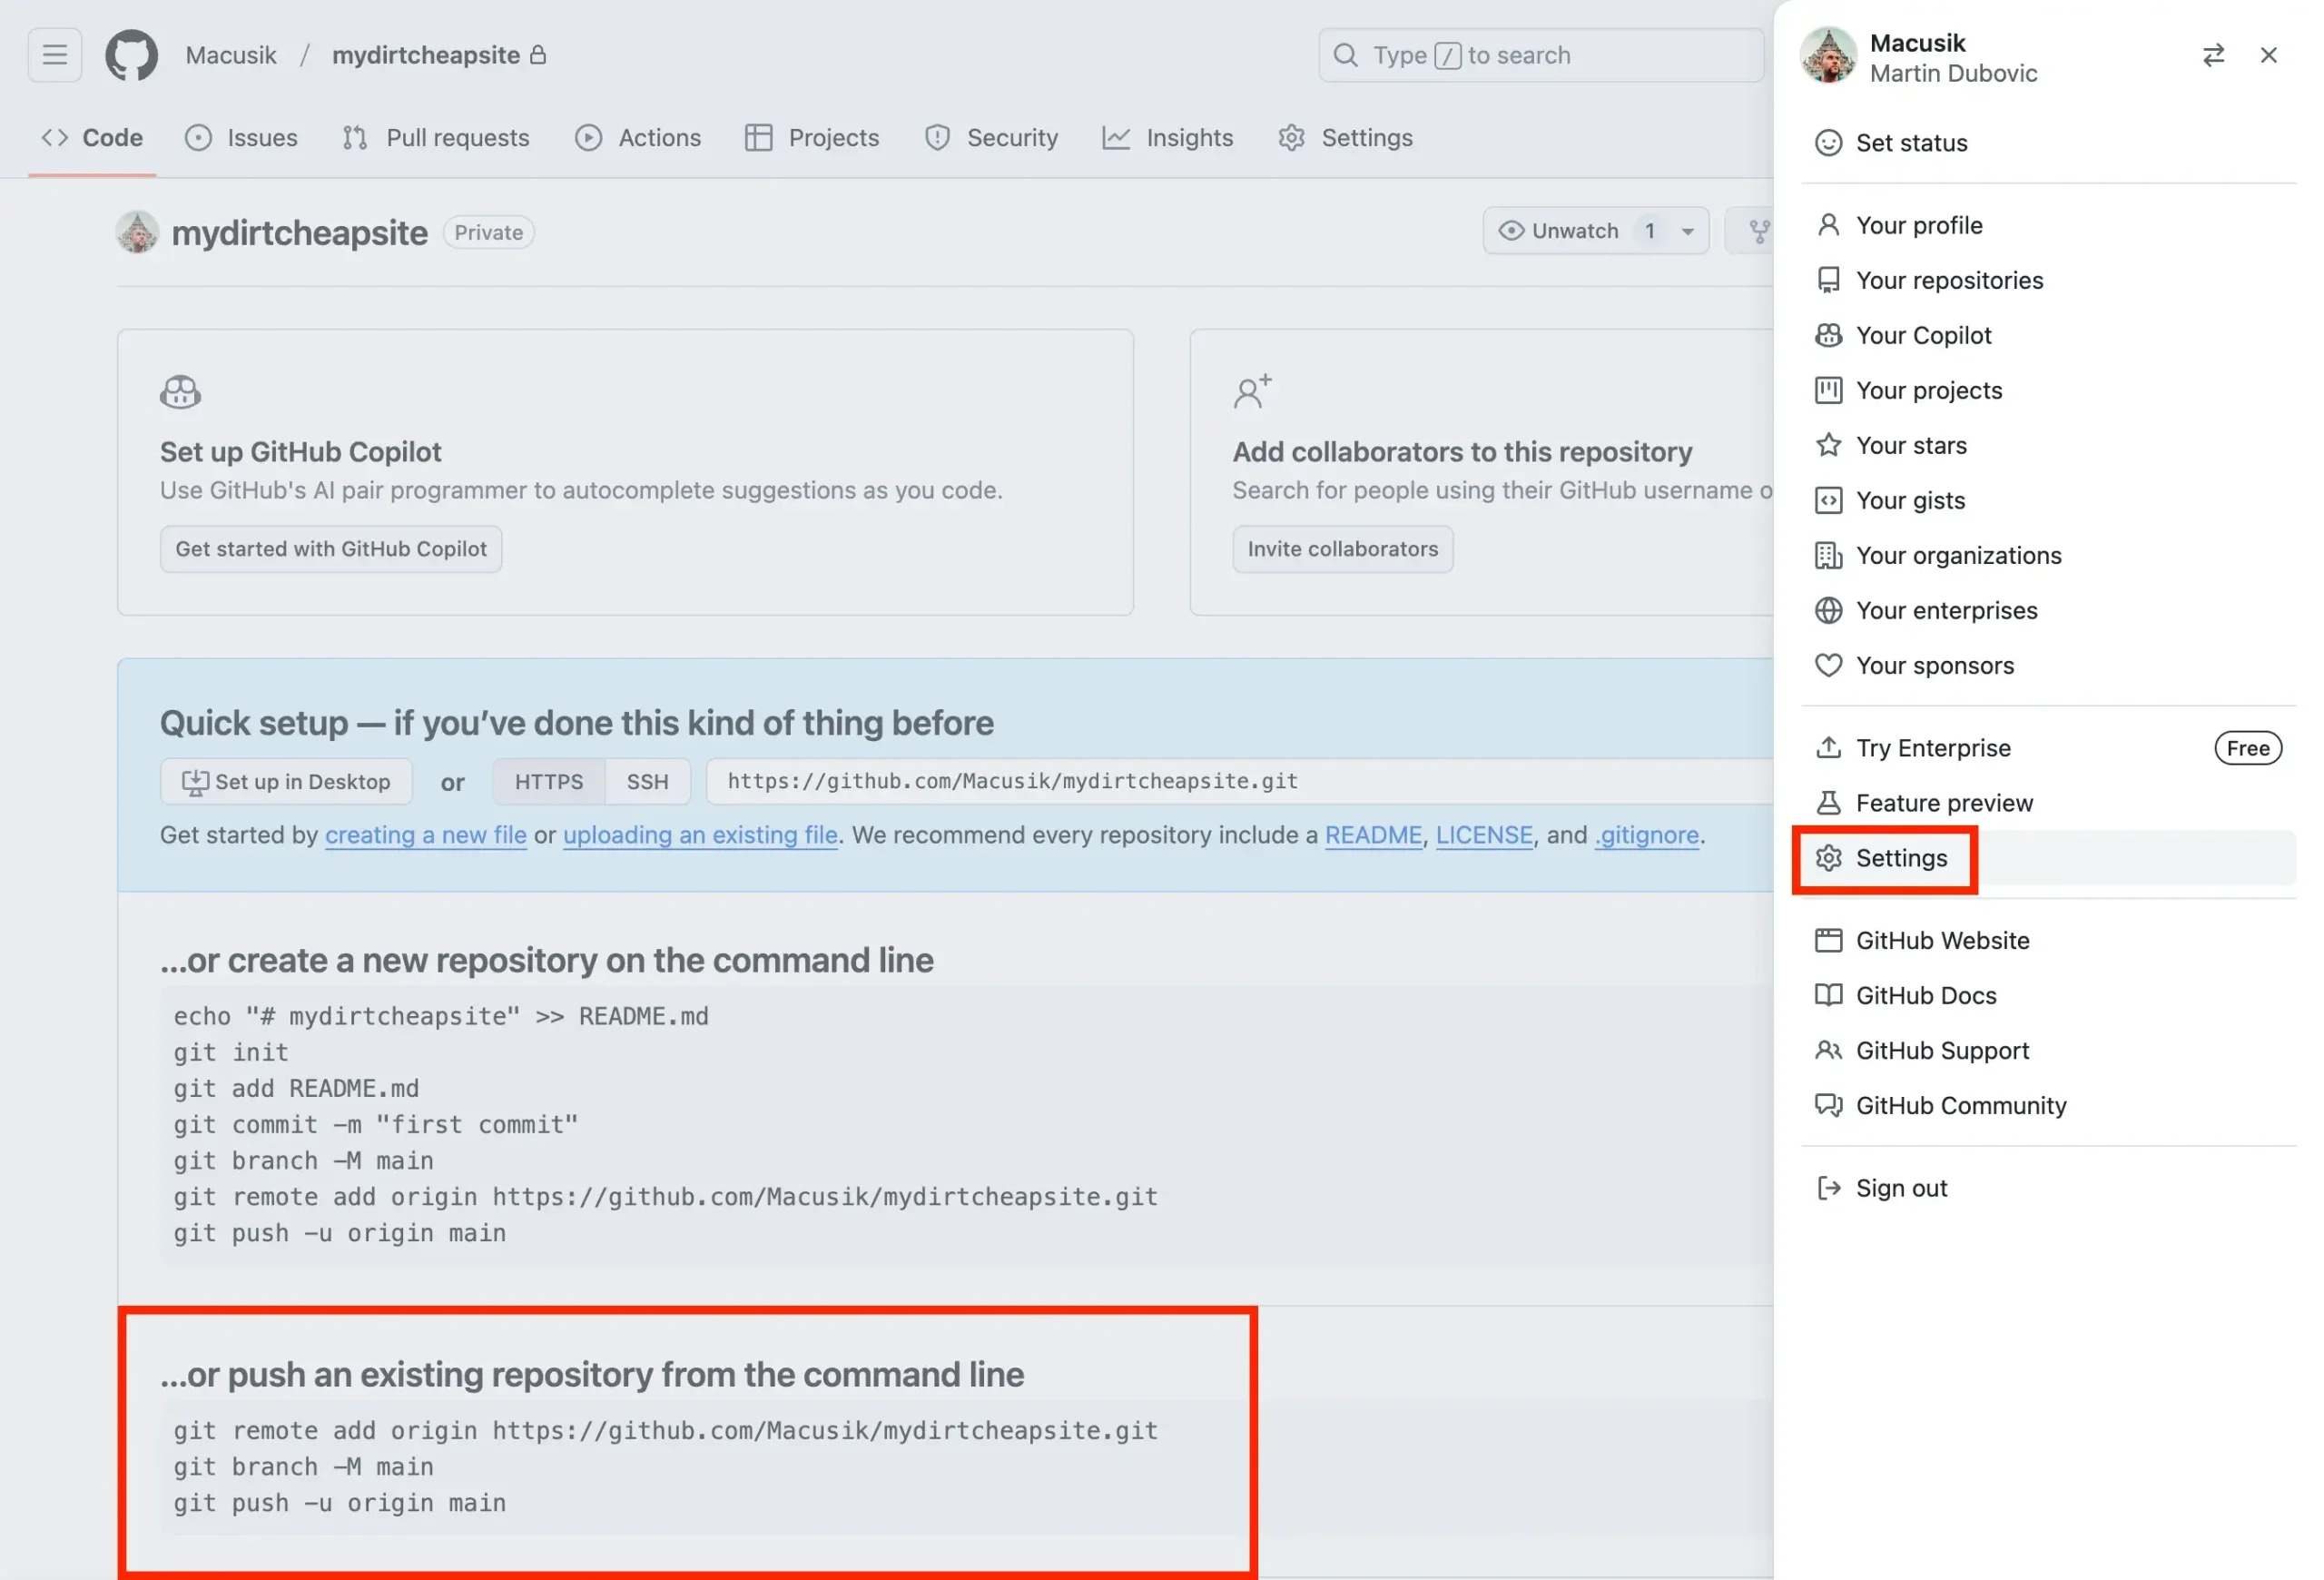
You are going to use the third option (push an existing repository from the command line), but before you do that, you first need to generate an access token. This is to verify that you have permission to import the files into the repository.
Generate an access token
Click on your profile image (or the placeholder avatar if you haven’t added a profile image) on the top right of the screen. In the sidebar menu that slides out, tap on Settings:
On the next screen (not shown here), you’ll see another sidebar menu – this time on the left side of the screen. Scroll down until you get to the very bottom option, which is called Developer Settings. Click on it.
Once inside the Developer Settings, tap on Personal access tokens on the left, and select Tokens (classic). Then click on Generate new token and choose Generate new token (classic) from the dropdown menu:

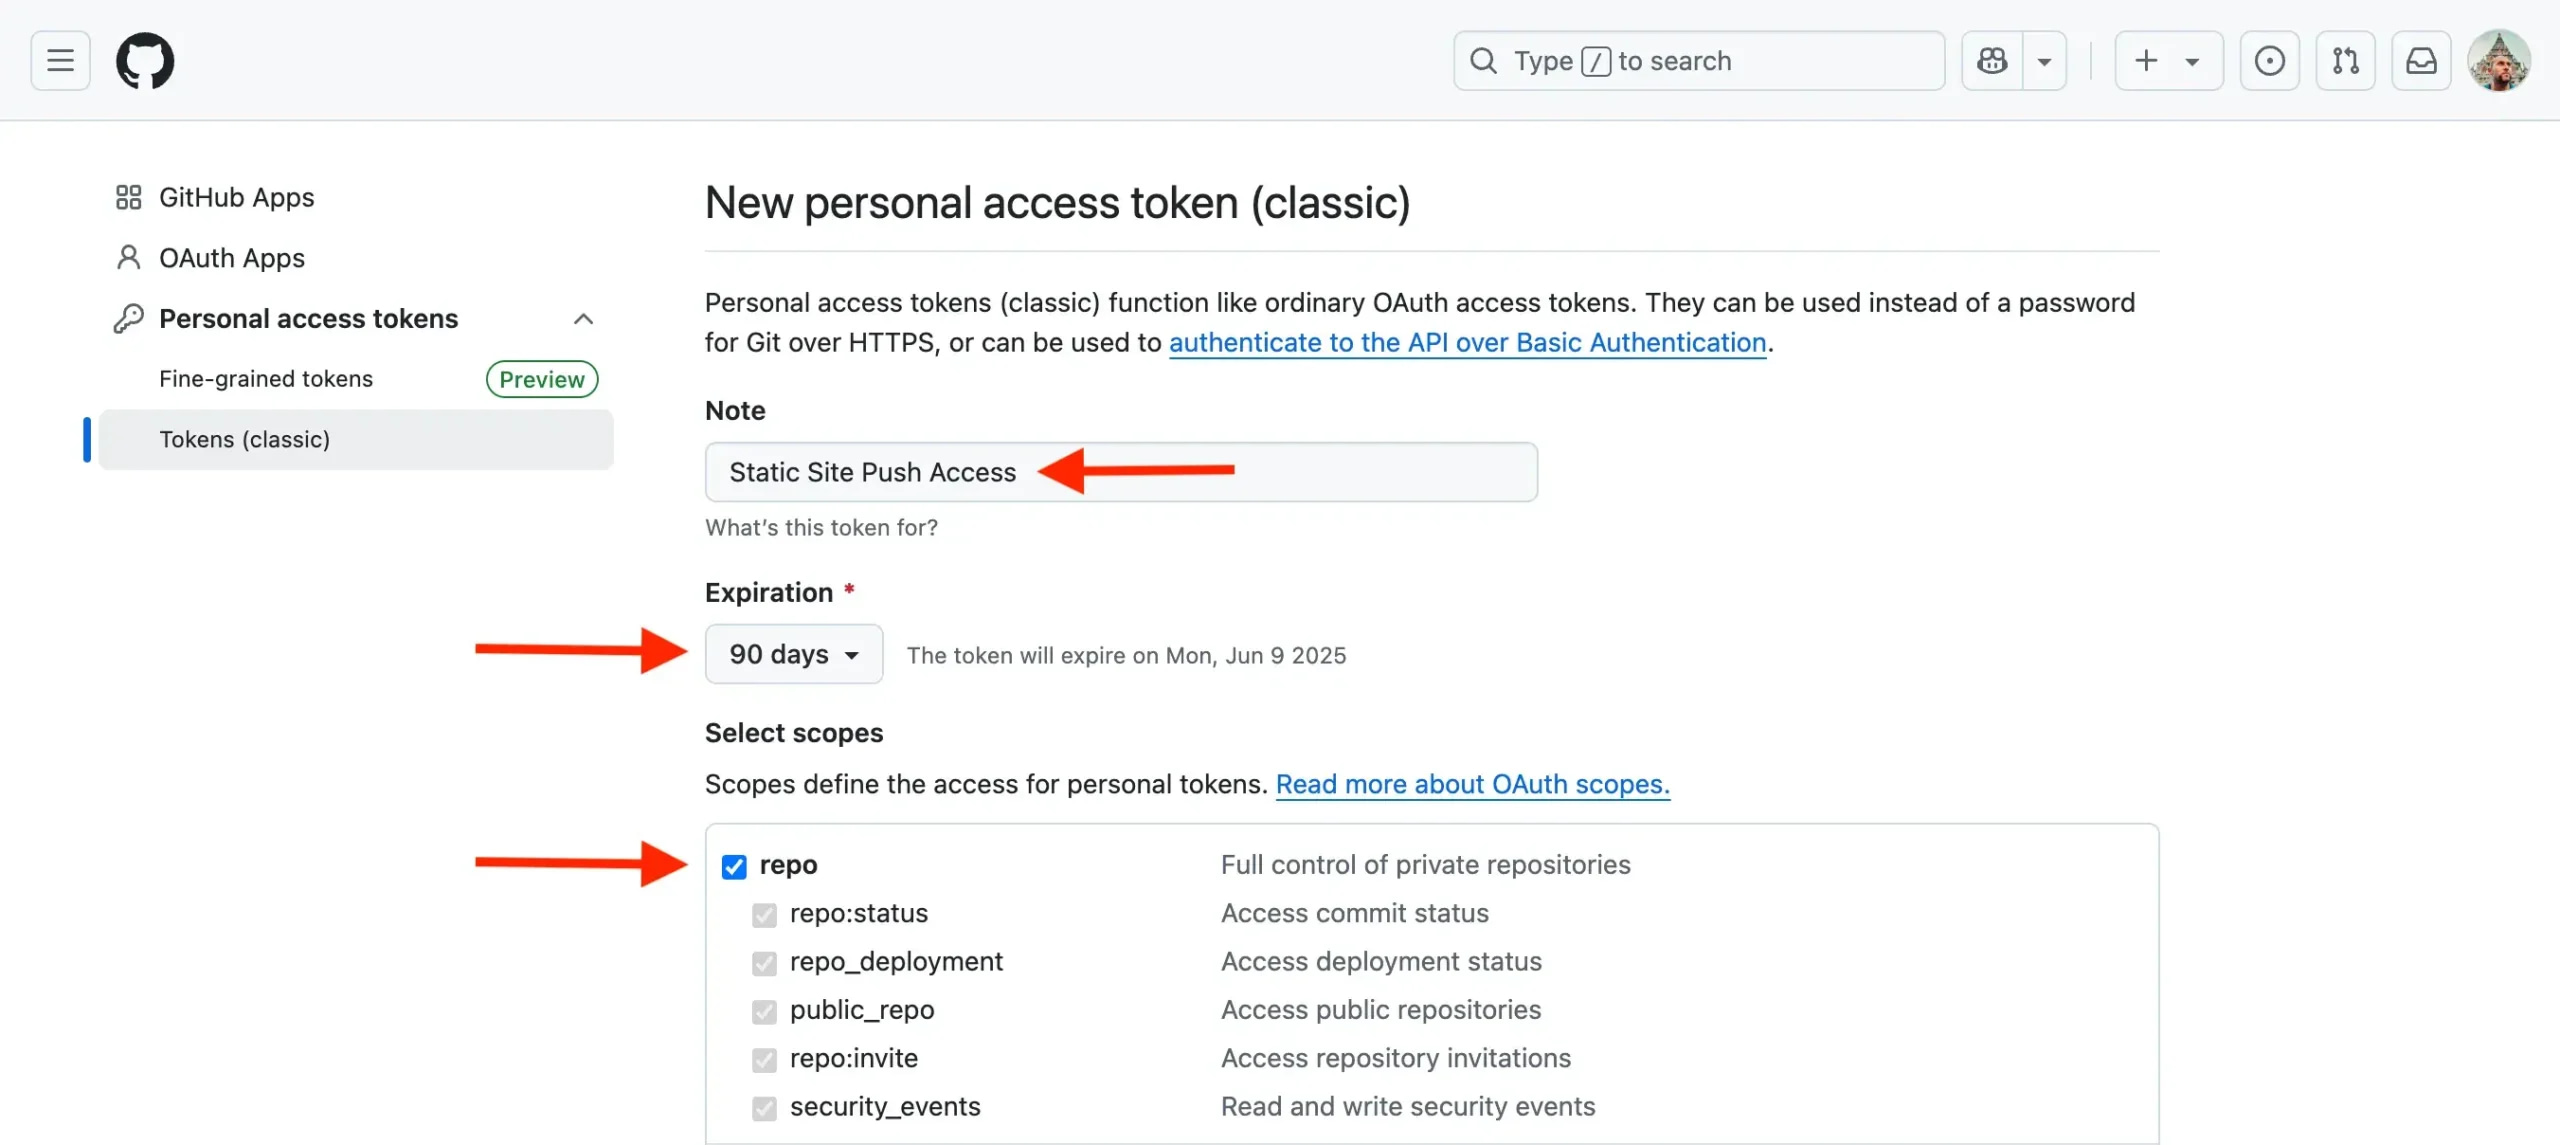
GitHub will ask you to re-authenticate yourself via your chosen 2FA method. After you do so successfully, you’ll be asked to provide some details about your access token. There’s a lot there, but you only really need to worry about three things:
- In the Note, write down the purpose of the token. You can make this whatever you want. For most of you reading this, it will be the only token on your GitHub list so it’s unlikely to get lost in the shuffle. Nonetheless, if you start deploying multiple sites using this method, it’s a good idea to make the note something you’ll remember as being associated with the particular site you’re working on.
- For the Expiration, you can choose some set time or you can make the token last forever if you don’t feel like making a new one every so many months.
- Finally, for the Select scopes, check the repo box and leave all the others below it unchecked.
When you’re finished, scroll down and click on Generate token.
Once you see your token, copy it by clicking on the little box-within-a-box icon next to it:

Set it aside somewhere and remember where you put it because you won’t be able to see it again after you leave this screen.
Use the access token to connect to GitHub
The next step is to use the access token to establish a connection between your site as it exists on your hard drive and your GitHub repository. Pay close attention here because you are going to have to do a lot of manual substitutions to the command so that it’s relevant to your site and credentials. The command is:
git remote add origin https:Code language: PHP (php)So in my case, based on the example I’ve shown you, it would look like this:
git remote add origin https:Code language: JavaScript (javascript)To adapt this to your own setup:
- Replace
YOUR-USERNAME(twice) with your GitHub username. - Replace
YOUR-TOKENwith the personal access token you copied earlier. - Replace
YOUR-REPO-NAMEwith the name of your repository.
Type or paste the edited command into your Terminal (Mac) or Command Prompt (Windows) and press Enter.
💡 Security note: Commands containing your token might be saved in your shell history. If you’re using a shared computer, consider clearing your history after completing these steps with history -c on Mac or by clearing Command Prompt history on Windows.
Set the main branch
Next, we need to set the default branch name to “main”:
git branch -M mainPush your files to GitHub
Finally, push your committed changes to GitHub:
git push -u origin mainThe -u flag (short for --set-upstream) tells Git to remember these settings, making future pushes simpler.
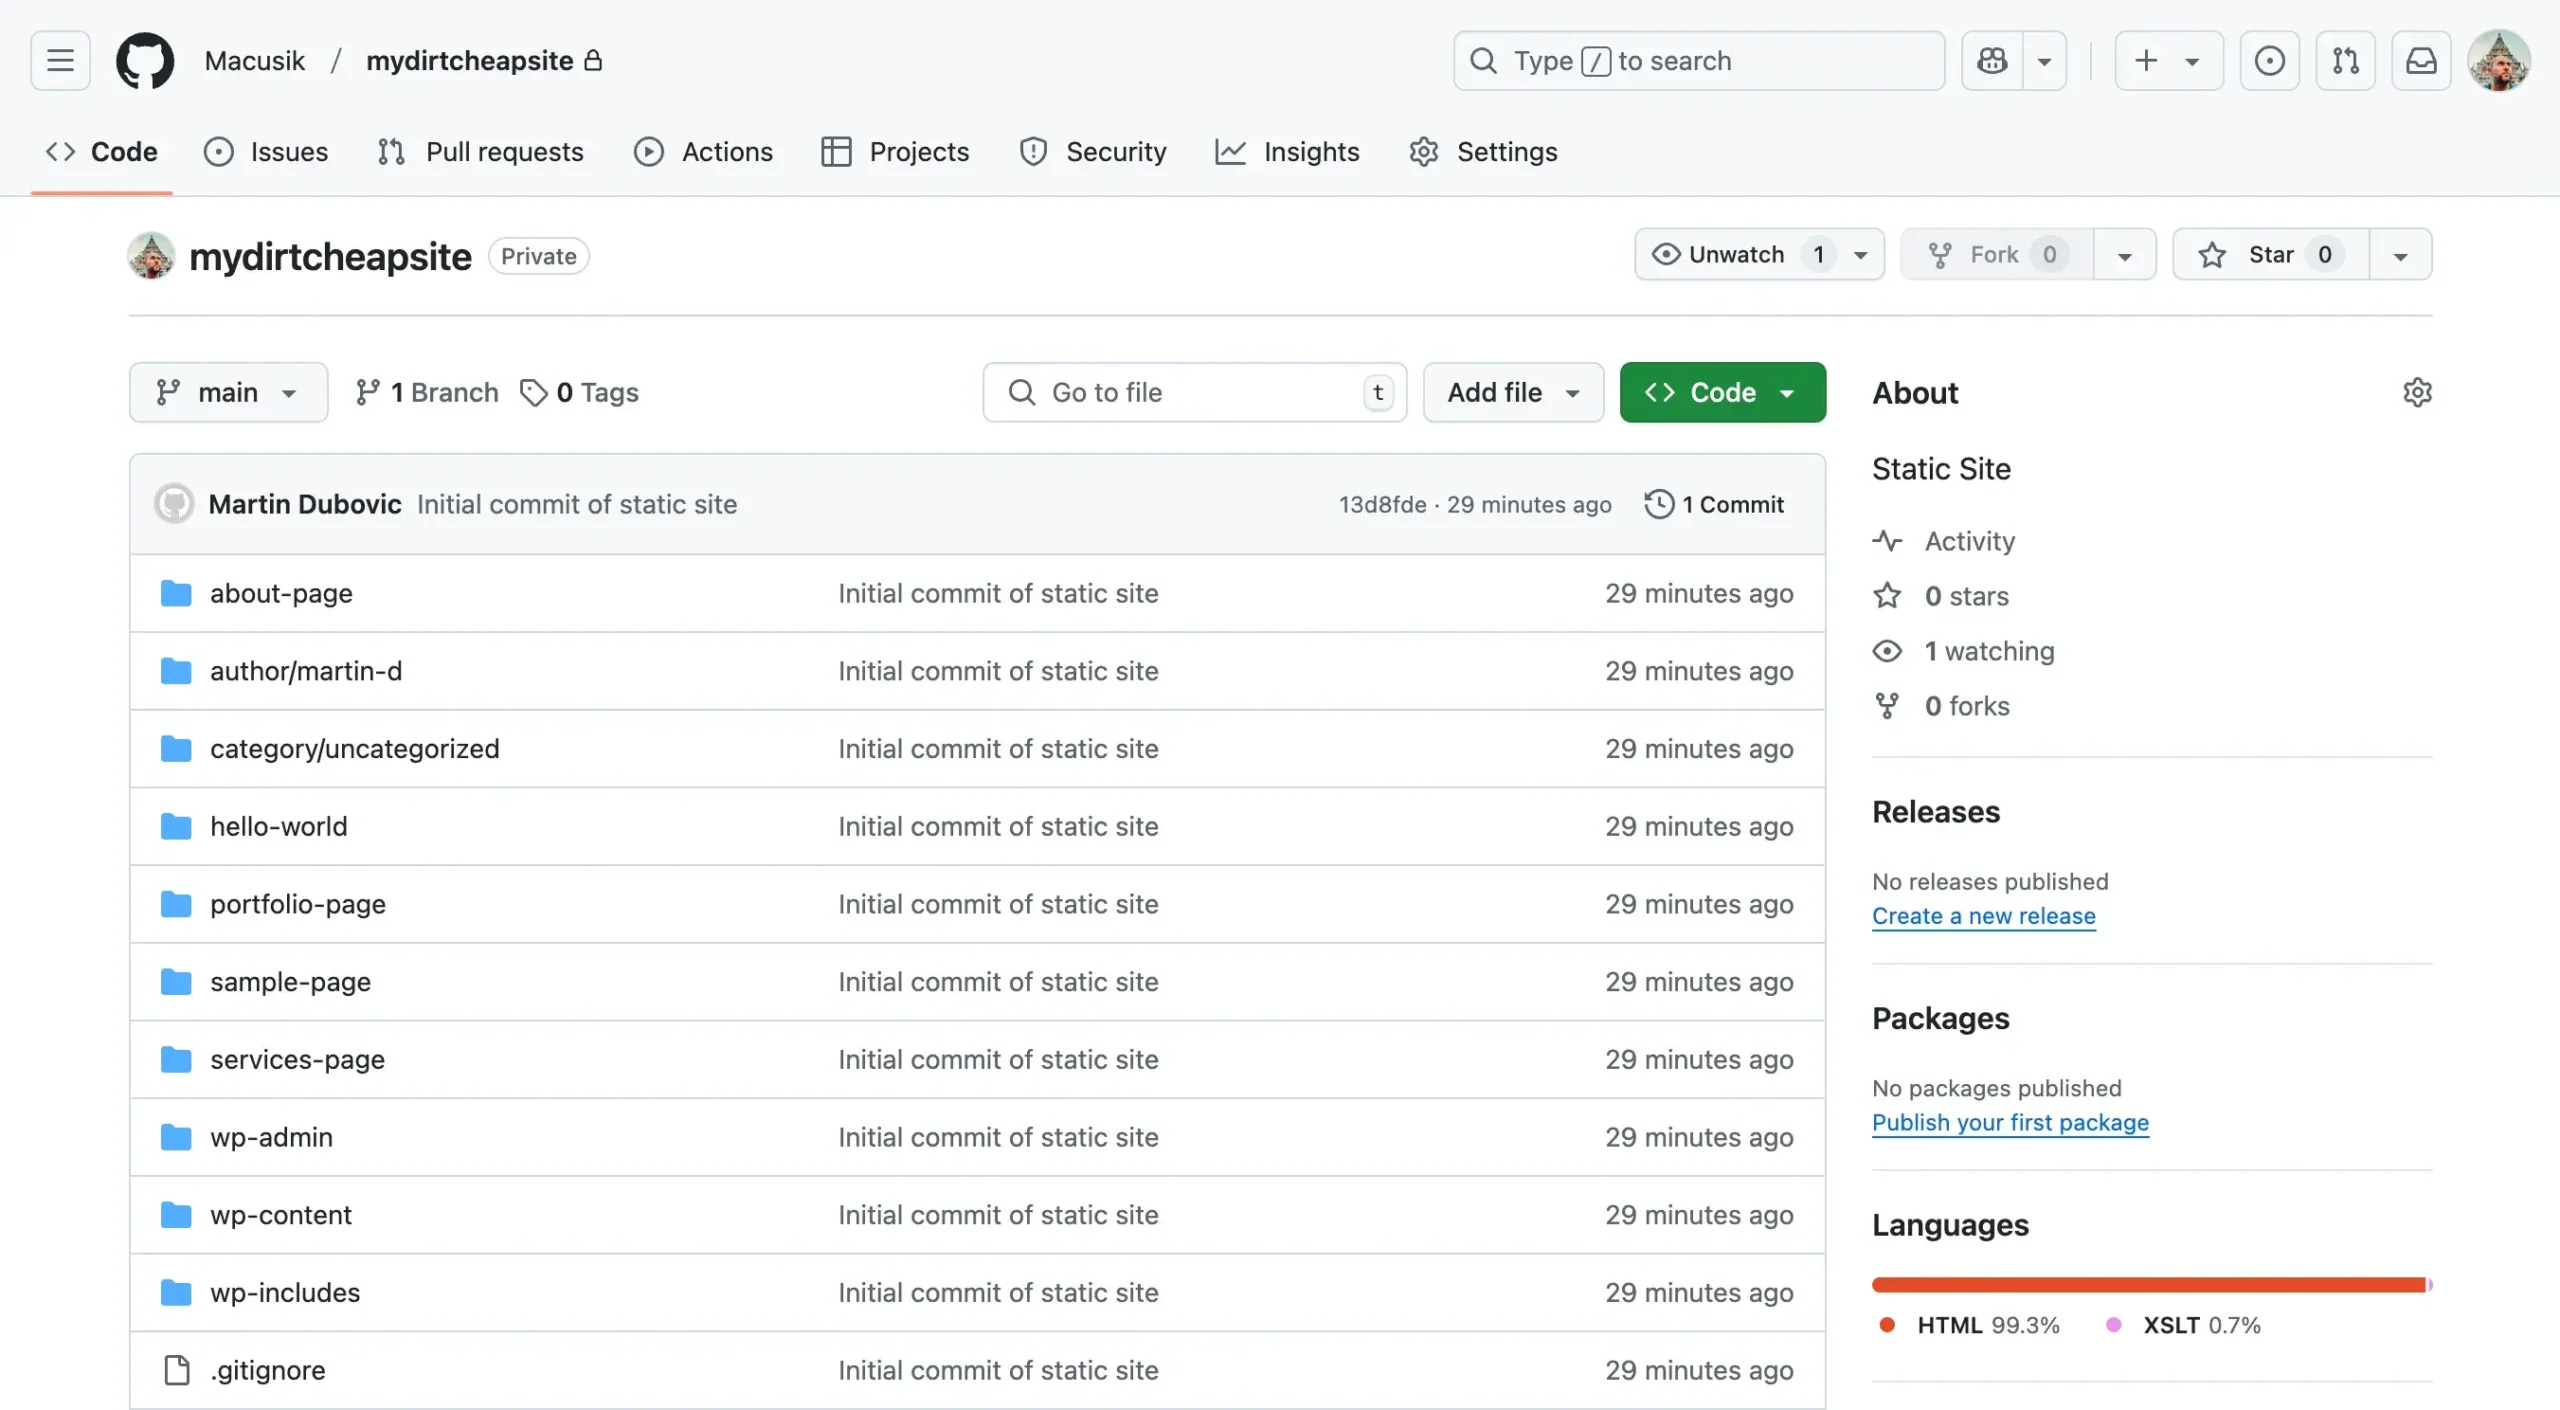
If everything worked correctly, you’ll see output indicating that your files are being uploaded to GitHub. When the process completes, you can refresh your GitHub repository page to see all your static site files now available online:
Phase four: transfer your local WordPress site to Cloudflare Pages
This is arguably the most rewarding step because you finally get to see all the fruits of your labor when the site is deployed. It’s also the easiest and fastest step and mostly consists of clicking your way through some buttons.
To get started:
- Log into your Cloudflare account.
- Use the left sidebar to find Workers & Pages. Tap on it and then click on the submenu item that has the same name (Workers & Pages).
- Click on Pages (next to Workers) near the top of the screen.
- Click the Connect to Git button.
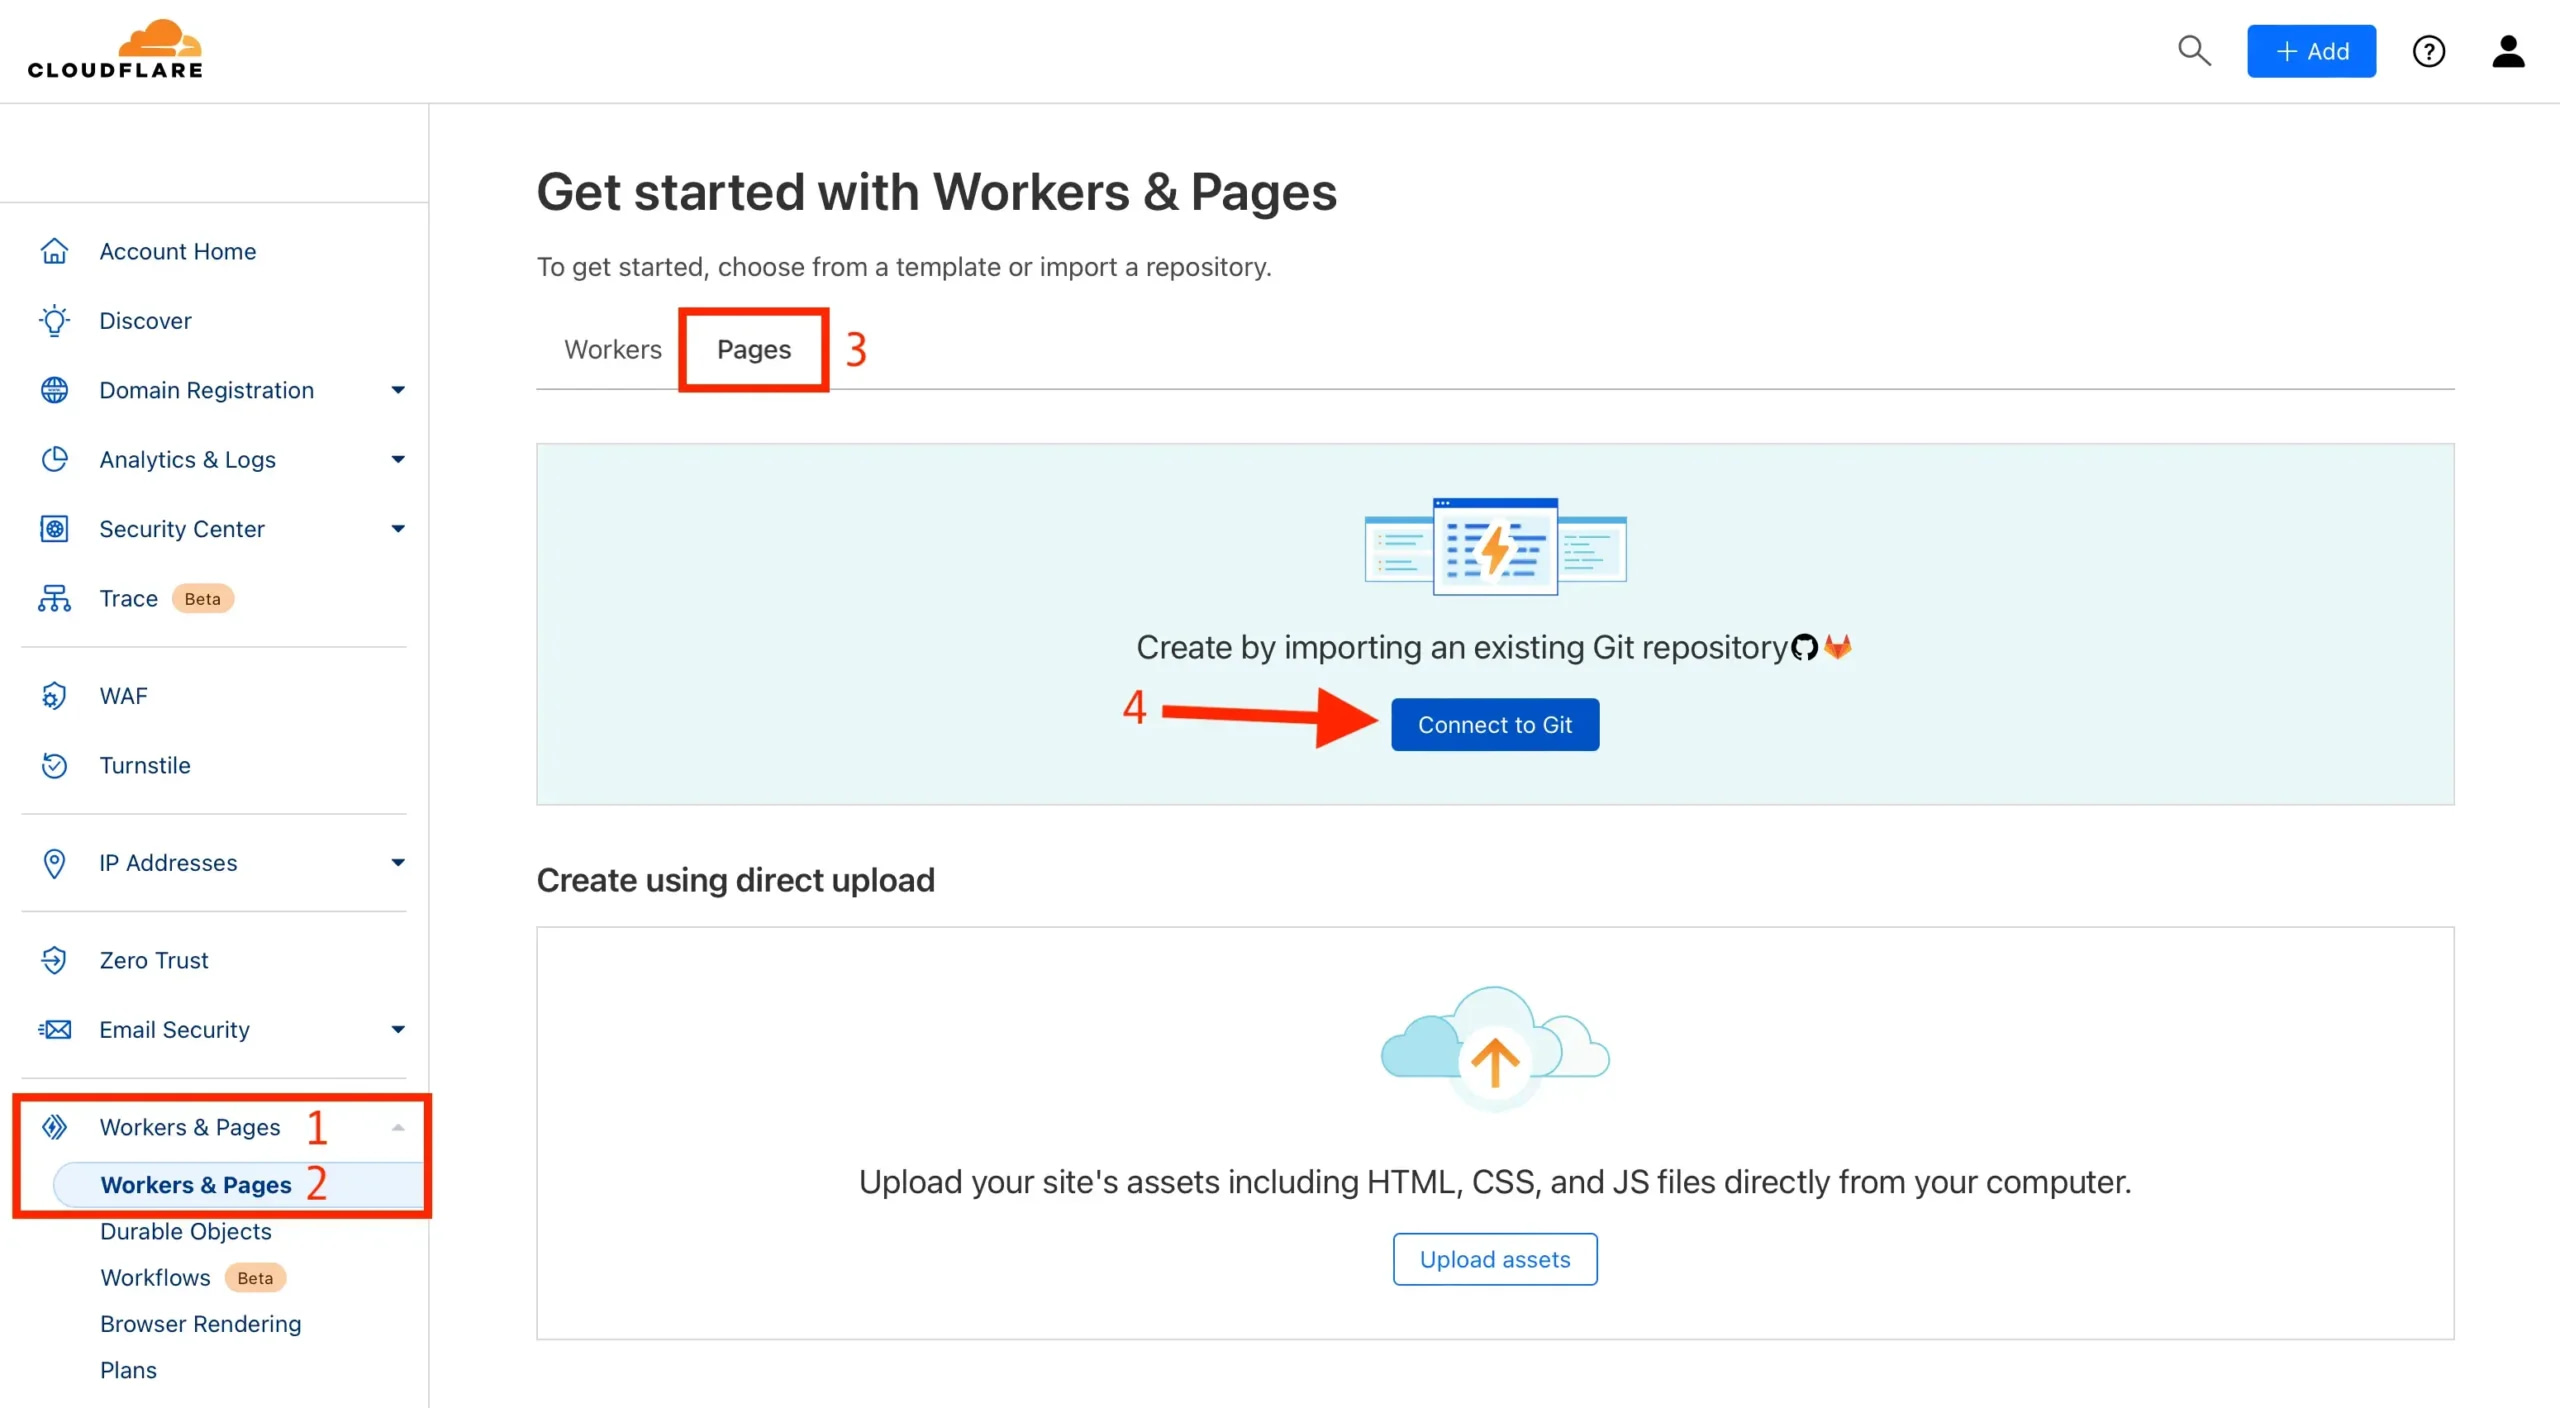
On the next screen (not shown), tap on Connect GitHub.
After that you’ll need to authorize the connection.
You can choose to give permission for all of your repositories or only the particular repository that contains your site. For most of you reading this, this choice probably won’t matter too much initially, but I recommend choosing only the specific repository that has your site files.
When you finish making your selection, tap on Install & Authorize at the bottom of the screen:

The next page has an odd, minor quirk.
If you chose the specific repository as I recommended, then you’ll see it automatically populated in the Select a repository window. However, the Begin setup button will be unavailable to click.
Simply click into the Select a repository window, and that will lift the hold on the button so you can tap it and move forward.
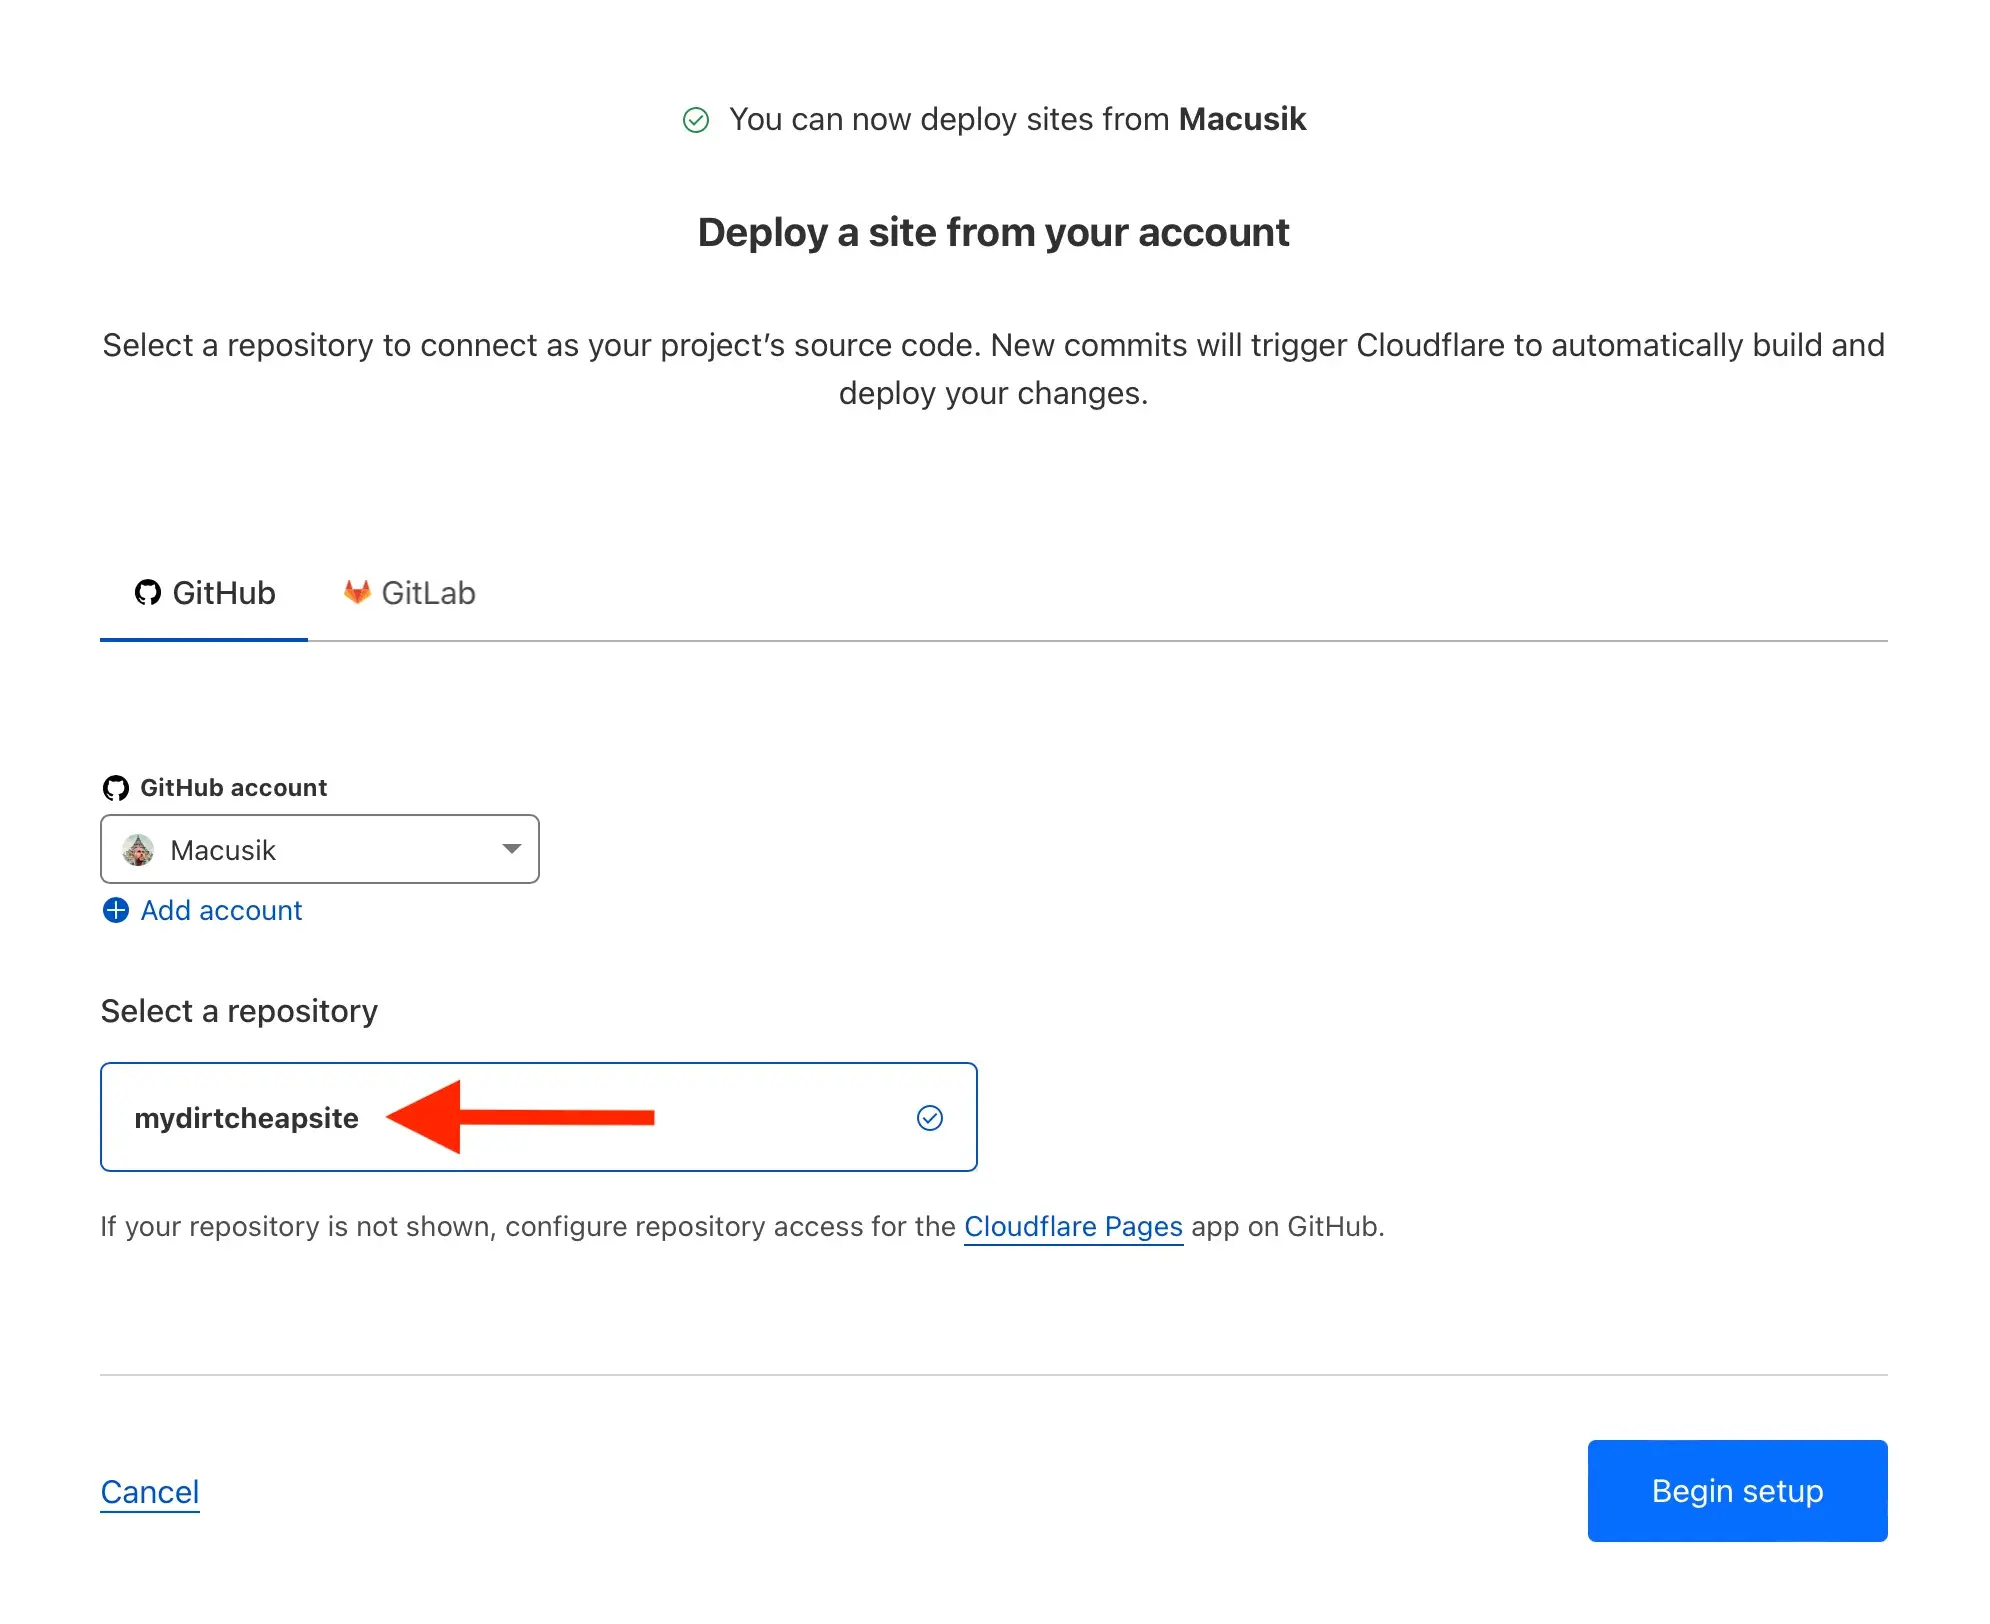
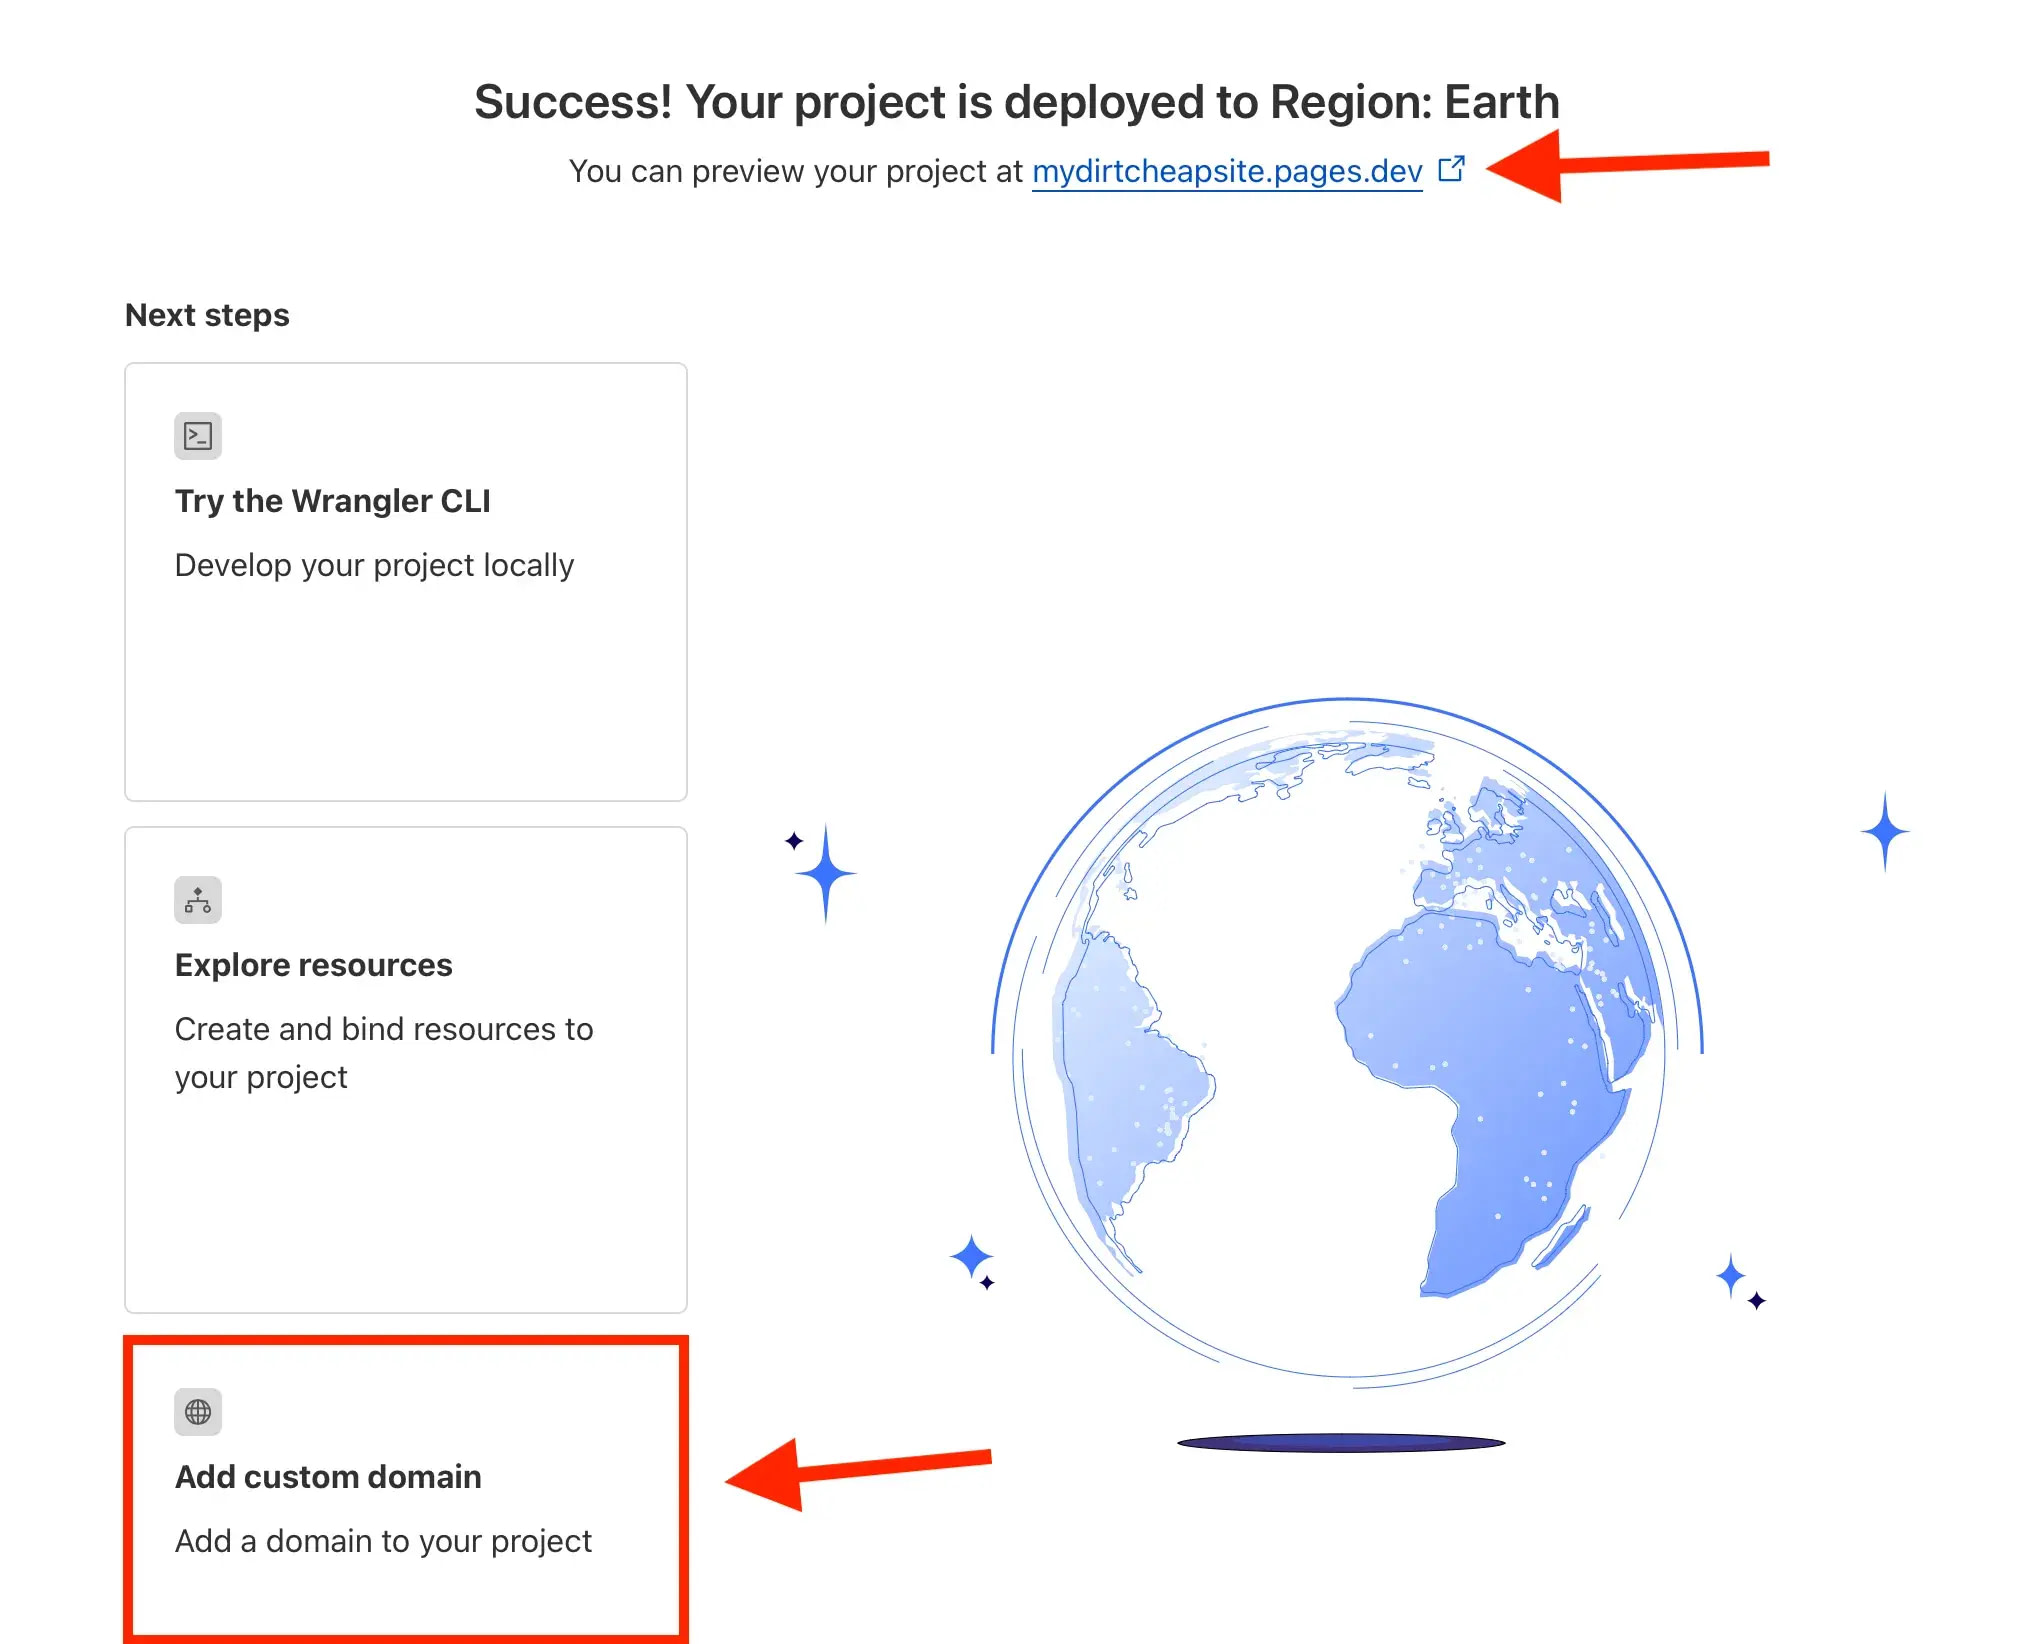
Next, you’ll see Cloudflare work through the process. When it’s all done, your site will be live.
⚠️ Note: It may take a few minutes for it to propagate so if you click on the link and you get an error screen – don’t panic. Give it ~5 minutes and it should work. Keep in mind that this temporary link doesn’t matter anyway because you’ll be connecting your site to your domain.
Click on Add custom domain on the bottom left to complete that step:
Adding the domain is very straightforward – type it into the Domain window and click Continue:
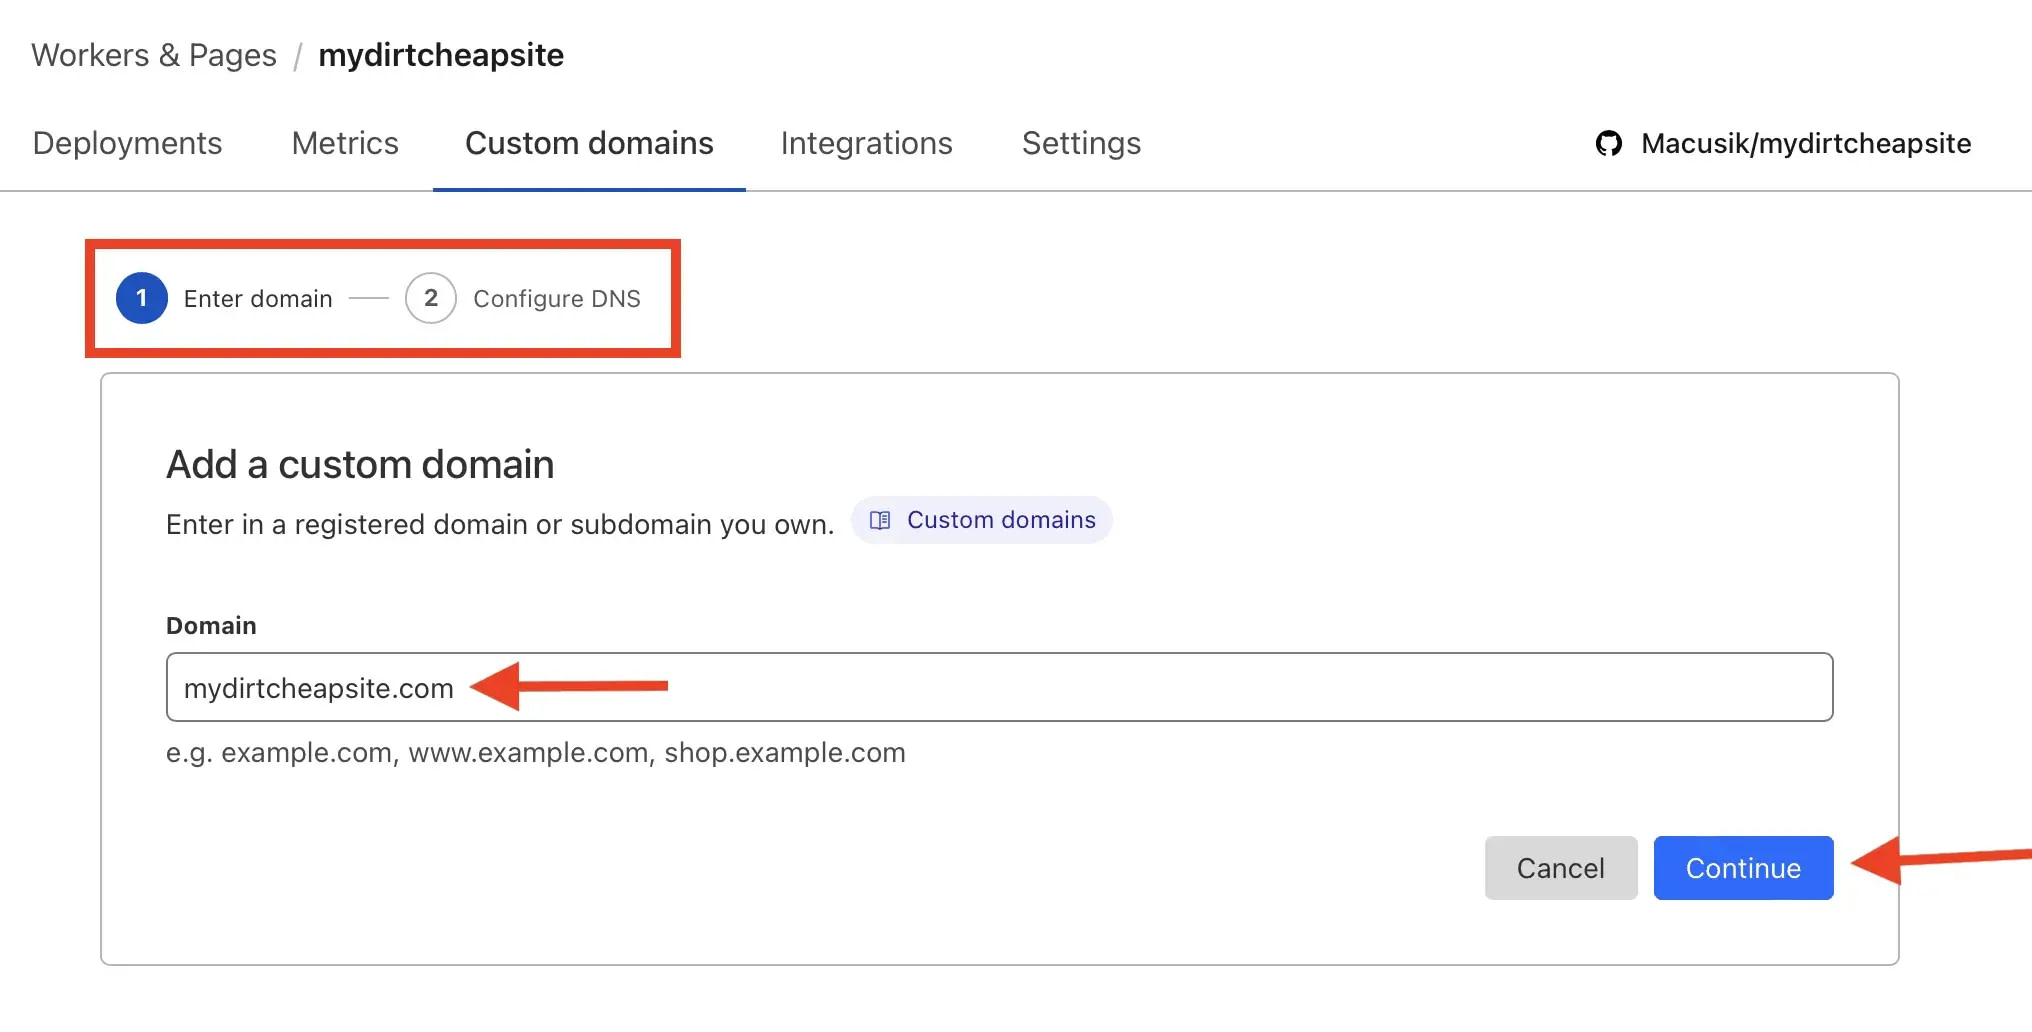
On the next screen (not shown) tap the Begin DNS transfer button to let Cloudflare initiate the DNS transfer. Once the DNS transfer is complete, you’ll be able to add your custom domain to your static WordPress site.
Phase five: create an efficient update workflow
If you’ve made it successfully to this point, you might be tempted to simply call it a day. After all, your WordPress site is now live. You’ve got free hosting, a free SSL certificate, and all things considered, you’re in good shape.
However, unless you don’t plan on updating your site more than maybe once a year, then I would highly urge you to stick with me for this last phase of the tutorial.
The reason why is that updating a static site doesn’t work the same way as updating a site on traditional web hosting.
Every time you make any kind of change and regenerate the static files, you’ll need to commit those changes to GitHub, which then triggers a new deployment on Cloudflare Pages. If you simply overwrite all the files each time, your Git history will become bloated with unchanged files, making it harder to track actual changes and potentially causing slower deployments.
Luckily, there’s a solution to this problem.
Python to the rescue
By using a Python script, you can identify which files have actually changed on your WordPress site when updating it. You then only update those specific files in your Git repository. This approach keeps your repository size manageable while maintaining an accurate record of your site’s evolution.
Here’s how to do it:
Create and modify the Python script
- Make a folder on your Desktop to organize your automation files. You can name it something like
website-toolsto make it easy to remember. - Open up a new document in your preferred text editor. If you’re not sure which text editor to use and you’re on a Mac, you can use TextEdit. For Windows users, you can use Notepad. Both of them come pre-installed on their respective systems.
- Copy the Python script below and paste it into your text editor document.
- Modify
REPO_DIRin the script to match your specific setup. In other words, replace/Users/yourusername/Desktop/static-sitewith whatever the path is that you put into the Simply Static plugin Deploy section.
- Save the file as
update_site.pyin yourwebsite-toolsfolder.
Streamline the workflow
Rather than running the Python script manually every time you need to use it, I’m going to show you how to create a simple shell script (or batch file on Windows) that performs the entire update sequence in one step.
Once again, open a new empty document in your text editor. Copy and paste the code below (relevant to your operating system) into the text editor and save the file with the appropriate name and extension:
- For Mac: Save as
update-website.sh - For Windows: Save as
update-website.bat
Don’t forget to save these files in your dedicated folder (like website-tools in this example) to keep your automation tools organized and separate from your static site files.
With this workflow in place, your update process will be extremely straightforward:
- Make changes to your WordPress site in Local by Flywheel.
- Generate a new static version using Simply Static.
- Run your batch script / shell.
Finish line
First, take a deep breath. You made it all the way to the end.
This guide was not for the faint of heart and is longer than most simple WordPress tutorials about how to install some plugin or use a feature in the block editor.
With that said, moving your WordPress site over to a static deployment is absolutely worth the undertaking in my opinion. The few hours this process takes the first time you do it will pay you dividends for years to come. You’ll have a faster, more secure site with global CDN distribution – and more money in your bank account.
You’re welcome. 😃
If you have any questions or get stuck on any step in the process, just drop a comment below. I’ll be happy to help you out.

