By using cookies you can significantly improve user experience on your site. However, installing tracking cookies without express user consent constitutes a breach of the ePrivacy Directive 2002/58/EC (EU Cookie Law), and can result in a number of issues for European sites. This is why ensuring you make your WordPress site EU Cookie Law compliant is so important.
In this article, we’ll delve deeper into cookies, the EU Cookie Law and what it all means for your website. We’ll also discuss how easy WordPress integrations can help take the hassle and guesswork out of compliance. Let’s dive in!
What Are Cookies?
First let’s cover what exactly cookies are. When it comes to websites “cookies” are not the traditional gooey goodness you’re used to – instead they’re information files stored in the browser that contain data specific to a website visitor. They contain information relevant to your experience using a website. For example, cookies might retain a user’s search history, remember login details, or make product recommendations based on previous purchases.
How Are Cookies Used in WordPress?
With WordPress cookies are mostly used to login you into a website. Currently WordPress stores a cookie upon login to verify/store your authentication (for the backend/admin panel), another cookies to indicate that your specific user account is logged in and a few other cookies to personalize how the admin panel (or even the main website) interface appears to you. Cookies are also stored when users leave a comment.
Depending on the plugins installed or third party services being used there could be more cookies scattered around your website. For example, if you’ve added a push notifications plugin or if you’re using Google Adsense that’s at least a couple more cookies on your website that you should be aware of.
How This Applies to You
Based on the info above it’s pretty safe to assume that everyone using WordPress is also using cookies. The important part here is to disclose to your readers that you’re using them. Currently in the USA, informing visitors of your use of cookies and their purpose in your privacy policy is enough (though there are state level laws that may require more detailed information). But for European based sites (and websites targeting the European market) the rules are a bit stricter.
What Is the EU Cookie Law?
Since cookies may acquire private user information (for instance if they are used for tracking) the EU Cookie Law was formulated to ensure that these details can only be acquired with a user’s consent. Although there are certain kinds of cookies that are exempt from the law, in most cases you’ll need to do the following if you use them on your site:
- Let your users know cookies are in use
- Tell your users what the cookies are being used for
- Give users the option to opt in or out of being tracked by cookies
And you’ll need to do this before visitors begin using your website. Failing to comply with the EU Cookie Law could result in incurring a fine, not to mention losing the trust of your users (which can be devastating if you use your website for business).
Before you start panicking, you should know it isn’t too difficult to make your WordPress site EU Cookie Law compliant. In fact, it’s pretty easy.
How to Make Your WordPress Site EU Cookie Law Compliant
There are three steps you’ll need to follow in order to make your WordPress site EU Cookie Law compliant. We’ll walk through each one in turn. Along the way, we’ll also cover how the Iubenda Cookie Solution plugin can help with the process.
Cookie compliance can be broken down into 3 main steps: a privacy/cookie policy, visible notice on your website and user consent. If you’re a developer you can likely create a simple cookie popup yourself, but for most folks a plugin makes this so much easier.
One option is to simply create your own privacy policy then add a cookie notice to your site with a free plugin, like the Lucky WP Cookie Notice. It’s a simple and quick way to add a basic notice to your site.

Or you could use the Cookie Consent by Securiti to create a more advanced custom banner for your site. The plugin is quick and easy to use, offering plenty of options for text, branding, colors and placement and is compliance with GDPR, CCPA and many other web privacy regulations. Plus with the built-in free Securiti scan you can be sure that all cookies on your site are properly identified and disclosed for users to opt in or out of. And the plugin collects required consent records and makes maintenance easy thanks to real-time privacy policy updates as new cookies are registered.

Another option is to use a policy generator & cookie notice such as the Iubenda Cookie Solution. With this plugin you can easily link to your cookie policy from a prominent banner on your site. Once a user is directed to the policy, they can read through instructions about how to manage their cookie preferences, and give or deny permission for their use. You have the option to link to your own previously-created cookie policy, or easily create a new one with Iubenda’s privacy and cookie policy generator. What’s more, this plugin automatically blocks cookies prior to obtaining user consent.
Any one of these plugins is a step in the right direction to make your WordPress site EU Cookie Law compliant.
Step 1: Have a Cookie Policy In Place

Your policy document (or “extended notice”) should comprehensively detail your site’s use of cookies. In order to be compliant with the law, this document should include each of the following points.
- A statement clearly informing users that cookies are in use on your website
- An explanation of what cookies are
- An explanation of what kinds of cookies are in use (by you and/or third parties)
- A clear overview of how and why you (and/or third parties) are using cookies
- And an explanation of how users can opt-out of having cookies placed on their device(s)
Creating a cookie policy to address these points is necessary. WordPress just so happens to make this pretty easy. Just use the built-in Privacy Policy template under Settings > Privacy. Simply edit the template to include information (and cookies) related to your site.
Alternatively, you can use a service such as Iubenda to generate your policy. For this you will first need to create an account, select a pan (don’t worry – they offer a free lite plan) and then follow a few simple steps to generate your policy. Once your policy is set up, you will receive a code. Be sure to keep that code handy, as you’ll need it to add your privacy policy to your WordPress site.
Step 2: Place a Consent Banner on Your Site
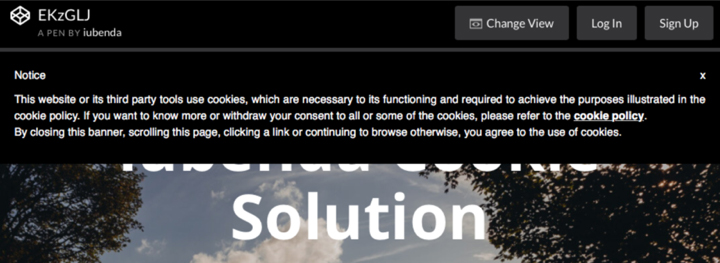
With your privacy policy ready, you’ll now need to add a consent banner (or brief notice) to your website. This should be prominently displayed so it’s the first information a user sees when they visit your site. The important information to include here is a notice that your site does use cookies as well as a link to your policy.

If you’ve created your own privacy policy page you can use any basic cookie notice plugin to add a simple statement (with links) on your homepage. One good option is the LuckyWP Cookie Notice. This plugin includes easy options to add a cookie use disclaimer, Accept/Reject buttons, read more link (to point to your privacy policy), expiration of acceptance and the ability to include added scripts on the page after a user has consented.
If you’ve used Iubenda, you’ll need to use their free Cookie Solution plugin to add your cookie policy and a consent banner to your site. After you install and activate the plugin a new tab should appear in your dashboard labeled Iubenda. You will need to enter your Iubenda code from step 1 in order to add the cookie policy and banner to your site.

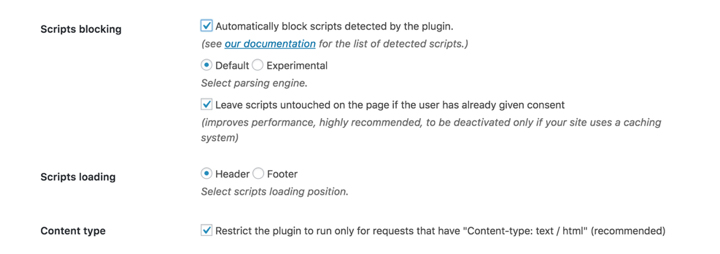
You’ll also have the option to configure a number of settings for your cookie banner. You can select whether you want it to appear in your header or footer, and even automatically block certain scripts.

Once you’ve made your selection, click on Save Changes.

Your banner, and the policy it links to, will now be displayed on your site!
Step 3: Allow Users to Give Consent
As we touched on earlier, when you make your WordPress site EU Cookie Law compliant you’ll need to give users the opportunity to accept or decline the use of cookies. If a user does not actively give their consent, you’ll need to block all scripts that install cookies. This should be triggered if a visitor rejects cookies, or simply fails to choose the “I accept” option.
Fortunately, most cookie consent/notice plugins offer this feature and the Iubenda Cookie Solution plugin is no different. It will automatically detect and block scripts associated with cookies (including scripts from Google, Facebook, YouTube, etc) as well as enable you to manually block additional resources as you see fit.
Conclusion
User privacy is one of the biggest we security issues so far in 2018. As such, it’s more important than ever to ensure that your cookie policy and notifications are watertight. Fortunately plugins like LuckyWP Cookie Notice and Iubenda can make this task much easier for WordPress.
Do you have any questions about EU Cookie Law compliance? Or how to make your WordPress site EU Cookie Law compliant? Let us know in the comment section below!

