Do you want to move a site from a WordPress multisite to a single install?
If you run a WordPress multisite network, sometimes, you may need to move one of the websites to its own separate WordPress install.
In this article, we’ll show you how to easily move a site from WordPress multisite to its own single install while preserving SEO rankings and all your content.
Step 1: Getting Started
To move a website from a WordPress multisite network, you’ll need a domain name.
If you already have a domain name where you want to install the single site, then you are good to go.
If you don’t have a separate domain name, you’ll need to register and add a new domain name to your hosting account.
We recommend using Domain.com. They are one of the best domain name registrars in the world and offer beginner-friendly domain management experience.
For more details, see our article on how to register a domain name.
Alternatively, you can buy a separate hosting account and domain name for your fresh WordPress install.
We recommend using Bluehost. They are offering a free domain name with a generous discount on hosting.
Basically, you can get started for $2.75 per month.
After getting your domain name and hosting, the next step is to install WordPress.
See our step-by-step WordPress installation tutorial if you need help.
Important: Since you are going to make some serious changes to your WordPress multisite, it is necessary to create a complete WordPress backup before you do anything else.
Now that everything is set up, let’s move a site from WordPress multisite network to its single install.
Step 2: Exporting a Single Site in WordPress Multisite Network
The built-in WordPress import/export functionality works the same way in multisite as it does on a single site install. We will use the default tools to export the data from a site on a WordPress multisite network.
First, you need to log in to the dashboard of the single site you want to move, and then click on Tools » Export.
Next, you want to ensure all content is checked and click on the Download Export File button.
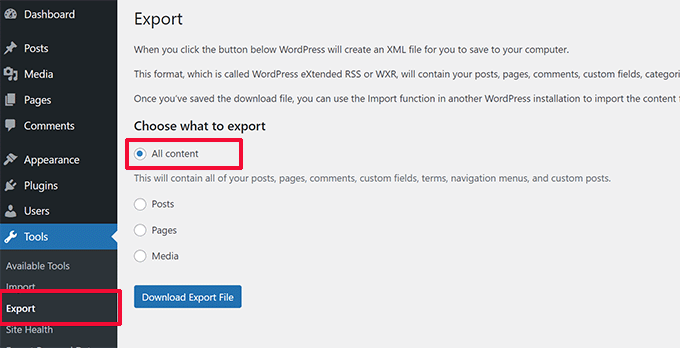
WordPress will now create an XML file containing all your data and send it to your browser for download.
Be sure to save the file on your computer because you will need it later.
Step 3: Importing Child Site to New Domain
Login to the WordPress admin area on the new location where you want to move your child site and then go to Tools » Import. On the import screen, WordPress will show you a number of import options.
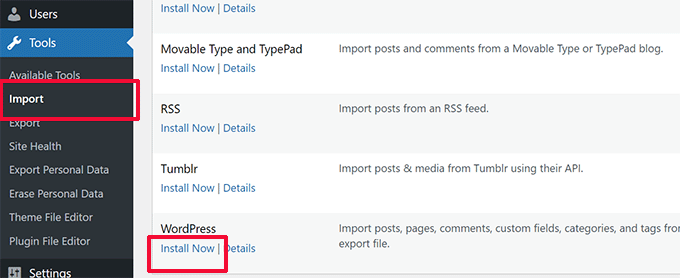
You need to click on the ‘Install Now’ link below ‘WordPress.’
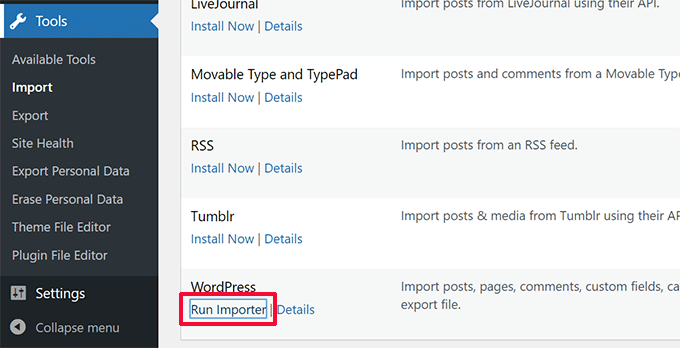
Wait for the importer to be installed and then click on the ‘Run Importer’ link.
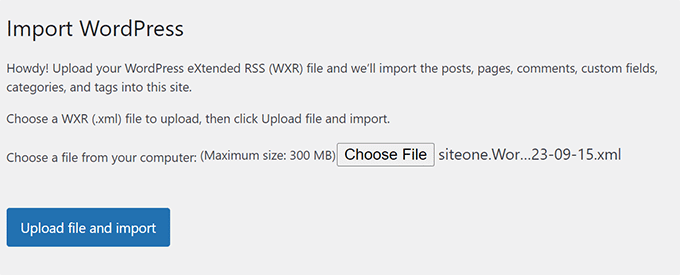
On the next screen, you will be asked to upload the WordPress export file you downloaded earlier from the WordPress multisite.
Click on the Choose file button to select the file from your computer and then click on the ‘Upload file and import’ button.
On the next screen, WordPress will ask if you would also like to import users. If you do nothing, then WordPress will import all users. This is recommended if you do not want to change authors.
You will also see the Import Attachments option, and you want to make sure it is checked so that WordPress can download images from your posts and pages.
Don’t worry if it misses out on some or most of your images. You can import them separately afterward.
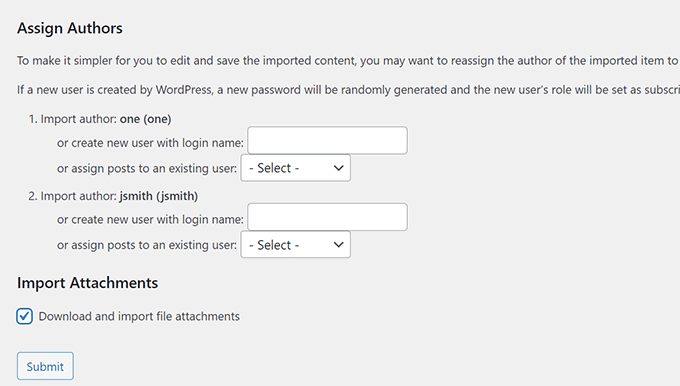
Click on the ‘Submit’ button to continue.
WordPress will now start importing your content. This will take a few minutes depending on how much content you have. Once it is done, you will see a notification that says ‘All done. Have fun!’

That’s all. You have successfully imported data from a multisite network child site to an individual WordPress install. There are still a few things left to do.
Step 4: Setting up Redirection
If you were using WordPress multisite with custom domains, then you don’t have to set up any redirection.
However, if you were using subdomains or directory structures in your WordPress multisite, you need to set up redirection so that users coming to your old URLs are redirected to your new site.
There are two ways to do this. You can set up a redirect using a WordPress plugin (recommended), or you can add some code to your WordPress .htaccess file.
We’ll show you both methods, and you can choose the one that best suits you.
Note: Make sure that your old site on the multisite network and the site on the new domain are both using the same permalink structure.
Method 1. Setting Redirects Using All in One SEO for WordPress
This method is easier and recommended for all users. We’ll be using All in One SEO for WordPress, which is the best WordPress SEO plugin on the market.
It allows you to easily optimize your WordPress site for search engines and comes with powerful features like SEO analysis, custom XML sitemaps, Schema.org support, and a redirects manager.
First, install and activate the All in One SEO for WordPress plugin on your WordPress multisite and then Network Activate it for the child site. For more details, see our guide on network activating plugins on WordPress Multisite.
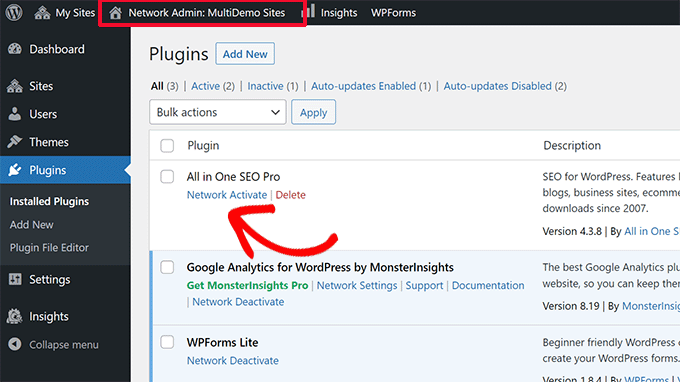
Note: You’ll need at least the Pro plan to access the Redirection Manager feature.
Next, you need to install and network activate the Redirection Manager addon. You can find it under ‘Downloads’ from your account page on the All in One SEO website.
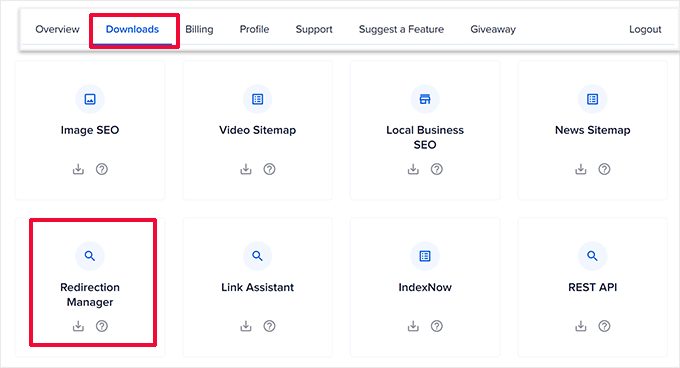
Once you have network-activated both plugins, you need to switch to the dashboard of the child site.
From here, go to the All in One SEO » Redirects page and switch to the ‘Full Site Redirect’ tab.
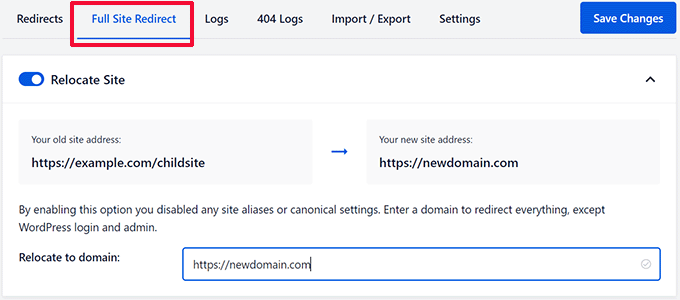
First, turn on the Relocate Site option by toggling the switch next to it.
Then, enter your new site’s domain name next to ‘Relocate to domain’ option.
Now click on the Save Changes button to store your settings.
All in One SEO for WordPress will now redirect users to your new domain name.
Method 2. Setting up Redirects using the Redirection Plugin
First, you need to install the Redirection plugin on your WordPress Multisite.
You can Network Activate a plugin, or you can log in as Super Admin on your child site and activate the Redirection plugin for that particular site alone.
After that, you need to visit the admin dashboard of the child site for which you want to set up the redirect.
Redirecting from Subdomain to New Domain
The Redirection plugin makes it super easy to point a domain name to a different one.
Simply go to the Tools » Redirection page and switch to the ‘Site’ tab.
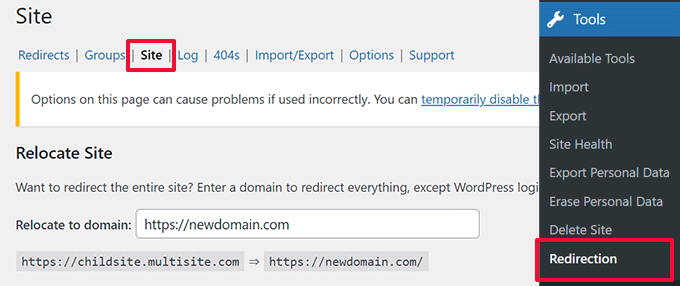
Simply enter your new domain name and then click on the ‘Update’ button to save your settings.
The plugin will redirect all your site users to your new domain name with the correct permalink structure.
The advantage of this method is that you can still log in to the admin area of your old subdomain.
Redirecting from Directory to New Domain
If your multisite uses a directory-based URL structure, then the Redirection plugin makes it easy to redirect it properly to your new domain.
Simply go to the Tools » Redirection page on your sub-site, and then click on the Add New button at the top.
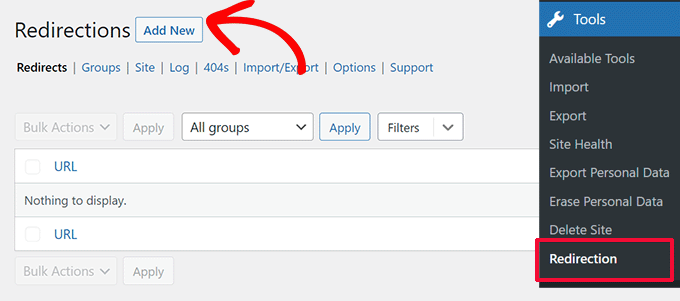
This will take you to Redirection’s setup form. Here is how you need to fill in that form:
Source URL: ^childsite/(.*)$
Target URL: https://example.com/$1
Be sure to replace childsite and example.com with the name of your subsite and its new location.
Don’t forget to change select ‘Regex’ from the dropdown to the right, and then just click on the Add Redirect button to save your settings.

You can now visit your sub-site to see the redirects in action.
Method 2. Setting up Redirects Using .htaccess file
For this method, you need to add redirect rules to the .htaccess file in your WordPress hosting account for your multisite network.
Subdomain to New Domain Redirect
For subdomain installs, you need to use this code in the .htaccess file of your WordPress multisite.
Options +FollowSymLinks
RewriteEngine on
RewriteCond %{HTTP_HOST} ^subdomain.example.com$ [NC]
RewriteRule ^(.*)$ http://www.example.net/$1 [L,R=301]
This code redirects visitors coming to any page on subdomain.example.com to http://www.example.net. The $1 sign at the end of the destination URL ensures that your users land on the same page they requested.
Redirecting From Directory to New Domain
For directory-based multisite installs, you’ll need to paste the following code in the .htaccess file of your WordPress multisite.
Options +FollowSymLinks
RewriteEngine On
RewriteRule ^childsite/(.*)$ http://example.net/$1 [R=301,L]
This code simply redirects any users coming on http://www.example.com/childsite/ to http://example.net. The $1 makes sure that your users land on exactly the same page or post they requested.
Don’t forget to replace childsite and example.net with the name of your subsite and its new location.
Step 5: Troubleshooting the Migration
Moving a site is not a routine task, so it is likely that you may come across some issues.
1. Export File Too Large – If your WordPress export file is too large, you may fail to import it properly. To fix this, you may need to split large XML file into smaller pieces.
2. Images Not Imported – Another common issue is that images may not import correctly to your new site. To fix this, you can try importing them as external images.
3. Redirects Not Working – If users are not being redirected correctly to your new site, then you need to carefully review your redirect settings. Make sure that your single install and the child site are both using the same Permalinks structure.
For other issues, see other common WordPress errors and how to fix them.
We hope this article helped you move a site from a WordPress multisite to a single install. You may also want to review our WordPress SEO checklist for your new install or try these essential WordPress plugins on your fresh site.
If you liked this article, then please subscribe to our YouTube Channel for WordPress video tutorials. You can also find us on Twitter and Facebook.

