Did you know you can receive an SMS notification each time a form is submitted on your WordPress site, eliminating the need for constant email or active website monitoring? If you’ve been searching for a practical method to stay updated on new inquiries from your site visitors, implementing SMS notifications from your contact form is an excellent starting point.
But how do you set up this feature? This article will discuss the benefits of sending SMS notifications from your WordPress contact form and outline the necessary steps to get started.
There are many reasons why you might want to send SMS notifications related to your WordPress site. Among them are many benefits to enhance communications with your team and site visitors.
Improved Response Time
Integrating SMS notifications with your WordPress contact form lets you and your team receive messages directly on your mobile devices, significantly reducing response time. This is particularly useful when providing quick customer support or dealing with urgent inquiries. Immediate attention to your users’ concerns can increase customer satisfaction and improve your business’s reputation.
Convenience
Receiving SMS notifications eliminates the need to constantly check your email for new messages. It saves time and keeps you updated on your website’s activities, even on the go. Since most people have their mobile devices with them all the time, you can easily stay connected to your users without being tied to your computer.
Increased Efficiency
By sending SMS notifications, you can filter and prioritize messages based on their urgency. This allows you to address important issues immediately and schedule non-urgent matters for later, resulting in a more efficient workflow.
Sending SMS notifications from your WordPress contact form offers plenty of benefits, but you must set up the system first. If you want to hire external help, you can expect to pay at least $40 per hour for a front-end developer who can do this for you. However, setting up this system yourself isn’t actually that complicated, as we’ll outline below.
Step 1: Choose a Suitable SMS Gateway
An SMS gateway is a service that sends SMS messages from your WordPress contact form to your mobile device. Various SMS gateway providers are available, with different pricing plans and features. Popular choices include TextMagic, Twilio, Plivo, and Clickatell. Compare the services offered and their pricing and features to choose the best option for your needs.
Step 2: Install and Configure a Contact Form Plugin
To start sending SMS notifications from your contact form, install a WordPress contact form plugin that supports SMS notification integration.
Several options are available, such as:
- WPForms – WPForms is a popular WordPress plugin allowing you to easily build and manage online forms. It offers an intuitive drag-and-drop interface, making it a great choice for beginners and non-technical users. Besides basic contact forms, you can also create email subscription forms, order forms, and more. WPForms integrates well with many SMS gateway services, allowing for the efficient setup of SMS notifications.
- Contact Form 7 – Contact Form 7 is one of WordPress’s most widely used contact form plugins due to its simplicity and flexibility. It lets you manage several contact forms and supports kismet spam filtering, AJAX-powered submitting, and CAPTCHA. While it doesn’t natively support SMS notifications, you can extend its functionalities with additional plugins like Contact Form 7 – SMS Alert, which allows you to send SMS notifications upon form submission.
- Fluent Forms – Fluent Forms is a powerful and fast form builder plugin for WordPress. It features a user-friendly interface, form fields, and customization options. With its advanced conditional logic, you can create highly personalized forms. Fluent Forms provides integrations with numerous third-party services, including SMS gateway providers, enabling the feature of SMS notifications.
Other plugins are also available, and different contact forms support different SMS providers. So browse around to see what best suits your needs. Ensure your chosen plugin is updated at least once a year for proper security and functionality.
To install a plugin, go to your WordPress dashboard, select “Plugins,” then click “Add New.” Then, if you’re using a free option, search for your chosen option and click “Install Now.” Though if you’ve chosen a premium plugin (or upgraded your version of WPForms or Fluent Forms) you’ll need to upload the zip file provided by the plugin developer to install. Once the plugin is installed, activate it to get started.

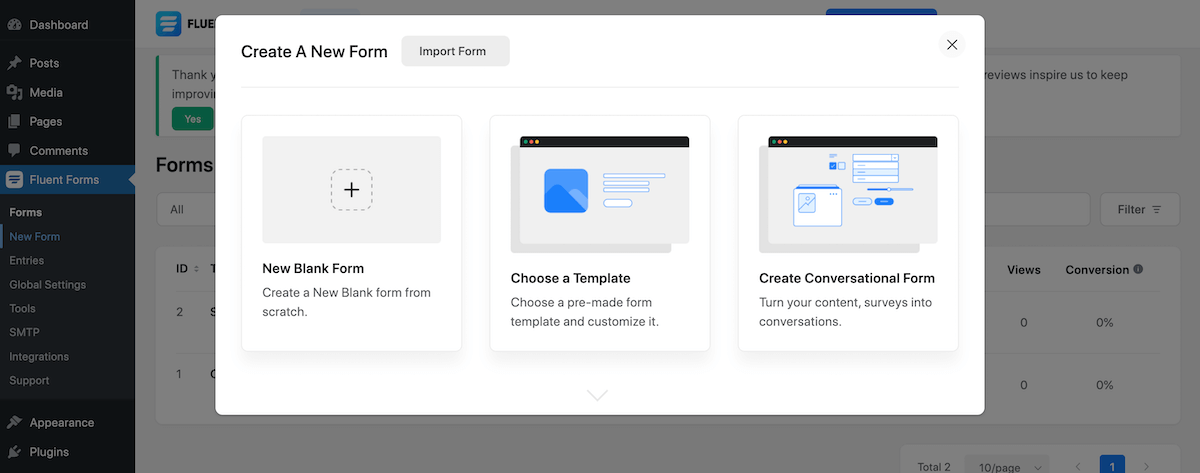
After activating your plugin, look for a section to “Add New” and create a new contact form. Name your form and choose a template to begin. From there, customize the form fields as needed. This will change based on the plugin you choose, but most contact form plugins have an intuitive visual editor or use simple form tags (such as in Contact Form 7’s case) to add fields.
Step 3: Publish Your Contact Form
The process for adding the contact form to your website may vary slightly depending on the plugin you are using. Generally, you can follow these steps:
- Create or edit the page or post where you want to display the contact form.
- Click the “Add Block” button in the WordPress editor and search for the block associated with your contact form plugin (e.g., WPForms, Contact Form 7, or Fluent Forms).
- Select the appropriate block and choose the contact form you want to display from the dropdown menu or by entering the form’s shortcode.
- Update or publish your page or post, and your contact form will now appear on your website.
Step 4: Configure SMS Notification Settings
To set up SMS notifications, you must integrate your chosen SMS gateway with your contact form plugin. The process may vary depending on the plugin and SMS gateway you choose. Here’s a general outline of how to configure SMS notifications.
First, sign up for an account with your preferred SMS gateway provider. Follow the provider’s instructions to obtain necessary credentials such as API keys, Account SID, or Auth Token.
Next, install the required add-on or extension for your contact form plugin that enables SMS notification integration. This may involve searching for and installing the add-on from your WordPress dashboard or downloading and uploading it manually.

You can choose a general purpose solution like WP SMS messaging and SMS notifications for many WordPress features. This specific plugin integrates with Contact Form 7, GravityForms, QuForm, WooCommerce, EDD and more. Plus it supports more than 300 SMS gateways, so you have lots of options.
Alternatively you can also use a solution specific to your contact form. Using the same contact form plugin examples mentioned above:
- WPForms requires the use of a Zapier integration to enable SMS, which is available as a part of their Pro or Elite plans
- Contact Form 7 has a few free third party SMS add-on plugins, such as this free Twilio integration
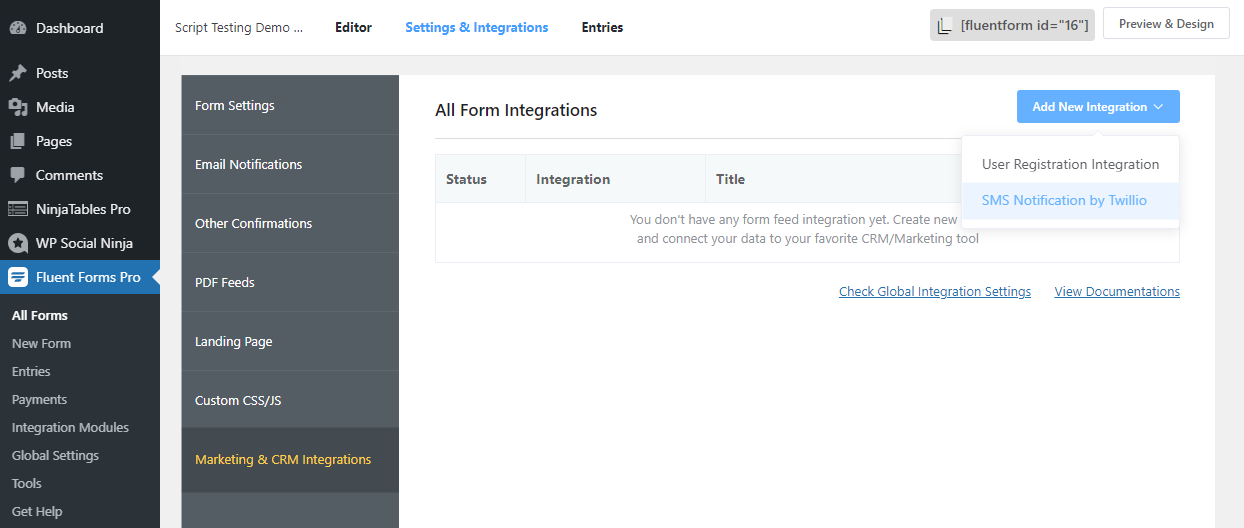
- Fluent Forms includes a Twilio integration with all premium plans that can be enabled from the Integration Modules page
You will need to configure the settings for your SMS gateway in the contact form plugin. This usually involves entering the API keys, Account SID, or Auth Token obtained from the SMS gateway provider. Some plugins may also require you to configure additional settings, such as the phone number you want the notifications sent to and the phone number or sender ID from which to send the messages.
Then you can set up SMS notifications for each contact form you want to receive notifications for. This typically involves navigating to the plugin’s form settings or notifications section and configuring the appropriate fields. You may need to specify the recipient’s phone number, the sender’s phone number or sender ID, and the SMS message template.

For example with Fluent Forms, you can add an SMS service in the global settings then enable SMS from the Marketing/CRM integration tab on each individual form you create. It’s quick and easy!
Step 5: Test Your SMS Notifications
Your last step in making your contact form live is to ensure the SMS notifications are working correctly. Submit a test entry through your contact form and check if you receive an SMS notification on your mobile device. If everything is set up correctly, you should receive a message containing the details of the test entry.
Integrating SMS notifications with your WordPress contact form is a valuable addition that can significantly improve your website’s user experience and streamline your workflow.
The benefits of utilizing SMS notifications include improved response time, increased convenience, and heightened efficiency in handling inquiries. Carefully selecting an SMS gateway provider and a compatible contact form plugin allows you to set up a seamless SMS notification system that keeps you connected to your users even when you’re away from your computer.
In the end, staying informed about new submissions and prioritizing urgent matters can provide a better user experience for your website visitors, leading to higher customer satisfaction and a better reputation for your business.
Regularly evaluating the performance of your SMS notification system and making any necessary adjustments will help maintain its effectiveness and ensure continued success in connecting with your users.

