In this article, we’ll go over what file permissions are and how they work. We’ll also discuss the ideal permission settings for WordPress and show you how to set them. Let’s get to it! 🙋♂️
An introduction to file permissions
File permissions determine who can read, write, and execute files and directories. In the context of WordPress, file permissions can limit access to your site’s core files to keep them secure.
👉 WordPress file permissions are based on Unix-based systems. That means the administrator can assign any of the following permissions to a file or directory:
- Read (r): The ability to read the contents of a file or list the contents of a directory.
- Write (w): You can modify a file or directory, including creating, editing, or deleting it.
- Execute (x): This permission enables you to run a file as a program or script, or enter a directory.
As the administrator, you should be the only person with a full set of permissions. Other users should be assigned permissions depending on their role and what they need to do. As a rule of thumb, no user should have more permissions than are required to carry out their work.
When you change file permissions in a Unix-based system, you do so using a numerical system. Each file and directory has unique permission settings codified in three-digit numbers. The first number represents who owns the file/directory; the second represents user accounts in owner groups; and the third represents public users.
👉 Aside from those figures, each action corresponds to a different number. Read is four, write is two, and execute is one. Here are some examples of what these file permissions look like and what they mean:
- 777. This setting offers the highest level of permissions. It means all users have read, write, and execute access. The sevens in each position represent the sum of 4+2+1, which stands for all the available actions.
- 744. This code means the owner of the file/directory has full permissions. Other users only have read access.
- 644. This setting means the owner has read/write permissions and other users have read access.
- 444. With this code, the file or directory becomes read-only for all users.
Ideal permission settings vary from one file or directory to the other. However, there are several agreed-upon settings for specific WordPress components, which we’ll cover in the next section.
What are the optimal WordPress file permissions
These permission settings recommendations come from our experience using WordPress and the official Codex. The goal of these permissions is to protect your website by limiting all access to its core files and directories except when needed.
👉 In this section, we’ll cover four different types of files and directories and explain the optimal permission settings for each of them. Let’s start with WordPress folders:
- WordPress folders. These are the folders and directories that house all the WordPress core files. The ideal permission level for the root folder and all its subdirectories is 755. This gives you full access, where other users will only be able to read and execute directories. Keep in mind this shouldn’t apply to internal files, just to the directories.
- WordPress files. These are all the files contained in the root folder and its subdirectories. With the two exceptions below, the ideal setting for these files is 644. This gives you read and write access. Other users will only be able to read files and not modify or execute them.
- wp-config.php. A lot of WordPress web hosts will use a similar 644 permission setting for the wp-config.php file. The official WordPress codex recommends setting permissions to 440, so you and other users in your group have read access. Other users get no access at all.
- .htaccess. Similar to wp-config.php, a lot of web hosts will default to 644 permissions for this file. That is also the configuration the WordPress Codex recommends. A more secure setting would be 444 to limit all access to read-only.
Depending on your web host, you might not need to modify WordPress file permissions. A lot of managed hosting providers typically optimize permission settings to maximize security. In any case, it pays to know how to modify file permissions if you need to make some changes.
How to change WordPress file permissions (3 steps)
Changing file permissions in WordPress requires you to use File Transfer Protocol (FTP). However, the process is fairly simple. Here’s how it works:
Step 1: Connect to your website via FTP
To connect to your site via FTP, you’ll need a client. We recommend using FileZilla as it’s easy to set up and requires basically no configuration.
Once you open the client, enter your FTP credentials to connect to your website. Typically, you’ll be able to find these credentials in your hosting control panel. You may also have received them in an email when signing up for hosting:
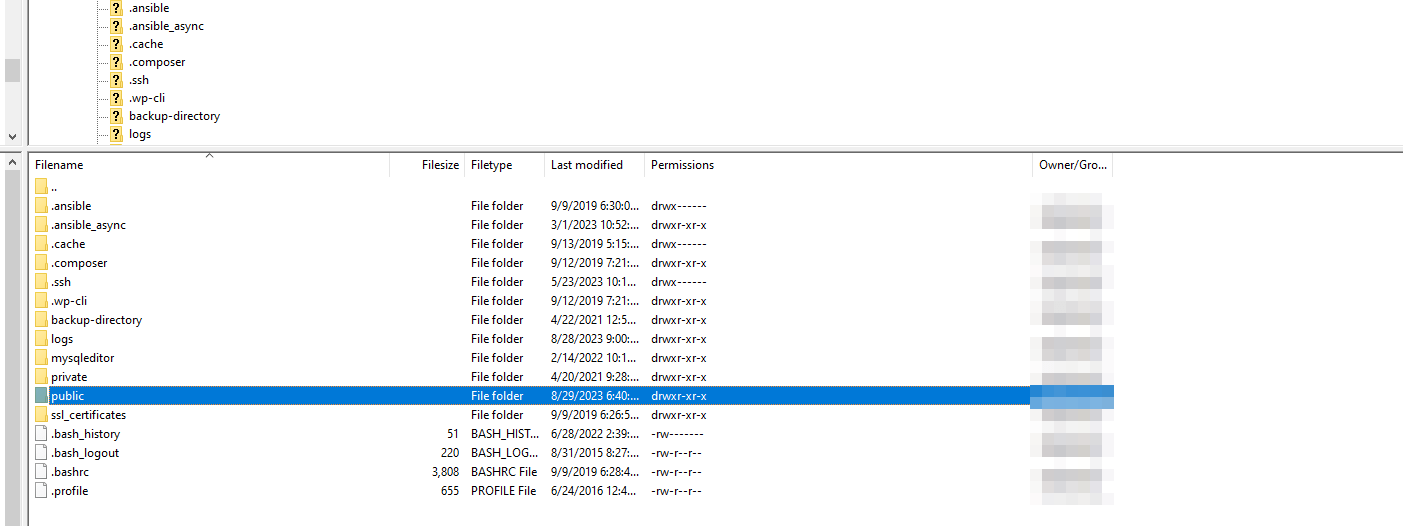
When you connect to the server, you’ll see a collection of files and directories appear in the client. Locate your WordPress root directory, which contains all of your site’s files. The directory may be called public_html, public, www, or named after your site.

Now enter the root directory and move on to step number two.
Step 2: Set the permissions for directories
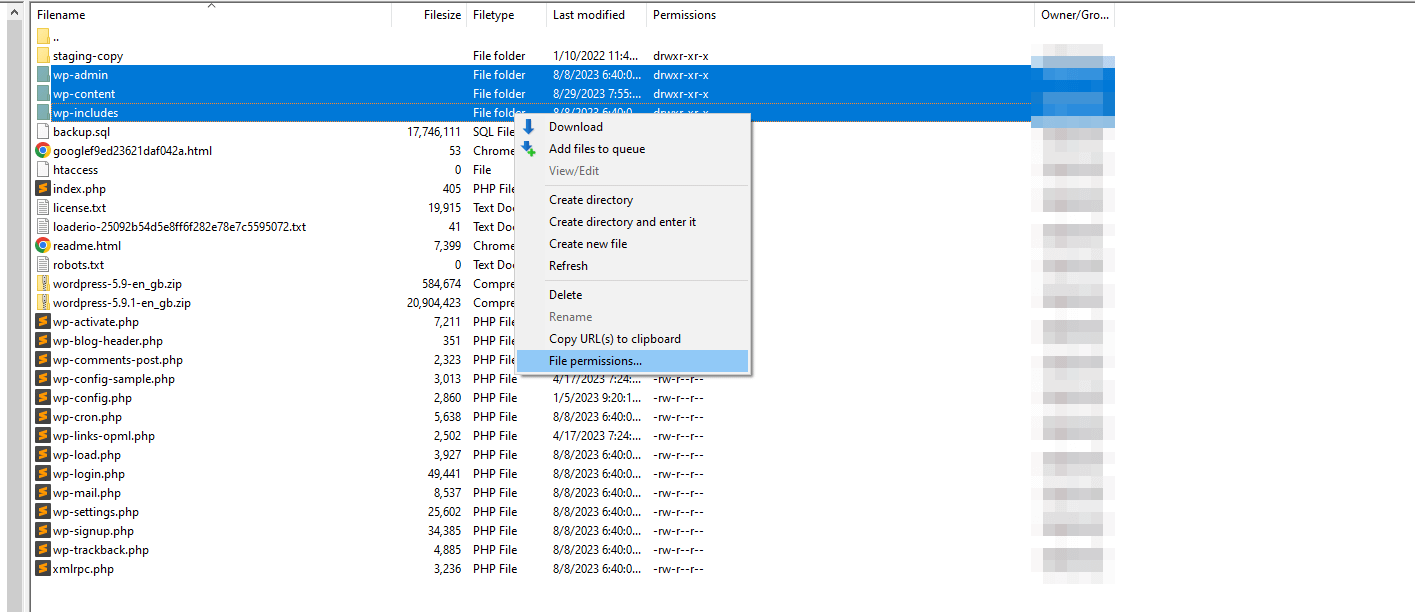
Locate the wp-content, wp-admin, and wp-includes folders. You’re going to right-click on one of them and select the File Permissions setting:

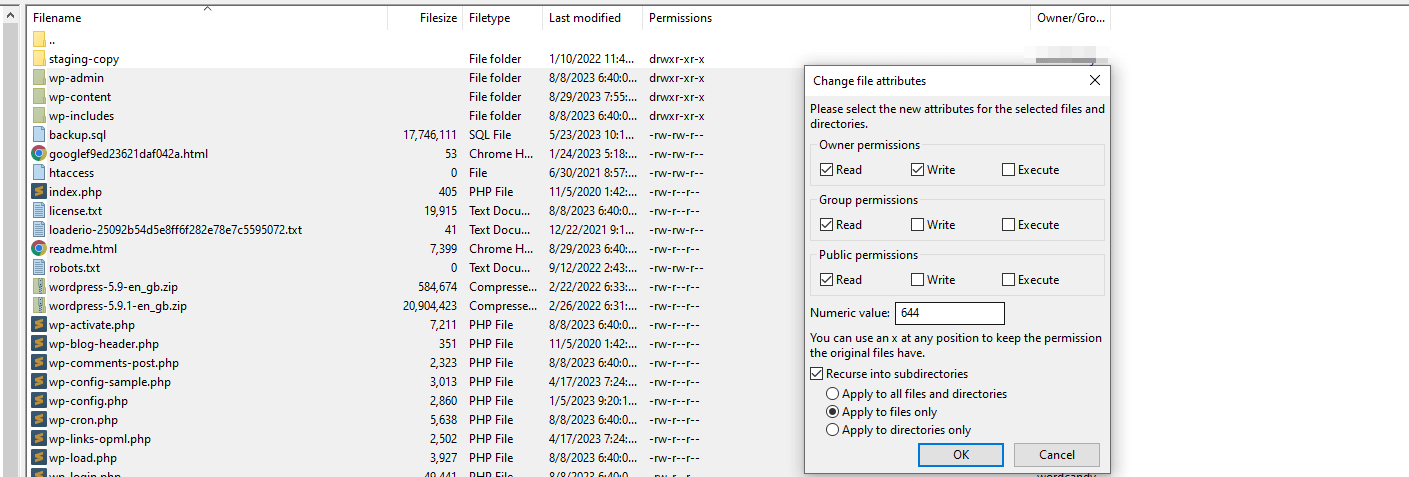
A new window will open, including the option to set file permissions manually or with a numeric value. Enter 755 in the Numeric value field and toggle the Recurse into subdirectories setting. Select the Apply to directories only option and click on OK:

That configuration will apply the 755 permission setting to the three folders and all their subdirectories. However, it won’t affect files, which is precisely what we want. Files have different optimal permission settings, which we’ll configure in the next step.
Step 3: Set the permissions for files
The WordPress root directory has hundreds of files. That means manually changing permissions for each of them can take a long time. Your best option is to apply permission settings using the same recursive approach as with directories.
To do this, select all files and directories in the root folder (except perhaps wp-config.php and .htaccess) and right-click to open the File Permissions menu. Set the numeric value for the permissions to 644 and select the option to apply this setting recursively to files only:

Click on OK and that’s it. You can double-check if the permissions are assigned correctly by selecting directories or files at random and checking their permission levels.
Changing permissions shouldn’t alter the way your site works or break any part of it. If any part of your site stops working after changing permissions, it’s probably due to a wrong value set for a directory or a core file.
Conclusion 🧐
WordPress file permissions are easy to set, but if you input the wrong values, they can break your website. Understanding how file permissions work and what the recommended configurations are in WordPress will help improve your site’s security and prevent errors.
If you want to review your WordPress permissions, start by re-reading the section on the recommended settings for files and directories. Once you know what settings to use, follow these steps:
- Connect to your website via FTP.
- Set the permissions for directories.
- Set the permissions for files.
Do you have any questions about how to set WordPress file permissions? Let’s talk about them in the comments section below!

