The WordPress .htaccess file might seem mysterious at first glance, but it’s one of the most powerful tools you have for controlling how your website works. This small configuration file can make significant changes to your site’s security, redirect functionality, and performance without requiring you to dive deep into code.
If you’ve ever wondered where to find this file, how to edit it safely, or what you can actually do with it, you’re in the right place. In this guide, we’ll walk through everything from basic concepts to advanced applications, helping you harness the full potential of your WordPress site’s .htaccess file.
Table of Contents
- What is the WordPress .htaccess File?
- Where to Find the .htaccess File in WordPress
- Creating a Default .htaccess File
- Editing the .htaccess File Safely
- Common Uses of the .htaccess File
- Security Enhancements via .htaccess
- Performance Optimization through .htaccess
- Common Issues and Troubleshooting
What is the WordPress .htaccess File?
The WordPress .htaccess file (short for hypertext access) serves as a configuration file that controls how the Apache web server handles various aspects of your website. Unlike standard PHP files that execute specific functions, the .htaccess file provides server-level instructions that affect your entire WordPress site or specific directories.
This small yet mighty file plays several critical roles in your WordPress installation:
- It manages your permalink structure, enabling clean URLs instead of query string parameters
- It handles redirects between pages or even entire domains
- It controls access to specific files and directories
- It enhances security by blocking suspicious requests
- It optimizes performance through caching and compression settings
When WordPress creates a new installation, it generates a default .htaccess file with basic permalink functionality. However, the true power comes when you customize this file to meet your specific needs.
Many WordPress plugins also interact with the .htaccess file to implement their functionality. For example, security plugins might add rules to block malicious traffic, while caching plugins add code to improve page loading times.
Despite its technical nature, the .htaccess file doesn’t require programming knowledge to use effectively. With the proper guidance, you can make precise modifications that dramatically improve how your WordPress site functions.
Where to Find the .htaccess File in WordPress
Finding your WordPress .htaccess file might take a bit of detective work since it’s not visible through the WordPress dashboard. The file resides in your site’s root directory (often called public_html, www, or httpdocs, depending on your hosting provider).
There are two primary ways to access this file:
Using an FTP Client
- Connect to your server using an FTP client like FileZilla
- Navigate to your website’s root directory
- Look for the .htaccess file
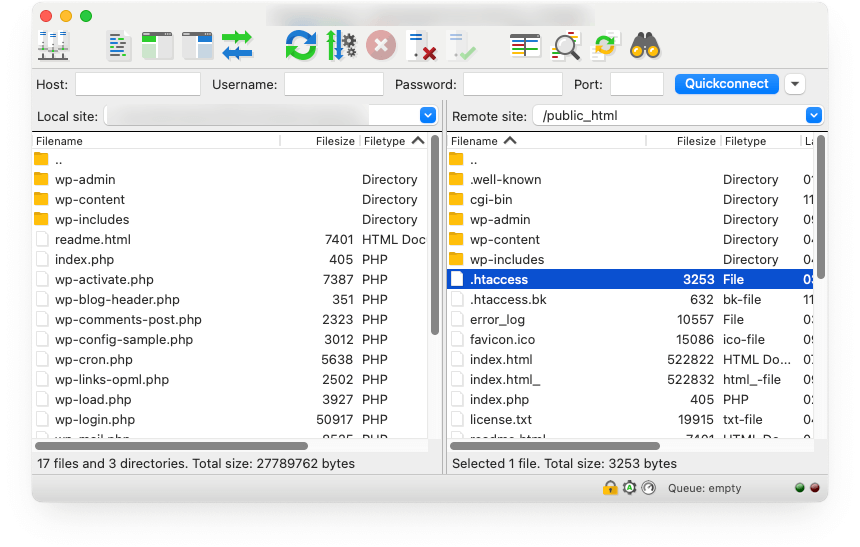

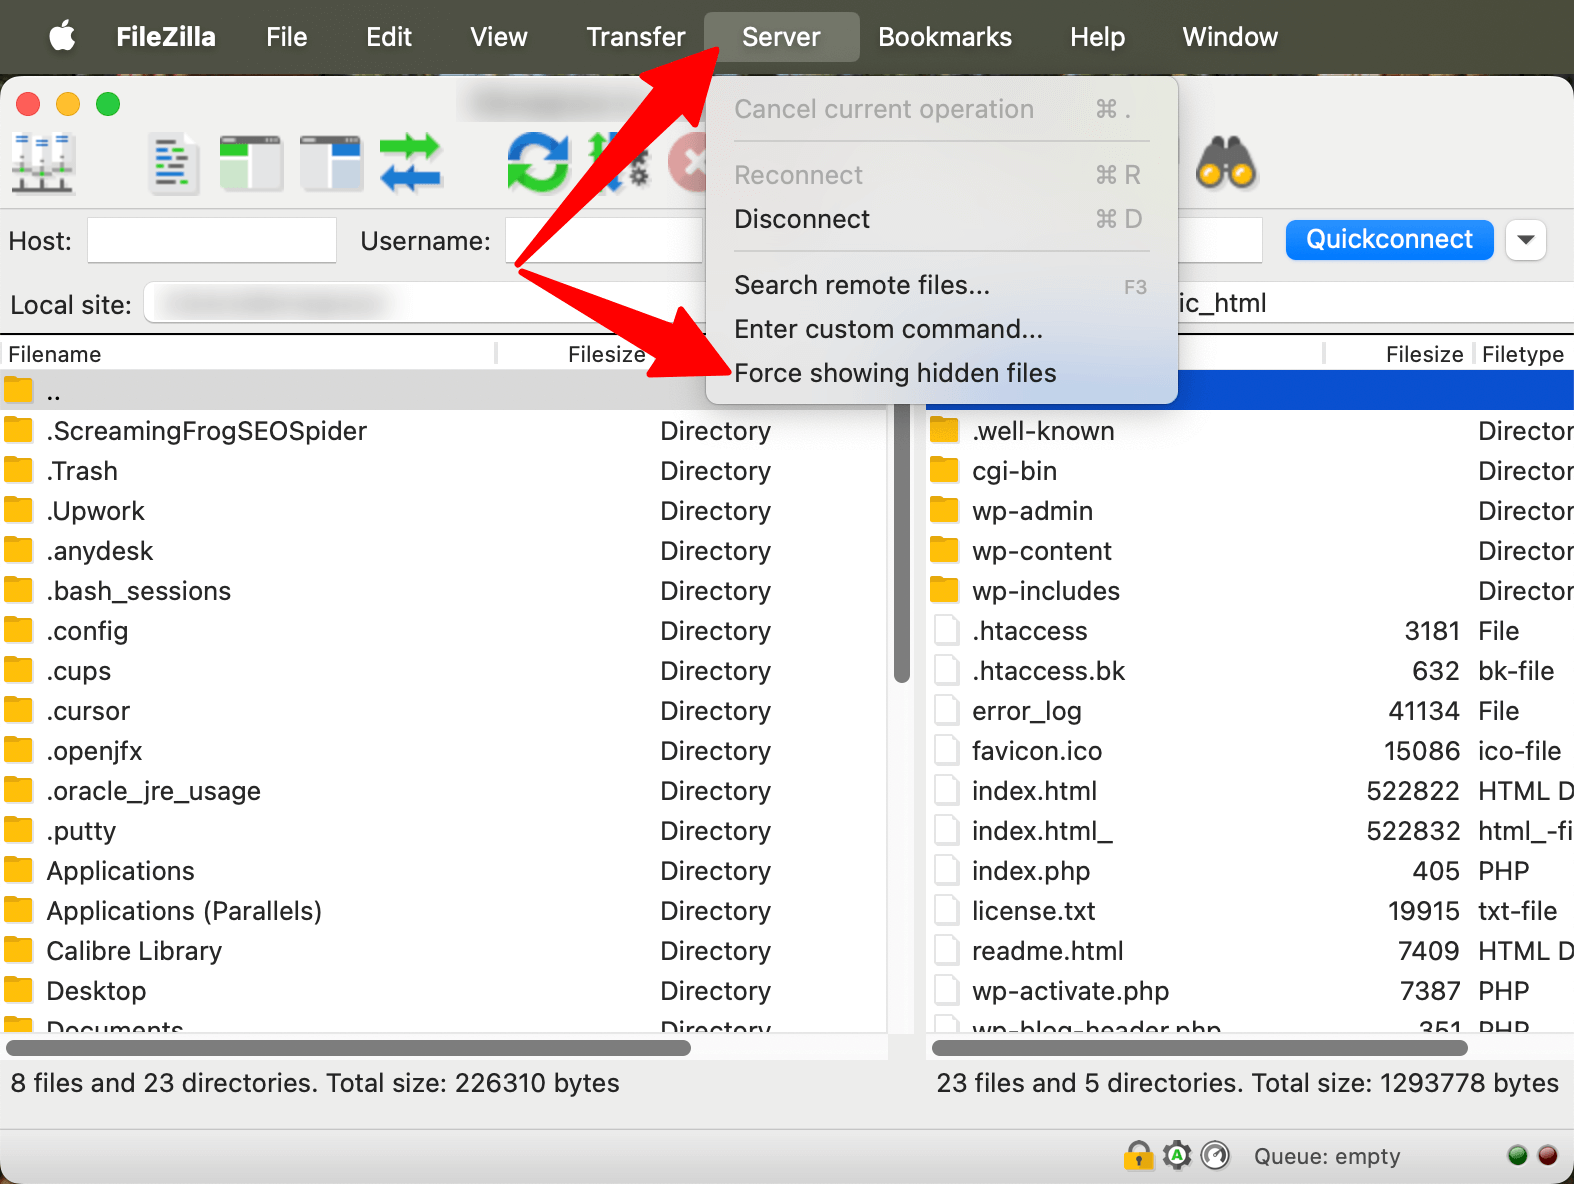
Can’t see the file? The .htaccess file is hidden by default in many file managers. To make it visible in FileZilla, you may need to enable viewing hidden files by going to Server > Force showing hidden files before connecting.
 Show hidden files” srcset=”https://b8f4g5a7.delivery.rocketcdn.me/wp-content/uploads/2025/03/filezilla-show-hidden-files.png 1574w, https://b8f4g5a7.delivery.rocketcdn.me/wp-content/uploads/2025/03/filezilla-show-hidden-files-734×552.png 734w, https://b8f4g5a7.delivery.rocketcdn.me/wp-content/uploads/2025/03/filezilla-show-hidden-files-1024×770.png 1024w, https://b8f4g5a7.delivery.rocketcdn.me/wp-content/uploads/2025/03/filezilla-show-hidden-files-1536×1155.png 1536w” sizes=”(max-width: 1574px) 100vw, 1574px”/>
Using cPanel File Manager
If your hosting service provides cPanel access:
1. Log into your cPanel dashboard
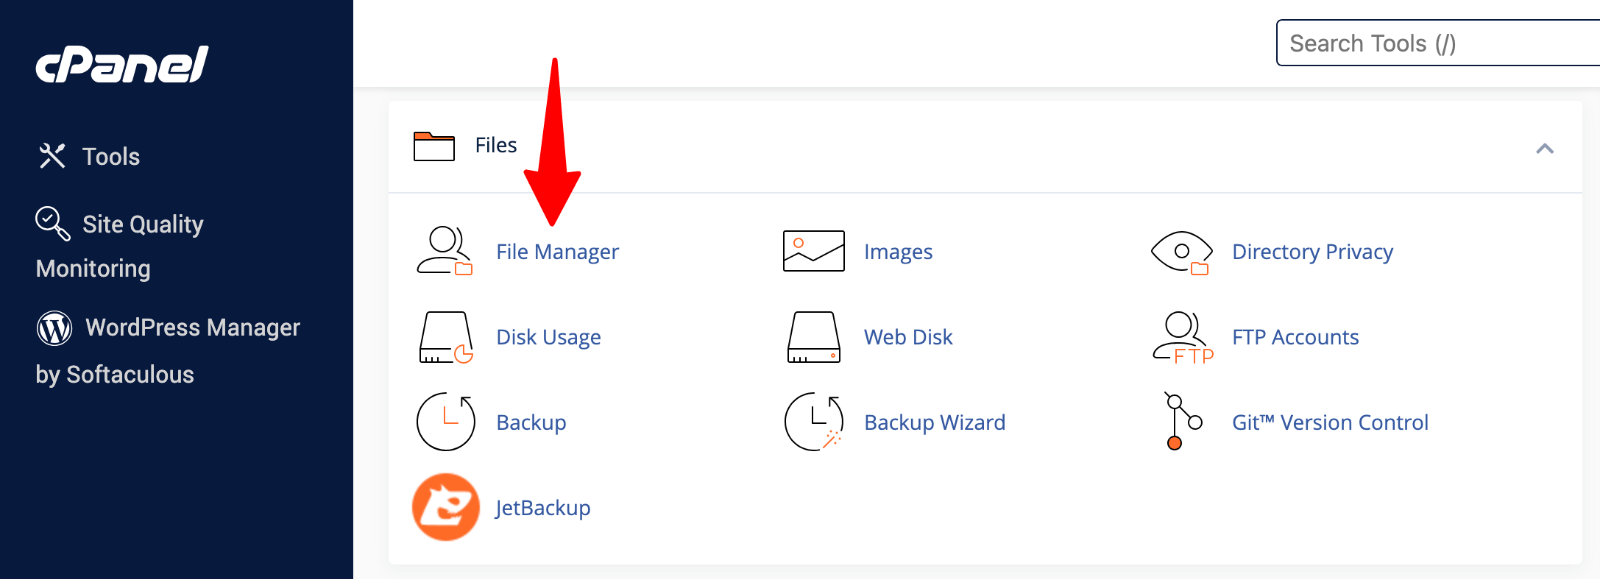
2. Look for the “File Manager” option, typically found in the Files section
 File Manager” class=”wp-image-809072″ srcset=”https://b8f4g5a7.delivery.rocketcdn.me/wp-content/uploads/2025/03/cpanel-file-manager.png 1600w, https://b8f4g5a7.delivery.rocketcdn.me/wp-content/uploads/2025/03/cpanel-file-manager-734×266.png 734w, https://b8f4g5a7.delivery.rocketcdn.me/wp-content/uploads/2025/03/cpanel-file-manager-1024×371.png 1024w, https://b8f4g5a7.delivery.rocketcdn.me/wp-content/uploads/2025/03/cpanel-file-manager-1536×556.png 1536w” sizes=”(max-width: 1600px) 100vw, 1600px”/>
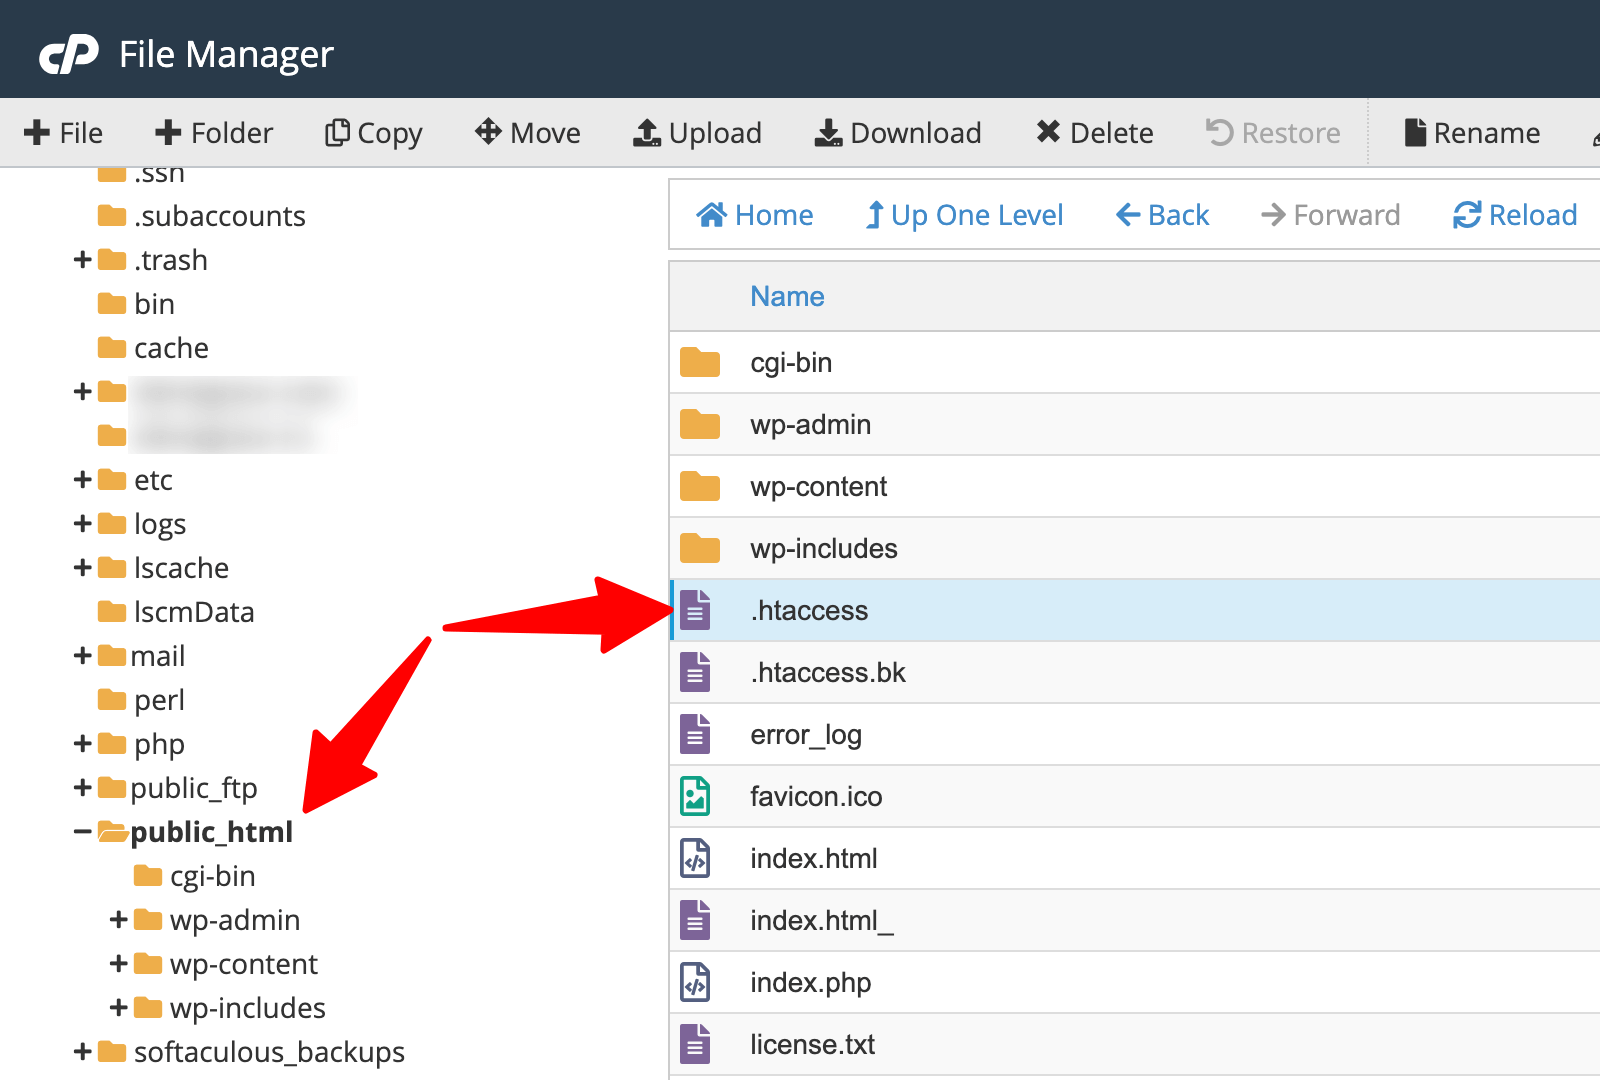
3. Navigate to your website’s root directory (usually public_html)
4. Look for the .htaccess file in this directory
 .htaccess file” class=”wp-image-809073″ srcset=”https://b8f4g5a7.delivery.rocketcdn.me/wp-content/uploads/2025/03/cpanel-htaccess.png 1600w, https://b8f4g5a7.delivery.rocketcdn.me/wp-content/uploads/2025/03/cpanel-htaccess-734×495.png 734w, https://b8f4g5a7.delivery.rocketcdn.me/wp-content/uploads/2025/03/cpanel-htaccess-1024×691.png 1024w, https://b8f4g5a7.delivery.rocketcdn.me/wp-content/uploads/2025/03/cpanel-htaccess-1536×1037.png 1536w” sizes=”(max-width: 1600px) 100vw, 1600px”/>
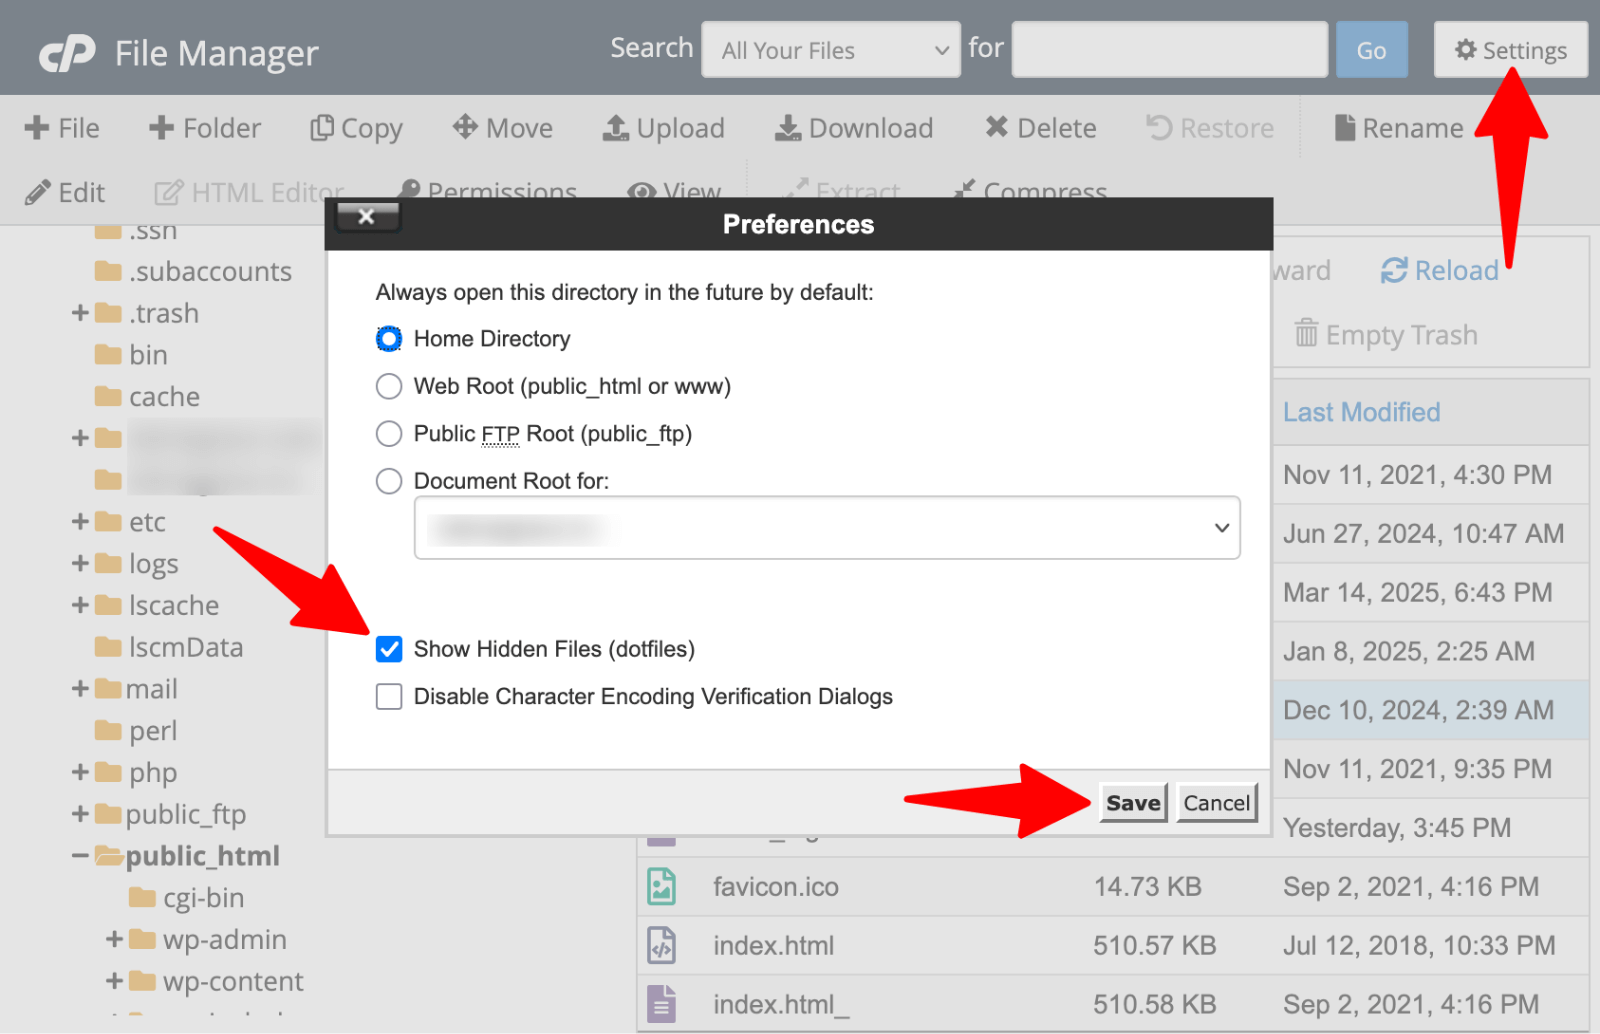
If you can’t see the file, you can make it visible:
- Click the “Settings” button in the top-right corner of File Manager
- Check the box labeled “Show Hidden Files (dotfiles)“
- Click “Save“
 File Manager > Show hidden files” srcset=”https://b8f4g5a7.delivery.rocketcdn.me/wp-content/uploads/2025/03/cpanel-file-manager-hidden-files.png 1600w, https://b8f4g5a7.delivery.rocketcdn.me/wp-content/uploads/2025/03/cpanel-file-manager-hidden-files-734×474.png 734w, https://b8f4g5a7.delivery.rocketcdn.me/wp-content/uploads/2025/03/cpanel-file-manager-hidden-files-1024×662.png 1024w, https://b8f4g5a7.delivery.rocketcdn.me/wp-content/uploads/2025/03/cpanel-file-manager-hidden-files-1536×993.png 1536w” sizes=”(max-width: 1600px) 100vw, 1600px”/>
The .htaccess file should now appear in your root directory.
Remember that some web servers, particularly those running NGINX instead of Apache, don’t use .htaccess files. If you’re using a managed WordPress host, they might be using NGINX, which handles configuration differently.
If you can’t find your .htaccess file and your site runs on Apache, it’s possible the file hasn’t been created yet. Don’t worry! We’ll cover how to create one from scratch in the next section.
Creating a Default .htaccess File
If your WordPress installation doesn’t have an .htaccess file yet, or if you need to create a fresh one after issues with a corrupted file, you have several methods to generate a proper default file. Let’s explore each option in detail.
Method 1: Through WordPress Settings
The simplest way to generate a default .htaccess file:
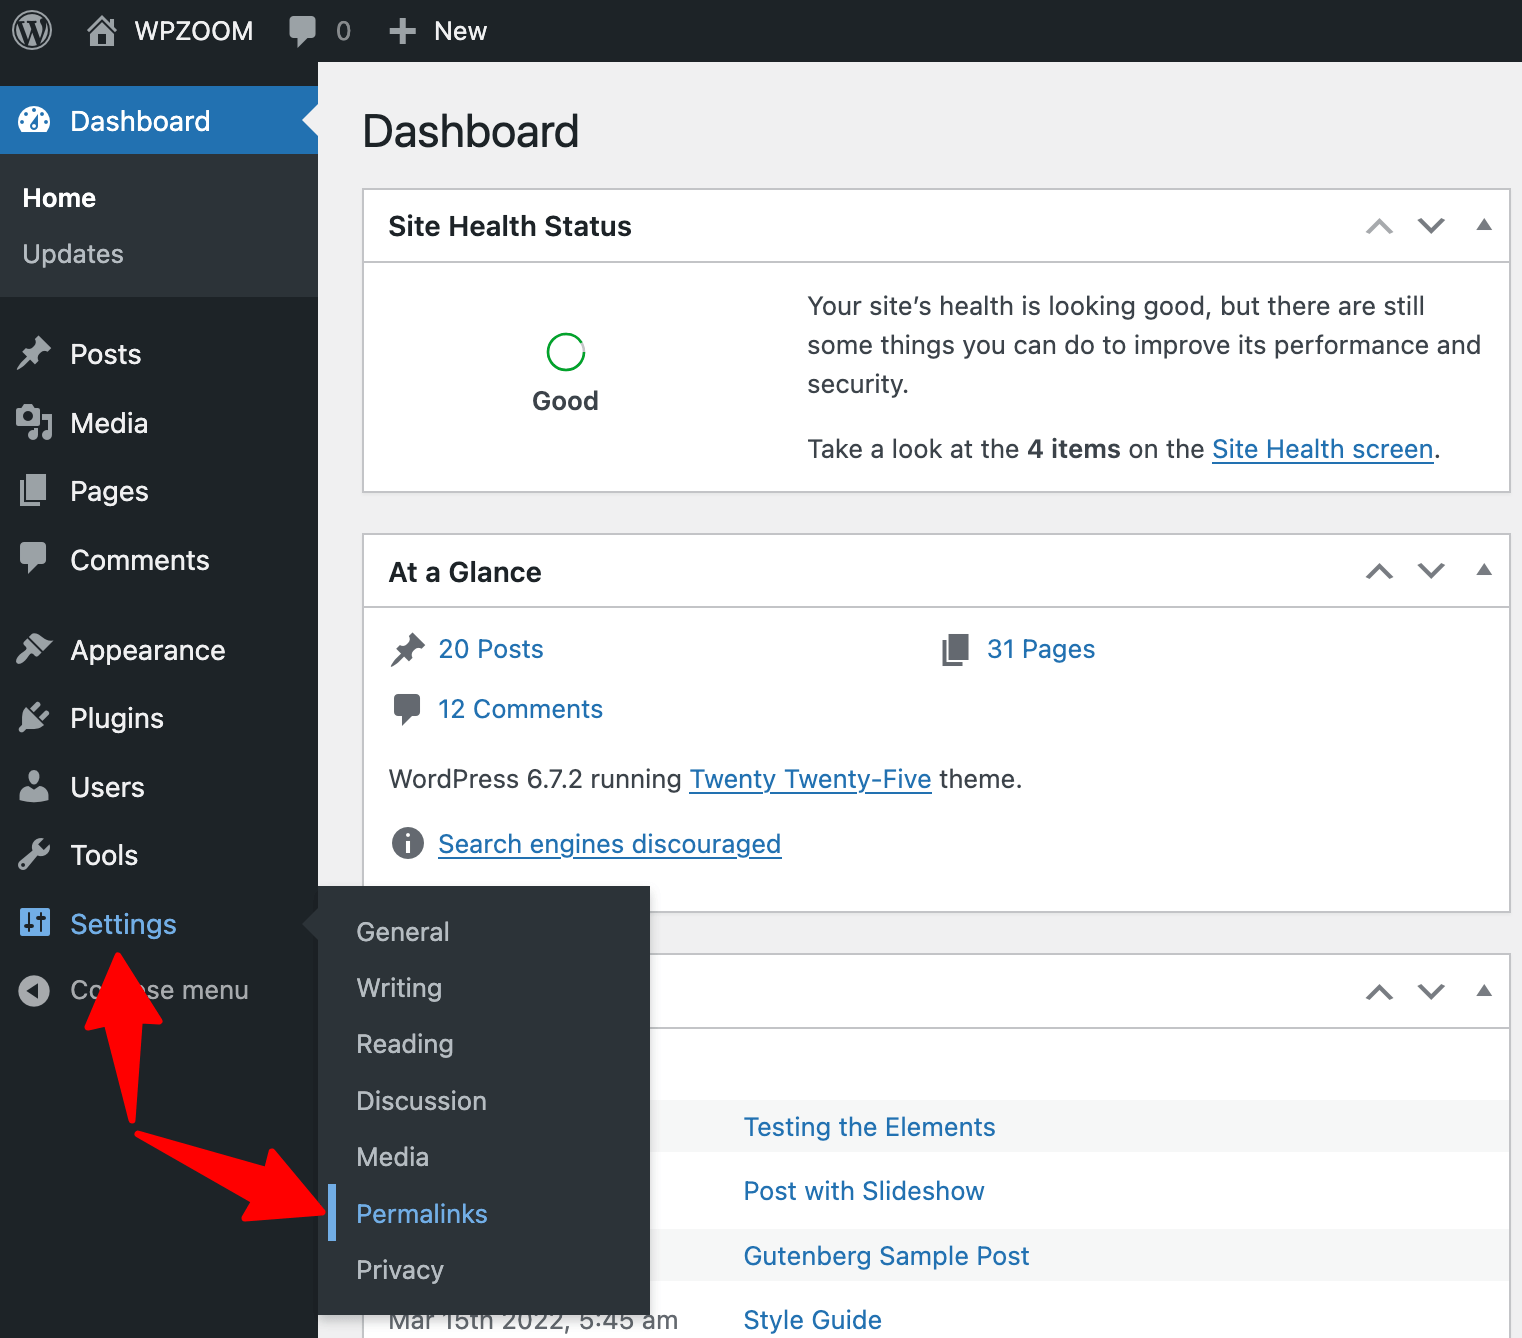
1. Log in to your WordPress dashboard
2. Go to Settings > Permalinks
 Permalinks” class=”wp-image-809077″ style=”width:650px” srcset=”https://b8f4g5a7.delivery.rocketcdn.me/wp-content/uploads/2025/03/settings-permalinks.png 1522w, https://b8f4g5a7.delivery.rocketcdn.me/wp-content/uploads/2025/03/settings-permalinks-734×645.png 734w, https://b8f4g5a7.delivery.rocketcdn.me/wp-content/uploads/2025/03/settings-permalinks-1024×900.png 1024w” sizes=”(max-width: 1522px) 100vw, 1522px”/>
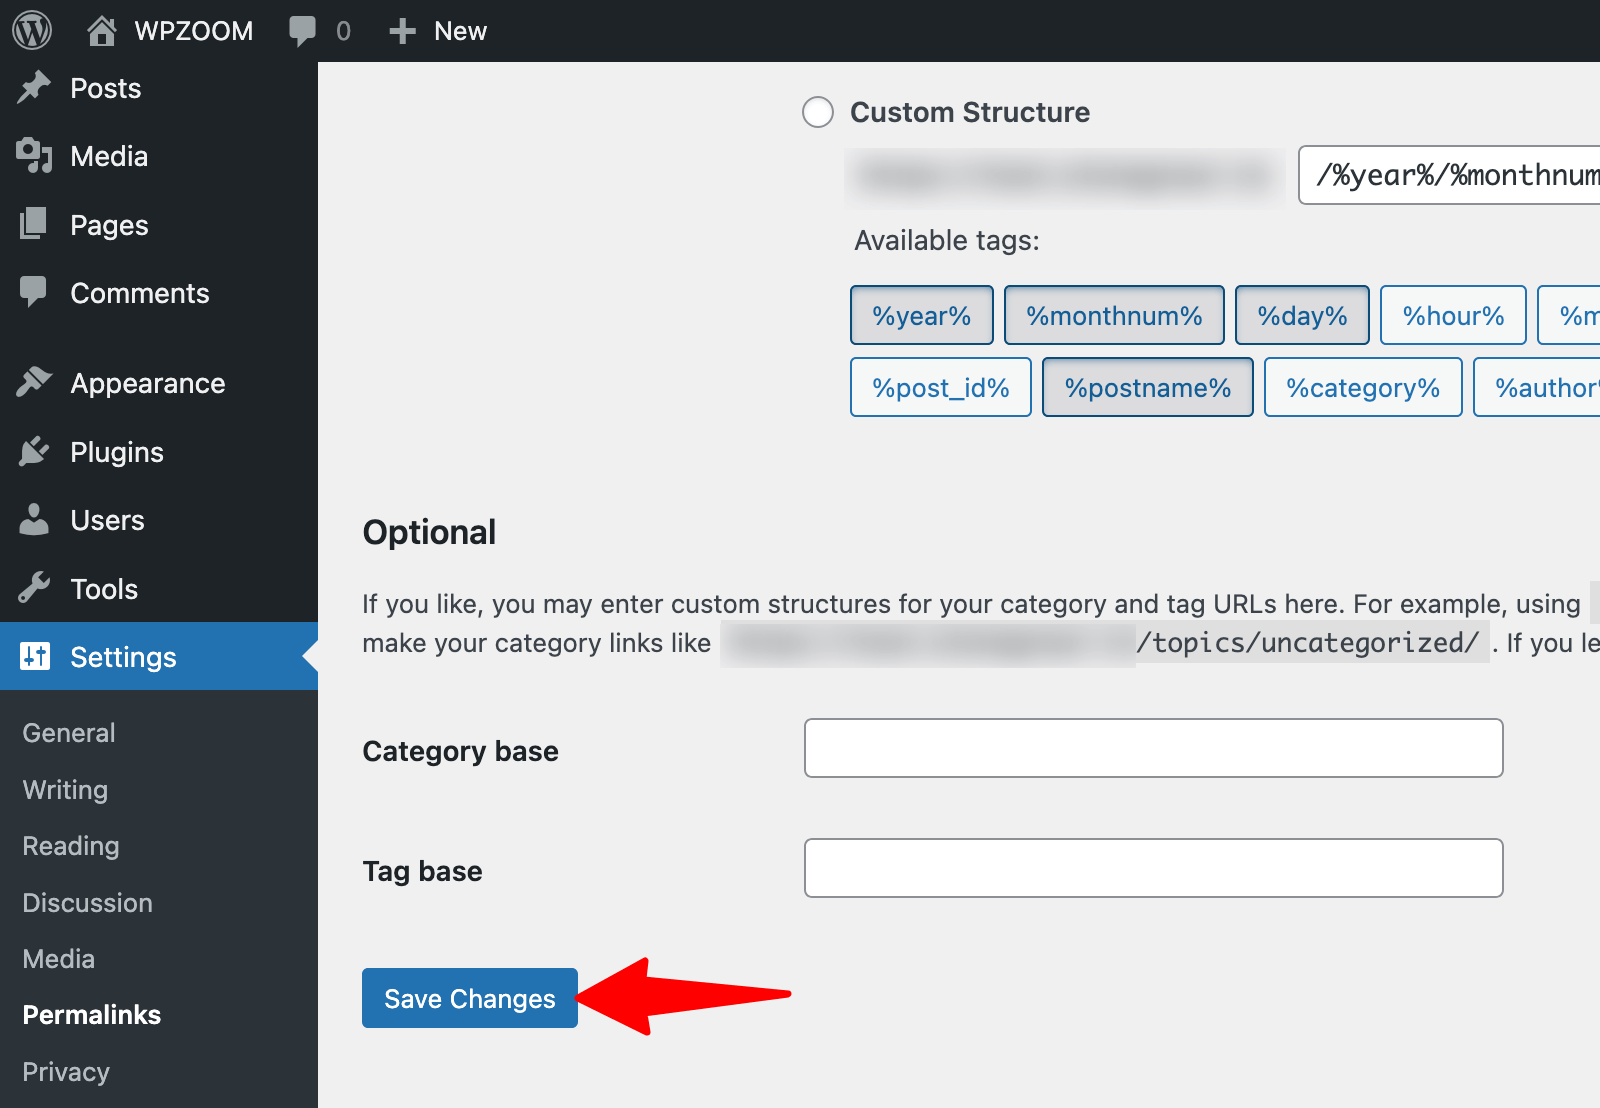
3. Without changing anything, click “Save Changes” at the bottom of the page
 Permalinks > Save Changes” class=”wp-image-809079″ style=”width:700px” srcset=”https://b8f4g5a7.delivery.rocketcdn.me/wp-content/uploads/2025/03/settings-permalinks-save-changes.png 1600w, https://b8f4g5a7.delivery.rocketcdn.me/wp-content/uploads/2025/03/settings-permalinks-save-changes-734×508.png 734w, https://b8f4g5a7.delivery.rocketcdn.me/wp-content/uploads/2025/03/settings-permalinks-save-changes-1024×709.png 1024w, https://b8f4g5a7.delivery.rocketcdn.me/wp-content/uploads/2025/03/settings-permalinks-save-changes-1536×1064.png 1536w” sizes=”(max-width: 1600px) 100vw, 1600px”/>
WordPress will attempt to create the .htaccess file automatically with the correct permalink structure. This method works well when WordPress has the proper permissions to write to your server.
If WordPress can’t create the file, you’ll see a message with the code you need to add manually. Copy this code for use with one of the manual methods below.
Method 2: Manual Creation via FTP
To create an .htaccess file manually:
1. Open a text editor like Notepad or TextEdit
2. Create a new file and paste the default WordPress .htaccess code:
# BEGIN WordPress

RewriteEngine On
RewriteBase /
RewriteRule ^index.php$ - [L]
RewriteCond %{REQUEST_FILENAME} !-f
RewriteCond %{REQUEST_FILENAME} !-d
RewriteRule . /index.php [L]

# END WordPress
3. Save the file as “.htaccess” (include the dot)
Note: Some text editors might add a .txt extension. If this happens, rename the file to remove any extension
4. Connect to your server using an FTP client like FileZilla
5. Navigate to your WordPress root directory
6. Upload the .htaccess file you created
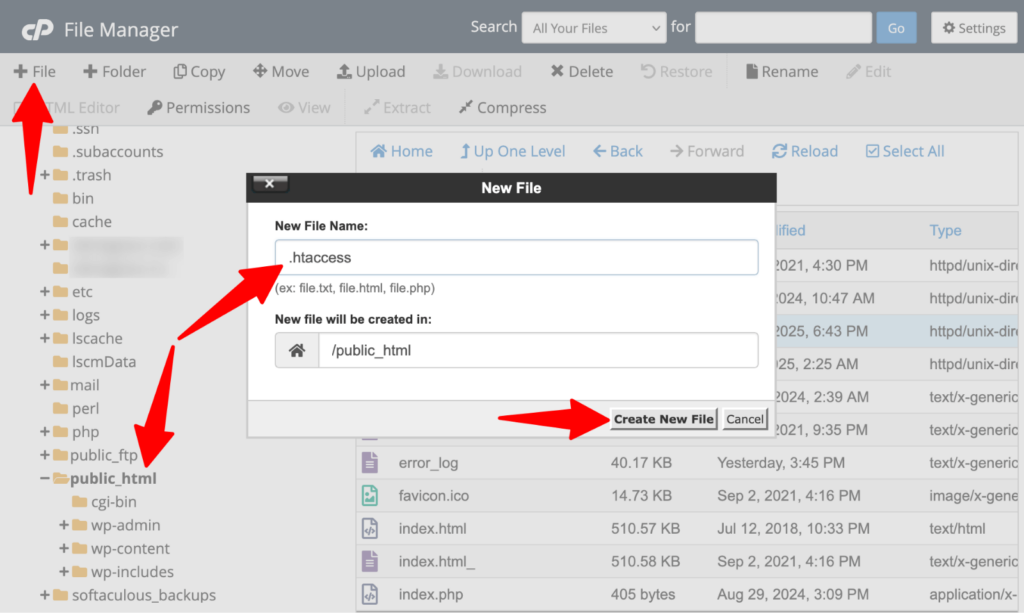
Method 3: Manual Creation via cPanel
If you prefer using cPanel:
1. Log into your hosting account’s cPanel
2. Open the File Manager application
3. Navigate to your website’s root directory (typically public_html)
4. Click the “+ File” button in the top menu
5. Name the file “.htaccess” (include the dot)
6. Click “Create New File“
 Create a .htaccess file” srcset=”https://b8f4g5a7.delivery.rocketcdn.me/wp-content/uploads/2025/03/cpanel-create-htaccess-file-1024×613.png 1024w, https://b8f4g5a7.delivery.rocketcdn.me/wp-content/uploads/2025/03/cpanel-create-htaccess-file-734×439.png 734w, https://b8f4g5a7.delivery.rocketcdn.me/wp-content/uploads/2025/03/cpanel-create-htaccess-file-1536×920.png 1536w, https://b8f4g5a7.delivery.rocketcdn.me/wp-content/uploads/2025/03/cpanel-create-htaccess-file.png 1600w” sizes=”(max-width: 1024px) 100vw, 1024px”/>
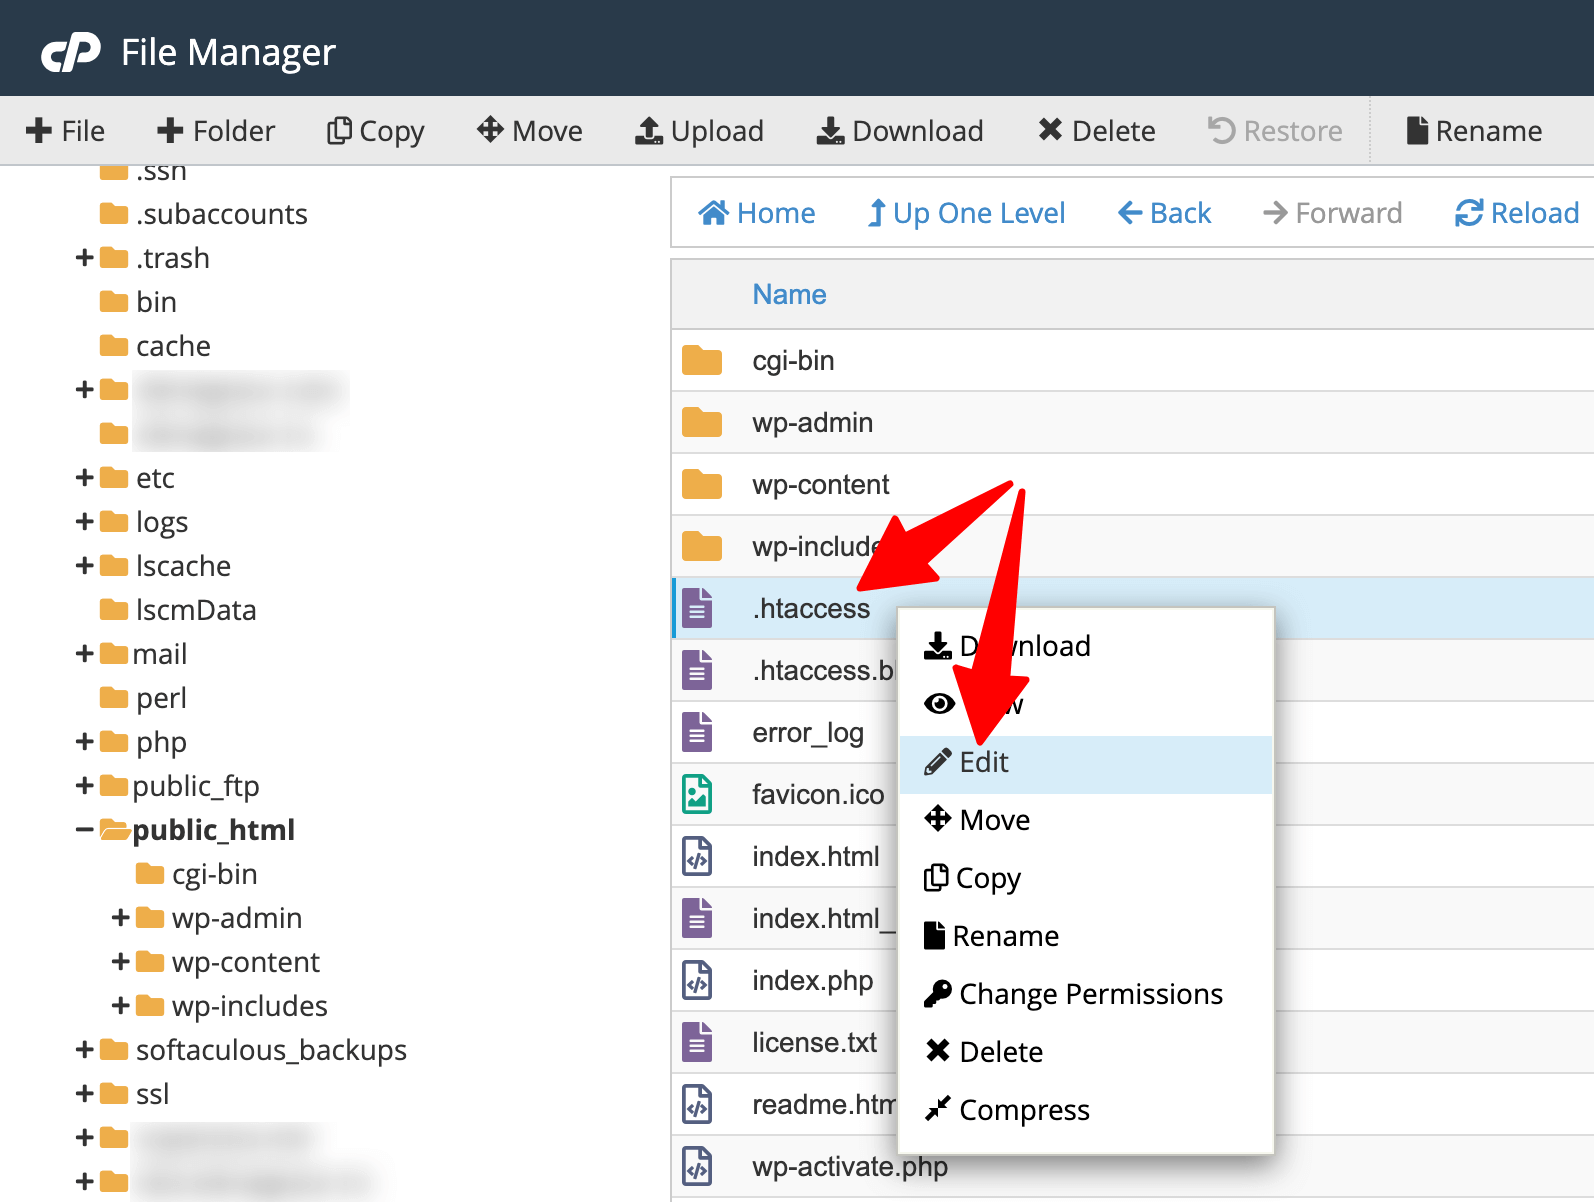
7. Select the new file and click “Edit“
 Edit .htaccess” class=”wp-image-809084″ style=”width:700px” srcset=”https://b8f4g5a7.delivery.rocketcdn.me/wp-content/uploads/2025/03/cpanel-edit-htaccess.png 1594w, https://b8f4g5a7.delivery.rocketcdn.me/wp-content/uploads/2025/03/cpanel-edit-htaccess-734×553.png 734w, https://b8f4g5a7.delivery.rocketcdn.me/wp-content/uploads/2025/03/cpanel-edit-htaccess-1024×772.png 1024w, https://b8f4g5a7.delivery.rocketcdn.me/wp-content/uploads/2025/03/cpanel-edit-htaccess-1536×1158.png 1536w” sizes=”(max-width: 1594px) 100vw, 1594px”/>
8. Paste the default WordPress .htaccess code (shown above)
9. Click “Save Changes“
 Edit .htaccess > Save changes” class=”wp-image-809085″ srcset=”https://b8f4g5a7.delivery.rocketcdn.me/wp-content/uploads/2025/03/cpanel-edit-htaccess-save-changes.png 2150w, https://b8f4g5a7.delivery.rocketcdn.me/wp-content/uploads/2025/03/cpanel-edit-htaccess-save-changes-734×197.png 734w, https://b8f4g5a7.delivery.rocketcdn.me/wp-content/uploads/2025/03/cpanel-edit-htaccess-save-changes-1024×274.png 1024w, https://b8f4g5a7.delivery.rocketcdn.me/wp-content/uploads/2025/03/cpanel-edit-htaccess-save-changes-1536×412.png 1536w, https://b8f4g5a7.delivery.rocketcdn.me/wp-content/uploads/2025/03/cpanel-edit-htaccess-save-changes-2048×549.png 2048w” sizes=”(max-width: 2150px) 100vw, 2150px”/>
Upgrade Your Website with a Premium WordPress Theme
Find a theme that you love and get a 20% discount at checkout with the FLASH20 code


Editing the .htaccess File Safely
Once you have an .htaccess file in place, you’ll likely need to modify it at some point. However, editing this file requires careful attention to detail since even minor syntax errors can make your entire site inaccessible.
Before making any changes to your .htaccess file, take these precautions:
- Create a backup: Download a copy of your current .htaccess file before editing. If something goes wrong, you can quickly restore it.
- Use a plain text editor: Always edit .htaccess files with a plain text editor, not a word processor like Microsoft Word, which might add formatting that breaks the file.
Method 1: Using an FTP Client:
- Connect to your server using FileZilla or another FTP client
- Navigate to your root directory
- Download the .htaccess file to your computer
- Open it with your plain text editor
- Make your changes
- Save the file locally
- Upload it back to your server, overwriting the original
- Test your website immediately
Pro tip: Set your FTP client to binary mode when transferring .htaccess files to prevent data corruption.
Method 2: Using cPanel:
- Log into cPanel and open File Manager
- Navigate to your site’s root directory
- Right-click the .htaccess file and select “Edit“
- Make your changes carefully
- Click “Save Changes“
- Immediately test your website in a new browser tab
Method 3: Using WordPress Plugins:
Several plugins offer user-friendly interfaces for editing .htaccess:
These plugins often safeguard against common mistakes, making them suitable for beginners. However, plugins may not support all advanced .htaccess features, making manual editing necessary for complex rules.
Essential Tips for Safe Editing
Editing your .htaccess file requires precision and caution. These expanded tips will help you modify this critical file while avoiding common pitfalls that could take your site offline.
- WordPress core section: Never modify anything between # BEGIN WordPress and # END WordPress comments. WordPress automatically manages this section when you change permalink settings.
- Custom code placement: Add your custom rules either before the WordPress section or after it. This separation keeps your customizations safe during WordPress updates.
- Rule order matters: Rules are processed from top to bottom. More specific rules should generally appear before broader ones to prevent overrides.
- Case sensitivity: Many directives are case-sensitive. RewriteRule works, but rewriterule might not.
- Spacing matters: Proper spacing between directives and parameters is crucial. Too many or too few spaces can break your rules.
- Special characters: Be cautious with characters like brackets, parentheses, and quotation marks. Make sure they’re properly paired and escaped when necessary.
- Line endings: Some editors use different line ending formats (CRLF vs. LF). This can occasionally cause issues, especially when copying code from websites.
- Test your site immediately after making changes. If your site breaks, restore your backup immediately.
Remember that incorrect .htaccess modifications can result in a “500 Internal Server Error” or make your site inaccessible. Always proceed with caution and have your backup ready.
Common Uses of the .htaccess File
Your site’s .htaccess file can transform how WordPress functions across many areas. Let’s explore some of the most practical applications that can enhance your website.
Setting Up Redirects
Redirects send visitors and search engines from one URL to another. They’re essential for maintaining SEO value when you change page URLs or migrate websites.
301 (Permanent) Redirects
Use 301 redirects when content has moved permanently. This passes SEO value to the new page:
# Redirect single page
Redirect 301 /old-page/ https://www.yoursite.com/new-page/

# Redirect entire site to new domain
RewriteEngine on
RewriteCond %{HTTP_HOST} ^olddomain.com [NC,OR]
RewriteCond %{HTTP_HOST} ^www.olddomain.com [NC]
RewriteRule ^(.*)$ https://newdomain.com/$1 [L,R=301,NC]
302 (Temporary) Redirects
For temporary moves, use 302 redirects:
Redirect 302 /temporary-page/ https://www.yoursite.com/new-page/Enforcing SSL/HTTPS
Once you’ve installed an SSL certificate, make sure all traffic uses HTTPS:
RewriteEngine On
RewriteCond %{HTTPS} off
RewriteRule ^(.*)$ https://%{HTTP_HOST}%{REQUEST_URI} [L,R=301]
This code redirects any HTTP request to HTTPS, ensuring secure browsing for your visitors.
Setting Custom Permalinks
While WordPress manages the permalink structure automatically, you can customize how URLs work:
# Make URLs case-insensitive
RewriteEngine On
RewriteMap lowercase int:tolower
RewriteCond %{REQUEST_URI} [A-Z]
RewriteRule (.*) ${lowercase:$1} [R=301,L]
This example makes your URLs case-insensitive, redirecting uppercase URLs to lowercase versions.
Many WordPress plugins, like Redirection or Yoast SEO, handle these tasks through user-friendly interfaces if you prefer not to edit .htaccess directly. These tools generate the appropriate code and add it to your .htaccess file automatically.
Remember that each directive added to your .htaccess file affects server processing time. Keep your file clean and organized by removing unused rules to maintain optimal performance.
Upgrade Your Website with a Premium WordPress Theme
Find a theme that you love and get a 20% discount at checkout with the FLASH20 code


Security Enhancements via .htaccess
Your WordPress site faces numerous threats daily. The .htaccess file provides powerful ways to strengthen your security without installing additional plugins. Here are effective security measures you can implement:
Block IP Addresses
If you notice suspicious activity from specific IP addresses, you can block them entirely:
# Block individual IP addresses

order allow,deny
deny from 123.45.67.89
deny from 98.76.54.32
allow from all
Replace the example IPs with the actual addresses you want to block. This prevents those IPs from accessing any part of your site.
Password Protection for wp-admin
Add an extra layer of security to your WordPress admin area with password protection:
# Protect wp-admin directory

AuthName "Admin Area"
AuthType Basic
AuthUserFile /path/to/.htpasswd
require valid-user
This requires creating a .htpasswd file with valid username/password combinations. Many online generators can help create this file for you.
Disable Directory Browsing
By default, if a directory doesn’t have an index file, visitors can see all the files within it. Prevent this with:
# Disable directory browsing
Options All -Indexes
This simple directive prevents potential attackers from exploring your file structure.
Protection Against Hotlinking
Hotlinking occurs when other websites display your images directly from your server, using your bandwidth. Stop this practice with:
# Prevent image hotlinking
RewriteEngine on
RewriteCond %{HTTP_REFERER} !^$
RewriteCond %{HTTP_REFERER} !^http(s)?://(www.)?yourdomain.com [NC]
RewriteRule .(jpg|jpeg|png|gif)$ - [NC,F,L]
Replace “yourdomain.com” with your actual domain name. This blocks external sites from displaying your images.
Protecting wp-config.php File
The wp-config.php file contains sensitive information like database credentials. Protect it with:
# Protect wp-config.php

order allow,deny
deny from all
This prevents anyone from accessing your configuration file directly through a browser.
These security measures work best as part of a comprehensive security strategy. While powerful, .htaccess rules should complement other security practices like regular updates, strong passwords, and limited user permissions.
For sites needing extensive security features, consider combining these .htaccess rules with a dedicated security plugin. This provides both server-level protection and application-level monitoring.
Upgrade Your Website with a Premium WordPress Theme
Find a theme that you love and get a 20% discount at checkout with the FLASH20 code


Performance Optimization through .htaccess
Speed matters for user experience and search engine rankings. Your .htaccess file can significantly boost your WordPress site’s performance with these optimization techniques:
Browser Caching Setup
Browser caching stores static resources locally in visitors’ browsers, reducing load times for returning visitors:
# Enable browser caching

ExpiresActive On
ExpiresByType image/jpg "access plus 1 year"
ExpiresByType image/jpeg "access plus 1 year"
ExpiresByType image/gif "access plus 1 year"
ExpiresByType image/png "access plus 1 year"
ExpiresByType text/css "access plus 1 month"
ExpiresByType application/pdf "access plus 1 month"
ExpiresByType text/javascript "access plus 1 month"
ExpiresByType application/javascript "access plus 1 month"
ExpiresByType application/x-javascript "access plus 1 month"
ExpiresByType text/html "access plus 1 week"
ExpiresByType application/xhtml+xml "access plus 1 week"
ExpiresDefault "access plus 1 week"
This code sets different expiration times based on file types. Images change less frequently than HTML, so they get longer cache times.
Enabling Gzip Compression
Gzip compression reduces file sizes before sending them to browsers, decreasing load times:
# Enable Gzip compression

AddOutputFilterByType DEFLATE text/html text/plain text/xml text/css text/javascript application/javascript application/x-javascript application/json
This compresses text-based files like HTML, CSS, and JavaScript, making them load faster.
Setting File Caching Durations
Fine-tune how long specific resources stay cached with:
# Set cache control headers


Header set Cache-Control "max-age=2592000, public"
This example sets a 30-day cache (2,592,000 seconds) for static files.
Performance optimization through .htaccess complements other speed enhancements like image optimization, minification, and using a content delivery network (CDN). For best results, combine these techniques with a quality caching plugin.
Remember that not all hosting environments support every optimization directive. Test each change individually to ensure compatibility with your server configuration.
Measuring your site’s speed before and after implementing these changes helps quantify improvements. Tools like Google PageSpeed Insights or GTmetrix provide detailed performance metrics.
Common Issues and Troubleshooting
Even when you’re careful, .htaccess issues can arise. Knowing how to identify and fix these problems quickly will minimize downtime and frustration.
How to Identify if Your .htaccess File is Corrupted
A corrupted .htaccess file typically shows these symptoms:
- Your site displays a 500 Internal Server Error
- Pages that worked previously now return 404 errors
- WordPress permalinks stop functioning
- Specific functionality (like redirects) suddenly fails
If you notice these issues immediately after editing your .htaccess file, the problem likely lies within your recent changes.
Solving 500 Internal Server Errors
The dreaded 500 error often stems from syntax errors in your .htaccess file:
1. Connect to your server via FTP or cPanel
2. Rename your current .htaccess file to something like “.htaccess_backup“
3. Create a new .htaccess file with the default WordPress code:
# BEGIN WordPress

RewriteEngine On
RewriteBase /
RewriteRule ^index.php$ - [L]
RewriteCond %{REQUEST_FILENAME} !-f
RewriteCond %{REQUEST_FILENAME} !-d
RewriteRule . /index.php [L]

# END WordPress
4. Check if your site works again
5. If it does, the issue was in your .htaccess file
If you need your custom rules, add them back one by one, testing after each addition to identify which caused the problem.
Fixing “Too Many Redirects” Errors
This error occurs when redirect rules create an infinite loop:
- Clear your browser’s cookies and cache first
- Check for conflicting redirect rules in your .htaccess file
- Look for multiple HTTPS redirect instructions (from plugins and .htaccess)
- Verify that your WordPress address and site address settings match under Settings > General
For example, if you have both a plugin forcing HTTPS and .htaccess code doing the same, remove one of these redundant rules.
Resolving Posts Returning 404 Errors
When posts or pages return 404 errors despite existing in WordPress:
- Check your permalink settings under Settings > Permalinks
- Click “Save Changes” without changing anything (this refreshes permalink rules)
- Verify that your .htaccess file contains the correct rewrite rules
- Check file permissions. Your .htaccess file should be set to 644
If these steps don’t resolve the issue, your server might have mod_rewrite disabled. Contact your hosting provider to confirm it’s enabled for your account.
Remember that preventive measures are your best defense against .htaccess problems:
- Always back up your .htaccess file before editing
- Make one change at a time and test immediately
- Use a staging environment for testing complex rules
- Keep your .htaccess file clean and commented for clarity
With these troubleshooting techniques, you can quickly resolve most .htaccess-related issues without extended downtime.
Optimize, Design, Succeed: The WPZOOM Way
Now that your .htaccess file is optimized, take your WordPress site to new heights with WPZOOM’s premium themes. Our solutions are built to work flawlessly with your technical optimizations, combining speed, security, and stunning design.
From professional portfolios to dynamic blogs and robust online stores, WPZOOM provides the tools you need to stand out. Our themes are responsive, SEO-friendly, and designed with user experience in mind, the perfect complement to your newly optimized WordPress setup.Ready to showcase your content on a platform as refined as your server configuration? Visit WPZOOM today.

