The php.ini file is a powerful configuration tool that many WordPress users struggle to locate and modify. It controls critical PHP settings directly impacting your website’s performance, from memory limits to file upload sizes. Finding and editing this file can seem daunting, especially if you’re unfamiliar with server-side components.
This guide will help you find, understand, and safely modify the php.ini file to solve common WordPress issues and enhance your site’s functionality.
Table of Contents
- What is the php.ini File in WordPress?
- Where is the php.ini File Located in WordPress?
- Finding php.ini Using cPanel
- Accessing php.ini via FTP Client
- Using WordPress File Manager Plugins
- Finding php.ini Using phpinfo.php
- How to Edit the php.ini File in WordPress
- Alternative Methods if You Can’t Access php.ini
- Why You Need to Edit the php.ini File
- Best Practices for php.ini Configuration
What is the php.ini File in WordPress?
The php.ini file is the central configuration file for PHP, the programming language that powers WordPress websites. Think of it as the control center determining how PHP operates on your server, influencing everything from memory usage to handling errors.
Understanding PHP and Its Role in Web Development
PHP itself is a server-side scripting language specifically designed for web development. Unlike HTML or CSS, which work on the browser side, PHP runs on your web server, generating dynamic content before sending it to visitors’ browsers. This behind-the-scenes work makes PHP essential for WordPress, as it processes database queries, user inputs, and content management functions.
WordPress relies heavily on PHP to function. When you click a link or submit a form on your WordPress site, PHP code executes on the server to retrieve or process information. The relationship between WordPress and PHP is so fundamental that your site’s performance depends mainly on how PHP is configured, which is precisely what the php.ini file controls.
Critical Parameters Controlled by php.ini
This configuration file manages several critical parameters that affect your WordPress site:
- Memory limits: Controls how much memory PHP scripts can use
- File upload sizes: Determines the maximum size of files you can upload
- Execution time: Sets how long scripts can run before timing out
- Error reporting: Configures how PHP errors are displayed or logged
- PHP extensions: Enables or disables additional PHP functionality
Modifying these settings in your php.ini file can resolve common WordPress errors and optimize your site’s performance. For example, increasing the memory limit can prevent “Fatal error: Allowed memory size exhausted” messages that sometimes appear when WordPress needs more resources than PHP allows.
Where is the php.ini File Located in WordPress?
If you don’t know where to look, finding the php.ini file can feel like searching for a needle in a haystack. The file typically resides in your server’s root directory, often inside the public_html folder. However, its exact location varies depending on your hosting environment and server configuration.
Different hosting providers organize their server architecture in unique ways. On most standard hosting setups, php.ini is in the main public_html directory alongside your WordPress core files. Some hosts place it in a different folder altogether or may have multiple php.ini files serving various purposes.
How Hosting Types Affect Access to php.ini
Your hosting type significantly affects your ability to access this file.
- With shared hosting plans, you might not have direct access to the main php.ini file that controls server-wide settings. This restriction exists because multiple websites share the same server, and allowing individual users to modify core configuration files could impact all sites on that server.
- By contrast, virtual private servers (VPS), dedicated servers, or managed WordPress hosting plans often provide more control over server configurations. These hosting types typically allow you to access and modify the php.ini file directly or create custom versions that override the default settings.
What If You Can’t Find the php.ini File?
Many WordPress users can’t locate their php.ini file because it simply doesn’t exist in their accessible directories. In such cases, you may need to create your own php.ini file or use alternative methods to adjust PHP settings. Don’t worry – we’ll cover these approaches in detail.
Several methods exist to find and access your php.ini file. Each approach has its advantages depending on your technical comfort level and hosting restrictions. In the following sections, we’ll walk through each method step-by-step so you can successfully locate and edit your php.ini file regardless of your particular WordPress setup.
Finding php.ini Using cPanel
Many WordPress hosting providers offer cPanel access, which makes it straightforward to locate your php.ini file. This user-friendly interface lets you navigate server files without technical expertise.
1. Log in to your hosting account and locate the cPanel dashboard.
2. From there, find the “Files” section and click “File Manager” to browse your server files directly in your browser.
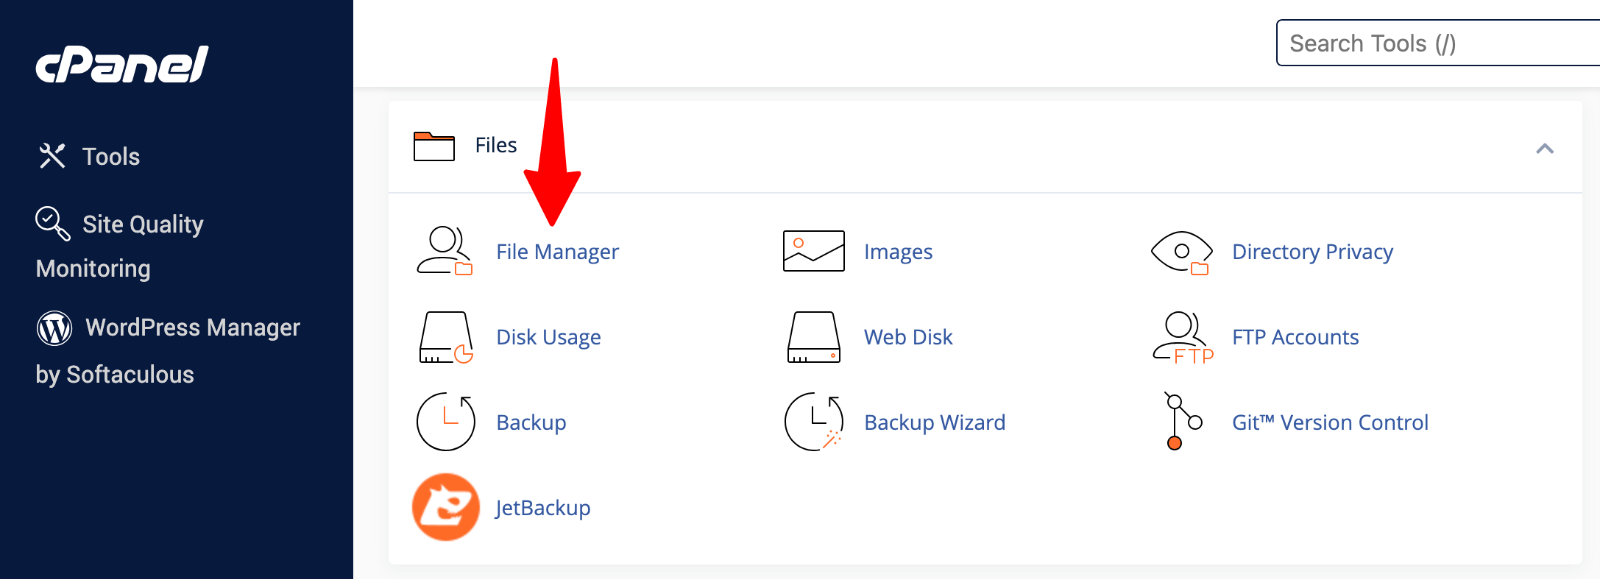 File Manager” class=”wp-image-809072″ srcset=”https://b8f4g5a7.delivery.rocketcdn.me/wp-content/uploads/2025/03/cpanel-file-manager.png 1600w, https://b8f4g5a7.delivery.rocketcdn.me/wp-content/uploads/2025/03/cpanel-file-manager-734×266.png 734w, https://b8f4g5a7.delivery.rocketcdn.me/wp-content/uploads/2025/03/cpanel-file-manager-1024×371.png 1024w, https://b8f4g5a7.delivery.rocketcdn.me/wp-content/uploads/2025/03/cpanel-file-manager-1536×556.png 1536w” sizes=”(max-width: 1600px) 100vw, 1600px”/>
3. Once inside File Manager, navigate to your site’s root directory, typically named “public_html.” This folder contains all your WordPress core files and is where php.ini usually lives.
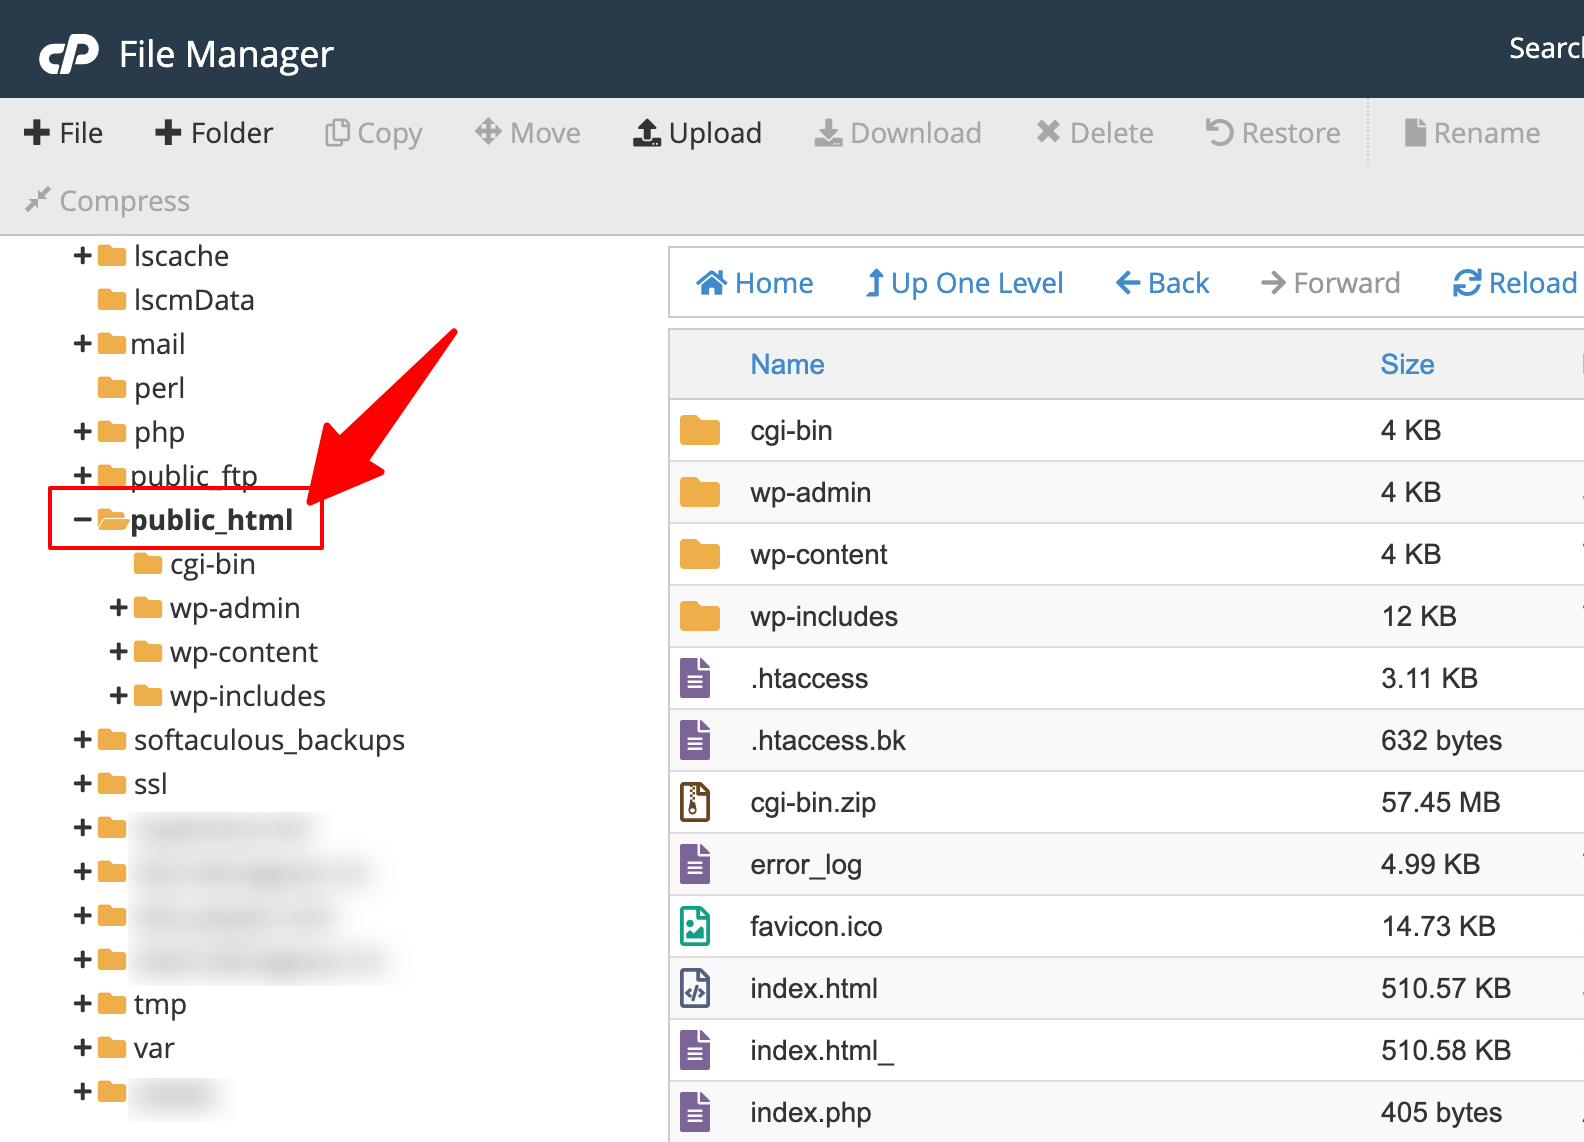

4. Scan the directory for php.ini by scrolling through the file list. Can’t see it? Try clicking “Settings” (often a gear icon) and enabling “Show Hidden Files” to reveal files that might be hidden from standard view.
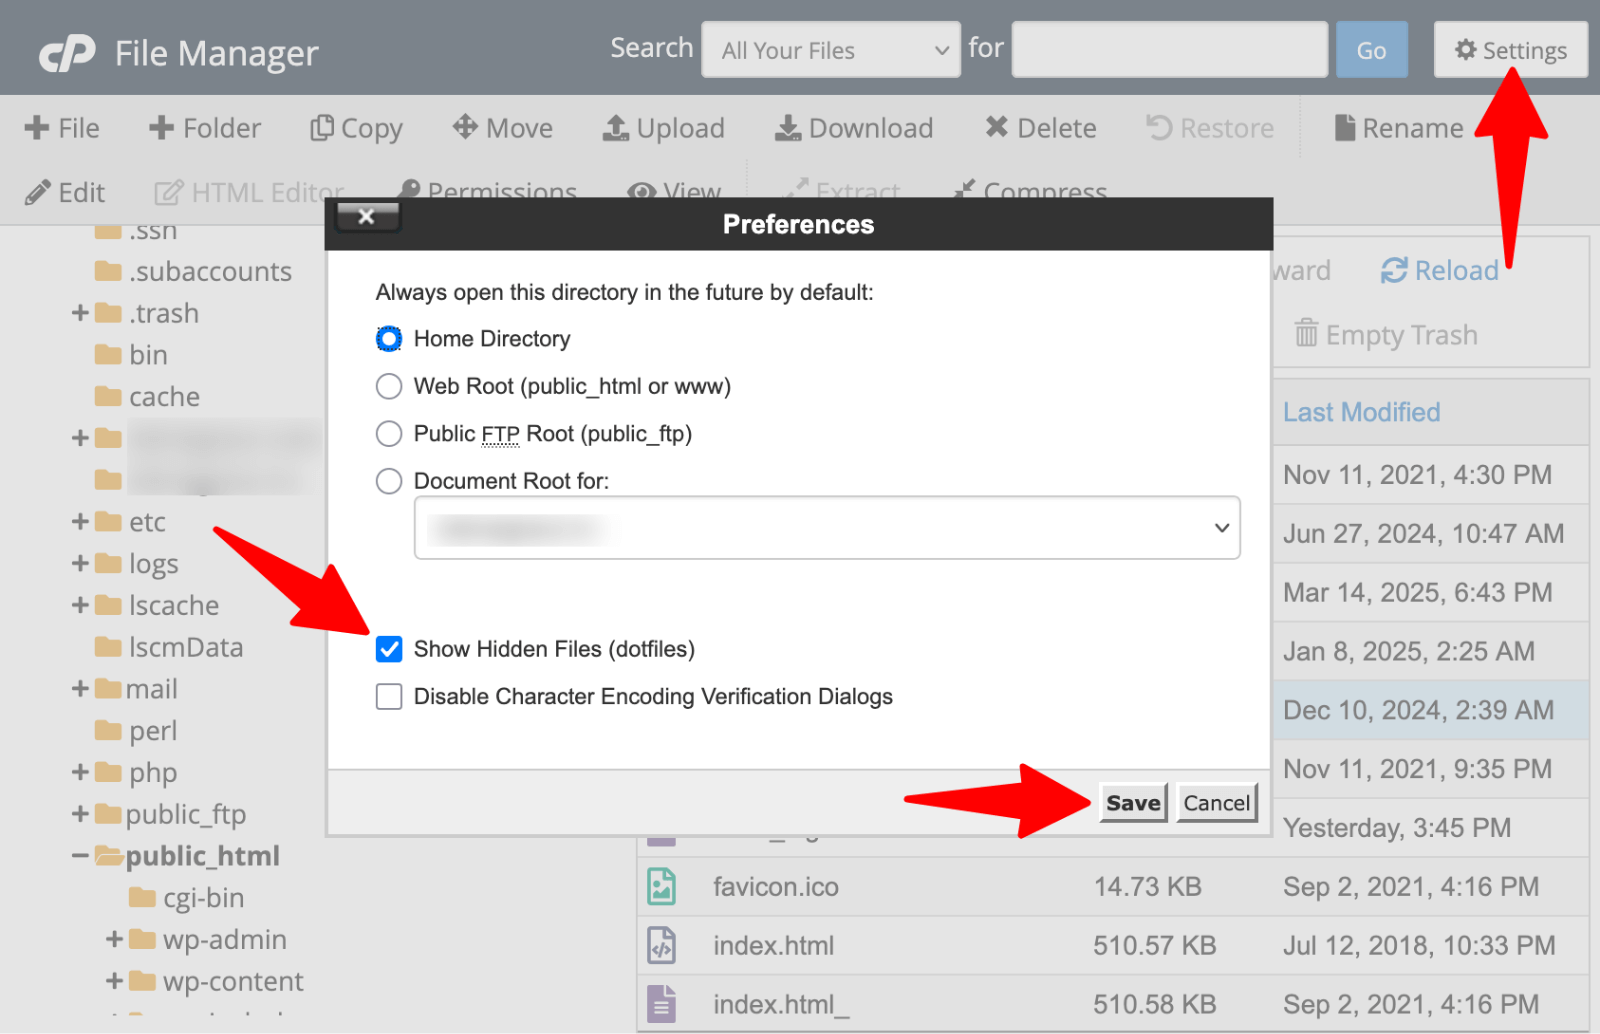 File Manager > Show hidden files” srcset=”https://b8f4g5a7.delivery.rocketcdn.me/wp-content/uploads/2025/03/cpanel-file-manager-hidden-files.png 1600w, https://b8f4g5a7.delivery.rocketcdn.me/wp-content/uploads/2025/03/cpanel-file-manager-hidden-files-734×474.png 734w, https://b8f4g5a7.delivery.rocketcdn.me/wp-content/uploads/2025/03/cpanel-file-manager-hidden-files-1024×662.png 1024w, https://b8f4g5a7.delivery.rocketcdn.me/wp-content/uploads/2025/03/cpanel-file-manager-hidden-files-1536×993.png 1536w” sizes=”(max-width: 1600px) 100vw, 1600px”/>
5. When you find the php.ini file, right-click on it and select “Edit” or “Download” depending on whether you want to modify it directly in the browser or on your computer.
If you can’t locate the file, your host might restrict direct access to php.ini. Look for the “MultiPHP INI Editor” in cPanel’s “Software” section. This specialized tool lets you modify PHP settings without accessing the actual file.
Accessing php.ini via FTP Client
This approach works well when you need direct server access or when cPanel isn’t available with your hosting plan.
FileZilla is one of the most popular FTP clients due to its user-friendly interface and compatibility with Windows, Mac, and Linux systems.
1. Download and install FileZilla or your preferred FTP client on your computer.
2. Launch your FTP client and enter your FTP credentials to connect to your server.
3. Once connected, you’ll see your local files on one side and server files on the other.
Navigate to your website’s root directory on the server side, commonly labeled “public_html” or “www.” Browse through the files to locate php.ini.
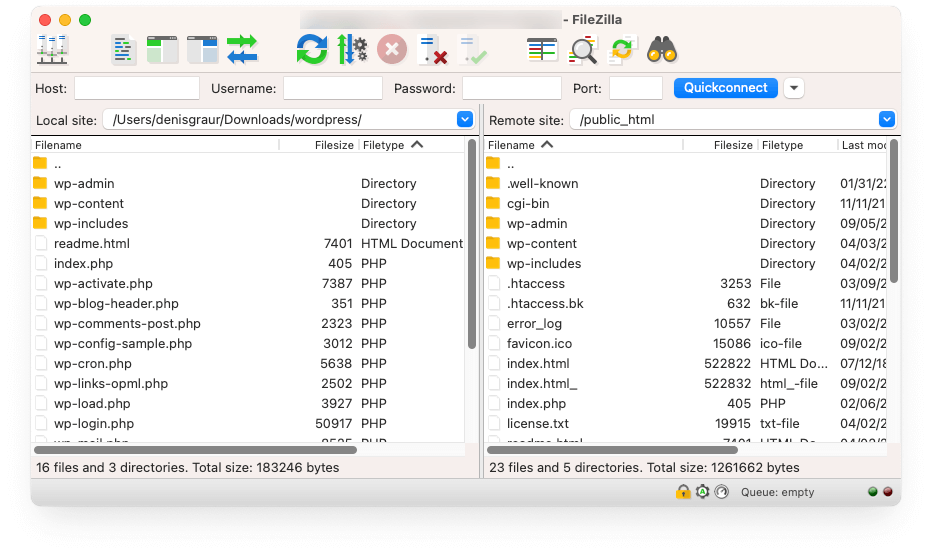

Similar to cPanel, if you don’t immediately see a file, you might need to enable the display of hidden files in your FTP client’s settings.
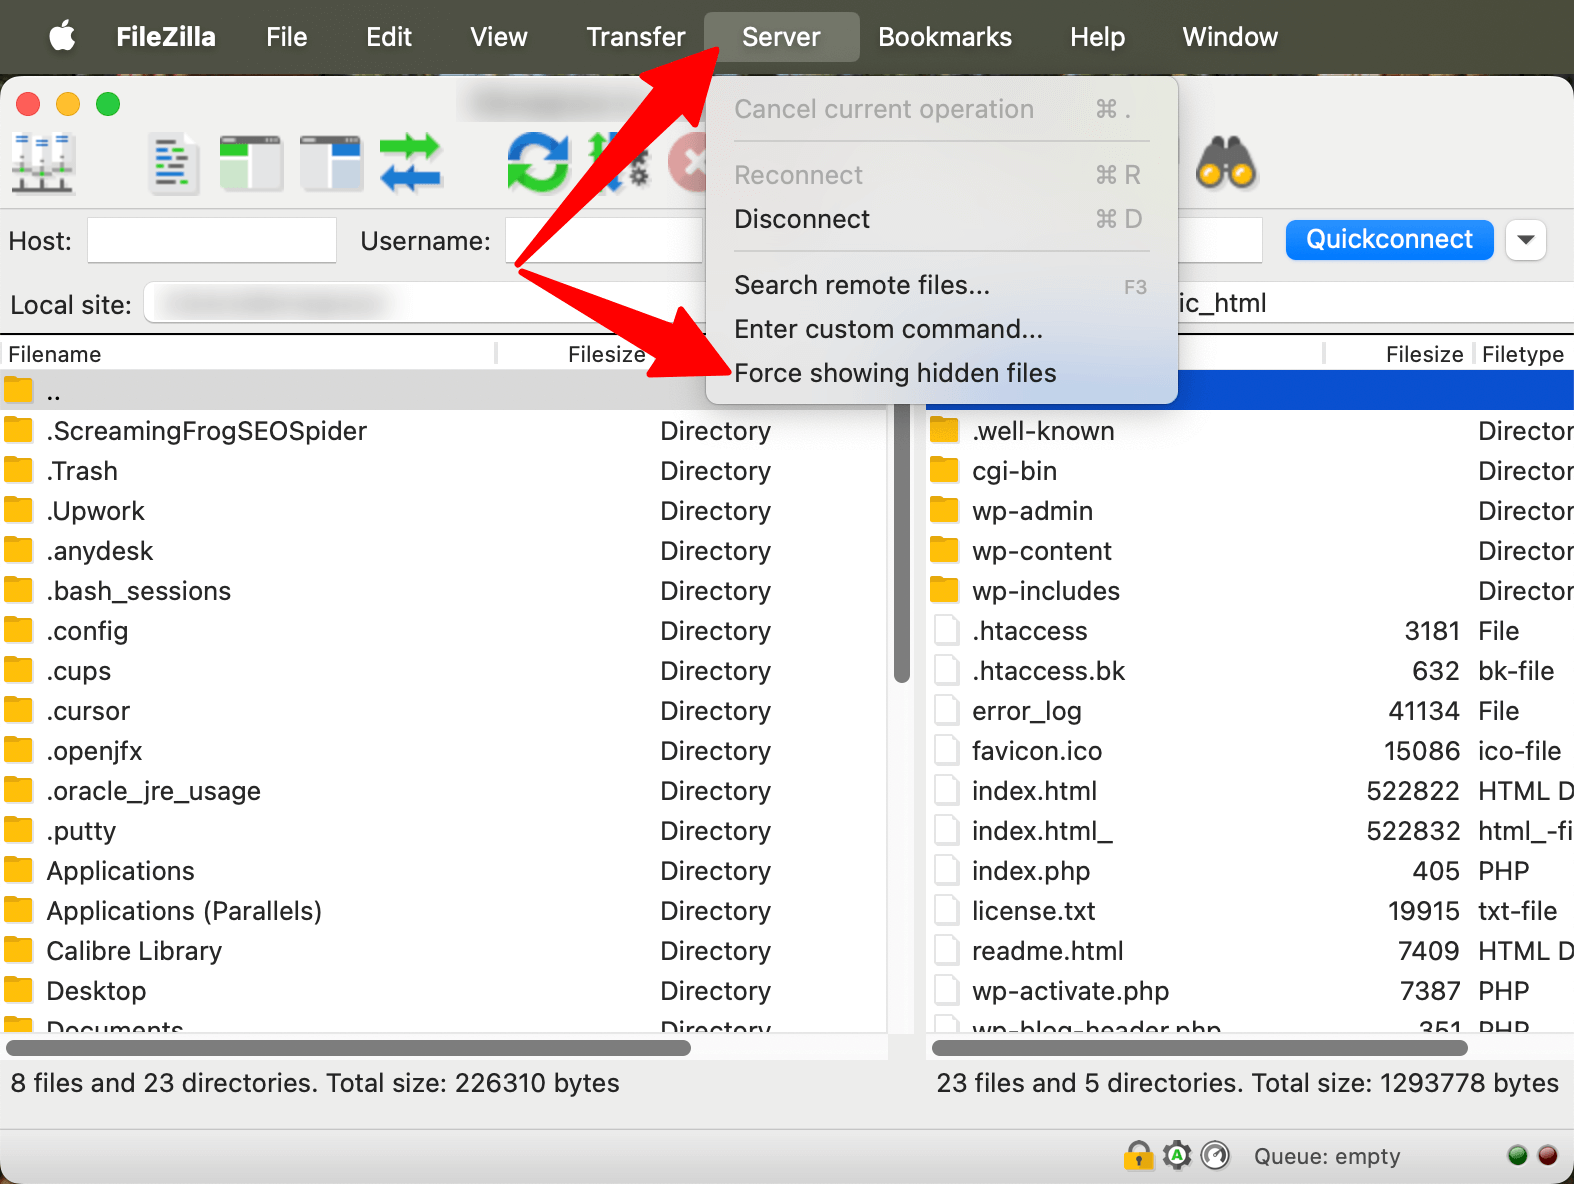 Show hidden files” srcset=”https://b8f4g5a7.delivery.rocketcdn.me/wp-content/uploads/2025/03/filezilla-show-hidden-files.png 1574w, https://b8f4g5a7.delivery.rocketcdn.me/wp-content/uploads/2025/03/filezilla-show-hidden-files-734×552.png 734w, https://b8f4g5a7.delivery.rocketcdn.me/wp-content/uploads/2025/03/filezilla-show-hidden-files-1024×770.png 1024w, https://b8f4g5a7.delivery.rocketcdn.me/wp-content/uploads/2025/03/filezilla-show-hidden-files-1536×1155.png 1536w” sizes=”(max-width: 1574px) 100vw, 1574px”/>
4. If you find php.ini, you can download it to your computer by right-clicking and selecting “Download.”
5. After making your edits locally, upload the file back to the server by dragging it from your local panel to the server panel.
Can’t find the file? You can create a new php.ini file using a text editor on your computer and then upload it to your root directory.
Using WordPress File Manager Plugins
If server-level access feels intimidating, WordPress file manager plugins offer a more straightforward way to find your php.ini file directly from your dashboard. These tools bring file management capabilities right into your familiar WordPress admin area.
File Manager is the most popular option, with over a million active installations. This free plugin provides an interface similar to your computer’s file explorer.
1. Go to Plugins > Add New Plugin and search “File Manager.” Install and activate it.
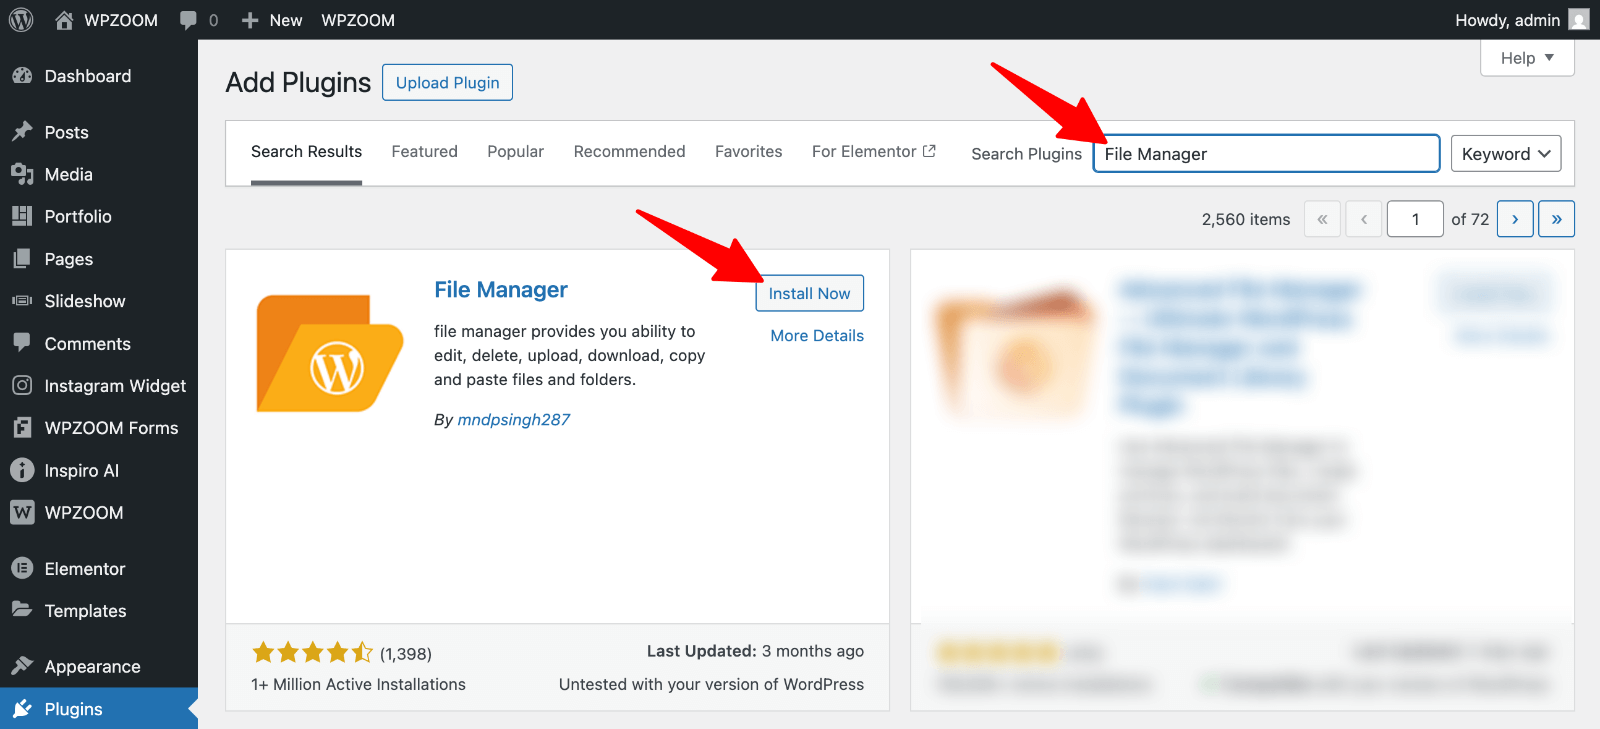

2. A new “WP File Manager” menu item will be added to your dashboard sidebar. Click it to launch a file explorer within WordPress.
3. Navigate to the root directory (usually public_html) and look for php.ini.
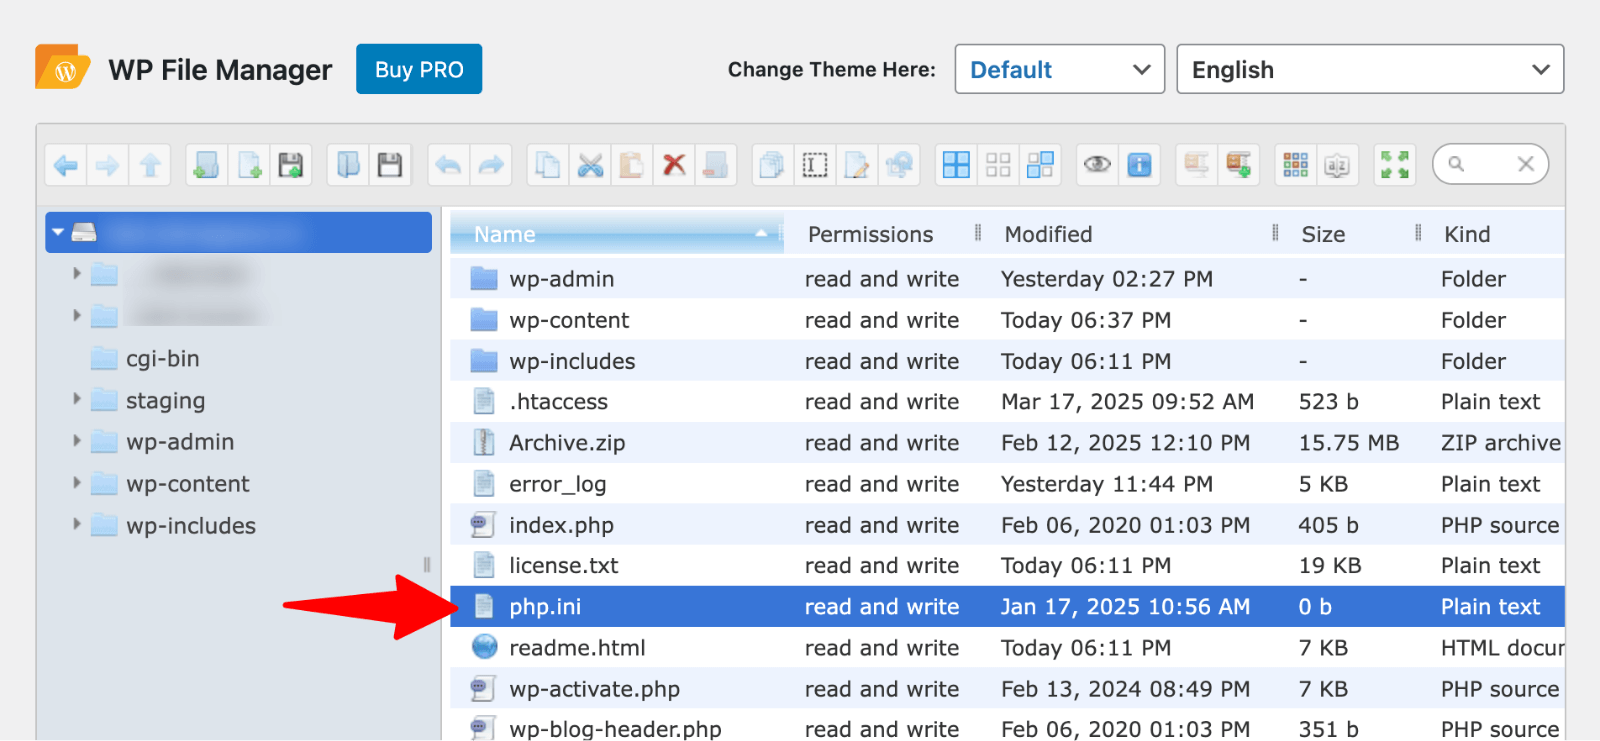

Can’t find it? Use the search function in the plugin’s toolbar to locate it quickly.
4. Once found, right-click the file and select “Edit” to modify its contents in your browser. The plugin provides a code editor with syntax highlighting for easier editing.
The main advantage here is simplicity – no need to learn FTP protocols or navigate complex hosting panels. However, some hosting providers restrict what plugins can access for security reasons.
Finding php.ini Using phpinfo.php
Creating a phpinfo.php file is a reliable method to discover where your server stores the php.ini file. This approach works across almost all hosting environments and provides comprehensive information about your PHP configuration.
1. Start by creating a simple text file on your computer. Name it “phpinfo.php“.
2. Add this single line of code:
This short snippet calls PHP’s built-in phpinfo() function, which displays all information about your PHP installation, including the location of configuration files.
3. Next, upload this file to your website’s root directory using cPanel, FTP, or your file manager plugin.
4. Once uploaded, access the file by entering your domain followed by the filename in your browser: www.yourdomain.com/phpinfo.php
Your browser will display a detailed page with information about your PHP configuration.


5. Look for the “Loaded Configuration File” entry, which shows the exact path to your active php.ini file.
The information provided helps you pinpoint where php.ini is located and which version your server is using. This distinction matters because servers sometimes have multiple php.ini files, but only one controls your site’s settings.
6. After noting the file location, remember to delete the phpinfo.php file from your server. Leaving it accessible could expose sensitive server information to potential attackers, creating an unnecessary security risk.
Now that you know the exact location of your php.ini file, you’re ready to proceed to the editing phase.
How to Edit the php.ini File in WordPress
Before making any changes to your php.ini file, completely back up your WordPress site. This crucial step ensures you can restore everything if something goes wrong.
Once you’ve secured your backup, open the php.ini file using your preferred method: cPanel’s editor, FTP client, or file manager plugin. You’ll see numerous settings, many with comments explaining their purpose.
When editing these values, maintain proper syntax. Each directive follows this format:
directive_name = value
Don’t remove semicolons from commented lines (those starting with “;”) unless you want to activate those settings. Adding new lines? Follow the same pattern as existing directives.
After saving your changes, you may need to restart your web server for modifications to take effect. Most hosting providers handle this automatically, but check if your changes are active by creating a test PHP file with:
If you encounter issues after editing, check for syntax errors or revert to your backup and try again with more minor changes. Making incremental adjustments helps isolate problematic settings.
Having trouble saving changes? Your hosting provider might restrict direct edits to php.ini. In this case, try our alternative methods in the next section.
Alternative Methods if You Can’t Access php.ini
What if you can’t directly access or modify the php.ini file? Don’t worry! Several effective alternatives exist that can override PHP settings without touching the main configuration file.
The .htaccess File
The .htaccess file offers a powerful way to adjust PHP settings on Apache servers. This special file controls various aspects of your server’s behavior and can override php.ini directives.
To modify PHP settings via .htaccess, access your WordPress root directory and look for the existing .htaccess file.
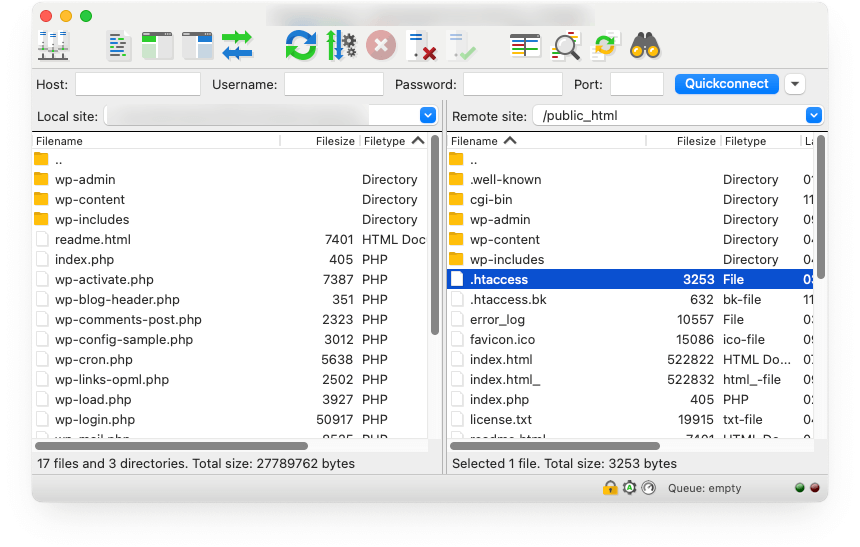

If you don’t find it, create a new text file named “.htaccess” (including the period).
Add PHP directives using this syntax:
php_value memory_limit 256M
php_value upload_max_filesize 64M
php_value post_max_size 64M
php_value max_execution_time 300
The wp-config.php File
Another approach involves editing your wp-config.php file, which WordPress uses for core configuration. While this method can’t change all PHP settings, it works well for memory limits. Open wp-config.php and add this line before the “That’s all, stop editing!” comment:
define('WP_MEMORY_LIMIT', '256M');Custom php.ini File in Site’s Directory
Creating a custom php.ini file in your site’s directory can also work, especially when your host supports “local” php.ini files. Create a new text file with your desired settings and upload it to your WordPress root directory. Many hosts will recognize and apply these settings even if you can’t modify the main php.ini file.
If none of these methods work, contact your hosting provider directly. Most hosts offer ways to adjust PHP settings through their customer portals or can make server-side changes upon request.
Best Practices for php.ini Configuration
Optimizing your php.ini settings can significantly improve your WordPress site’s performance, but it requires a thoughtful approach. Follow these recommended practices to get the best results without compromising security or stability:
- memory_limit: 256M to 512M for most sites, more for complex ones
- max_execution_time: 60 to 300 seconds, depending on your site’s complexity
- upload_max_filesize: 64M for media-heavy sites
- post_max_size: Equal to or slightly larger than upload_max_filesize
- max_input_vars: 3000 for sites with complex forms or large menus
- display_errors: Off on production sites (On for development only)
Security should remain a priority when adjusting php.ini settings.
- Avoid enabling potentially dangerous functions like allow_url_fopen unless absolutely necessary.
- Always set display_errors to “Off” on live sites to prevent exposing sensitive information to visitors.
These security-focused configurations protect your site while maintaining performance benefits.
After making changes, thoroughly test your site’s functionality. Check key features like:
- Media uploads
- Contact forms
- E-commerce functions
- Plugin operations
- Page loading speed
Keep track of all modifications you make to php.ini. Document each change, including the original value, new value, and reason for the adjustment. This documentation proves invaluable when troubleshooting issues or migrating to a new host.
Remember that php.ini optimization isn’t a one-size-fits-all process. Your site’s specific needs should guide your configuration choices, balancing performance improvements against security considerations.
Why You Need to Edit the php.ini File
Have you ever tried uploading a large image only to receive an error message? Or perhaps your site freezes when processing complex tasks? These issues often stem from default PHP configurations that are not optimized for your specific WordPress needs.
Common Issues That php.ini Can Fix
Editing the php.ini file becomes necessary in several common scenarios. Many WordPress users encounter the dreaded “uploaded file exceeds the upload_max_filesize” error when adding media files to their library. This happens because PHP limits file sizes that can be uploaded to protect servers from potential overload. By adjusting these limits in php.ini, you can easily upload larger images, videos, or theme files.
Performance Benefits of php.ini Optimization
Many site owners also modify PHP settings due to performance issues. If your pages load slowly or break during resource-intensive operations, increasing the memory limit can provide PHP with additional resources to complete these tasks efficiently. Similarly, if complex plugins time out before completing their operations, extending the max_execution_time parameter gives them the extra seconds needed to finish processing.
The benefits of customizing php.ini settings extend beyond solving errors. Optimized PHP configurations can improve your site’s overall performance. For example, enabling output buffering can make page generation more efficient, while adjusting caching directives can reduce server load and speed up response times.
Common WordPress Errors Solved by php.ini Adjustments
WordPress errors that can be fixed through php.ini adjustments include:
- “File exceeds upload_max_filesize“: Solved by increasing upload size limits
- “Maximum execution time exceeded“: Fixed by extending execution time
- “Out of memory” errors: Resolved by increasing memory limits
- “Missing MySQL extension“: Addressed by enabling required PHP extensions
Remember that editing server files requires caution. Before making any changes to php.ini, create a complete site backup. Incorrect modifications could potentially cause your site to crash or behave unexpectedly. Always make one change at a time and test thoroughly after each adjustment to ensure everything works properly.
Beyond PHP.ini: Boost Your WordPress Site with WPZOOM
Looking for more ways to enhance your WordPress site beyond php.ini optimization? WPZOOM themes offer performance-focused designs that complement your server-side improvements.
Our professionally crafted themes are built with clean code and optimized for speed. They work hand-in-hand with your php.ini adjustments to create lightning-fast websites. Whether you run a blog, portfolio, or online store, WPZOOM provides templates specifically designed for your niche.
Check out our collection for the perfect theme for your newly optimized PHP settings. Your visitors will notice the difference in loading times and overall site responsiveness.

